Origin: http://blog.csdn.net/qq_23191031. Author: Dashengdai
1. Preface
With the vigorous development of mobile market in recent years, a large number of people have been involved in it. Android,iOS At the same time, every major training institute in China trains thousands of developers with 2 to 3 years'working experience every month. Of course, this is no secret. At present, the main force of China's IT industry has basically gone through the road of training.
However, the problem is that the so-called 2-3 years of work experience, so that recruitment units mistakenly believe that: 2-3 years of development experience and just concluded training experience, basically equate. This has led to a dramatic increase in employing standards, which has led to why today Mobile Development The market is still hot, but the job is not easy to find the status quo.
Perhaps the most tragic example is the past few years. ios For example, in the middle of the day, a year later, the blowout happened to the developers, and a large number of IOS developers could not find jobs.
Generally speaking, there are a lot of job opportunities, but enterprises have greatly increased their employer requirements. How to stand out among thousands of people, to reach the peak of life, to marry Bai Fumei, without bright spots, is absolutely impossible...
Next I will study together. android UI optimization
2. Analysis of Android Rendering Mechanism
We have more or less encountered the perceptible interface cartoon phenomenon in the development of applications, especially in the case of too many nested layers of layout, unnecessary rendering, or too many time-consuming operations in onDraw method, too many times of animation execution, it is easy to create such a situation. Today, APP design requires beautiful interface, more animation, pictures and other fashion elements to create a good user experience. But a lot of complex rendering work is likely to cause too much pressure on Android system to complete rendering work in time. How often do you perform rendering to make the interface run smoothly?
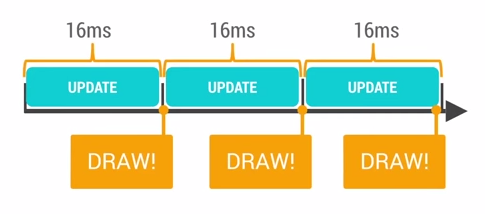
As shown in the figure above, the Android system sends a VSYNC signal (VSYNC: vertical synchronization vertical synchronization, frame synchronization) every 16 ms, triggering the rendering of the UI. If each rendering is successful, the normal frame rate required for a smooth picture can be achieved: 60fps. Once the system is doing a time-consuming operation larger than 16 ms, the system will not be able to respond to VSYNC signal and perform rendering, resulting in frame loss.
When you notice APP Carton, you can look at the logcat console. There will be similar warnings for drop frames.
This quotation is from: [Android UI performance optimization in battle recognition rendering] (http://blog.csdn.net/lmj623565791/article/details/45556391)
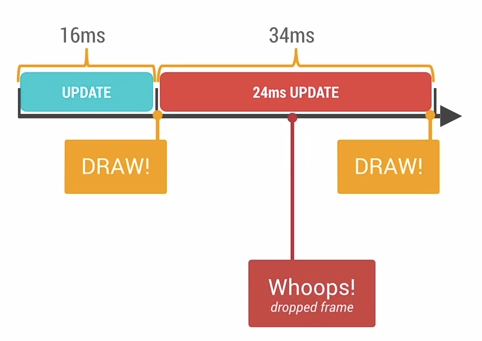
For example, as shown in the figure above, if one of your operations takes 24 ms, the system will not be able to render normally when it gets the VSYNC signal, and can only wait for the next VSYNC signal (the second 16ms) to perform the rendering work. Then the user will see the same frame in 32ms. (I just feel that the picture given by google is wrong, clearly 32ms, how to mark a 34ms, is there any other implication that I did not understand?)
It is easy for users to perceive the cartoon and unfluent phenomena when the UI performs animation, ListView and RecyclerView sliding. Therefore, developers must pay attention not to nest too many layers in the design of layout, and use include method to introduce layout. At the same time, don't let the animation execute too many times, resulting in CPU or GPU overload.
Seeing here, students may ask: why is it that 16ms rendering once, and what is the relationship between 60fps? Now let's look at the principle:
16ms means 1000/60hz, equivalent to 60fps.
So if we explain why it is 60fps, the problem will be solved immediately.
This is because the writing between the human eye and the brain can not perceive more than 60 FPS of picture updates. 12 FPS is similar to the frame rate of flipping books manually, which is obviously not smooth enough.
24fps enables the human eye to perceive continuous linear motion, which is attributed to the motion blurring effect. 24fps is the frame rate commonly used in film circles, because this frame rate is sufficient to support most of the content of the film screen to be expressed, while minimizing the cost.
But less than 30 FPS is ____________.
If you can't smoothly express the gorgeous picture content, you need to use 60fps to achieve the desired effect. Of course, it's not necessary to use more than 60fps.
This citation is from: Google releases Android Performance Optimization Model - Open Source Chinese Community
3.1 Overdraw, the main culprit of interface carton
3.1 What is over-rendering?
Transition rendering refers to how many times a pixel on the screen has been rendered in the same frame of time. In the multi-level UI structure, if the invisible UI is also rendering operations, this will lead to some pixel areas being drawn many times, which is a great waste of CPU and GPU resources. The most common overdrawing is setting useless background colors!!!
3.2 How to detect over-rendering?
The problem of Overdraw is easy to find. We can turn on the Show GPU Overrdraw option by following steps
Setting - > Developer Options - > Debugging GPU Overdrawing - > Displaying GPU Overdrawing
After opening, you will find that there are various colors on the screen. At this time, you can switch to the program and interface that need to be detected. For the meaning of each color block, see the following picture:
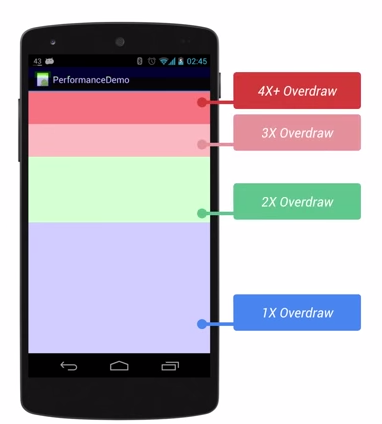
Blue, light green, light red and dark red represent four different degrees of Overdraw.
Blue: It means twice as much as overdraw. Pixels are drawn twice. Big blue is acceptable (if the whole window is blue, you can get rid of one layer).
Green: It means overdraw twice. Pixels are drawn three times. Medium-sized green areas are acceptable, but you should try to optimize and reduce them.
Light red: It means overdraw three times. Pixels are drawn four times and acceptable in a small range.
Dark red: It means overdraw four times. Pixels are drawn five times or more. It's wrong. We need to fix them.
Our goal is to minimize red Overdraw and see more blue areas.
3.3 Tools and Methods for Solving Problems
Hierarchy Viewer is used to detect rendering efficiency and remove unnecessary nesting.
Overdraw can be detected by Show GPU Overdraw, and eventually unnecessary background can be removed.
4. UI optimization practices
4.1 Remove unnecessary background
(Because the company's project is still in the stage of secrecy, so extract Performance optimization of Android UI in real-world recognition rendering Some examples)
Let's look at a simple example showing ListView:
- activity_main
?xml version="1.0" encoding="utf-8"?>
<LinearLayout xmlns:android="http://schemas.android.com/apk/res/android"
              android:layout_width="match_parent"
              android:layout_height="match_parent"
              android:paddingLeft="@dimen/activity_horizontal_margin"
              android:paddingRight="@dimen/activity_horizontal_margin"
              android:background="@android:color/white"
              android:paddingTop="@dimen/activity_vertical_margin"
              android:paddingBottom="@dimen/activity_vertical_margin"
              android:orientation="vertical"
    >

    <TextView
        android:layout_width="match_parent"
        android:layout_height="wrap_content"
        android:padding="@dimen/narrow_space"
        android:textSize="@dimen/large_text_size"
        android:layout_marginBottom="@dimen/wide_space"
        android:text="@string/header_text"/>

    <ListView
        android:id="@+id/id_listview_chats"
        android:layout_width="match_parent"
        android:background="@android:color/white"
        android:layout_height="wrap_content"
        android:divider="@android:color/transparent"
        android:dividerHeight="@dimen/divider_height"/>
</LinearLayout>- 1
- 2
- 3
- 4
- 5
- 6
- 7
- 8
- 9
- 10
- 11
- 12
- 13
- 14
- 15
- 16
- 17
- 18
- 19
- 20
- 21
- 22
- 23
- 24
- 25
- 26
- 27
- 28
- 1
- 2
- 3
- 4
- 5
- 6
- 7
- 8
- 9
- 10
- 11
- 12
- 13
- 14
- 15
- 16
- 17
- 18
- 19
- 20
- 21
- 22
- 23
- 24
- 25
- 26
- 27
- 28
- The layout file of item
<?xml version="1.0" encoding="utf-8"?>

<LinearLayout xmlns:android="http://schemas.android.com/apk/res/android"
    android:layout_width="match_parent"
    android:layout_height="match_parent"
    android:orientation="horizontal"
    android:paddingBottom="@dimen/chat_padding_bottom">

    <ImageView
        android:id="@+id/id_chat_icon"
        android:layout_width="@dimen/avatar_dimen"
        android:layout_height="@dimen/avatar_dimen"
        android:src="@drawable/joanna"
        android:layout_margin="@dimen/avatar_layout_margin" />

    <LinearLayout
        android:layout_width="match_parent"
        android:layout_height="wrap_content"
        android:background="@android:color/darker_gray"
        android:orientation="vertical">

        <RelativeLayout
            android:layout_width="wrap_content"
            android:layout_height="wrap_content"
            android:background="@android:color/white"
            android:textColor="#78A"
            android:orientation="horizontal">

            <TextView xmlns:android="http://schemas.android.com/apk/res/android"
                android:layout_width="wrap_content"
                android:layout_height="wrap_content"
                android:layout_alignParentLeft="true"
                android:padding="@dimen/narrow_space"
                android:text="@string/hello_world"
                android:gravity="bottom"
                android:id="@+id/id_chat_name" />

            <TextView xmlns:android="http://schemas.android.com/apk/res/android"
                android:layout_width="wrap_content"
                android:layout_height="wrap_content"
                android:layout_alignParentRight="true"
                android:textStyle="italic"
                android:text="@string/hello_world"
                android:padding="@dimen/narrow_space"
                android:id="@+id/id_chat_date" />
        </RelativeLayout>

        <TextView xmlns:android="http://schemas.android.com/apk/res/android"
            android:layout_width="match_parent"
            android:layout_height="match_parent"
            android:padding="@dimen/narrow_space"
            android:background="@android:color/white"
            android:text="@string/hello_world"
            android:id="@+id/id_chat_msg" />
    </LinearLayout>
</LinearLayout>- 1
- 2
- 3
- 4
- 5
- 6
- 7
- 8
- 9
- 10
- 11
- 12
- 13
- 14
- 15
- 16
- 17
- 18
- 19
- 20
- 21
- 22
- 23
- 24
- 25
- 26
- 27
- 28
- 29
- 30
- 31
- 32
- 33
- 34
- 35
- 36
- 37
- 38
- 39
- 40
- 41
- 42
- 43
- 44
- 45
- 46
- 47
- 48
- 49
- 50
- 51
- 52
- 53
- 54
- 55
- 56
- 1
- 2
- 3
- 4
- 5
- 6
- 7
- 8
- 9
- 10
- 11
- 12
- 13
- 14
- 15
- 16
- 17
- 18
- 19
- 20
- 21
- 22
- 23
- 24
- 25
- 26
- 27
- 28
- 29
- 30
- 31
- 32
- 33
- 34
- 35
- 36
- 37
- 38
- 39
- 40
- 41
- 42
- 43
- 44
- 45
- 46
- 47
- 48
- 49
- 50
- 51
- 52
- 53
- 54
- 55
- 56
- Activity code
package com.zhy.performance_01_render;

import android.os.Bundle;
import android.os.PersistableBundle;
import android.support.annotation.Nullable;
import android.support.v7.app.AppCompatActivity;
import android.view.LayoutInflater;
import android.view.View;
import android.view.ViewGroup;
import android.widget.ArrayAdapter;
import android.widget.ImageView;
import android.widget.ListView;
import android.widget.TextView;

/**
 * Created by zhy on 15/4/29.
 */
public class OverDrawActivity01 extends AppCompatActivity
{
    private ListView mListView;
    private LayoutInflater mInflater ;

    @Override
    protected void onCreate(@Nullable Bundle savedInstanceState)
    {
        super.onCreate(savedInstanceState);

        setContentView(R.layout.activity_overdraw_01);

        mInflater = LayoutInflater.from(this);
        mListView = (ListView) findViewById(R.id.id_listview_chats);

        mListView.setAdapter(new ArrayAdapter<Droid>(this, -1, Droid.generateDatas())
        {
            @Override
            public View getView(int position, View convertView, ViewGroup parent)
            {

                ViewHolder holder = null ;
                if(convertView == null)
                {
                    convertView = mInflater.inflate(R.layout.chat_item,parent,false);
                    holder = new ViewHolder();
                    holder.icon = (ImageView) convertView.findViewById(R.id.id_chat_icon);
                    holder.name = (TextView) convertView.findViewById(R.id.id_chat_name);
                    holder.date = (TextView) convertView.findViewById(R.id.id_chat_date);
                    holder.msg = (TextView) convertView.findViewById(R.id.id_chat_msg);
                    convertView.setTag(holder);
                }else
                {
                    holder = (ViewHolder) convertView.getTag();
                }

                Droid droid = getItem(position);
                holder.icon.setBackgroundColor(0x44ff0000);
                holder.icon.setImageResource(droid.imageId);
                holder.date.setText(droid.date);
                holder.msg.setText(droid.msg);
                holder.name.setText(droid.name);

                return convertView;
            }

            class ViewHolder
            {
                ImageView icon;
                TextView name;
                TextView date;
                TextView msg;
            }

        });
    }


}- 1
- 2
- 3
- 4
- 5
- 6
- 7
- 8
- 9
- 10
- 11
- 12
- 13
- 14
- 15
- 16
- 17
- 18
- 19
- 20
- 21
- 22
- 23
- 24
- 25
- 26
- 27
- 28
- 29
- 30
- 31
- 32
- 33
- 34
- 35
- 36
- 37
- 38
- 39
- 40
- 41
- 42
- 43
- 44
- 45
- 46
- 47
- 48
- 49
- 50
- 51
- 52
- 53
- 54
- 55
- 56
- 57
- 58
- 59
- 60
- 61
- 62
- 63
- 64
- 65
- 66
- 67
- 68
- 69
- 70
- 71
- 72
- 73
- 74
- 75
- 76
- 1
- 2
- 3
- 4
- 5
- 6
- 7
- 8
- 9
- 10
- 11
- 12
- 13
- 14
- 15
- 16
- 17
- 18
- 19
- 20
- 21
- 22
- 23
- 24
- 25
- 26
- 27
- 28
- 29
- 30
- 31
- 32
- 33
- 34
- 35
- 36
- 37
- 38
- 39
- 40
- 41
- 42
- 43
- 44
- 45
- 46
- 47
- 48
- 49
- 50
- 51
- 52
- 53
- 54
- 55
- 56
- 57
- 58
- 59
- 60
- 61
- 62
- 63
- 64
- 65
- 66
- 67
- 68
- 69
- 70
- 71
- 72
- 73
- 74
- 75
- 76
Entity code
package com.zhy.performance_01_render;

import java.util.ArrayList;
import java.util.List;

public class Droid
{
    public String name;
    public int imageId;
    public String date;
    public String msg;


    public Droid(String msg, String date, int imageId, String name)
    {
        this.msg = msg;
        this.date = date;
        this.imageId = imageId;
        this.name = name;
    }

    public static List<Droid> generateDatas()
    {
        List<Droid> datas = new ArrayList<Droid>();

        datas.add(new Droid("Lorem ipsum dolor sit amet, orci nullam cra", "3 Minutes ago", -1, "alex"));
        datas.add(new Droid("Omnis aptent magnis suspendisse ipsum, semper egestas", "12 Minutes ago", R.drawable.joanna, "john"));
        datas.add(new Droid("eu nibh, rhoncus wisi posuere lacus, ad erat egestas", "17 Minutes ago", -1, "7heaven"));
        datas.add(new Droid("eu nibh, rhoncus wisi posuere lacus, ad erat egestas", "33 Minutes ago", R.drawable.shailen, "Lseven"));

        return datas;
    }


}- 1
- 2
- 3
- 4
- 5
- 6
- 7
- 8
- 9
- 10
- 11
- 12
- 13
- 14
- 15
- 16
- 17
- 18
- 19
- 20
- 21
- 22
- 23
- 24
- 25
- 26
- 27
- 28
- 29
- 30
- 31
- 32
- 33
- 34
- 35
- 1
- 2
- 3
- 4
- 5
- 6
- 7
- 8
- 9
- 10
- 11
- 12
- 13
- 14
- 15
- 16
- 17
- 18
- 19
- 20
- 21
- 22
- 23
- 24
- 25
- 26
- 27
- 28
- 29
- 30
- 31
- 32
- 33
- 34
- 35
Now the effect is: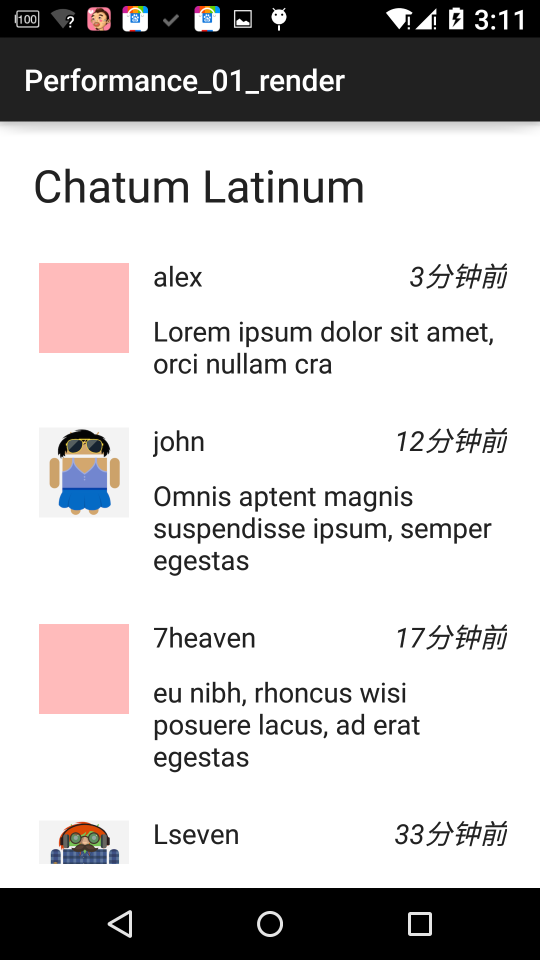
Note that our requirement is that Activity as a whole is a white background.
After opening Show GPU Overdraw:
Comparing with the above reference map, we can see that a simple ListView shows Item, which has been over-drawn in many places. Well, the main reason is that there are many unnecessary backgrounds in the layout file. Look at the layout file carefully, then start removing it.
* Unnecessary Background 1
The file in our main layout is backgroundwhile, so you can remove the white background of ListView.
-
Unnecessary Background 2
Linear Layout's android:background="@android:color/darker_gray" in the Item layout
-
Unnecessary Background 3
android:background="@android:color/white" of Relative Layout in the Item layout
-
Unnecessary Background 4
android:background="@android:color/white" of TextView with id_msg in the Item layout
These four unnecessary backgrounds are also easy to find, so the effect of removing them is as follows: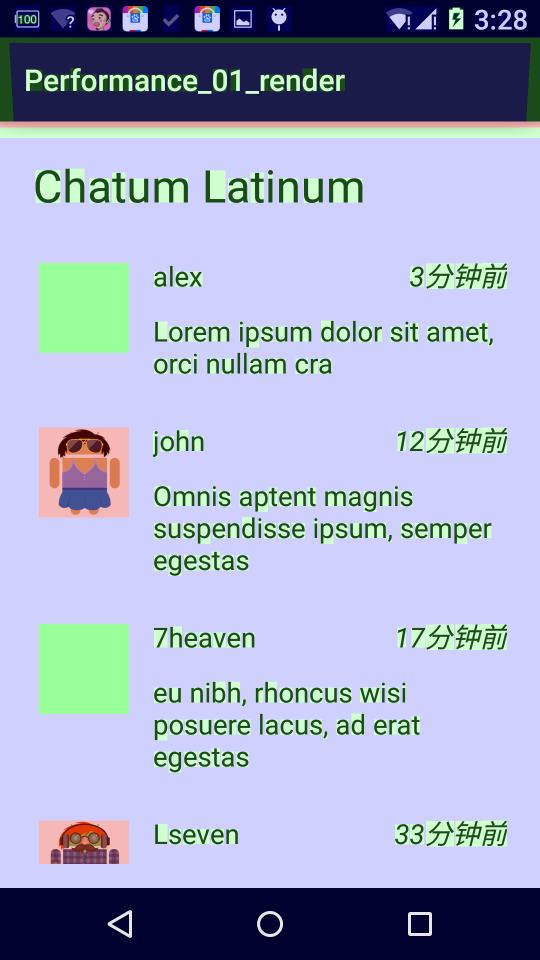
Is it much better than before? Next, there are some unnecessary backgrounds. Can you still find them?
* Unnecessary Background 5
This background is hard to find. You need to look at the Adapter's getView code. The above code will show you that the background color is set for each icon (mainly when there is no icon map), and then a head image is set. Then overdraw is created. There is no need to draw the background with the avatar. All the Modification codes are as follows:
Droid droid = getItem(position);
                if(droid.imageId ==-1)
                {
                    holder.icon.setBackgroundColor(0x4400ff00);
                    holder.icon.setImageResource(android.R.color.transparent);
                }else
                {
                    holder.icon.setImageResource(droid.imageId);
                    holder.icon.setBackgroundResource(android.R.color.transparent);
}- 1
- 2
- 3
- 4
- 5
- 6
- 7
- 8
- 9
- 10
- 1
- 2
- 3
- 4
- 5
- 6
- 7
- 8
- 9
- 10
ok, and the last one, which is also very easy to ignore.
* Unnecessary Background 6
Remember that we said before that our Activity requires the background color to be white, and we did set the background color to be white in the layout, so here's to note that the layout of our Activity will eventually be added to DecorView, the background in the View meeting is not necessary, so we hope to call mDecor. setWindows Background (drawable); then we can use Acti. Vity calls getWindow().setBackgroundDrawable(null);
setContentView(R.layout.activity_overdraw_01);
getWindow().setBackgroundDrawable(null);- 1
- 2
- 1
- 2
ok, a simple listview shows item s. We have identified six unnecessary backgrounds. Now let's look at the final Show GPU Overdraw and compare it with the original one. 
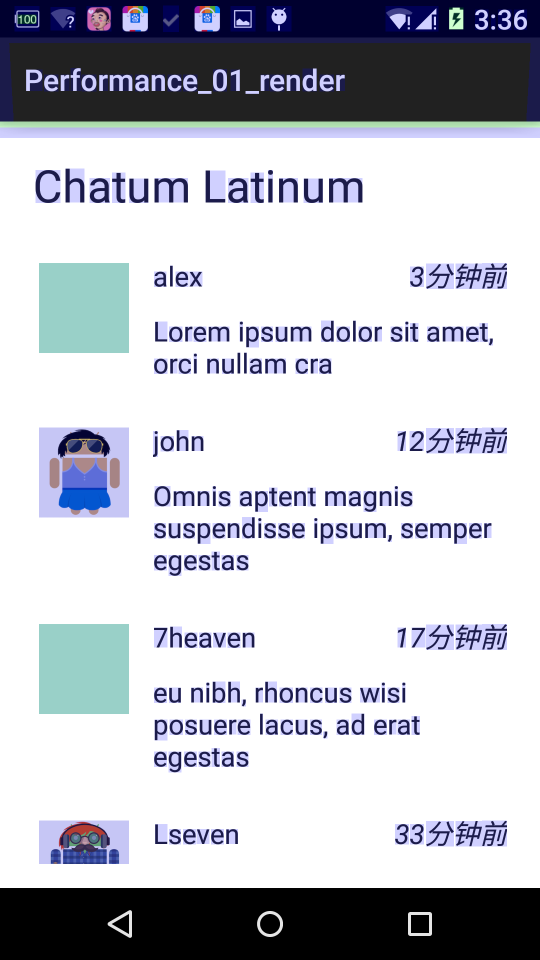 ok, compared with reference to Fig. 1, it has basically reached the optimal state.
4.2 Use Layout Labels to Optimize Layout
4.2.1 Label
I believe that the most commonly used Layout label is <include>. The purpose of <include> is to extract the common parts of the Layout for other Layouts to optimize the Layout. This Layout is written in a way that greatly facilitates development. Personally, I feel that this idea and React The idea of component-oriented programming in Native has the same merits and demerits. It extracts a specific function into an independent component, which can satisfy different requirements as long as the parameters are controlled. For example, we often need to add a title bar when editing the Android interface. If we do not use < include >, we can only write duplicate code in every xml file that needs to display the title bar, which is time-consuming and laborious. But as long as we extract the title bar layout that needs to be used many times into a separate xml file, and then use the < include > tag to introduce it where needed.
Let's take the example of introducing another layout foot.xml with include in one layout main.xml. The main.mxl code is as follows:
<RelativeLayout xmlns:android="http://schemas.android.com/apk/res/android"
    android:layout_width="match_parent"
    android:layout_height="match_parent">

    <ListView
        android:id="@+id/simple_list_view"
        android:layout_width="match_parent"
        android:layout_height="match_parent"
        android:layout_marginBottom="80dp" />

    <include
        android:id="@+id/my_foot_ly"
        layout="@layout/foot" />

</RelativeLayout>- 1
- 2
- 3
- 4
- 5
- 6
- 7
- 8
- 9
- 10
- 11
- 12
- 13
- 14
- 15
- 1
- 2
- 3
- 4
- 5
- 6
- 7
- 8
- 9
- 10
- 11
- 12
- 13
- 14
- 15
The foot.xml introduced by include is at the bottom of the common page. The code is as follows:
?xml version="1.0" encoding="utf-8"?>
<RelativeLayout xmlns:android="http://schemas.android.com/apk/res/android"
    android:layout_width="match_parent"
    android:layout_height="match_parent"
    android:id="@+id/my_foot_parent_id">

    <Button
        android:id="@+id/button"
        android:layout_width="match_parent"
        android:layout_height="@dimen/dp_40"
        android:layout_above="@+id/title_tv"/>

    <TextView
        android:id="@+id/title_tv"
        android:layout_width="match_parent"
        android:layout_height="@dimen/dp_40"
        android:layout_alignParentBottom="true"
        android:text="@string/app_name" />
</RelativeLayout>- 1
- 2
- 3
- 4
- 5
- 6
- 7
- 8
- 9
- 10
- 11
- 12
- 13
- 14
- 15
- 16
- 17
- 18
- 19
- 1
- 2
- 3
- 4
- 5
- 6
- 7
- 8
- 9
- 10
- 11
- 12
- 13
- 14
- 15
- 16
- 17
- 18
- 19
<include> is simple to use, just specify a layout attribute as the layout file you need to include. Of course, you can also specify the android:id, android:height, android:width attributes to override the introduced root node attributes.
Note
The most common problem with the < include > tag is that findViewById can't find the following layout of the < include > incoming control, and the premise of this problem is to set the ID when include. When the ID is set, the original foot.xml and layout id have been replaced by the ID specified in <include>, so the null pointer exception will be reported when findViewById finds the original ID.
View titleView = findViewById(R.id.my_foot_parent_id) ; // At this point the id has been overwritten and titleView is empty and cannot be found. The null pointer at this time - 1
- 1
View titleView = findViewById(R.id.my_foot_ly) ; //Rewrite the specified id- 1
- 1
The < include > tag simply means that it is equivalent to introducing the layout specified by layout into main.xml as a whole. So we have the same layout as we did directly in main.xml, except that there is a problem mentioned above where the more layout id is covered.
4.2.2 Label
ViewStub tags can be used to introduce an external layout just like include tags. The difference is that the layout introduced by ViewStub will not display or occupy the position by default, so it can save cpu, memory and other hardware resources when parsing the layout.
ViewStub is often used to introduce layouts that are not displayed by default and only appear in specific situations, such as progress bars, prompt layouts for network connection failure display, etc.
Let's take the example of the prompt page network_error.xml when adding network errors to a layout main.xml. The main.mxl code is as follows:
<?xml version="1.0" encoding="utf-8"?>
<RelativeLayout xmlns:android="http://schemas.android.com/apk/res/android"
    android:layout_width="match_parent"
    android:layout_height="match_parent" >

......
    <ViewStub
        android:id="@+id/network_error_layout"
        android:layout_width="match_parent"
        android:layout_height="match_parent"
        android:layout="@layout/network_error" />

</RelativeLayout>- 1
- 2
- 3
- 4
- 5
- 6
- 7
- 8
- 9
- 10
- 11
- 12
- 13
- 1
- 2
- 3
- 4
- 5
- 6
- 7
- 8
- 9
- 10
- 11
- 12
- 13
Where network_error.xml is the layout that needs to be displayed only when network errors occur. By default, it will not be parsed. The sample code is as follows:
<?xml version="1.0" encoding="utf-8"?>
<RelativeLayout xmlns:android="http://schemas.android.com/apk/res/android"
    android:layout_width="match_parent"
    android:layout_height="match_parent" >

    <Button
        android:id="@+id/network_setting"
        android:layout_width="@dimen/dp_160"
        android:layout_height="wrap_content"
        android:layout_centerHorizontal="true"
        android:text="@string/network_setting" />

    <Button
        android:id="@+id/network_refresh"
        android:layout_width="@dimen/dp_160"
        android:layout_height="wrap_content"
        android:layout_below="@+id/network_setting"
        android:layout_centerHorizontal="true"
        android:layout_marginTop="@dimen/dp_10"
        android:text="@string/network_refresh" />

</RelativeLayout>- 1
- 2
- 3
- 4
- 5
- 6
- 7
- 8
- 9
- 10
- 11
- 12
- 13
- 14
- 15
- 16
- 17
- 18
- 19
- 20
- 21
- 22
- 1
- 2
- 3
- 4
- 5
- 6
- 7
- 8
- 9
- 10
- 11
- 12
- 13
- 14
- 15
- 16
- 17
- 18
- 19
- 20
- 21
- 22
ViewStub is found in the code by (ViewStub)findViewById(id), ViewStub is expanded by stub.inflate(), and then sub-View is obtained, as follows:
private View networkErrorView;

private void showNetError() {
  if (networkErrorView != null) {
    networkErrorView.setVisibility(View.VISIBLE);
  }else{
    ViewStub stub = (ViewStub)findViewById(R.id.network_error_layout);
    if(stub !=null){
      networkErrorView = stub.inflate();

      //  The effect is the same as above.
      //  Stub. setVisibility (View. VISIBLE); // ViewStub is replaced by the expanded layout
      //  NetworkErrorView = findViewById (R.id.network_error_layout); // Gets the expanded layout
    }
 }
}

private void showNormal() {
  if (networkErrorView != null) {
    networkErrorView.setVisibility(View.GONE);
  }
}- 1
- 2
- 3
- 4
- 5
- 6
- 7
- 8
- 9
- 10
- 11
- 12
- 13
- 14
- 15
- 16
- 17
- 18
- 19
- 20
- 21
- 22
- 1
- 2
- 3
- 4
- 5
- 6
- 7
- 8
- 9
- 10
- 11
- 12
- 13
- 14
- 15
- 16
- 17
- 18
- 19
- 20
- 21
- 22
ViewStub is expanded in showNetError() above, and we save the networkErrorView so that we don't need to continue inflate next time.
Notice here that I made a non-null judgment on the instance of ViewStub, because the id defined by ViewStub in XML is only valid at the beginning. Once the layout specified in ViewStub is loaded, the id will fail, and then the value of findViewById() will also be null.
Most of the attributes of the viewstub tag are similar to those of the include tag.
Note:
Sometimes we need to set the speakability of View to GONE according to the requirement. When inflate, the View and its word View will be parsed. So using < ViewStub > avoids parsing the specified layout file. Thus, the analysis time of layout is accelerated and hardware resources such as cpu memory are saved. At the same time, the layout loaded by ViewStub is not allowed to use the < merge > tag.
4.2.3 Label
Using include may result in too many nested layouts, too many view nodes and slow down the parsing speed.
The merge tag can be used in two typical cases:
1. The top node of the layout is FrameLayout and does not need to set properties such as background or padding. merge can be used instead, because the parent of the Activity content view
view is just a FrameLayout, so you can use merge to eliminate only one.
2. When a layout is include d as a sub-layout by other layouts, merge is used as the top node of the layout, so that when introduced, the top node will be automatically ignored, and all its own points will be merged into the main layout.
Take the code example in Label 4.2.1 as an example, and use hierarchy viewer to view the main.xml layout as follows:
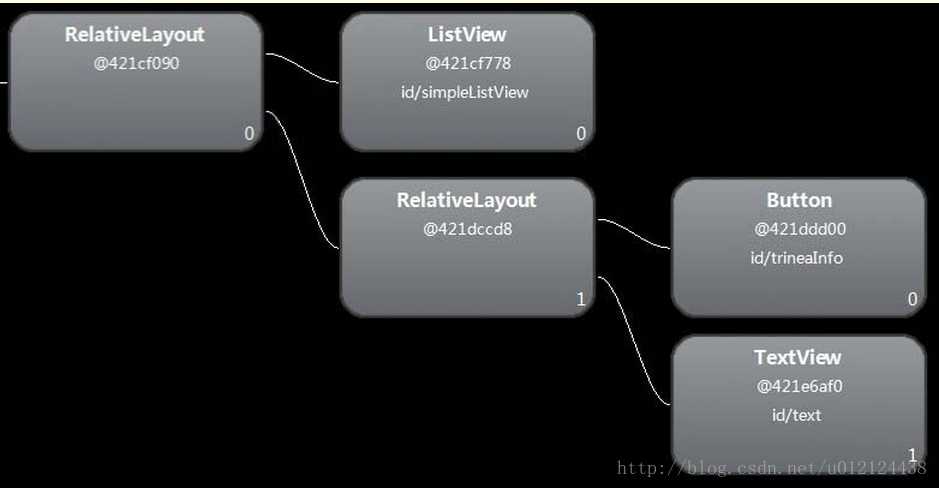
You can find an unnecessary layer of Relative Layout. Change Relative Layout to merge in foot.xml, as follows:
<?xml version="1.0" encoding="utf-8"?>
<merge xmlns:android="http://schemas.android.com/apk/res/android"
    android:layout_width="match_parent"
    android:layout_height="match_parent" >

    <Button
        android:id="@+id/button"
        android:layout_width="match_parent"
        android:layout_height="@dimen/dp_40"
        android:layout_above="@+id/text"/>

    <TextView
        android:id="@+id/text"
        android:layout_width="match_parent"
        android:layout_height="@dimen/dp_40"
        android:layout_alignParentBottom="true"
        android:text="@string/app_name" />

</merge>- 1
- 2
- 3
- 4
- 5
- 6
- 7
- 8
- 9
- 10
- 11
- 12
- 13
- 14
- 15
- 16
- 17
- 18
- 19
- 1
- 2
- 3
- 4
- 5
- 6
- 7
- 8
- 9
- 10
- 11
- 12
- 13
- 14
- 15
- 16
- 17
- 18
- 19
After running, use hierarchy viewer again to view the main.xml layout as follows: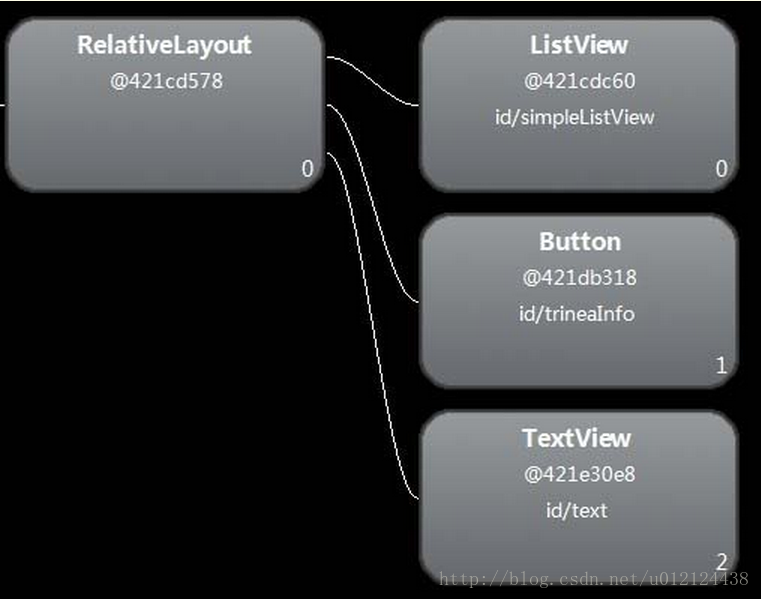
So there will be no redundant Relative Layout nodes.
Reference:
Performance optimization of Android UI in real-world recognition rendering
Google releases an Android performance optimization paradigm
Layout optimization of Android performance optimization series