- home page
- special column
- android
- Article details
Android tutorial | UI layout RelativeLayout relative layout
 Android_ An Zi Published 3 minutes ago
RelativeLayout overview
RelativeLayout inherits from android.widget.ViewGroup and completes the layout according to the position relationship between child elements. As the most flexible and commonly used layout method among the five layouts of Android system, RelativeLayout is very suitable for some complex interface designs.
RelativeLayout is similar to LinearLayout. Both are viewgroups, which can "accommodate" multiple child views.
RelativeLayout is a view group that displays child views in relative positions. The position of each view can be specified relative to the sibling element (for example, to the left or below another view) or relative to the parent RelativeLayout area (for example, aligned at the bottom, left, or center).
The sub view can be TextView, Button, linear layout, RelativeLayout, etc. If no other configurations are added, they are in the upper left corner of RelativeLayout by default.
In RelativeLayout, a child View can determine its position based on another child View. However, it must be noted that RelativeLayout and its child views cannot depend on each other. For example, RelativeLayout sets the height to wrap_content, the child View has set ALIGN_PARENT_BOTTOM, so you will find that the RelativeLayout is maximized. RelativeLayout eliminates nested View groups and keeps the layout hierarchy flat.
Attribute introduction
RelativeLayout property:
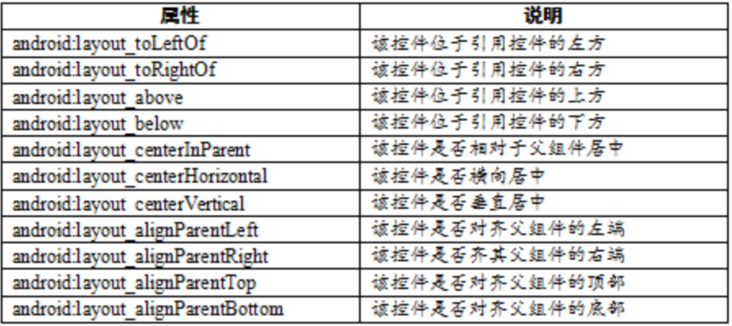
RelativeLayout specifies the position of child views relative to the parent view or each other (determined by ID). Therefore, you can align two elements according to the right border, or make them up and down, center the screen, center the left, and so on. By default, all child views are drawn in the upper left corner of the layout, so the location of each view must be defined using the various layout properties provided in RelativeLayout.LayoutParams.
There are many layout properties available for views in RelativeLayout. Some examples include:
android:layout_alignParentTop
If true, the top edge of this view is aligned with the top edge of the parent view.
android:layout_centerVertical
If true, the child is centered vertically within the parent.
android:layout_below
Place the top edge of this view below the view specified with the resource ID.
android:layout_toRightOf
Place the left edge of this view to the right of the view specified with the resource ID.
Example:
To make the UI look better, first define the style and add a new style in the style.xml file.
<style name="RelativeLayoutDemo1Item">
    <item name="android:layout_height">wrap_content</item>
    <item name="android:layout_width">wrap_content</item>
    <item name="android:padding">4dp</item>
    <item name="android:background">@color/colorAccent</item>
    <item name="android:textColor">#ffffff</item>
    <item name="android:textSize">12sp</item>
</style>
Example 1:
Add RelativeLayout and some sub views in layout. The child View sets different properties, which are distributed in the upper, lower, left and right of the parent View.
<RelativeLayout
        android:layout_width="match_parent"
        android:layout_height="100dp">

        <TextView
            style="@style/RelativeLayoutDemo1Item"
            android:text="default" />

        <TextView
            style="@style/RelativeLayoutDemo1Item"
            android:layout_alignParentEnd="true"
            android:text="layout_alignParentEnd" />

        <TextView
            style="@style/RelativeLayoutDemo1Item"
            android:layout_centerInParent="true"
            android:text="layout_centerInParent" />

        <TextView
            style="@style/RelativeLayoutDemo1Item"
            android:layout_alignParentBottom="true"
            android:text="layout_alignParentBottom" />

        <TextView
            style="@style/RelativeLayoutDemo1Item"
            android:layout_alignParentEnd="true"
            android:layout_alignParentBottom="true"
            android:text="layout_alignParentBottom | End" />

    </RelativeLayout>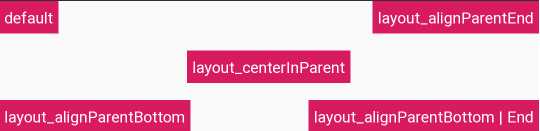
Example 2:
Sub views can take other sub views as the location basis.
<RelativeLayout
        android:layout_width="match_parent"
        android:layout_height="match_parent"
        android:layout_marginTop="120dp">

        <TextView
            android:id="@+id/tv1"
            style="@style/RelativeLayoutDemo1Item"
            android:text="day" />

        <TextView
            android:id="@+id/tv2"
            style="@style/RelativeLayoutDemo1Item"
            android:layout_below="@id/tv1"
            android:layout_toEndOf="@id/tv1"
            android:text="day" />

        <TextView
            android:id="@+id/tv3"
            style="@style/RelativeLayoutDemo1Item"
            android:layout_below="@id/tv2"
            android:layout_toEndOf="@id/tv2"
            android:text="towards" />

        <TextView
            android:id="@+id/tv4"
            style="@style/RelativeLayoutDemo1Item"
            android:layout_below="@id/tv3"
            android:layout_toEndOf="@id/tv3"
            android:text="upper" />

    </RelativeLayout>
RelativeLayout video reference for getting started with relative layout
 android