Preface
Transition was introduced as early as Android 4.4, but was only truly implemented at 5.0.What exactly is Transition used for?Next, I'll analyze the powerful animation framework of Google through examples and primitive analysis.
First come to an effect picture to suppress the scene

Newsstand app on Google Play (v3.3)
This effect is described below, but first you need to understand some of the basic concepts of this framework.
The core of the Transition Framework is to help developers automatically generate animations based on the Scene (scene, explained below).There are several ways to start an animation.
- TransitionManager.go()
- beginDelayedTransition()
- setEnterTransition()/setSharedElementEnterTransition()
Let's explain each of these things one by one
TransitionManager.go()
First, introduce the Scene class to see the official explanation
A scene represents the collection of values that various properties in the View hierarchy will have when the scene is applied. A Scene can be configured to automatically run a Transition when it is applied, which will animate the various property changes that take place during the scene change.
The popular explanation is that this class stores the properties of various views under a single view.Instances are usually obtained by getSceneForLayout (ViewGroup sceneRoot,int layoutId,Context context).
- sceneRoot
Where scene s change and animations execute - layoutId
That is the root view mentioned above
Perhaps this explanation is a bit weak, let me give you an example.

Chestnuts
private Scene scene1;
private Scene scene2;
private boolean isScene2;
@Override
protected void onCreate(Bundle savedInstanceState) {
    super.onCreate(savedInstanceState);
    setContentView(R.layout.activity_scene);
    initToolbar();
    initScene();
}

private void initScene() {
    ViewGroup sceneRoot= (ViewGroup) findViewById(R.id.scene_root);
    scene1=Scene.getSceneForLayout(sceneRoot,R.layout.scene_1,this);
    scene2=Scene.getSceneForLayout(sceneRoot,R.layout.scene_2,this);
    TransitionManager.go(scene1);
}

/**
 * scene1 Switch with scene2 to play animations* @param view
  */
public void change(View view){
    TransitionManager.go(isScene2?scene1:scene2,new ChangeBounds());
    isScene2=!isScene2;
}
scene1:
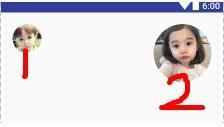
scene1
scene2:
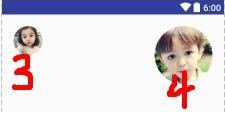
scene2
Note that 1 and 4, 2 and 3 of the two scene layouts have the same id except for the size of the picture position.You can think of it as a view because different animations created by analyzing and comparing the starting scenes are for the same view.
The simple example above is to trigger an animation with TransitionManager.go() in the first way.That is, when you enter an Activity, you manually pass the start scene through
TransitionManager.go(scene1) is set to scene1.Click button to switch to the end scene state through TransitionManager.go (scene 2, new ChangeBounds()): the scene 2.Transition framework analyzes the differences between start and end scenes by using the ChangeBounds class to create and play animations.Because the ChangeBounds class is used to analyze and compare the position boundaries of view s in two scenes to create motion and zoom animations.It is found that scene 1->scene 2 is actually 1->4,2->3.The corresponding animation is executed as follows:

scene_simple.gif
Similar to the ChangeBounds class are the following, which all inherit the Transiton class
- ChangeBounds
Detect view's position boundaries to create move and zoom animations - ChangeTransform
Detect view scale s and rotation s to create zoom and rotate animations - ChangeClipBounds
Detects the position boundaries of the view's clipping area, similar to ChangeBounds.However, ChangeBounds are for views and ChangeClipBounds are for rects in the set ClipBound (Rect rect) of views.No animation if not set - ChangeImageTransform
Detect the size, location, and ScaleType of the ImageView (specifically, ImageView) and create the appropriate animation. - Fade,Slide,Explode
All three are progressive, sliding, and explosive animations created according to the different visibilities of the view.
The above animation classes are implemented as follows:
scene_all.gif
- AutoTransition
If TransitionManager.go(scene1) does not specify an animation, the default animation is the AutoTransition class.It's actually a collection of animations. Looking at the source code, it's actually a collection of animations with Fade and ChangeBounds classes added.
When it comes to animation collections, animation classes can be created not only by methods like new ChangeBounds(), but also by xml files.And for animation collections, the xml approach may be more convenient.private void init() { setOrdering(ORDERING_SEQUENTIAL); addTransition(new Fade(Fade.OUT)). addTransition(new ChangeBounds()). addTransition(new Fade(Fade.IN)); }
In just two steps, the first step is to create an xml file in res/transition
The following:
res/transition/changebounds_and_fade.xml:<?xml version="1.0" encoding="utf-8"?> <transitionSet xmlns:android="http://schemas.android.com/apk/res/android"> <changeBounds /> <fade /> </transitionSet>
Then called in the code:
Transition sets=TransitionInflater.from(this).inflateTransition(R.transition.changebounds_and_fade);
Finally, to add a point, about and TransitionManager.go(scene2) is actually scene1.exit() that calls the current scene(scene1) and scene2.enter() that calls the next scene(scene2)
They trigger scene1.setExitAction() and scene1.setEnterAction(), respectively. Some special effects can be customized in these two methods.
beginDelayedTransition()
Next, the next trigger is described, which is easy if you understand it well.The previous type of TransitionManager.go() always created start and end scene s from xml files, which was cumbersome.
BegininDelayedTransition () works by changing the view's properties through code, then animating by analyzing the differences between start scene and end Scene using the ChangeBounds class described earlier.
Still an example:

Chestnut x2
@Override
protected void onCreate(Bundle savedInstanceState) {
    super.onCreate(savedInstanceState);
    setContentView(R.layout.activity_begin_delayed);
    initToolBar();
    initView();
}

@Override
public void onClick(View v) {
    //start scene is the current scene
  TransitionManager.beginDelayedTransition(sceneRoot, TransitionInflater.from(this).inflateTransition(R.transition.explode_and_changebounds));
    //next scene has changed scene statue by code at this time
  changeScene(v);
}

private void changeScene(View view) {
    changeSize(view);
    changeVisibility(cuteboy,cutegirl,hxy,lly);
    view.setVisibility(View.VISIBLE);
}

/**
 * view Width and height 1.5 times and original size switching*Scale with ChangeBounds* @param view
  */
private void changeSize(View view) {
    isImageBigger=!isImageBigger;
    ViewGroup.LayoutParams layoutParams = view.getLayoutParams();
    if(isImageBigger){
        layoutParams.width=(int)(1.5*primarySize);
        layoutParams.height=(int)(1.5*primarySize);
    }else {
        layoutParams.width=primarySize;
        layoutParams.height=primarySize;
    }
    view.setLayoutParams(layoutParams);
}

/**
 * VISIBLE Toggle status with INVISIBLE* @param views
  */
private void changeVisibility(View ...views){
    for (View view:views){
        view.setVisibility(view.getVisibility()==View.VISIBLE?View.INVISIBLE:View.VISIBLE);
    }
}
When the click event is triggered, the current scene status is recorded, the size of the clicked view is changed, the visibility of other views is changed, and the changed scene status is recorded.In this case, the second parameter of beginDelayedTransition() passes through a collection of ChangeBounds and Explode animations, so the execution zoom animations in this collection change the execution explosion of visibility.The overall effect is as follows:
beginDelayed.gif
Interface Switching Animation
So much has been said before and it's time to get to the big picture: the switching effect before Activity/Fragment.There are two types of interface switching: Content Transition without shared elements and Shared Element Transition with shared elements.
Content Transition
Explain the following key concepts first:
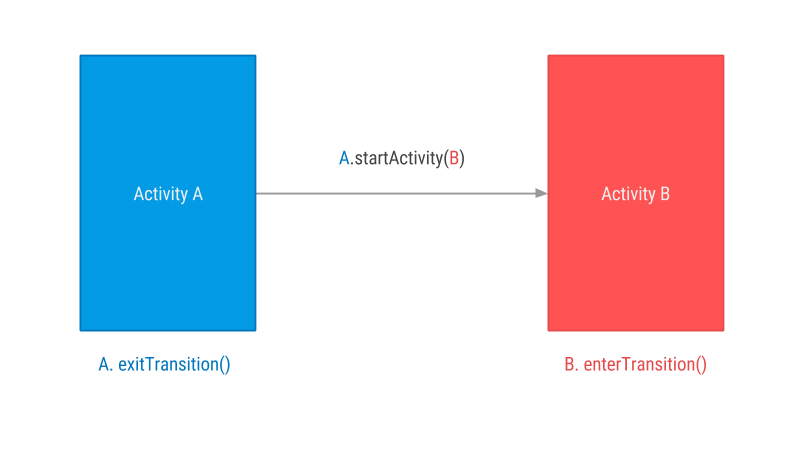
transition_A_to_B.png
-
A.exitTransition(transition)
The Transition framework first traverses the A interface to determine the view (non-shared element view) to animate, and before executing A.exitTransition(), the A interface gets the start scene(view is in VISIBLE state) of the interface, then sets all views to animate to INVISIBLE and gets the end scene(view is in INVISIBLE state) at this time.Create execution animations based on transition analysis differences. -
B.enterTransition()
The Transition framework first traverses the B interface, determines which view to animate, and sets it to INVISIBLE.Get the start scene at this point (view is in INVISIBLE state) before executing B.enterTransition(), then set all views to animate to VISIBLE, and get the end scene at this time (view is in VISIBLE state). Create an execution animation based on the difference of transition analysis.
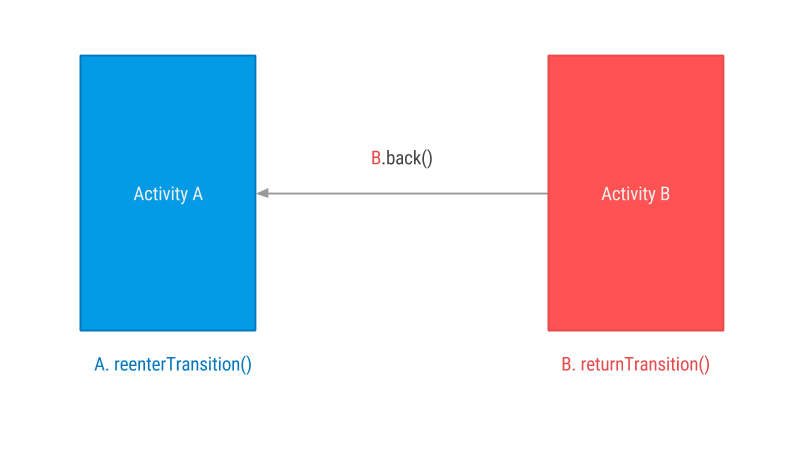
transition_B_to_A.png
As explained above, interface switching animations are based on changes in visibility, so getWindow().setEnterTransition(transition); the parameters in the getWindow().setEnterTransition(transition); generally pass instances of the Fade,Slide,Explode classes (because these three classes are created by analyzing visibility differently).There are usually several steps to writing a complete Activity Content Transiton:
- Add in style
Material theme application is automatically set to true.<item name="android:windowActivityTransitions">true</item> - Set the corresponding A leave/B enter/B leave/A re-enter animation.
Of course, you can also set it in the theme//A Do not set default to null getWindow().setExitTransition(transition); //B Do not set default to Fade getWindow().setEnterTransition(transition); //B Do not set the default to EnterTransition getWindow().setReturnTransition(transition); //A Do not set default to ExitTransition getWindow().setReenterTransition(transition);<item name="android:windowEnterTransition">@transition/slide_and_fade</item> <item name="android:windowReturnTransition">@transition/return_slide</item> - Jump Interface
The jump interface here can't be just startActivity(intent),
NeedBundle bundle=ActivityOptionsCompat.makeSceneTransitionAnimation(activity).toBundle; startActivity(intent,bundle)
ok So far you can run the toggle animation between the activities.
But you will find that when the interface switches, A exits and B enters after a short while. (ExitTransition is too much to show A completely.) If you want B to enter after A exits completely, you can also set it in xml by setting AllowEnterTransition Overlap (false) (default is true):
<item name="android:windowAllowEnterTransitionOverlap">false</item>
<item name="android:windowAllowReturnTransitionOverlap">false</item>
So much said that I feel I have to give another simple example.
A.Activity:
@Override
protected void onCreate(Bundle savedInstanceState) {
    super.onCreate(savedInstanceState);
    setContentView(R.layout.activity_main);
    initToolBar();
    getWindow().setExitTransition(TransitionInflater.from(this).inflateTransition(R.transition.slide));
    //setReenterTransition() is not set by default as setExitTransition
}

public void goContentTransitions(View view){
    Intent intent = new Intent(this, ContentTransitionsActivity.class);
    ActivityOptionsCompat activityOptionsCompat = ActivityOptionsCompat.makeSceneTransitionAnimation(this);
    startActivity(intent,activityOptionsCompat.toBundle());
}
res/translation/slide.xml:
<transitionSet xmlns:android="http://schemas.android.com/apk/res/android">
<slide android:duration="1000"></slide>
</transitionSet>
B.Activity:
@Override
protected void onCreate(Bundle savedInstanceState) {
    super.onCreate(savedInstanceState);
    setContentView(R.layout.activity_content_transitions);
    initToolbar();

    Slide slide=new Slide();
    slide.setDuration(500);
    slide.setSlideEdge(Gravity.LEFT);
    getWindow().setEnterTransition(slide);
    getWindow().setReenterTransition(new Explode().setDuration(600));

}
The results are as follows:
contentTransition.gif
Looking closely at the animation, you can actually see that A's status bar is also pulled up with the drop-down, and is somewhat spaced from the view below.Virgo says she can't bear it.
Actually, in principle, the Activity's switching animation is for the visibility of the entire interface's view. Is there any way to make the Transition framework focus only on one view or not on one view?Of course, transition.addTarget() and transition.excludeTarget() can achieve the above functions separately.
Conveniently, this property can also be set in xml, so what we need to do now is to exclude the statusBar, which can be written in slide.xml:
<transitionSet xmlns:android="http://schemas.android.com/apk/res/android">
<slide android:duration="1000">
    <targets >
        <!--Indicates that in addition to the status bar-->
        <target android:excludeId="@android:id/statusBarBackground"/>
        <!--Indicates only for status bar-->
 <!--<target android:targetId="@android:id/statusBarBackground"/>-->  </targets>
</slide>
</transitionSet>
With great success, I won't stick the result. You can make up for it.
Shared Element Transition

shared_element.png
Content Transition and Chared Element Transition often exist in interface switching at the same time, which is different from Content Transition in that there are several main differences:
-
startActivity()
Here pairs are a collection of instances of the Pair<View, String>class that store shared views and names between two activity s.The name here should match the transitionName of the shared view of the B interface.Like this:Bundle bundle=ActivityOptionsCompat.makeSceneTransitionAnimation(activity,pairs).toBundle; startActivity(intent,bundle)
Intent intent = new Intent(this, WithSharedElementTransitionsActivity.class);
ActivityOptionsCompat activityOptionsCompat = ActivityOptionsCompat.makeSceneTransitionAnimation(this
  ,new Pair<View, String>(shared_image,"shared_image_")
        ,new Pair<View, String>(shared_text,"shared_text_"));
startActivity(intent,activityOptionsCompat.toBundle());

//xml
<TextView
  android:text="withShared"
  android:transitionName="shared_text_"
 style="@style/MaterialAnimations.TextAppearance.Title.Inverse"
  android:layout_width="wrap_content"
  android:layout_height="wrap_content" />


><de.hdodenhof.circleimageview.CircleImageView
  android:id="@+id/icon_gg"
  android:layout_centerInParent="true"
  android:src="@mipmap/xkl"
  android:transitionName="shared_image_"
  android:layout_width="150dp"
  android:layout_height="150dp" />
- setSharedElementEnterTransition()/setSharedElementReturnTransition()
Default if not set is @android : transition/move animation.setExitTransition() and setEnterTransition() default to null and Fade.
In fact, the Shared Element Transition principle and Content Transition are similar to creating animations based on different scene status es at the beginning and end.
The difference is that Content Transition further animates scene s by changing the visibility of the view, whereas Shared Element Transition animates different sizes, locations, and styles of shared views on the A B interface.So the former usually sets a Transition such as Fade and the latter usually sets a Transition such as ChangeBounds.
Finally, let's analyze how to achieve the gif effect at the beginning of this article.
- The entire animation includes Content Transition and Chared Element Transition.The setExitTransition() of the A interface is not set to null.
- When you enter the B interface, the shared view here is simply a move, so setSharedElementEnterTransition(transition) can be set without setting, defaulting to move.A watermark expansion animation is also executed, which can be achieved by the ViewAnimationUtils.createCircularReveal() method.When you execute Content Transition after the Chared Element Transition has ended, you can see that it is a Slide animation.So you can do this by setting setExitTransition(new Slide()).Note that here Slide only works on the bottom item (to set the target), otherwise it works on the entire view.
- The most critical thing is that when B exits, you can see the half of the screen sliding up and the bottom part sliding down.A visual effect torn apart from the middle.So you can split the layout in two and specify a Target with two Slide s in different directions, much like this:
There is actually a hole here. Let's first look at the isTransitionGroup() method:<transitionSet android:duration="800" xmlns:android="http://schemas.android.com/apk/res/android"> <slide android:slideEdge="top"> <targets > <target android:targetId="@id/viewGroup_top"></target> </targets> </slide> <slide android:slideEdge="bottom"> <targets > <target android:targetId="@id/viewGroup_bottom"></target> </targets> </slide> </transitionSet>
A return value of true indicates that this ViewGroup executes an Activity Transition as a whole, and false indicates that each of the ViewGroupneutron view s executes its own.If the ViewGroup has background or TransitionName set, or setTransitionGroup(true), the return value is true to indicate that the animation is performed as a whole.public boolean isTransitionGroup() { if ((mGroupFlags & FLAG_IS_TRANSITION_GROUP_SET) != 0) { return ((mGroupFlags & FLAG_IS_TRANSITION_GROUP) != 0); } else { final ViewOutlineProvider outlineProvider = getOutlineProvider(); return getBackground() != null || getTransitionName() != null || (outlineProvider != null && outlineProvider != ViewOutlineProvider.BACKGROUND); } }
So here, viewGroup_bottom and viewGroup_top are best set to setTransitionGroup(true).
The result is as follows, I added some other special effects myself
finish
I won't post the exact code. All the code in this article has been uploaded to Github. I am a link ), including Fragment switching. This is not covered in the code.I hope you can order a star.
If you've seen it once or don't know it, I strongly recommend that you run it in conjunction with the code and see it again, but it's still fairly simple to understand.
Finally, I would like to say that there are still some things left unsatisfactory about this Transition Framework, which may be updated over time. We will also be writing articles about Dagger 2 and an enhanced version of Navigation Bar. Please wait.

Bye-bye
Reference resources
There are other articles
English: https://www.shinobicontrols.com/blog/introducing-bitesize-android-kitkat
Translation: http://www.jcodecraeer.com/a/anzhuokaifa/androidkaifa/2015/0905/3420.html
English: https://github.com/lgvalle/Material-Animations/blob/master/README.md
Translation: http://www.jianshu.com/p/1b5212d84a15