UART (Universal Asynchronous Receiver Transmitter) is a general interface for data interaction with peripheral devices, such as GPS module, LCD display, XBee radio and other complex peripheral devices. Usually UART ports (usually referred to as serial ports) are used to communicate.
It is universal: because the data transfer rate and data byte format are configurable.
It is asynchronous: because there is no clock signal to synchronize data transmission between two devices, the hardware of the device collects all input data in a first-in-first-out buffer until your app reads it.
It's full duplex: it means that data can be sent and interface at the same time.
It's faster than I2C: But the lack of shared clock means that all devices must agree to the same data transmission rate, and each device can adhere to an independent minimum timing error.
It only supports point-to-point communication: unlike API and I2C, it only supports point-to-point communication between two devices.

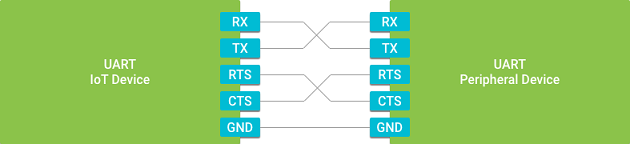
UART peripherals usually have two types:
3-wire ports include data reception (RX), data transmission (TX), and ground reference (GUD) signals.
The 5-wire port adds request sending (RTS) and clear sending (CTS) signals for hardware flow control. Flow control allows the receiving device to identify that its buffer is full and the sending device should wait before sending more data.
II. Use Steps
1. Open the connection: Create the Peripheral Manager Service object, use the name of the port you want to open, and call the open() method to open the connection.
@Override
protected void onCreate(Bundle savedInstanceState) {
    super.onCreate(savedInstanceState);
    try {
        PeripheralManagerService manager = new PeripheralManagerService();
        mDevice = manager.openUartDevice(UART_DEVICE_NAME);
    } catch (IOException e) {
        Log.w(TAG, "Unable to access UART device", e);
    }
}Each character sent through UART is packaged in the data frame, which contains the following components:

Beginning bit: Before sending data, this line maintains a fixed 1-bit duration interval to indicate the beginning of a new character.
Data bits: Individual bits that identify data characters. UART may be configured to send 5-9 bits to represent characters. Less bits reduce the range of data, but improve the efficiency of data transmission.
Check bits: optional error check values. If UART is configured as parity check, an additional frame will be added to this bit, indicating whether the data content matches parity check. Setting none removes this from the frame.
End bit: After all data transfers, the line is reset to a configurable time interval indicating the end of the character. It can be configured to have 1 or 2 bits of idle time.
The rate at which data is transmitted through UART is called baud rate, which represents the rate at which data is received and transmitted, bits per second.
Connected devices via UART do not share clocks, so they need to use the same baud rate configuration in advance to ensure the correct decoding of data.
public void configureUartFrame(UartDevice uart) throws IOException {
    uart.setBaudrate(115200);
    uart.setDataSize(8);
    uart.setParity(UartDevice.PARITY_NONE);
    uart.setStopBits(1);
}After the start of hardware flow control, UART sends out the RTS signal when the receiving buffer of the device is full and can not accept any data. Once the buffer is exhausted, the signal will be cleared. Similarly, UART monitors and clears the CTS signal, and if it finds that the line of external devices is in effect, it will increase data transmission.
public void setFlowControlEnabled(UartDevice uart, boolean enable) throws IOException {
    if (enable) {
        // Enable hardware flow control
        uart.setHardwareFlowControl(UartDevice.HW_FLOW_CONTROL_AUTO_RTSCTS);
    } else {
        // Disable flow control
        uart.setHardwareFlowControl(UartDevice.HW_FLOW_CONTROL_NONE);
    }
}public void writeUartData(UartDevice uart) throws IOException {
byte[] buffer = {...};
int count = uart.write(buffer, buffer.length);
Log.d(TAG, "Wrote " + count + " bytes to peripheral");
}UART reads are non-blocking and will return immediately if there is no valid data in FIFO. UartDevice will return the number of FIFO valid bytes at read time to meet the required number. To ensure that all data is read, the UART loops until it reports that no data exists.
When the buffer is empty, to avoid unnecessary polling, use Uart Device to register a Uart Device Callback. This callback calls the on UartDevice DataAvailable () method when the data is still readable. When your application no longer listens to input data, you should cancel this callback.
The onUartDeviceDataAvailable() callback returns a Boolean value indicating whether the callback automatically logs off to obtain future interrupt events. Here we return true to continue retrieving events every time data appears in UART FIFO.
@Override
protected void onStart() {
    super.onStart();
    // Begin listening for interrupt events
    mDevice.registerUartDeviceCallback(mUartCallback);
}
public void readUartBuffer(UartDevice uart) throws IOException {
    // Maximum amount of data to read at one time
    final int maxCount = ...;
    byte[] buffer = new byte[maxCount];

    int count;
    while ((count = uart.read(buffer, buffer.length)) > 0) {
        Log.d(TAG, "Read " + count + " bytes from peripheral");
    }
}
@Override
protected void onStop() {
    super.onStop();
    // Interrupt events no longer necessary
    mDevice.unregisterUartDeviceCallback(mUartCallback);
}
private UartDeviceCallback mUartCallback = new UartDeviceCallback() {
    @Override
    public boolean onUartDeviceDataAvailable(UartDevice uart) {
        // Read available data from the UART device
        try {
            readUartBuffer(uart);
        } catch (IOException e) {
            Log.w(TAG, "Unable to access UART device", e);
        }
        // Continue listening for more interrupts
        return true;
    }
    @Override
    public void onUartDeviceError(UartDevice uart, int error) {
        Log.w(TAG, uart + ": Error event " + error);
    }
};@Override
protected void onDestroy() {
super.onDestroy();
if (mDevice != null) {
try {
mDevice.close();
mDevice = null;
} catch (IOException e) {
Log.w(TAG, "Unable to close UART device", e);
}
}
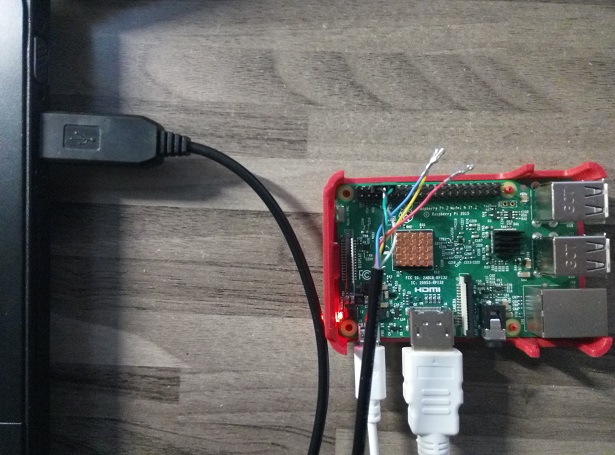
}Here we will show you how computers and raspberry pies can transmit information through FTDI TTL-232R connection, which uses UART interface.
1. Circuit Construction
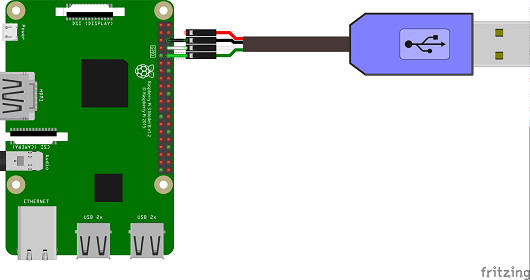
Note: The TX connection of the connection line is inserted into the RX pin of the raspberry pie, and the RX is inserted into the TX in the same way.
2. Coding
UARTDemo\app\src\main\java\com\chengxiang\uartdemo\MainActivity.java
public class MainActivity extends AppCompatActivity {
    private static final String TAG = "LoopbackActivity";
    private static final String UART_DEVICE_NAME = "UART0";
    private static final int BAUD_RATE = 115200;
    private static final int DATA_BITS = 8;
    private static final int STOP_BITS = 1;
    private static final int CHUNK_SIZE = 512;

    private UartDevice mUartDevice;

    @Override
    protected void onCreate(Bundle savedInstanceState) {
        super.onCreate(savedInstanceState);
        setContentView(R.layout.activity_main);

        PeripheralManagerService peripheralManagerService = new PeripheralManagerService();
        try {
            //Open the interface through UART interface name UART0
            mUartDevice = peripheralManagerService.openUartDevice(UART_DEVICE_NAME);
            //Setting baud rate, data size, check and other parameters
            mUartDevice.setBaudrate(BAUD_RATE);
            mUartDevice.setDataSize(DATA_BITS);
            mUartDevice.setParity(UartDevice.PARITY_NONE);
            mUartDevice.setStopBits(STOP_BITS);
            //Register data monitor and call back when data is readable
            mUartDevice.registerUartDeviceCallback(mUartDeviceCallback);
        } catch (IOException e) {
            e.printStackTrace();
        }
    }

    private UartDeviceCallback mUartDeviceCallback = new UartDeviceCallback() {
        @Override
        public boolean onUartDeviceDataAvailable(UartDevice uart) {
            try {
                //Read the data from PC terminal and return it to PC in its original form
                byte[] buffer = new byte[CHUNK_SIZE];
                int read;
                while ((read = mUartDevice.read(buffer, buffer.length)) > 0) {
                    Log.w(TAG, "read from PC:"+ new String(buffer));
                    mUartDevice.write(buffer, read);
                }
            } catch (IOException e) {
                Log.w(TAG, "Unable to transfer data over UART", e);
            }
            return true;
        }

        @Override
        public void onUartDeviceError(UartDevice uart, int error) {
            Log.w(TAG, uart + ": Error event " + error);
        }
    };

    @Override
    protected void onDestroy() {
        super.onDestroy();
        //Close the connection when you don't need it
        if (mUartDevice != null) {
            try {
                mUartDevice.close();
                mUartDevice = null;
            } catch (IOException e) {
                Log.w(TAG, "Unable to close UART device", e);
            }
        }
    }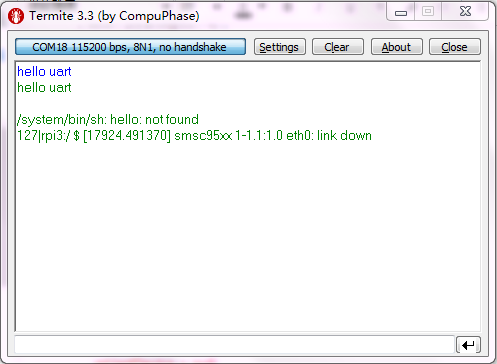
}We are demonstrating with windows system, so we use Termite terminal to set serial port (related drivers recommend using driver life automatic installation) connection parameters (consistent with the code, related operations are not described in detail here).
Enter hello uart (blue) at the terminal and receive the returned hello uart (red)
1. New technology, new future! Welcome everyone to pay attention to the "1024 Workshop" Wechat Service Number and keep abreast of our latest news. 2. After reading our article, do you want to try the bull's knife, come to "1024 Workshop" micro-store, here you want. 3. Join "Android Things Development" to discuss QQ group, let's exchange.