preface
So far, the Gradle foundation and Kotlin foundation have been explained. Therefore, in this article, we will explain in detail the construction optimization of Gradle and how to migrate from Groovy to KTS!
Don't say much, just start!
1. Gradle build optimization
Optimization is all about configuration. Just go through it quickly! Focus on migrating KTS
1.1 enable parallel compilation
By default, when Gradle processes multiple modules, it usually processes them one by one. Set parallel compilation in gradle.properties under the root directory of the project to improve the compilation speed:
org.gradle.parallel=true
1.2 enable compilation daemon (enabled by default)
The process always exists after the first startup. When you compile it again, you can reuse the process
- There is no need to start the gradle process (JVM instance) every time, which reduces the work related to initialization.
- Daemon can cache project structure, files, task s, etc., reuse previous compilation results as much as possible, and shorten the compilation process
- Set org.gradle.daemon=true in gradle.properties. (in fact, it is already supported by default)
1.3 increase compileable memory
Dex in process allows multiple DEX processes to run in a single VM, which makes incremental and clean-up builds faster. You need to set a heap size of at least 1536MB of memory.
Set org.gradle.jvmargs=-Xmx4096m / / in gradle.properties, that is, the size of 4G
1.4 ZipAlign optimization
Running zip align on the application makes the interaction between Android and the application more efficient at run time. Make applications and the entire system run faster.
Set in the build.gradle file under app:
android {
...slightly
    buildTypes {
        release{
            zipAlignEnabled true //It can also be added to the custom product flavor together with 1.6
        }
        debug{
            zipAlignEnabled true
        }
    }
  }
1.5 configuring dexOptions
Configure dexOptions and enable library pre-processing: Dex In Process: Android studio 2.1 adds a new feature: Dex In Process, which can greatly speed up recompilation and improve the performance of Instant Run. Configuring the corresponding DEX build features can improve the build speed.
android {
...slightly
    dexOptions {
        javaMaxHeapSize "2048m"
        jumboMode true//Ignore check for method limit

        //Do you perform dex preprocessing on dependent libraries to make your incremental build faster
        //Because this feature may slow down your clean build
        //Therefore, on your continuous integration server, you may want to turn off this feature
        preDexLibraries true

        //Set the maximum number of threads. When running Dex in process, the default is 4
        maxProcessCount 8
    }
  }
Some setting instructions of dexOptions:
- preDexLibraaies: declare whether to perform dex preprocessing on dependent libraries to make your incremental build faster, because this feature may slow down your clean build, so you may want to turn this feature off on your continuous integration server
- javaMaxHeapSize: set the maximum heap size for the DEX compiler. Instead of setting this property, you should increase the heap size of the Gradle (this heap size is valid for the DEX compiler when Dex in process is available). The setting of this value needs to adjust the value optimized in point 3.
- maxProcessCount: sets the maximum number of threads. When running Dex in process, the default value is 4.
- Note: the parameter value here does not have a specified value. You need to adjust the value to test which is more suitable, otherwise you will get a negative impact.
1.6 build a variant
There are many configurations you need when preparing the release version of the app, but you don't need them when developing the app. Starting an unnecessary build process will slow your incremental build or clean build. Therefore, you need to build a variant that only retains the configuration required during development. Built through productFlavors, dev represents the debug version and prod represents the release version
    flavorDimensions 'channel'
    productFlavors {
        //What can be optimized by the locally developed version
        dev {
            dimension 'channel'
            //Avoid compiling unnecessary resources
            resConfigs "en","xxhdpi"
            resValue 'string', 'bbb', 'nnnn'
			//1.4 content ZIP optimization
			zipAlignEnabled true
            //It is forbidden to automatically compress pictures every time an app is built
            aaptOptions{
                cruncherEnabled false
            }

            //The local development environment can stop alliance statistics or tools not needed by the three parties. This is user-defined
            buildConfigField  "Boolean", "UM_FLAG", "false"
        }
        //Official version
        prod {
            dimension 'channel'
            buildConfigField  "Boolean", "UM_FLAG", "true"
        }
    }
1.7 use static version dependency
When you declare dependencies in the build.gradle file, you should avoid using the + sign at the end of the version number, such as com.android.tools.build:gradle:4. + because the dynamic version number will lead to unknown version updates, make it difficult to solve version differences and slow construction. You should use static or hard coded version numbers instead.
1.8 multi module management
Extract the relatively independent functional modules in the code and create new modules for development. Modularizing your code in this way will allow the construction system to only compile those modules that have changed, and cache their construction results for later construction. At the same time, it can also improve development efficiency and publish multiple apps on maven. (component and plug-in)
All right, just pass the above quickly! Next is the focus of this article!
2,Gradle Kotlin DSL
2.1 advantages and disadvantages of kotlin DSL:
- Android Gradle plug-in 4.0 supports the use of Kotlin script (KTS) in Gradle build configuration to replace Groovy (the programming language used in Gradle configuration file in the past)
- In the future, KTS will be more suitable for writing Gradle scripts than Groovy, because the code written in Kotlin is more readable, and Kotlin provides better compile time checking and IDE support
- Although KTS can be better integrated in the code editor of Android Studio than Groovy, the construction speed of KTS is often slower than Groovy. Therefore, the construction performance should be considered when migrating to KTS.
2.2 what is KTS?
- KTS: refers to kotlin script, which is a kotlin language form used by Gradle in building configuration files. Kotlin scripts are kotlin code that can be run from the command line.
- Kotlin DSL: mainly refers to the Android Gradle plug-in kotlin DSL, and sometimes refers to the underlying Gradle Kotlin DSL
- The Gradle build file written with Kotlin uses the. gradle.kts file extension.
Well, I've said a lot of concepts. Now it's time to start!
2.2 start migration:
It is recommended to migrate a single file from simple to deep
2.2.1 migrating settings.gradle
Original settings.gradle
include ':coroutines'
include ':app'
rootProject.name = "kotlinAndroidstudy"
First copy settings.gradle, then delete it, and then create settings.gradle.kts
New settings.gradle.kts note the suffix here
include (":coroutines",":app")
rootProject.name = "kotlinAndroidstudy"
We can see that include can pass multiple parameters continuously. We can guess that there must be vararg keyword. Enter the corresponding source code to see:
abstract class SettingsDelegate : Settings {
...slightly
    override fun include(vararg projectPaths: String?) =
        delegate.include(*projectPaths)
}
Read the source code, and so it is. After migrating to Kotlin DSL, you can look at the source code at will, which is much easier than groovy before!
Next!
2.2.2 migrating the root build.gradle
On the basis of copying, deleting and creating, you also need to comment out all the build.gradle written in Groovy in the project! (now, when Groovy and Kotlin DSL are mixed, errors will always be reported, so comment out all the original ones first)
Original build.gradle
buildscript {
    ext.kotlin_version = '1.5.0'
    repositories {
        google()
        //jcenter()
        mavenCentral()
    }
    dependencies {
        classpath "com.android.tools.build:gradle:4.1.2"
        classpath "org.jetbrains.kotlin:kotlin-gradle-plugin:$kotlin_version"
    }
}

allprojects {
    repositories {
        google()
       // jcenter()
        mavenCentral()
    }
}

task clean(type: Delete) {
    delete rootProject.buildDir
}
New build.gradle.kts
buildscript{

}
Write this first, and then click compile / try... In the upper right corner. If you can see the source code after successful compilation, you can continue to the next step!
Source code
    /**
     * Configures the build script classpath for this project.
     *
     * @see [Project.buildscript]
     */
    @Suppress("unused")
    open fun buildscript(@Suppress("unused_parameter") block: ScriptHandlerScope.() -> Unit): Unit =
        internalError()
When you can see the corresponding source code, it means that the corresponding Kotlin DSL has been introduced!
Continue to transform the new build.gradle.kts
buildscript {
	//ext.kotlin_version = '1.5.0'
    val kotlinVersion = "1.5.0" // kotlin dsl cannot have single quotation marks!
    repositories {
        google()
       // jcenter()
        mavenCentral()
    }
    dependencies {
    	//This is changed to method call
        classpath ("com.android.tools.build:gradle:4.1.2")
//        classpath ("org.jetbrains.kotlin:kotlin-gradle-plugin:$kotlin_version")
		//Because this is a Kotlin plugin, you can directly use kotlin ("gradle plugin", "version number")
		//Not the one above
        classpath(kotlin("gradle-plugin", kotlinVersion))
    }
}

allprojects {
    repositories {
        google()
       // jcenter()
        mavenCentral()
    }
}

//This is built into the clean system of the original method
//task clean(type: Delete) {
//    delete rootProject.buildDir
//}

tasks{//It's about rewriting the system

	//Therefore, to get the system's own, you must be in the tasks expression!
    val clean by registering(Delete::class) {
        delete(buildDir)
    }
}

//This is custom
task("add") {
    println("config ")
    this.doFirst {
		println("doFirst")
    }
    doLast {
        val num1 = 10
        val num2 = 20
        println("name is ${ext["name"]} ,sum=${num1 + num2}")
    }
}


//Latest definition ext variable
ext {
    //name = "hqk"
    set("name","hqk")
    set("kotlinVersion","1.5.0")
}
//The latest uses the ext variable
ext["name"]
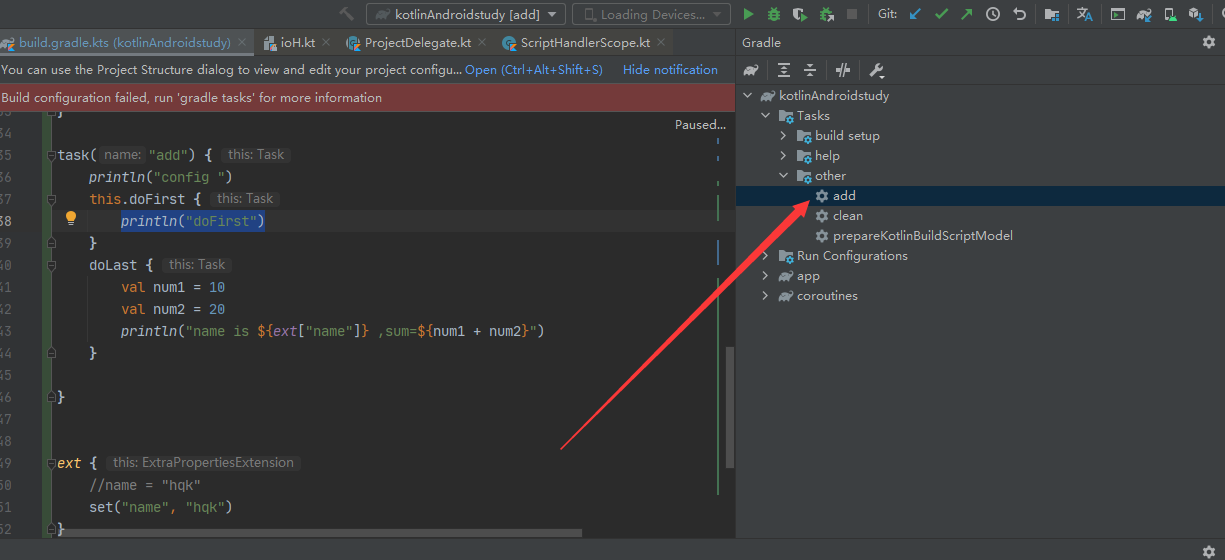
As shown in the figure
After compilation, execute the Task on the right
Operation effect:
> Configure project :
config

> Task :add
doFirst
name is hqk ,sum=30
OK, now the root build.gradle.kts has been migrated. Next!
2.2.3 migrate the build.gradle corresponding to the main model
Create the corresponding build.gradle.kts file. Of course, you can comment out the code in the original file, and then rename and suffix it!
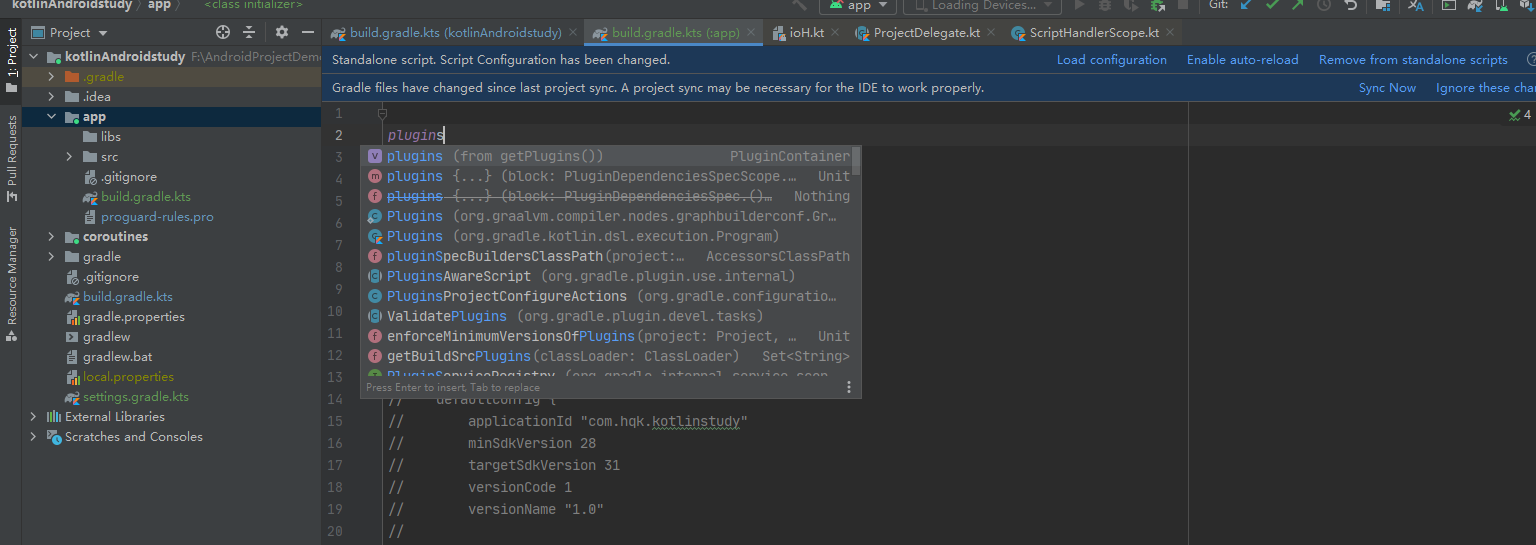
As shown in the figure
Now Kotlin DSL has been completely introduced. You can write code when prompted, and you can see the source code. It's really cool.
Groovy didn't have any tips before. You can't read the source code. Put on the pain mask directly.
I make complaints about it and go back to the subject.
build.gradle.kts corresponding to the new model
plugins{
    id("com.android.application")
    id("kotlin-android")
    id("kotlin-android-extensions")
}
First write the script plug-in, and then click Sync Now on the right. Because the content written later is in the com.android.application script plug-in, you need to import it first before writing it later!
After compilation, continue to transform:
build.gradle.kts corresponding to the new model
plugins {
    id("com.android.application")
    id("kotlin-android")
    id("kotlin-android-extensions")
}

android {
    compileSdkVersion(31)
    defaultConfig {
        applicationId = "com.hqk.kotlinstudy"
        minSdkVersion(28)
        targetSdkVersion(31)
        versionCode = 1
        versionName = "1.0"
        testInstrumentationRunner = "androidx.test.runner.AndroidJUnitRunner"
    }

    buildTypes {
//        release {
//            zipAlignEnabled true
//        }
//        debug {
//            zipAlignEnabled true
//        }

        getByName("release") {
            zipAlignEnabled(true)
            proguardFiles(
                getDefaultProguardFile("proguard-android-optimize.txt"),
                "proguard-rules.pro"
            )
        }

        getByName("debug") {
            zipAlignEnabled(true)
        }

    }

    dexOptions {
        javaMaxHeapSize = "2048m"
        jumboMode = true//Ignore check for method limit

        //Do you perform dex preprocessing on dependent libraries to make your incremental build faster
        //Because this feature may slow down your clean build
        //Therefore, on your continuous integration server, you may want to turn off this feature
        preDexLibraries = true

        //Set the maximum number of threads. When running Dex in process, the default is 4
        maxProcessCount = 8
    }

    flavorDimensions.add("channel")
    productFlavors {

        create("dev") {
            dimension = "channel"
            resConfigs("en", "xxhdpi")
            resValue("string", "bbb", "nnnn")// 'string', 'bbb', 'nnnn'
            buildConfigField("Boolean", "UM_FLAG", "false")
        }

        create("prod") {
            dimension = "channel"
            buildConfigField("Boolean", "UM_FLAG", "false")
        }

    }

    compileOptions {
        sourceCompatibility = JavaVersion.VERSION_1_8
        targetCompatibility = JavaVersion.VERSION_1_8
    }
}

dependencies {
    implementation("androidx.appcompat:appcompat:1.2.0")
    implementation ("com.google.android.material:material:1.1.0")
    implementation ("androidx.constraintlayout:constraintlayout:1.1.3")
    testImplementation ("junit:junit:4.+")
    androidTestImplementation ("androidx.test.ext:junit:1.1.1")
    androidTestImplementation ("androidx.test.espresso:espresso-core:3.2.0")
    implementation ("androidx.core:core-ktx:+")
    implementation ("org.jetbrains.kotlin:kotlin-stdlib-jdk7:1.5.0")
}


afterEvaluate {

    val task = tasks.findByName("packageDebug")
    task?.doFirst {
        println("==============inputs.files====================")
        inputs.files.forEach {
            println(it)
        }
    }

    task?.doLast {
        println("==============outputs.files====================")
        outputs.files.forEach {
            println(it)
        }
    }

}

println(rootProject.ext["name"])
Note that buildTypes and productFlavors are the only two places that have changed the most. The others can be changed to =; Or change to ("xx").
As for when to use =, when to use ("xx"), readers can look at the corresponding source code!
Of course, you can also choose to try = no, then use ("xx"). If neither of them can be used, it depends on the source code! Anyway, now you can see the source code anytime and anywhere!
OK, now try to run Build Apk to see the effect:
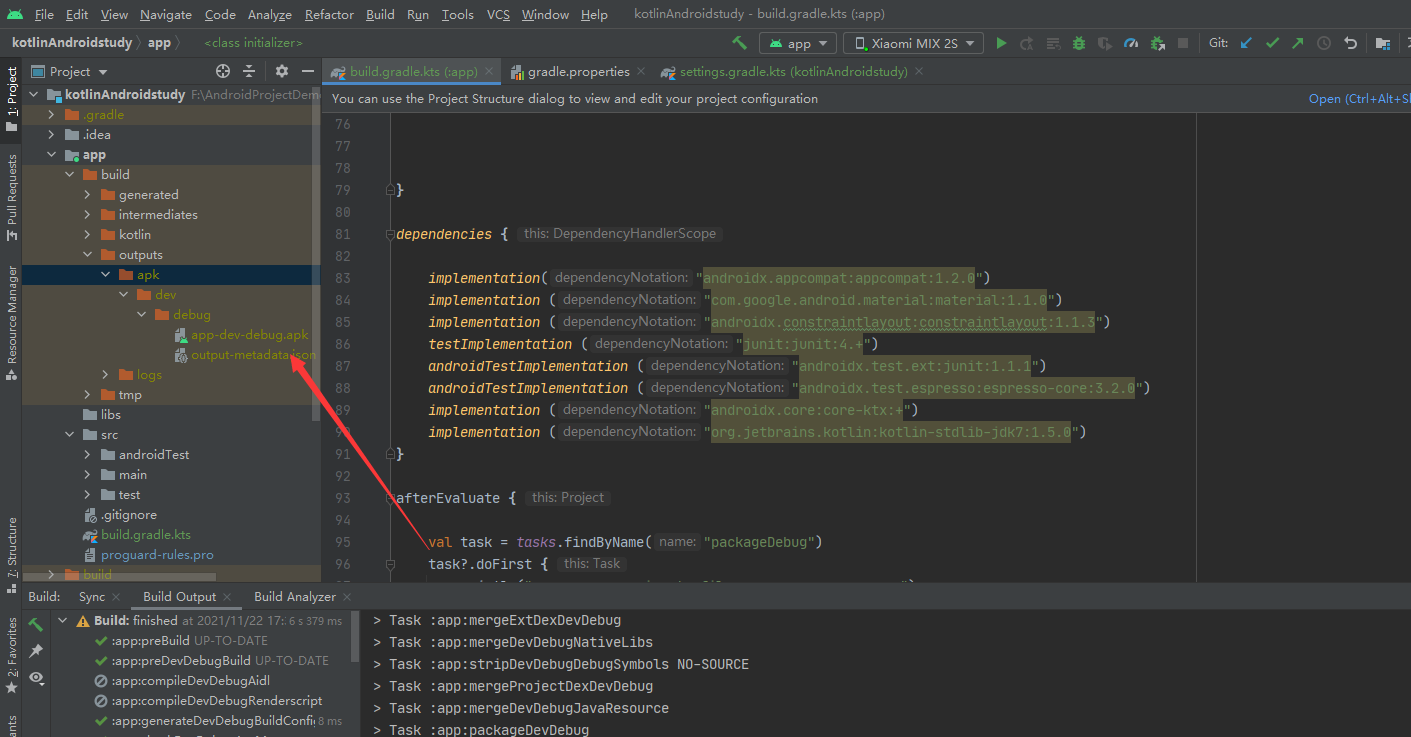
As shown in the figure
It has run perfectly and successfully! Has successfully migrated to Kotlin DSL, cool!
Finally, let's make a big summary!
3. Gradle column summary
What knowledge points do you need to master in this column?
- Groovy syntax (basic syntax, closures, etc.) and dynamic features (MOP metaprogramming)
- Gradle, running mechanism, life cycle, hook function
- The essence of the. Gradle script is the operation of the project object. (different from the gradle script, buildscript)
- Attribute extension provided by Gradle.
- Implementation of Gradle task and plug-in
- Gradle dependency management to solve dependency conflicts
- Gradle Plugin for Android:
- defaultConfig, custom product flavor and variants
- productFlavors and construction dimensions
- buildTypes,aaptOptions,dexOptions,compileOptions ...
- Various built-in construction tasks and special processing of AGP, etc
- Groovy migrating Kotlin DSL
Look at this. How much do readers know?
Ha ha ha, come here! This column tutorial is over! Of course, learning knowledge can not play its greatest role! We need to combine actual combat to refine Kotlin's knowledge points!
For example: Tinker hot update, bytecode stub and so on! Will use Gradle related knowledge points! I'll see you again in future examples!
All right, that's it! No sigh! Starting with the next article, we will open the Jetpack column!: >