1. Model Introduction
Definition of patterns
Define the framework of the algorithm in an operation and defer some steps to subclasses. It enables subclasses to redefine some specific steps of the algorithm without changing the structure of the algorithm.
Use scenarios of patterns
- When multiple subclasses have common methods and the logic is basically the same.
- Important and complex algorithms can be designed as template methods, and the peripheral details are implemented by various subclasses.
- When refactoring, the template method pattern is a frequently used pattern, which extracts the same code into the parent class and then constrains its behavior through hook functions.
2. UML class diagram
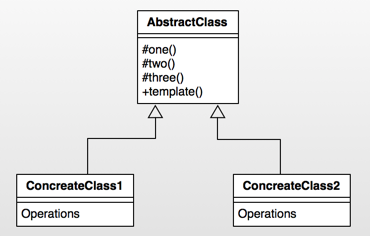
Role introduction
- AbstractClass: An abstract class that defines an algorithmic framework.
- ConcreteClass1: Specific implementation class 1;
- ConcreteClass2: Specific implementation class 2;
3. Simple Implementation of Patterns
Introduction to Simple Implementation
Template methods are actually encapsulating an algorithmic framework, just like a set of templates. Subclasses can be implemented with different algorithms, which can be replaced without modifying the framework. Now let's briefly demonstrate the template method with the action of turning on the computer. The whole process of turning on the computer is relatively stable. First, turn on the power of the computer. When the computer detects its own state, it will enter the operating system. After verifying the user, it can log on to the computer. Next, we use the template method to simulate this process.
Implementation source code
package com.dp.example.templatemethod;

/**
 * The Abstract Computer
 * @author mrsimple
 *
 */
public abstract class AbstractComputer {

    protected void powerOn() {
        System.out.println("Power on");
    }

    protected void checkHardware() {
        System.out.println("Hardware check");
    }

    protected void loadOS() {
        System.out.println("Load the operating system");
    }

    protected void login() {
        System.out.println("Xiaobai's computer is not validated and directly enters the system.");
    }

    /**
     * Start the computer method, the steps are fixed to turn on the power supply, system inspection, loading the operating system, user login. This method is final and prevents overwriting of the algorithm framework.
     */
    public final void startUp() {
        System.out.println("------ Boot up START ------");
        powerOn();
        checkHardware();
        loadOS();
        login();
        System.out.println("------ Boot up END ------");
    }
}


package com.dp.example.templatemethod;

/**
 * Nunn's computer
 *
 * @author mrsimple
 */
public class CoderComputer extends AbstractComputer {
    @Override
    protected void login() {
        System.out.println("Code farmers only need to verify the user and password.");
    }
}


package com.dp.example.templatemethod;

/**
 * Military Computer
 *
 * @author mrsimple
 */
public class MilitaryComputer extends AbstractComputer {


    @Override
    protected void checkHardware() {
        super.checkHardware();
        System.out.println("Check Hardware Firewall");
    }

    @Override
    protected void login() {
        System.out.println("Complex user authentication such as fingerprints");
    }
}


package com.dp.example.templatemethod;

public class Test {
    public static void main(String[] args) {
        AbstractComputer comp = new CoderComputer();
        comp.startUp();

        comp = new MilitaryComputer();
        comp.startUp();

    }
}
The output results are as follows:
Start START - --------------------------------------------------------------------------------------------------------------
Power on
 Hardware check
 Load the operating system
 Code farmers only need to verify the user and password.
Boot END - --------------------------------------------------------------------------------------------------------------
Start START - --------------------------------------------------------------------------------------------------------------
Power on
 Hardware check
 Check Hardware Firewall
 Load the operating system
 Complex user authentication such as fingerprints
 Boot END - --------------------------------------------------------------------------------------------------------------
From the example above, we can see that there are some fixed steps in the startUp method, which are power on, hardware checking, loading system and user login in turn. These four steps are the four processes that will not change in the process of computer booting. But the implementation of these steps may vary from user to user, so they can use different implementations. StartUp is the final method, which guarantees that the algorithm framework can not be modified, but the specific algorithm implementation can be flexibly changed. These algorithm steps in startUp can be called a routine, or template method. Therefore, the template method defines the framework of an algorithm in an operation, and defers some steps to subclasses. It enables subclasses to redefine some specific steps of the algorithm without changing the structure of the algorithm. As shown in the picture: 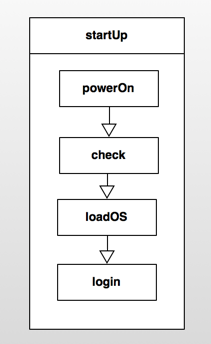
4. Pattern implementation in Android source code
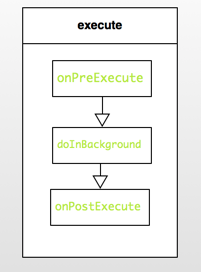
In Android, a typical class that uses template methods and is well known to us is AsyncTask. For a more detailed analysis of AsyncTask, please move to the use and source code analysis of AsyncTask in Android. We will only analyze the template method patterns used in this class.
When using AsyncTask, we all know that time-consuming methods need to be placed in doInBackground(Params... In params, if you want to do something similar to initialization before doInBackground, you can write it in the onPreExecute method. When the doInBackground method is executed, the onPostExecute method will be executed. We just need to build the AsyncTask object and then execute the method. We can see that the whole execution process is actually a framework, and the specific implementation needs subclasses to complete. And the algorithm framework it executes is fixed. When execute is called, onPreExecute,doInBackground,onPostExecute are executed in turn. Of course, you can update the progress by onProgressUpdate. We can simply understand the pattern as follows:
Now let's look at the source code. First, let's look at the entry to perform an asynchronous task, the execute method:
public final AsyncTask<Params, Progress, Result> execute(Params... params) {
        return executeOnExecutor(sDefaultExecutor, params);
    }

    public final AsyncTask<Params, Progress, Result> executeOnExecutor(Executor exec,
            Params... params) {
        if (mStatus != Status.PENDING) {
            switch (mStatus) {
                case RUNNING:
                    throw new IllegalStateException("Cannot execute task:"
                            + " the task is already running.");
                case FINISHED:
                    throw new IllegalStateException("Cannot execute task:"
                            + " the task has already been executed "
                            + "(a task can be executed only once)");
            }
        }

        mStatus = Status.RUNNING;

        onPreExecute();

        mWorker.mParams = params;
        exec.execute(mFuture);

        return this;
    }
You can see that the execute method (for final-type methods) calls the executeOnExecutor method, in which the state of the task is judged and an exception is thrown if it is not PENDING, which also explains why AsyncTask can only be executed once, so its state becomes FINISHED if the task has been executed. Looking further, we see that the onPreExecute method is first executed in the executeOnExecutor method, and that the method is executed in the UI thread. Then the params parameter is passed to the mParams field of the mWorker object, and the exec.execute(mFuture) method is executed.
What are mWorker and mFuture? In fact, mWorker only implements the Callable interface and adds a parameter array field. For information about Callable and FutureTask, please refer to Differences and Examples of Runnable, Callable, Future and FutureTask in Java Let's analyze it one by one. As we can see from the tracking code, both fields are initialized in the constructor.
public AsyncTask() {
        mWorker = new WorkerRunnable<Params, Result>() {
            public Result call() throws Exception {
                mTaskInvoked.set(true);

                Process.setThreadPriority(Process.THREAD_PRIORITY_BACKGROUND);
                return postResult(doInBackground(mParams));
            }
        };

        mFuture = new FutureTask<Result>(mWorker) {
            @Override
            protected void done() {
                try {
                    final Result result = get();

                    postResultIfNotInvoked(result);
                } catch (InterruptedException e) {
                    android.util.Log.w(LOG_TAG, e);
                } catch (ExecutionException e) {
                    throw new RuntimeException("An error occured while executing doInBackground()",
                            e.getCause());
                } catch (CancellationException e) {
                    postResultIfNotInvoked(null);
                } catch (Throwable t) {
                    throw new RuntimeException("An error occured while executing "
                            + "doInBackground()", t);
                }
            }
        };
    }
Simply put, mFuture wraps the mWorker object, calls the call method of the mWorker object, and returns it to the caller. For more detailed analysis of AsyncTask, please move on The Use and Source Code Analysis of AsyncTask in Android We will only analyze the template method pattern here. In short, the call method is called in the subthread, and the doInBackground method is called in the call method, so the doInBackground is executed in the subthread. The doInBackground returns the result and is eventually delivered to the UI thread through postResult. Let's look at the implementation of postResult:
private Result postResult(Result result) {
        Message message = sHandler.obtainMessage(MESSAGE_POST_RESULT,
                new AsyncTaskResult<Result>(this, result));
        message.sendToTarget();
        return result;
    }

    private static class InternalHandler extends Handler {
        @SuppressWarnings({"unchecked", "RawUseOfParameterizedType"})
        @Override
        public void handleMessage(Message msg) {
            AsyncTaskResult result = (AsyncTaskResult) msg.obj;
            switch (msg.what) {
                case MESSAGE_POST_RESULT:
                    // There is only one result
                    result.mTask.finish(result.mData[0]);
                    break;
                case MESSAGE_POST_PROGRESS:
                    result.mTask.onProgressUpdate(result.mData);
                    break;
            }
        }
    }


    private void finish(Result result) {
        if (isCancelled()) {
            onCancelled(result);
        } else {
            onPostExecute(result);
        }
        mStatus = Status.FINISHED;
    }
As you can see, postResult is to send a message (msg.what == MESSAGE_POST_RESULT) to sHandler, whose type is InternalHandler, which calls the result.mTask.finish(result.mData[0]) method when it receives a message of MESSAGE_POST_RESULT type. We can see that result is of AsyncTaskResult type with the following source code:
    @SuppressWarnings({"RawUseOfParameterizedType"})
    private static class AsyncTaskResult<Data> {
        final AsyncTask mTask;
        final Data[] mData;

        AsyncTaskResult(AsyncTask task, Data... data) {
            mTask = task;
            mData = data;
        }
    }
You can see that mTask is the AsyncTask object, and when you call the finish method of the AsyncTask object, you call onPostExecute, which completes the whole execution process. In short, the execute method encapsulates the onPreExecute, doInBackground, onPostExecute framework. Users can override these methods according to their own needs, making it easy for users to use asynchronous tasks to complete time-consuming operations, and also to update UI threads through onPostExecute.
Another good example of template method is Activity's declarative periodic function, such as Activity's programmed execution templates from onCreate, onStart, onResume, which is an activity's template method.
5. Building the BaseActivity of the whole application
Next, let's see how we can use it in development. Wait, I'm going to report you --> What's wrong? You copy others. Yes? Has it been discovered? I am not plagiarizing, I just take out the good things and share them with you. I would like to recommend them to you. https://github.com/simple-android-framework-exchange/android_design_patterns_analysis#schedule There are many design patterns in it. It's better for you to buy a book to read such a good thing or to support it. Hope you can come up with some better ones (although I'm looking at electronic documents). Speaking of this, I am very grateful to all of you for not much reward, but I really appreciate it in my heart. I hope more good articles can be published in the future.
Look up a lot of template design patterns on the internet, which are just a brief introduction of the concept and then write a small thing, such as a programmer's day, bank business and so on. I recently shaved my head, because I always scratch my hair when I am idle at work, and I always wonder where I should use it. Where can I use it?... So I just shaved my head.
Because we still stay in the system architecture part of the content segment sub-project, and every project must be inseparable from Activity, the onCreate() method of Activity is basically: setting layout - > initializing header - > initializing interface - > initializing data. If we follow such a process, is it just in line with our template design pattern?
/**
 * Created by Darren on 2017/2/8.
 * Email: 240336124@qq.com
 * Description: BaseActivity for the whole application
 */
public abstract class BaseActivity extends AppCompatActivity {

    @Override
    protected void onCreate(@Nullable Bundle savedInstanceState) {
        super.onCreate(savedInstanceState);
        setContentView();
        initTitle();
        initView();
        initData();
    }

    // Initialization data
    protected abstract void initData();

    // Initialization interface
    protected abstract void initView();

    // Setting Interface View
    protected abstract void setContentView();

    // Initialization header
    protected abstract void initTitle();
}
Every time we build a new Activity, instead of directly inheriting from AppCompatActivity, our own BaseActivity will automatically ask us to copy several abstract methods in BaseActivity, in which we write the corresponding code.
/**
 * Created by Darren on 2017/2/8.
 * Email: 240336124@qq.com
 * Description: Main Activity
 */
public class MainActivity extends BaseActivity {

    @Override
    protected void initData() {

    }

    @Override
    protected void initView() {

    }

    @Override
    protected void setContentView() {
        setContentView(R.layout.activity_main);
    }

    @Override
    protected void initTitle() {

    }
}
I'm going to expand BaseActivity. Some common processes and functions can actually be put in BaseActivity, such as those shared several times before. Create an IOC Annotation Framework by Yourself Start Activity...
/**
 * Created by Darren on 2017/2/8.
 * Email: 240336124@qq.com
 * Description: BaseActivity for the whole application
 */
public abstract class BaseActivity extends AppCompatActivity {

    @Override
    protected void onCreate(@Nullable Bundle savedInstanceState) {
        super.onCreate(savedInstanceState);
        setContentView();
        // IOC Annotation Injection
        ViewUtils.inject(this);
        initTitle();
        initView();
        initData();
    }

    // Initialization data
    protected abstract void initData();

    // Initialization interface
    protected abstract void initView();

    // Setting Interface View
    protected abstract void setContentView();

    // Initialization header
    protected abstract void initTitle();


    /**
     * Start an Activity
     * @param activity  Activity lass that needs to be started
     */
    public void startActivity(Class<? extends Activity> activity) {
        Intent intent = new Intent(this,activity);
        startActivity(intent);
    }
}
Next, let's talk about the benefits. The benefits of template design patterns don't go too far online. We just talk about the benefits of doing so in real development.
1. In the actual development process, we are often not alone. If we write a lot of things directly in onCreate(), it is obviously not good. But if we write some methods, then each member will write different methods. Besides, some buddies estimate that they have not passed CET-4, and all the words are written incorrectly.
2. Direct inheritance from BaseActivity will automatically prompt coverage methods, which is more conducive to development or code reading. Each method will do its part and only do what it should do, and stop doing nothing.
3. We can put the general process or some methods into BaseActivity, which saves code and is convenient, but not a mess of piles, there will be a lot of details can be seen in the video explanation;
4. We certainly need BaseActivity in the logical layer, which is beneficial to later version iteration, level extraction and code refactoring.
All sharing outlines: The Way to Advance Android in 2017
Video address: 8 p.m. Sunday night
In the next installment, we'll show you how to capture flip-back information and upload exceptions to the server to cooperate with hot fixes.