LZ-Says: Today, I suddenly saw a blog article that I wrote before was recommended to the homepage. I was very happy. Unfortunately, I was busy at that time and didn't come to see it urgently. But I still thank you from my heart. Thank you for your approval.~
Let's play Android together.~
Preface
Today, let's talk about maps.
At present, the better third-party maps are as follows:
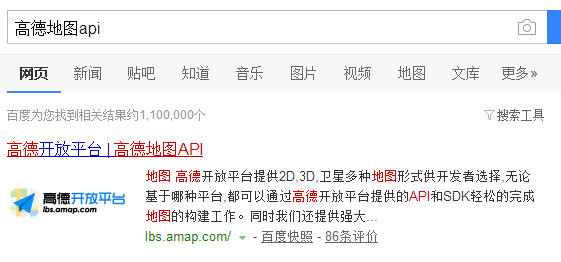
Baidu Map API Address: http://lbsyun.baidu.com/ ;
Gaud Map API Address: http://lbs.amap.com/ ;
Tencent Map API Address: http://lbs.qq.com/;
Google Baba's Map API address: http://maps.googleapis.com/.
LZ is uninformed. For the time being, I only know these four kinds. If there are other good maps, you are welcome to provide them. LZ also improves the blog posts better.~
After a simple search on the Internet, the following conclusions can be easily drawn (only LZ personally see, welcome to face ~):___________
- Baidu Map, full-featured, cattle break, helpless map update is not very timely;
- Golden Map, focusing on maps for more than n years, development documents and follow-up support are better. The built-in maps of Apple mobile phone are also Golden Map (Dagolden 666 ~);
- Tencent Map, not much used;
- Google Baba Map, seemingly need to turn over the wall, more tired~
So, after a brief understanding, let's have a pleasant trip to Golden Map.~
Open up the Exploratory Journey of Golden Map
I. Check the Official Strategy
This is very simple. We found the Gaud Map API and walked around according to the official.
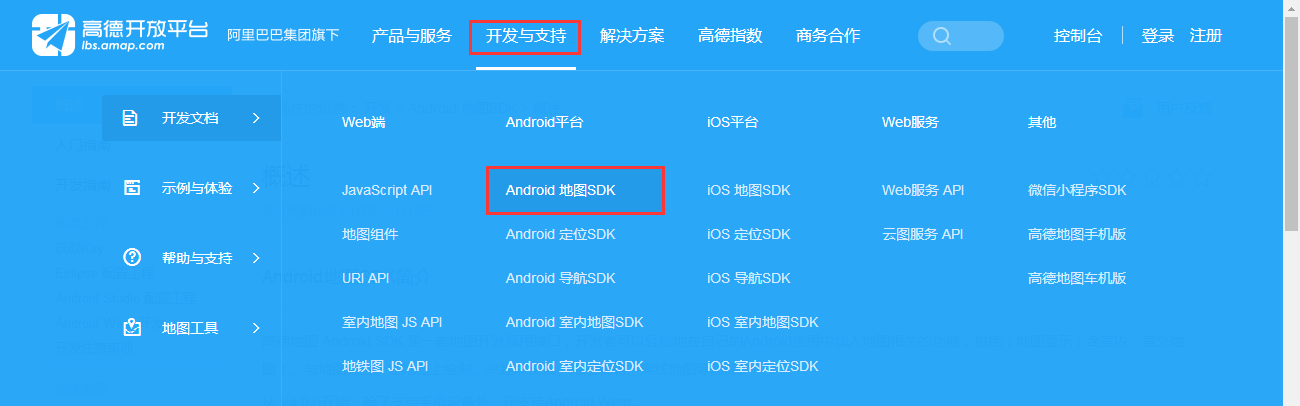
1. Baidu Search Gaode Map api
Click Enter, Select "Development and Support" and click "Android Map SDK"
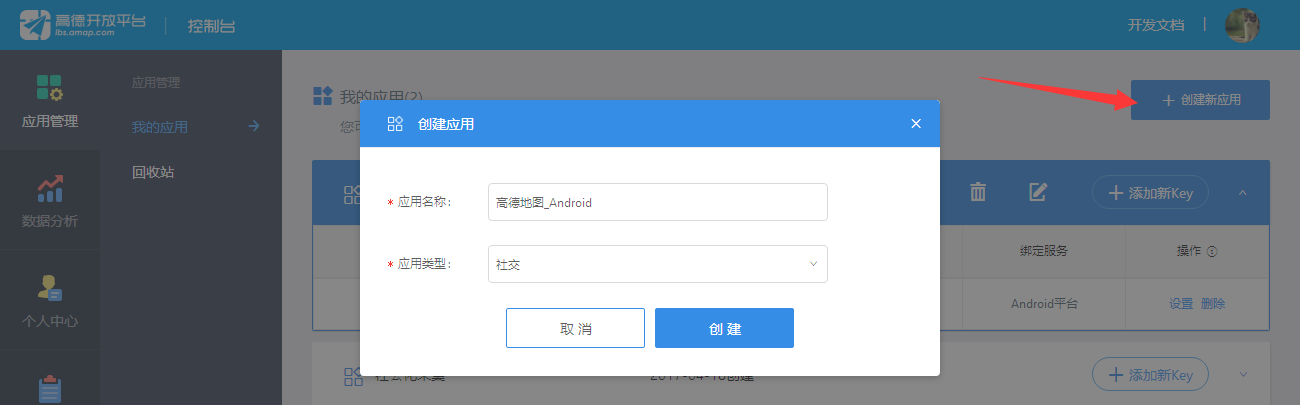
2. Getting Maps and Developing Key
First of all, we need to register to be a Golden Map Developer, which is not explained here.
Next, create the application in the console, as shown below:
Then click Create Key, Gaud hint gives a very comprehensive, you can follow the requirements.
For getting SHA1, you can refer to LZ's previous blog posts: Android Studio Gets SHA1 Value
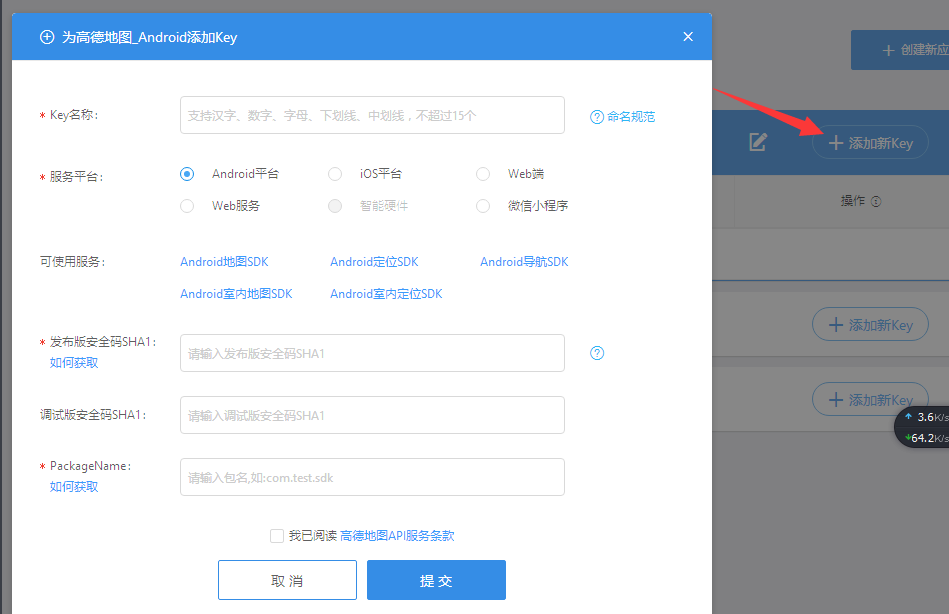
Get the key, we have a rough understanding of the relevant knowledge provided by the official.
3. Understanding official dry goods
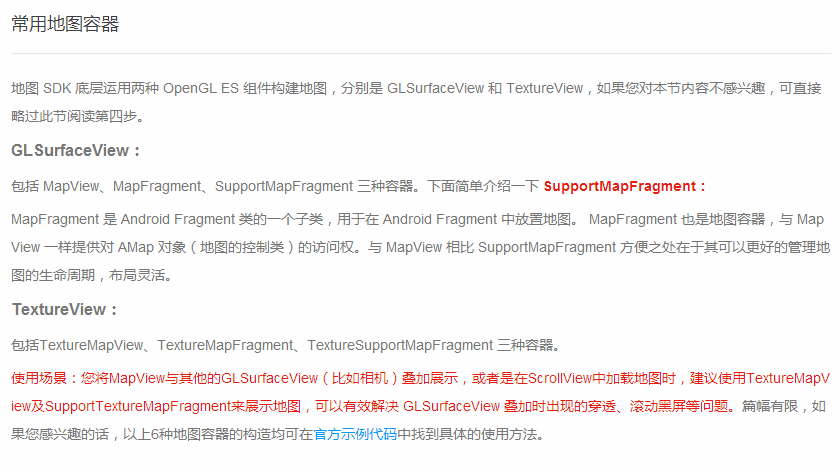
Google officially divides map-related SDK s into five categories, as follows:
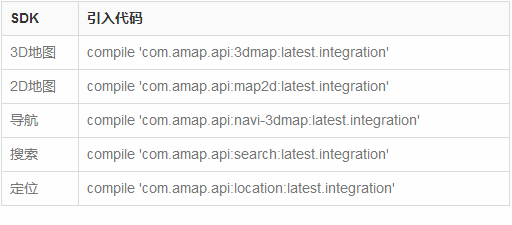
Here, you may wonder, 2-D maps, 3-D maps, what the hell is this? Don't worry, here's the official explanation.
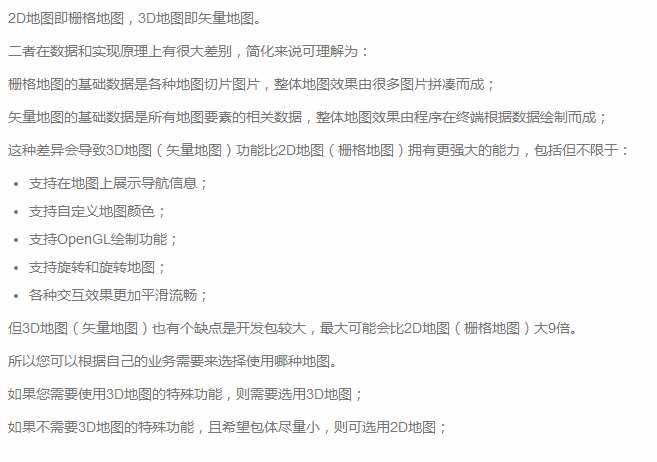
LZ chooses 3D map decisively, don't ask why, just like new!!!
4. Download SDK
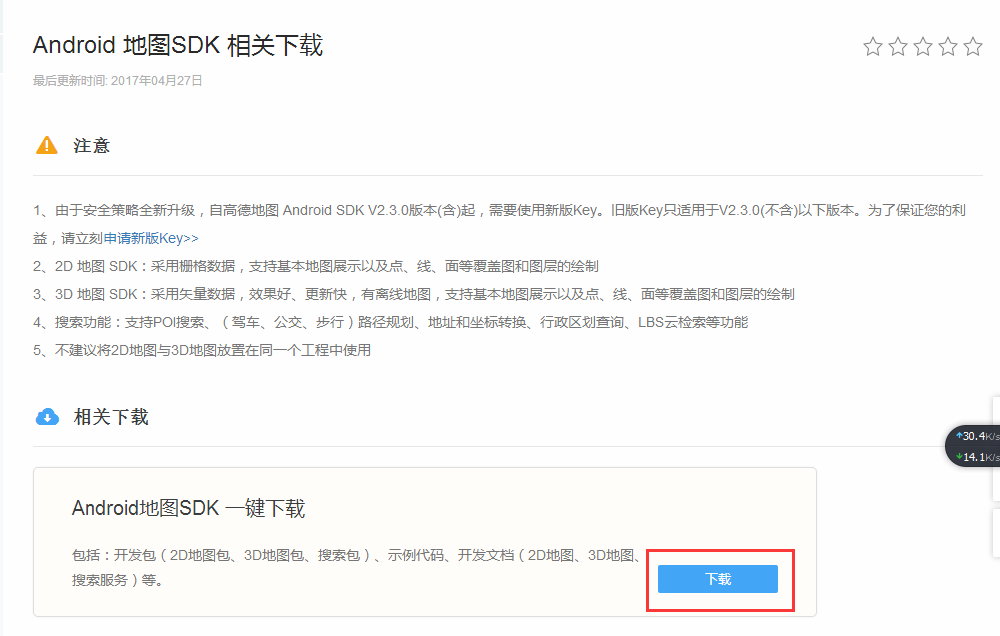
After the download is completed, you need to apply for key on Goethe when running, otherwise you can't run!
It's better to download all of the SDK and have a look at it. It won't take much time.
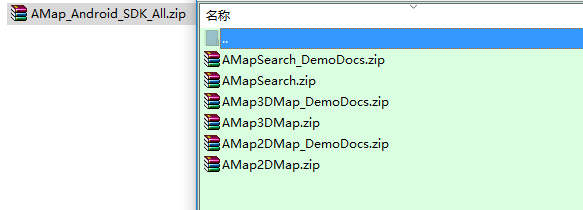
The following figure is a brief introduction. We develop it according to our needs. There are no more explanations here.
It's almost enough to know. Here's the way to code.~
Second, coding is a long way to go, and I will seek it from top to bottom.
Another person in the evening alone, no way, agreed to others. Man, at home, deserves his parents; at home, deserves his friends.
Who doesn't want to come back and cook, have a drink, take a break, watch TV, eat and stroll. Unfortunately. Anyway, what happened in that year is a memory. Without the past, where will the future come from? May we grow together!
Let's start with a small goal to show the Golden Map.
The first step is to configure Android Manifest. XML and add basic permissions
    <! - Project privilege module (the purpose of writing this here is to facilitate, to distinguish different modules in privilege, to facilitate the maintenance and management of other people in the later period)-->
    <! - Allows programs to open network sockets - >.
    <uses-permission android:name="android.permission.INTERNET"/>
    <! - Allows programs to set write permissions for bui lt-in sd cards
    <uses-permission android:name="android.permission.WRITE_EXTERNAL_STORAGE"/>
    <! - Allows programs to access network status - >
    <uses-permission android:name="android.permission.ACCESS_NETWORK_STATE"/>
    <! - Allow programs to access WiFi network information
    <uses-permission android:name="android.permission.ACCESS_WIFI_STATE"/>
    <! - Allow programs to read and write status and identity of mobile phones - >
    <uses-permission android:name="android.permission.READ_PHONE_STATE"/>
    <! - Allow programs to access CellID or WiFi hotspots to get rough locations - >
    <uses-permission android:name="android.permission.ACCESS_COARSE_LOCATION"/>
Setting up Golden Key
        <!-- Third Party of Project key Configuration module -->
        <!-- Golden Map key -->
        <meta-data
            android:name="com.amap.api.v2.apikey"
            android:value="98e3f4440af277a2f390b724602168f7(Here are the individual applications key that will do)"/>
The second step is to add so libraries for maps to the project and introduce development kits
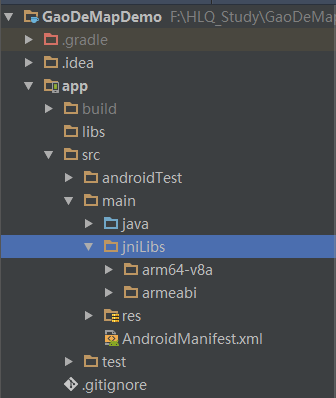
First, add so file, create a new jniLibs directory under src/main / directory, and put the file into it. LZ is only compatible with armeabi and arm64-v8a.
For simple knowledge of armeabi, you can refer to the blog summary before LZ:
After the addition is completed, the following is shown:
Next, configure dependencies. Since our first goal is to display the map, we need to add the following line of address to the build.gradle of the project.
compile 'com.amap.api:3dmap:latest.integration'
As follows:
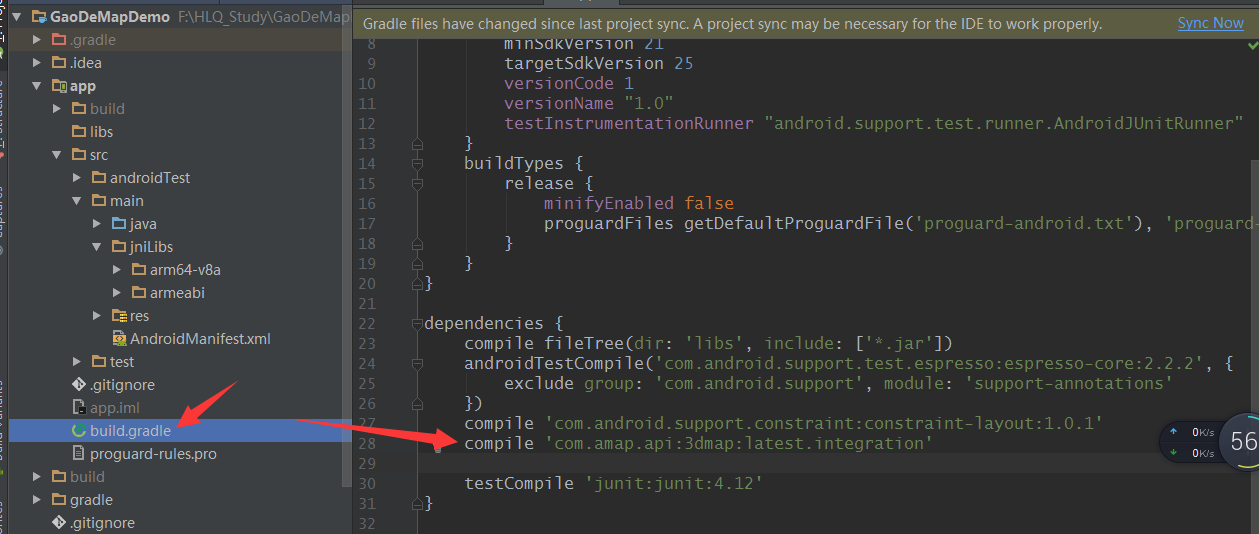
Then click sync now on the top right, and the Universal Dead or Lost will download the relevant packages in person.~
The third step is to initialize the map container
In our layout, add map controls
<?xml version="1.0" encoding="utf-8"?>
<LinearLayout
    xmlns:android="http://schemas.android.com/apk/res/android"
    xmlns:tools="http://schemas.android.com/tools"
    android:layout_width="match_parent"
    android:layout_height="match_parent"
    tools:context="cn.hlq.gaodemapdemo.map.GaoDeLocationActivity">

    <com.amap.api.maps.MapView
        android:id="@+id/id_gaode_location_map"
        android:layout_width="match_parent"
        android:layout_height="match_parent"/>

</LinearLayout>
Activity Manages Map Life Cycle
package cn.hlq.gaodemapdemo.map;

import android.app.Activity;
import android.os.Bundle;

import com.amap.api.maps.AMap;
import com.amap.api.maps.MapView;

import cn.hlq.gaodemapdemo.R;

/**
 * create by heliquan at 2017 May 4, 2003 23:26:59
 */
public class GaoDeLocationActivity extends Activity {

    private MapView mapView;

    private AMap aMap;

    @Override
    protected void onResume() {
        super.onResume();
        // Redraw Load Map
        mapView.onResume();
    }

    @Override
    protected void onCreate(Bundle savedInstanceState) {
        super.onCreate(savedInstanceState);
        setContentView(R.layout.activity_gao_de_location);
        initView();
        // Creating Maps
        mapView.onCreate(savedInstanceState);
    }

    @Override
    protected void onPause() {
        super.onPause();
        // Pause Mapping
        mapView.onPause();
    }

    @Override
    protected void onDestroy() {
        super.onDestroy();
        // Destroy maps
        mapView.onDestroy();
    }

    /**
     * Rewrite this method to execute mMapView.onSaveInstanceState (outState) when activity executes onSaveInstanceState to save the current state of the map
     *
     * @param outState
     */
    @Override
    protected void onSaveInstanceState(Bundle outState) {
        super.onSaveInstanceState(outState);
        mapView.onSaveInstanceState(outState);
    }

    private void initView() {
        // Instantiated Map Control
        mapView = (MapView) findViewById(R.id.id_gaode_location_map);
    }

}
Here is also a simple expansion of small knowledge for you.
Step 4: Display the map
    private void initView() {
        // Instantiated Map Control
        mapView = (MapView) findViewById(R.id.id_gaode_location_map);
        if (aMap == null) {
            // Display maps
            aMap = mapView.getMap();
        }
    }
Step 5: Look at our results
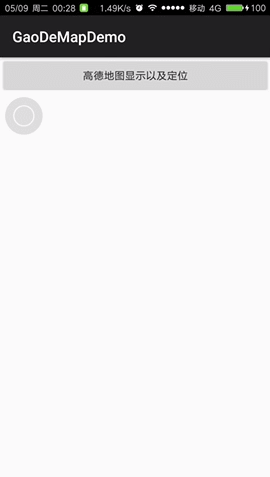
At this point, the map shows that we have finished.~
Next, start the positioning journey~
Next, there is a small goal to achieve Golden Map positioning.
The first step is to introduce location dependency~
compile 'com.amap.api:location:latest.integration'
The second step is to add Gaud Map Location Service
    <!-- project Service Modular -->
    <!-- GaoDeLocationService -->
    <service android:name="com.amap.api.location.APSService"/>
The third step is to implement three methods: location monitoring and rewriting.
implements LocationSource, AMapLocationListener
LZ pastes the code directly here, and the relevant comments are very clear ~!
    @TargetApi(Build.VERSION_CODES.N)
    @Override
    public void onLocationChanged(AMapLocation aMapLocation) {
        // Parsing AMapLocation Objects
        // Judging that the AMapLocation object is not empty, the location is successful when the location error code type is 0
        if (aMapLocation != null) {
            if (aMapLocation.getErrorCode() == 0) {
                aMapLocation.getLocationType(); // Get the current source of location results, such as network location results, as detailed in the location type table
                aMapLocation.getLatitude(); // Acquire latitude
                aMapLocation.getLongitude(); // Acquire longitude
                aMapLocation.getAccuracy(); // Acquisition of accuracy information
                aMapLocation.getAddress(); // Address. If isNeedAddress is set to false in option, there will be no result. There will be address information in the result of network positioning. GPS positioning does not return address information.
                aMapLocation.getCountry(); // National Information
                aMapLocation.getProvince(); // Provincial Information
                aMapLocation.getCity(); // Urban Information
                aMapLocation.getDistrict(); // Urban Information
                aMapLocation.getStreet(); // Street Information
                aMapLocation.getStreetNum(); // Street number information
                aMapLocation.getCityCode(); // City Coding
                aMapLocation.getAdCode(); // Area coding
                aMapLocation.getAoiName(); // Getting AOI information of the current location point
                aMapLocation.getBuildingId(); // Building Id for Current Indoor Location
                aMapLocation.getFloor(); // Getting the Floor of Current Indoor Location
                aMapLocation.getGpsAccuracyStatus(); // Get the current status of GPS
                // Acquire location time
                SimpleDateFormat df = new SimpleDateFormat("yyyy-MM-dd HH:mm:ss");
                Date date = new Date(aMapLocation.getTime());
                df.format(date);
                // Setting Scale Level
                aMap.moveCamera(CameraUpdateFactory.zoomTo(17));
                // Move the map to the location point
                aMap.moveCamera(CameraUpdateFactory.changeLatLng(new LatLng(aMapLocation.getLatitude(), aMapLocation.getLongitude())));
                // Clicking on the location button can move the center of the map to the location point.
                mListener.onLocationChanged(aMapLocation);
            } else {
                // ErrCode (error code) information can be used to determine the cause of the failure when locating the failure. ErInfo is the error information. See the error code table for details.
                Log.e("HLQ_Struggle", "location Error, ErrCode:"
                        + aMapLocation.getErrorCode() + ", errInfo:"
                        + aMapLocation.getErrorInfo());
            }
        }
    }

    @Override
    public void activate(OnLocationChangedListener onLocationChangedListener) {
        mListener = onLocationChangedListener;
    }

    @Override
    public void deactivate() {
        mListener = null;
    }
Step 4: Initialize Goethe Map and Basic Configuration and Open Location
        aMap.getUiSettings().setZoomControlsEnabled(false);
        // Set whether the default map pointer is displayed
        aMap.getUiSettings().setCompassEnabled(true);
        // Setting up Location Monitor
        aMap.setLocationSource(this);
        // Set whether the default location button is displayed
        aMap.getUiSettings().setMyLocationButtonEnabled(true);
        // Set totrueRepresents the display positioning layer and can trigger positioning.falseHidden Location Layer does not trigger Location. The default isfalse
        aMap.setMyLocationEnabled(true);
        aMap.setMyLocationType(AMap.LOCATION_TYPE_LOCATE);
Initialize Goethe Map and Open Location
    /**
     * Initialization of Goethe Map
     */
    public void initGaoDeMap() {
        // Initial positioning
        mLocationClient = new AMapLocationClient(getApplicationContext());
        // Setting up Callback Monitor for Location of Golden Map
        mLocationClient.setLocationListener(this);
        // Initialize the AMapLocation ClientOption object
        mLocationOption = new AMapLocationClientOption();
        // High-precision positioning mode: will use both network positioning and GPS positioning, priority return to the highest accuracy of positioning results, and the corresponding address description information
        // Set the location mode to AMapLocation Mode. Hight_Accuracy, high precision mode
        mLocationOption.setLocationMode(AMapLocationClientOption.AMapLocationMode.Hight_Accuracy);
        // Low power positioning mode: not using GPS and other sensors, only using network positioning (Wi-Fi and base station positioning);
        //Set the location mode to AMapLocation Mode. Battery_Saving, low power mode.
//        mLocationOption.setLocationMode(AMapLocationClientOption.AMapLocationMode.Battery_Saving);
        // Only use device positioning mode: do not need to connect to the network, only use GPS for positioning, this mode does not support indoor environment positioning, since v2.9.0 version supports return address description information.
        // Set the location mode to AMapLocation Mode. Device_Sensors, device mode only.
//        mLocationOption.setLocationMode(AMapLocationClientOption.AMapLocationMode.Device_Sensors);
        // SDK adopts continuous positioning mode by default with a time interval of 2000 Ms.
        // Set the location interval, unit milliseconds, default to 2000 ms, minimum 1000ms.
        mLocationOption.setInterval(3000);
        // Whether you need to return address description while setting location
        //Set whether to return address information (default return address information)
        mLocationOption.setNeedAddress(true);
        // Set whether to force refresh WIFI, default to force refresh. Each active refresh of WIFI module will improve the positioning accuracy of WIFI, but the corresponding will pay more power consumption.
        // Set whether to force refresh WIFI, default to true, force refresh.
        mLocationOption.setWifiActiveScan(true);
        // Set whether to allow the simulation software Mock location results, mostly for the simulation of GPS positioning results, default to false, not allowed to simulate location.
        // Set whether the simulated location is allowed, default to false, not allowed to simulate location
        mLocationOption.setMockEnable(false);
        // Set the location request timeout time by default of 30 seconds
        // The unit is milliseconds. The default is 30000 milliseconds. It is recommended that the timeout time should not be less than 8000 milliseconds.
        mLocationOption.setHttpTimeOut(50000);
        // Set whether to turn on location caching mechanism
        // The cache mechanism is turned on by default and can be turned off through the following interfaces.
        // When the location buffer function is enabled, the results of network location in high-precision mode and low-power mode will generate local cache, regardless of single or continuous location. GPS positioning results will not be cached.
        // Turn off the caching mechanism
        mLocationOption.setLocationCacheEnable(false);
        // Set whether to locate only once, default to false
        mLocationOption.setOnceLocation(false);
        // Setting Location Parameters for a Located Client Object
        mLocationClient.setLocationOption(mLocationOption);
        // Start the Map Location of Goethe
        mLocationClient.startLocation();
    }
After a while, let's see the effect now.~
Well, at this point, you may ask, how do you move elsewhere or to the current location? Urgently, let's see what caused this problem. Of course, LZ has limited ability, so it can only speculate simply. Correct points are welcome.~
Hey, how do sliding maps always get to the origin?
With this in mind, let's review the previous code as follows:
- We set the Golden Map for continuous precision positioning, and when we call back, we will move a point according to the latitude and longitude currently obtained. At this time, do you know where to do things easily and quickly to solve this problem?
The solutions are as follows:
                if(isFirstLocation){
                    // Setting Scale Level
                    aMap.moveCamera(CameraUpdateFactory.zoomTo(17));
                    // Move the map to the location point
                    aMap.moveCamera(CameraUpdateFactory.changeLatLng(new LatLng(aMapLocation.getLatitude(), aMapLocation.getLongitude())));
                    // Clicking on the location button can move the center of the map to the location point.
                    mListener.onLocationChanged(aMapLocation);
                    isFirstLocation=false;
                }
At this point, let's run it again to see how it works.~
Concluding remarks
Up to now, we have realized the displaying and positioning of Golden Map, as well as the episodes appearing in the process of realizing the positioning. I believe you can see that we have mastered the displaying and positioning of Golden Map.
GitHub address is attached below.
It took a long time for this article to be finished today. I've been a little restless lately.~
Thank you for watching.~