Plug-in Development Series
- Android Studio/Intellij IDEA Plug-in Development 1 Plug-in Introduction and Environment Construction
- Action System for Android Studio/Intellij IDEA Plug-in Development 2
Action System contains the most basic Action, as well as Action Group.
Action
What is Action
Our own code logic, executed in the IDE operating environment, our code will become its "plug-in", but how can we let the IDE execute our code logic? Intellij provides a very basic component, Action.
Action, literal translation is action, is the most common component we see, but also the most common code execution entrance.
Behind all menus and toolbars is an Action.
So I usually think of it as OnClickListener in Android. Similarly, to customize your own actions, you simply inherit the An Action class and place the logic in the actionPerformed method.
The simplest Action
public class SimpleAction extends AnAction {

    @Override
    public void actionPerformed(AnActionEvent e) {
        // TODO: insert action logic here
        System.out.println("This is an action");
    }
}
As mentioned in the previous article, Actions need to be registered in plugin.xml, so to get this Action running, you need to add the following to the actions tag of plugin.xml
<action id="MyPlugin.SimpleAction" class="SimpleAction" text="logAction" description="just log to console">
      <add-to-group group-id="HelpMenu" anchor="first"/>
</action>
Explain the meaning of the action tag's attributes
- id: The unique identity of this Action. All IDS cannot be repeated. IDE distinguishes different actions by id.
- class: class of this Action
- text: text that the Action displays on a menu or toolbar
- description: description of this Action
Then compile and run:
- If you don't click the run button with gradle
- Using gradle
- Click the tool window of gradle, find Tasks / intellij / runIdea, and double-click runIdea
- The command line executes gradle run Idea (gradle must be in your PATH)
gradle will be used by default later
If all goes well, a new IDE instance will run, depending on the version you specify in build.gradle
Now, the first entry in the Help menu bar is our Action
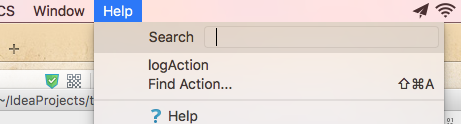
Click logAction to see the output in the console (we compiled the IDE instance of the plug-in)

New Action Wizard
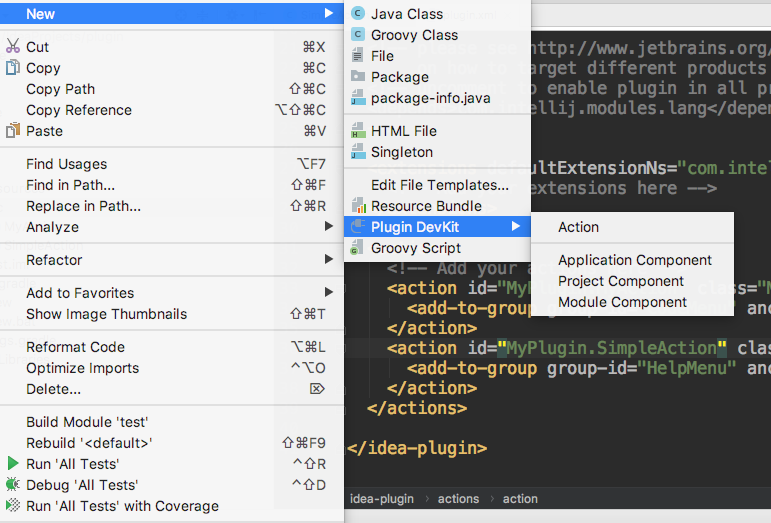
How could Intellij's smart engineers be indifferent to the trouble of building a new Action?
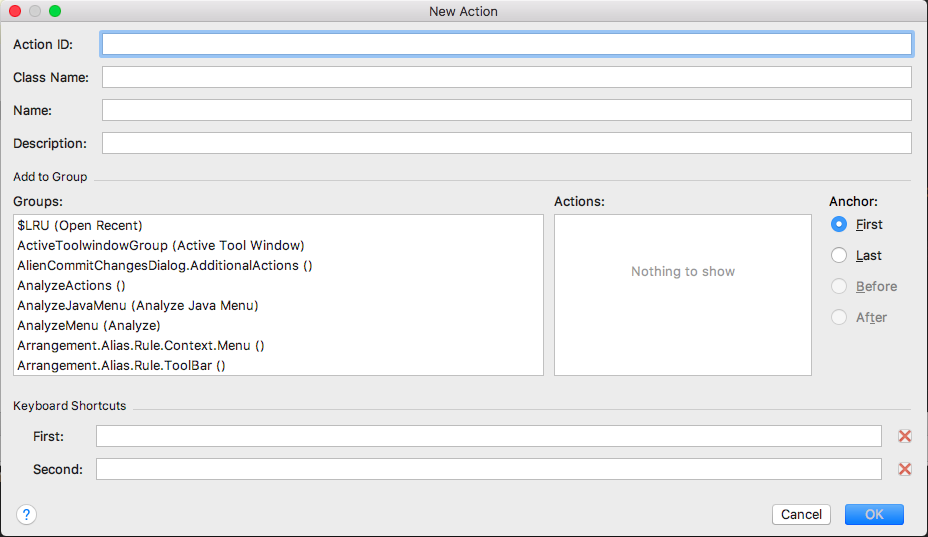
Plugin Dev plug-in provides a new Action wizard. It's as convenient and simple as new Activity. Fill in the relevant information, and the Action class and plugin.xml will help us build it.
Update the status of Action
In addition to actionPerformed, it is also noteworthy that the update method is used in Action. The system can get the status of Action by calling the update method of Action, so as to decide how to display Action on menu.
@Override
public void update(AnActionEvent e) {
    Editor editor = e.getData(PlatformDataKeys.EDITOR);
    if (editor != null) {
        int lineCount = editor.getDocument().getLineCount();
        if (lineCount > 20) {
            e.getPresentation().setEnabled(true);
        } else {
            e.getPresentation().setEnabled(false);
        }
    }
}
The code block above means that the current editor opens more than 20 lines of files to make Action available, otherwise it will be gray if Action is not available.
Presentation also has a series of ways to change the "appearance" of Action:
presentation.setDescription();
presentation.setIcon();
presentation.setText();
presentation.setVisible();
Action Group
Action Group contains one or more Action Item s, each of which belongs to an Action Group. Action Group can be added to the top level of the menu bar or to other Action Groups. There are many default Action Groups. In addition to File, Edit, View and so on, there are many Action Groups defined by Intellij. As shown in the New Action wizard above, you can see many Action Groups by dropping down the scroll box.
Now, manually define an Action Group
<actions>
    <group id="com.example.actiongroup" text="Action Group" description="this is a action group">
    </group>
</actions>
The < group > tag should also be wrapped in the actions tag. id is the id of the group to be added when registering action. Now add action group to the group of com. example. Action Group
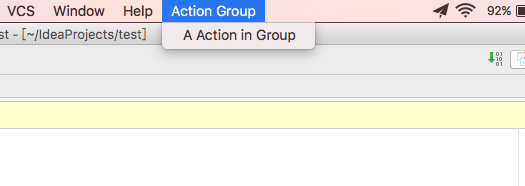
<group id="com.example.actiongroup" text="Action Group" description="this is a action group">
    <action class="GroupAction" id="com.example.actiongroup.groupaction" text="A Action in Group" />
    <add-to-group group-id="MainMenu"/>
</group>
By default, <action> is added to the group if it is written directly in <group>. Similarly, the group must be added to the existing group before it can be displayed in the menu. Here we add the main menu, that is, the top menu. The effect is as follows.
Submenu Expansion
Now add the secondary menu as follows
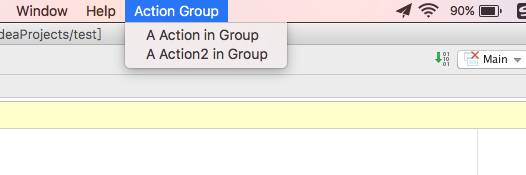
<group id="com.example.actiongroup" text="Action Group" description="this is a action group">
<action class="GroupAction" id="com.example.actiongroup.groupaction" text="A Action in Group"/>
<group id="com.example.subgroup" text="Sub Group">
<action class="GroupAction2" id="com.example.actiongroup.groupaction2" text="A Action2 in Group"/>
</group>
<add-to-group group-id="MainMenu"/>
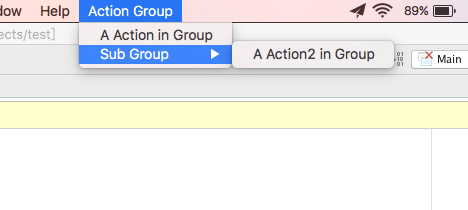
</group>But the result is this.
The result is different from our intuition!! To do what we want, like the sub-menu expansion, we also need to set a popup property, which can be broken by setting the popup property of the subgroup to true.
Adding separators
It's easy to add separators for menu items with similar functions, just add <separator/> labels under <group>.
Quote Action
<group id="com.example.actiongroup" text="Action Group" description="this is a action group">
    <action class="GroupAction" id="com.example.actiongroup.groupaction" text="A Action in Group"/>

    <group id="com.example.subgroup" text="Sub Group" popup="true">
        <action class="GroupAction2" id="com.example.actiongroup.groupaction2" text="A Action2 in Group"/>
    </group>

    <separator/>
    <reference ref="$Cut"/>
    <add-to-group group-id="MainMenu"/>
</group>
<reference> is used to refer to existing Actions, including system-defined and plug-in-defined Actions, with clipped Actions added as shown above
Peer Action is not quotable
Action defined at the same level as <reference> cannot be referenced. GroupAction is not referenced in the block above, but GroupAction 2 can be referenced.
Update Action Group status
Action Group also updates its status through the update method, but first assign a class to the Action Group, which inherits the DefaultAction Group.
<group id="com.example.actiongroup" class="MyActionGroup" text="Action Group" description="this is a action group">
<action class="GroupAction" id="com.example.actiongroup.groupaction" text="A Action in Group"/>
<group id="com.example.subgroup" text="Sub Group" popup="true">
<action class="GroupAction2" id="com.example.actiongroup.groupaction2" text="A Action2 in Group"/>
</group>
<separator/>
<reference ref="$Cut"/>
<reference ref="com.example.actiongroup.groupaction2"/>
<add-to-group group-id="MainMenu"/>
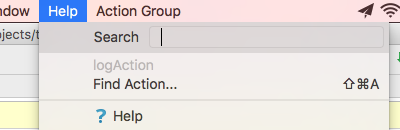
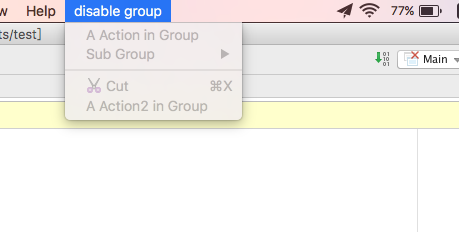
</group>Changing text and availability
@Override
public void update(AnActionEvent e) {
    e.getPresentation().setText("disable group");
    e.getPresentation().setEnabled(false);
}
Dynamic Addition of Action
If Action Group is required to act differently depending on the conditions, it is also necessary to set up the group class, but extend it to the Action Group class and copy the getChildren method to dynamically provide Action Group.
@NotNull
@Override
public AnAction[] getChildren(AnActionEvent anActionEvent) {
    return new AnAction[]{new MyAction()};
}