Copyright Statement: This article is from Guo Lin's blog, reprinted must indicate the source.
For reprinting, please indicate the source: http://blog.csdn.net/guolin_blog/article/details/11952435
I believe most of my friends are familiar with the term Service. Yes, a sophisticated one. Android Programmers who haven't even heard of Service are too bad. As one of the four components of Android, Service plays a very important role in every application. It is mainly used to process time-consuming logic in the background, or to perform tasks that require long-term operation. When necessary, we can even leave the service running in the background when the program exits.
However, although Service is well known to almost every Android programmer, not everyone has mastered all the knowledge points of Service very thoroughly. So today I will take you to a comprehensive and in-depth exploration of Service, hoping that everyone can have a deeper understanding of Service after reading this article.
Basic usage of Service
The most basic usage of Service is how to start a Service. The way to start a Service is very similar to how to start an Activity. We need to use Intent to implement it. Let's look at it through a specific example.
Create a new Android project called Service Test, where I choose to use the 4.0 API.
Then create a new MyService that inherits from Service, and override the parent class's onCreate(), onStartCommand() and onDestroy() methods, as follows:
As you can see, we just printed a sentence in onCreate(), onStartCommand() and onDestroy() methods, without any other operation.
Then open or create activity_main.xml as the main layout file of the program. The code is as follows:
We added two buttons to the layout file, one for starting the Service and one for stopping the Service.
Then open or create MainActivity as the main Activity of the program, and add the logic to start and stop the Service. The code is as follows:
As you can see, in the click event of the Start Service button, we constructed an Intent object and invoked the startService() method to start MyService. Then in the click event of the Stop Serivce button, we also construct an Intent object and call the stopService() method to stop MyService. The logic of the code is very simple. I don't think I need to explain it any more.
Also note that each Service in the project must be registered in AndroidManifest.xml, so you also need to edit the AndroidManifest.xml file. The code is as follows:
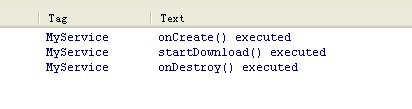
In this way, a simple program with Service function is written. Now let's run the program and click the Start Service button. You can see the print log of LogCat as follows:
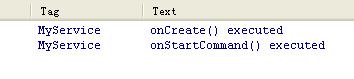
That is, when a Service is started, onCreate() and onStartCommand() methods in the Service are called.
What if I click the Start Service button again? The print logs at this time are as follows:
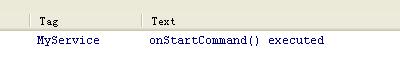
As you can see, this time only the onStartCommand() method is executed, and the onCreate() method is not executed. Why? This is because the onCreate() method will only be invoked when the Service is first created. If the current Service has been created, the onCreate() method will not be executed anyway by calling the startService() method. So you can click the Start Service button a few more times to try it, each time only printing logs in the onStartCommand() method.
We can also go to the application management interface of the mobile phone to check if MyService is running, as shown in the following figure: ___________

Well, MyService is really running, even if it doesn't have any logic in it.
Go back to the Service Test program and click the Stop Service button to stop MyService.
Service and Active Communication
We have learned the basic usage of Service above. After starting Service, we can execute some specific logic in onCreate() or onStartCommand() methods. But in that case, the relationship between Service and Activeness is not very big. Activity just notifies Service, "You can start it." Then Service went to work on his own business. So is there any way to make them more connected? For example, in Activity, you can specify what tasks a Service is supposed to perform. Sure, just have Activity and Service relate.
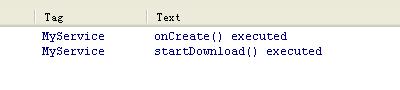
Looking at the code in MyService, you will find that there has always been an onBind() method that we haven't used. This method is actually used to establish association with Activeness. Modify the code in MyService, as follows:
Here we add a new MyBinder class inherited from the Binder class, and then add a startDownload() method to MyBinder to perform download tasks in the background. Of course, this is not really to download something, just to do it. test So the startDownload() method just prints a line of logs.
Then modify the code in activity_main.xml to add buttons for binding Service and unbound Service in the layout file:
Next, we modify the code in MainActivity to establish an association between MainActivity and MyService. The code is as follows:
As you can see, here we first create an anonymous class of Service Connection, in which we override the onService Connected () method and the onService Disconnected () method, which are called when Activity establishes and de-associates with Service, respectively. In the onService Connected () method, we get an example of MyBinder by downward transformation. With this example, the relationship between Activity and Service becomes very close. Now we can call any public method in MyBinder according to specific scenarios in Activity, which implements the function that Activity commands Service to do what Service does.
Of course, now Activity and Service are not actually related, this function is completed in the click event of the Bind Service button. As you can see, here we still build an Intent object and then call the bindService() method to bind Activity and Service. The bindService() method receives three parameters. The first parameter is the Intent object that has just been constructed. The second parameter is the instance of Service Connection created earlier. The third parameter is a flag bit. Here, BIND_AUTO_CREATE is passed in to indicate that the service is automatically created after the association between Activity and Service is established. This will enable the onCreate() method in MyService to be executed, but o The nStartCommand () method does not execute.
Then how do we want to decouple the relationship between Activity and Service? Just call the unbindService() method, which is also the logic implemented in the click event of the Unbind Service button.
Now let's run the program again. Click on the Bind Service button in MainActivity. The print log in LogCat is shown as follows:
It is also important to note that any Service is generic throughout the application, that is, MyService can not only associate with MainActivity, but also with any Activity, and they can get the same MyBinder instance when establishing association.
How to Destroy Service
In the basic usage section of Service, we introduce the simplest way to destroy Service. Click the Start Service button to start the Service and then click the Stop Service button to stop the Service. MyService is destroyed. You can see the print log as follows:
So what if we clicked the Bind Service button? Since the specified flag is BIND_AUTO_CREATE when binding a Service, it indicates that the Service will be created when the Bind Service button is clicked. How should the Service be destroyed? In fact, it's also very simple. Click on the Unbind Service button to remove the association between Activity and Service.
First click the Bind Service button, then click the Unbind Service button. Print the log as follows:
These two ways of destruction are well understood. So what if we clicked both the Start Service button and the Bind Service button? At this point, you will find that no matter you click the Stop Service button or the Unbind Service button alone, the Service will not be destroyed. It is necessary to click both buttons before the Service will be destroyed. That is to say, clicking on the Stop Service button will only stop the service, clicking on the Unbind Service button will only make the service and Active de-associate. A service must be destroyed when it is not associated with any Activity and handles the stop state.
To confirm, we add a print log to the click events of the Stop Service and Unbind Service buttons:
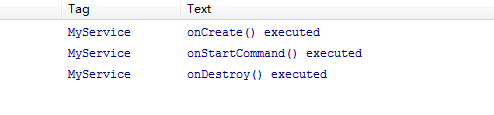
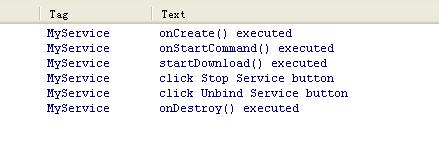
Then run the program again, first click on the Start Service button, then click on the Bind Service button, so that the Service can be started and connected with Active. Then click the Stop Service button and the Service will not be destroyed. Then click the Unbind Service button and the Service will be destroyed. Print the log as follows:
We should always remember to clean up the resources that are no longer used in the on Destroy () method of Service to prevent some objects that are no longer used from still occupying memory after Service is destroyed.
The relationship between Service and Thread
Many Android beginners may wonder what the relationship between Service and Thread is. When should I use Service and when should I use Thread? The answer may surprise you a little, because there is no relationship between Service and Thread!
The reason why many people associate them is mainly because of the background concept of Service. Thread, as we all know, is used to open a sub-thread, where to perform some time-consuming operations will not block the operation of the main thread. When we first understand Service, we always feel that it is used to handle some background tasks, and some time-consuming operations can also be run here, which will cause confusion. But if I tell you that Service actually runs in the main thread, do you think it has anything to do with Thread? Let's take a look at this cruel fact.
Add a line to the onCreate() method of MainActivity that prints the current thread id:
Then add a line to MyService's onCreate() method that prints the current thread id:
Now run the program again and click the Start Service button. You will see the following print logs:
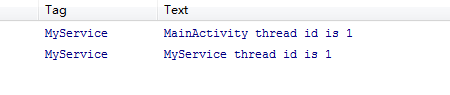
As you can see, their thread IDs are exactly the same, which confirms that Service does run in the main thread, that is to say, if you write very time-consuming code in Service, the program will appear ANR.
You may exclaim, isn't this a pit dad!? What's the use of a service? In fact, we should not link the background and sub-threads together. These are two completely different concepts. The background of Android is that it runs completely independent of the UI. Even if the Activity is destroyed or the program is shut down, the service can continue to run as long as the process is still there. For example, some applications, which always need to maintain a heartbeat connection with the server, can be implemented using Service. You might ask, haven't you just verified that Service runs in the main thread? The heartbeat connection is always executed here, won't it block the running of the main thread? Sure, but we can create a sub-thread in Service and then deal with time-consuming logic here.
Well, since a sub-thread is also created in Service, why not create it directly in Activity? This is because it is difficult for Activity to control Thread. When Activity is destroyed, there is no other way to retrieve instances of previously created sub-threads. And a subthread created in one activity cannot be manipulated by another activity. But Service is different. All Activities can be associated with Service, and then they can easily manipulate the method. Even if Activity is destroyed, as long as it is re-associated with Service, it can get the instance of Binder in the original Service. Therefore, using Service to process background tasks, Activity can safely finish without worrying about the situation that background tasks can not be controlled.
A standard Service can be written as:
Create Front Office Service
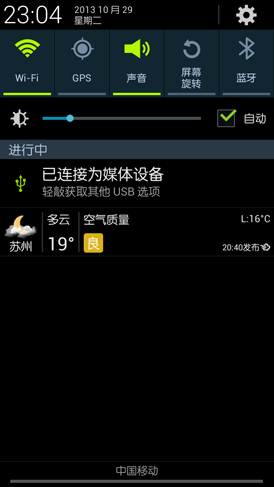
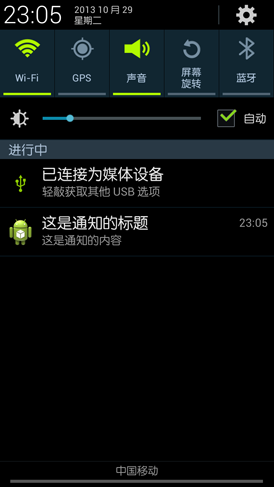
Service is almost always running in the background, it has been quietly doing hard work. However, the system priority of Service is still relatively low. When the system has insufficient memory, it is possible to reclaim the service running in the background. If you want the service to remain running without being reclaimed due to insufficient system memory, consider using the front-end service. The biggest difference between the front desk service and the ordinary service is that it will always have a running icon in the status bar of the system to display, drop down the status bar to see more detailed information, very similar to the effect of notification. Of course, sometimes you may not only use the front desk service to prevent the service from being recycled, but also use the front desk service because of special requirements, such as ink weather. Its service updates the weather data in the background, and displays the current weather information in the system status bar all the time, as shown in the following figure:
So let's see how to create a front-end Service. It's not complicated. Modify the code in MyService, as follows:
This is just a modification of the code for the onCreate() method in MyService. As you can see, we first create a Notification object, then call its setLatestEventInfo() method to initialize the layout and data for the notification, and set the click notification here to open MainActivity. Then call the startForeground() method to make MyService a front-end Service and display the picture of the notification.
Now run the program again, and click the Start Service or Bind Service button, MyService will start up in front of the service mode, and a bar icon will pop up in the system status bar. After dropping down the status bar, you can see the details of the notification, as shown in the figure below.
OK, because of the length, this article will be written here first. At present, we have sorted out a lot of important knowledge points about Service. The next article will take this article and introduce the use of remote service, which is one of the most important and complex knowledge points in Android Service. If you are interested, please read on. Android Service fully parses everything you need to know about services (2) .