I haven't written blog technology summary for a long time. It's mainly to do this line of work. It's not like doing business or other things. It's more and more passionate. It's slowly losing its fighting spirit. Otherwise, it's not much to say. In my work, I can realize it slowly. Today, I will summarize and share the views of audio broadcasting. If I have experience in this field or have better idea, my classmates will like it. Welcome to correct and share.
Now let's talk about this when playing music, we will capture the audio data, and then draw an interface. Here I just do several types of drawing, only one of them, the other two are very simple algorithms are not discussed.
Let's talk about this column drawing, first code, there is only one interface, Click to switch display mode, first look at Activity's code:
package com.asir.flashview;

import android.annotation.SuppressLint;
import android.app.Activity;
import android.media.AudioManager;
import android.media.MediaPlayer;
import android.media.audiofx.Visualizer;
import android.os.Bundle;
import android.view.ViewGroup;
import android.widget.LinearLayout;

@SuppressLint("NewApi")
public class FlashActivity extends Activity {
    // Define Media Player for Playing Sounds
    private MediaPlayer mPlayer;
    // Oscilloscope defining system
    private Visualizer mVisualizer;
    private LinearLayout layout;

    @Override
    public void onCreate(Bundle savedInstanceState) {
        super.onCreate(savedInstanceState);
        // Set up control music sound
        setVolumeControlStream(AudioManager.STREAM_MUSIC);
        layout = new LinearLayout(this);
        layout.setOrientation(LinearLayout.VERTICAL);
        setContentView(layout);
        // Create a MediaPlayer object
        mPlayer = MediaPlayer.create(this, R.raw.test);
        // Initialization Oscilloscope
        setupVisualizer();
        // Developing and Playing Music
        mPlayer.start();
    }

    private void setupVisualizer() {
        // Create a PlayFlashView component for displaying waveforms
        final PlayFlashView mVisualizerView = new PlayFlashView(this);
        mVisualizerView.setLayoutParams(new ViewGroup.LayoutParams(ViewGroup.LayoutParams.MATCH_PARENT, ViewGroup.LayoutParams.MATCH_PARENT));
        // Add the MyVisualizerView component to the layout container
        layout.addView(mVisualizerView);
        // Create Visualizer with MediaPlayer's AudioSessionId
        // Equivalent to setting up Visualizer to display the audio data of the Media Player
        mVisualizer = new Visualizer(mPlayer.getAudioSessionId());
        mVisualizer.setCaptureSize(Visualizer.getCaptureSizeRange()[1]);
        // Setting up listeners for mVisualizer
        mVisualizer.setDataCaptureListener(new Visualizer.OnDataCaptureListener() {
            @Override
            public void onFftDataCapture(Visualizer visualizer, byte[] fft, int samplingRate) {
                // Updating mVisualizer View Component with waveform Data
                mVisualizerView.updateVisualizer(fft);
            }

            @Override
            public void onWaveFormDataCapture(Visualizer visualizer, byte[] waveform, int samplingRate) {
                // Updating mVisualizer View Component with waveform Data
                mVisualizerView.updateVisualizer(waveform);
            }
        }, Visualizer.getMaxCaptureRate() / 2, true, false);
        mVisualizer.setEnabled(true);
    }

    @Override
    protected void onPause() {
        super.onPause();
        if (isFinishing() && mPlayer != null) {
            // Release all objects
            mVisualizer.release();
            mPlayer.release();
            mPlayer = null;
        }
    }
}
Then customize a view to draw views based on audio data.
package com.asir.flashview;

import android.annotation.SuppressLint;
import android.app.Activity;
import android.media.AudioManager;
import android.media.MediaPlayer;
import android.media.audiofx.Visualizer;
import android.os.Bundle;
import android.view.ViewGroup;
import android.widget.LinearLayout;

@SuppressLint("NewApi")
public class FlashActivity extends Activity {
    // Define Media Player for Playing Sounds
    private MediaPlayer mPlayer;
    // Oscilloscope defining system
    private Visualizer mVisualizer;
    private LinearLayout layout;

    @Override
    public void onCreate(Bundle savedInstanceState) {
        super.onCreate(savedInstanceState);
        // Set up control music sound
        setVolumeControlStream(AudioManager.STREAM_MUSIC);
        layout = new LinearLayout(this);
        layout.setOrientation(LinearLayout.VERTICAL);
        setContentView(layout);
        // Create a MediaPlayer object
        mPlayer = MediaPlayer.create(this, R.raw.beautiful);
        // Initialization Oscilloscope
        setupVisualizer();
        // Developing and Playing Music
        mPlayer.start();
    }

    private void setupVisualizer() {
        // Create a PlayFlashView component for displaying waveforms
        final PlayFlashView mVisualizerView = new PlayFlashView(this);
        mVisualizerView.setLayoutParams(new ViewGroup.LayoutParams(ViewGroup.LayoutParams.MATCH_PARENT, ViewGroup.LayoutParams.MATCH_PARENT));
        // Add the MyVisualizerView component to the layout container
        layout.addView(mVisualizerView);
        // Create Visualizer with MediaPlayer's AudioSessionId
        // Equivalent to setting up Visualizer to display the audio data of the Media Player
        mVisualizer = new Visualizer(mPlayer.getAudioSessionId());
        mVisualizer.setCaptureSize(Visualizer.getCaptureSizeRange()[1]);
        // Setting up listeners for mVisualizer
        mVisualizer.setDataCaptureListener(new Visualizer.OnDataCaptureListener() {
            @Override
            public void onFftDataCapture(Visualizer visualizer, byte[] fft, int samplingRate) {
                // Updating mVisualizer View Component with waveform Data
                mVisualizerView.updateVisualizer(fft);
            }

            @Override
            public void onWaveFormDataCapture(Visualizer visualizer, byte[] waveform, int samplingRate) {
                // Updating mVisualizer View Component with waveform Data
                mVisualizerView.updateVisualizer(waveform);
            }
        }, Visualizer.getMaxCaptureRate() / 2, true, false);
        mVisualizer.setEnabled(true);
    }

    @Override
    protected void onPause() {
        super.onPause();
        if (isFinishing() && mPlayer != null) {
            // Release all objects
            mVisualizer.release();
            mPlayer.release();
            mPlayer = null;
        }
    }
}
Without gif recording, it's a simple picture of the last effect. 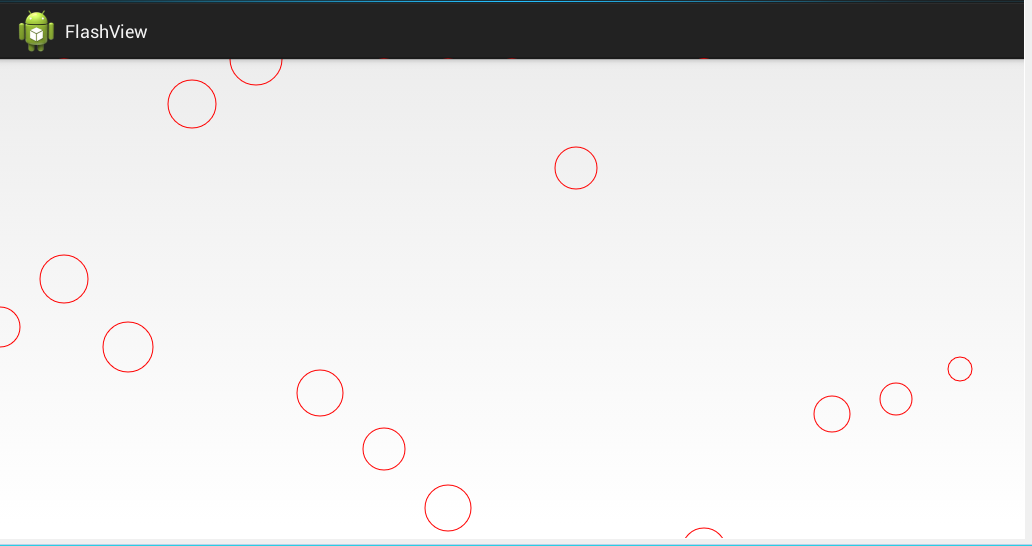

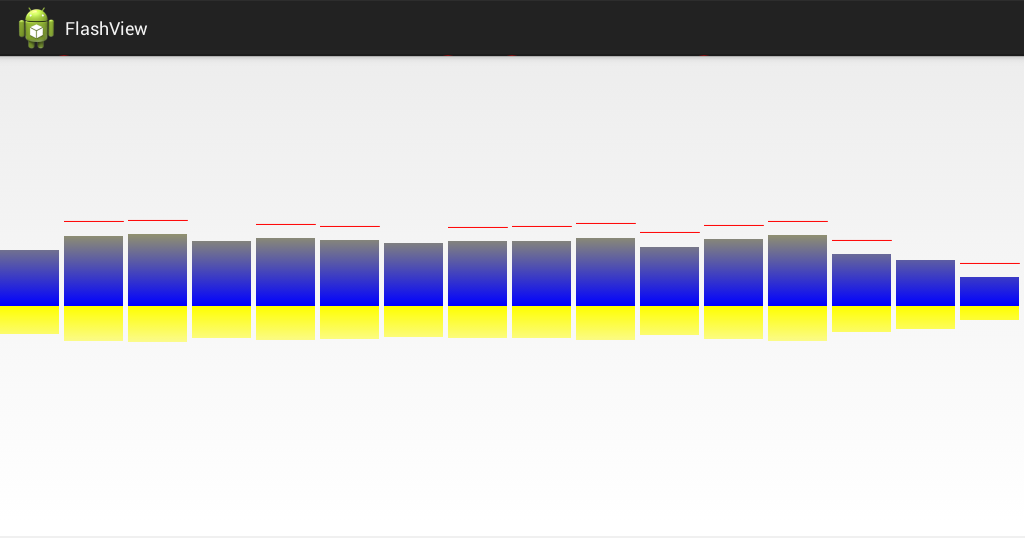
Probably that's the way it's displayed.
First of all, the idea of the code to do an analysis, but also to facilitate the use of their own back to quickly sort out the use of this method. First, 16 columns are defined as 16 audio data. The length of data returned from the callback method is 1024 bytes. This way, we can use the first 16 bytes to draw. Define two groups of audio bytes, one is the latest byte array currently obtained, and the other is the last byte array. Each byte of these bytes will be obtained. According to the change of frequency when music is playing, we use the latest data to draw the bar chart, and then use two groups of bytes data to alternately draw the horizontal lines above the column. This is the logic, which is clearly annotated in the code. Mainly a position problem, the left and right of the column and the line can be fixed by the screen width, the high jump effect can use this bytes, and then add a switch, when the music stops playing, stop the current drawing, that's all. As for the definition of brushes, initialization data, I think there's really nothing to say, to this column display. Even if the way of demonstration is realized,
Let's use our own logical thinking and different mathematical algorithms to imagine more dazzling effects. Just remember to share them with me then.
Finally, there is the right to play audio:
If there is passion in the future, I will summarize and share the knowledge I have learned about android framework Layer. I don't know much about it. Welcome to share my experience with you.