1. Preface
Because the author encountered various pits when configuring the NDK environment, and had some insights in the process of climbing the pit, I wrote a blog to describe in detail the process of configuring NDK using CMAKE mode in Android Studio 3.0.1 (version >= 2.2), hoping to help you.
2. Preparations
2.1 Development Environment
- Android Studio 3.0.1 (version > = 2.2)
- Android NDK 17.1.4828580
- CMAKE
- Android SDK 27.0.1
- OpenCV-3.4.1-android-sdk OpenCV download address (click this link to download)
- Download ndk and download the corresponding ndk at File - > Settings - > Appearance & Behavior - > System Settings - > Android SDK
- At the same time, as shown in the figure, download the corresponding CMake and LLDB

3. Configuration of Java OpenCV Environment
1. Create a new project and check the Include C++ support option


Check the appropriate options according to the diagram and click Finish.
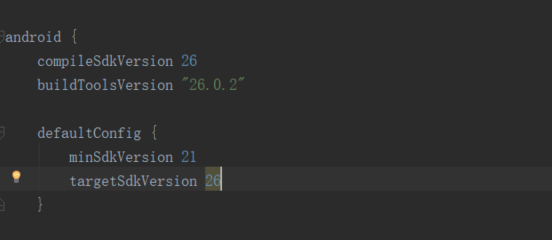
2. Import the Java folder under OpenCV (path is OpenCV-android-sdk\sdk\java) as a module. After importing, you will find that the directory of openCV Library 341 is generated under the Project directory. Modify the compileSDK Version, buildTools Version, minSdkVersion and targetSdkVersion of build.gradle under the directory to make them the same as those in the build.gradle file under the directory. Click the upper right corner. Reconfigure the app lication of Try Again to eliminate errors


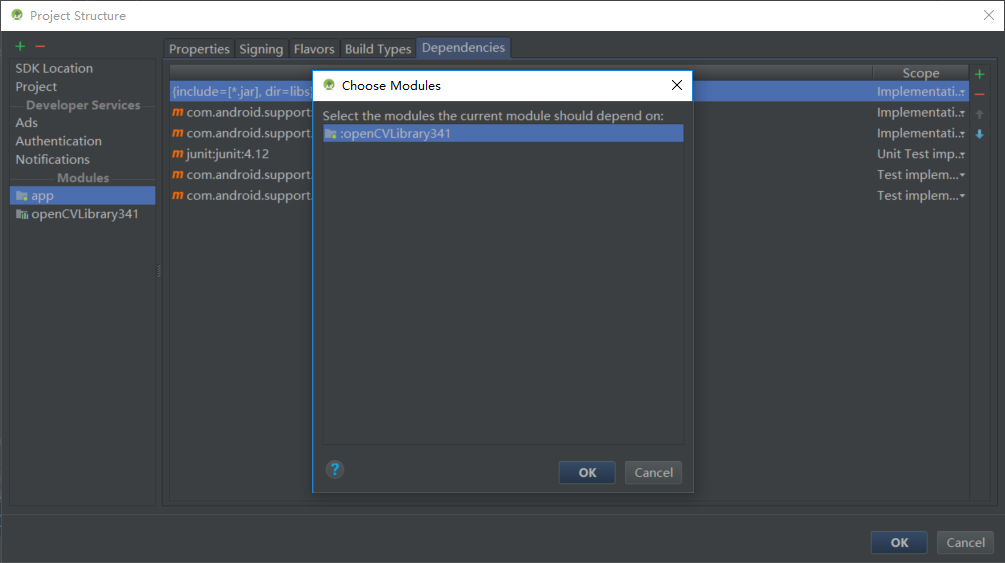
3. Add a dependency on OpenCV Library in the main module (right-click on the app in the left sidebar, select Open Module Settings, switch to Dependencies window, select Module dependency, and if you import Opencv SDK successfully before, there will be an option similar to that shown in the figure, then select OK to introduce OpenCV into the application)
4. At this point, OpenCV's Java layer configuration has been completed, sync, there should be code completion.

5. To use OpenCV Library happily, you can add the following permissions directly to AndroidManifest.xml
<uses-permission android:name="android.permission.READ_EXTERNAL_STORAGE"/>
<uses-permission android:name="android.permission.CAMERA"/>

<uses-feature android:name="android.hardware.camera" android:required="false"/>
<uses-feature android:name="android.hardware.camera.autofocus" android:required="false"/>
<uses-feature android:name="android.hardware.camera.front" android:required="false"/>
<uses-feature android:name="android.hardware.camera.front.autofocus" android:required="false"/>
4. Configure NDK environment
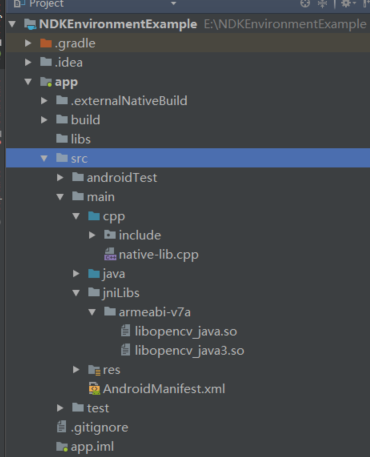
1. Copy the include folder (path OpenCV-android-sdk sdk native jni include) to the CPP directory (path app src main cpp)
2. Under the src main directory, we recommend a jniLIbs directory to copy the dependent dynamic and static libraries (paths are OpenCV-android-sdk\ sdk\ native\ jni\ libs) libopencv_java.so and libopencv_java3.so files to the \ src\main\ linis
3. To complete the above steps, your engineering structure should be as follows
4. Modify the gradle in app to look like this
apply plugin: 'com.android.application'

android {
    compileSdkVersion 26
    defaultConfig {
        applicationId "com.zxing.cameraapplication.forlastopencv07151100"
        minSdkVersion 21
        targetSdkVersion 26
        versionCode 1
        versionName "1.0"
        testInstrumentationRunner "android.support.test.runner.AndroidJUnitRunner"
        externalNativeBuild {
            cmake {
                cppFlags "-std=c++11 -frtti -fexceptions"
                arguments "-DANDROID_TOOLCHAIN=gcc"

                arguments "-DANDROID_ABI=armeabi-v7a"
                arguments "-DCMAKE_BUILD_TYPE=Release"
            }
        }
        ndk{
            abiFilters "armeabi-v7a"
        }
    }
    buildTypes {
        release {
            minifyEnabled false
            proguardFiles getDefaultProguardFile('proguard-android.txt'), 'proguard-rules.pro'
        }
    }
    externalNativeBuild {
        cmake {
            path "CMakeLists.txt"
        }
    }
    productFlavors{

    }
    sourceSets{ main { jni.srcDirs = ['src/main/jni' , 'src/main/jniLibs/'] } }

}

dependencies {
    androidTestCompile('com.android.support:support-annotations:26.1.0') {
        force = true
    }
    implementation fileTree(include: ['*.jar'], dir: 'libs')
    implementation 'com.android.support:appcompat-v7:26.1.0'
    implementation 'com.android.support.constraint:constraint-layout:1.1.2'
    testImplementation 'junit:junit:4.12'
    androidTestImplementation 'com.android.support.test:runner:1.0.2'
    androidTestImplementation 'com.android.support.test.espresso:espresso-core:3.0.2'
    implementation project(':openCVLibrary341')
}
5. Modify the CMakeLists.txt file (important), as shown in the figure
# For more information about using CMake with Android Studio, read the
# documentation: https://d.android.com/studio/projects/add-native-code.html

# Sets the minimum version of CMake required to build the native library.

cmake_minimum_required(VERSION 3.4.1)

set(CMAKE_VERBOSE_MAKEFILE on)
set(libs "${CMAKE_SOURCE_DIR}/src/main/jniLibs")
include_directories(${CMAKE_SOURCE_DIR}/src/main/cpp/include)

add_library(libopencv_java3 SHARED IMPORTED )
set_target_properties(libopencv_java3 PROPERTIES
    IMPORTED_LOCATION "${libs}/${ANDROID_ABI}/libopencv_java3.so")

add_library(libopencv_java SHARED IMPORTED )
set_target_properties(libopencv_java PROPERTIES
    IMPORTED_LOCATION "${libs}/${ANDROID_ABI}/libopencv_java.so")

set(CMAKE_CXX_FLAGS "${CMAKE_CXX_FLAGS} -std=gnu++11 -fexceptions -frtti")


# Creates and names a library, sets it as either STATIC
# or SHARED, and provides the relative paths to its source code.
# You can define multiple libraries, and CMake builds them for you.
# Gradle automatically packages shared libraries with your APK.

add_library( # Sets the name of the library.
             native-lib

             # Sets the library as a shared library.
             SHARED

             # Provides a relative path to your source file(s).
             src/main/cpp/native-lib.cpp )

# Searches for a specified prebuilt library and stores the path as a
# variable. Because CMake includes system libraries in the search path by
# default, you only need to specify the name of the public NDK library
# you want to add. CMake verifies that the library exists before
# completing its build.

find_library( # Sets the name of the path variable.
              log-lib

              # Specifies the name of the NDK library that
              # you want CMake to locate.
              log )

# Specifies libraries CMake should link to your target library. You
# can link multiple libraries, such as libraries you define in this
# build script, prebuilt third-party libraries, or system libraries.

target_link_libraries(native-lib android log
    libopencv_java3 #used for java sdk
    libopencv_java #same to static libs
    ${log-lib}
    )
Click sync in the upper right corner to reconfigure
5.demo Demo (Grayscale Pictures)
1.native-lib.cpp
#include <jni.h>
#include <string>
#include <opencv2/core/hal/interface.h>
#include <opencv2/calib3d.hpp>

using namespace cv;


extern "C" {

JNIEXPORT jintArray JNICALL
Java_com_www_ndk_MainActivity_getGrayImage(JNIEnv *env, jobject, jintArray buf, int w, int h){
    jint *pixels = env->GetIntArrayElements(buf, NULL);
    if(pixels == NULL){
        return NULL;
    }

    cv::Mat imgData(h, w,CV_8UC4, pixels);
    uchar *ptr = imgData.ptr(0);
    for(int i=0; i<w*h; i++){
        int grayScale = (int)(ptr[4*i+2]*0.299 + ptr[4*i+1]*0.587 + ptr[4*i+0]*0.114);
        ptr[4*i+0] = (uchar)grayScale;
        ptr[4*i+1] = (uchar)grayScale;
        ptr[4*i+2] = (uchar)grayScale;
    }
    int size = w * h;
    jintArray result = env->NewIntArray(size);
    env->SetIntArrayRegion(result, 0, size, pixels);
    env->ReleaseIntArrayElements(buf, pixels, 0);
    return result;
}

}
2.activity_main.xml
<?xml version="1.0" encoding="utf-8"?>
<RelativeLayout xmlns:android="http://schemas.android.com/apk/res/android"
    xmlns:app="http://schemas.android.com/apk/res-auto"
    xmlns:tools="http://schemas.android.com/tools"
    android:layout_width="match_parent"
    android:layout_height="match_parent"
    tools:context="com.www.ndk.MainActivity">

    <ImageView
        android:id="@+id/img"
        android:layout_width="wrap_content"
        android:layout_height="wrap_content"
        app:srcCompat="@drawable/boy"
        android:layout_centerInParent="true" />
    <Button
        android:id="@+id/bt_Gray"
        android:layout_width="wrap_content"
        android:layout_height="wrap_content"
        android:layout_alignParentRight="true"
        android:layout_alignParentEnd="true"
        android:text="Gray"  />

</RelativeLayout>
3.MainActivity.java
package com.www.ndk;

import android.graphics.Bitmap;
import android.graphics.drawable.BitmapDrawable;
import android.support.v7.app.AppCompatActivity;
import android.os.Bundle;
import android.view.View;
import android.widget.Button;
import android.widget.ImageView;
import android.widget.TextView;

import org.opencv.core.Mat;

public class MainActivity extends AppCompatActivity {

    // Used to load the 'native-lib' library on application startup.
    static {
        System.loadLibrary("native-lib");
    }

    private Button bt_photo = null;

    @Override
    protected void onCreate(Bundle savedInstanceState) {
        super.onCreate(savedInstanceState);
        setContentView(R.layout.activity_main);


        // adding
        bt_photo =  findViewById(R.id.bt_Gray);
        bt_photo.setOnClickListener(new Button.OnClickListener() {
            @Override
            public void onClick(View v) {
                // TODO Auto-generated method stub
                ImageView img = (ImageView)findViewById(R.id.img);
                Bitmap bitmap = ((BitmapDrawable) getResources().getDrawable(
                        R.drawable.boy)).getBitmap();
                int w = bitmap.getWidth(), h = bitmap.getHeight();
                int[] pix = new int[w * h];
                bitmap.getPixels(pix, 0, w, 0, 0, w, h);
                int[] resultPixes = getGrayImage(pix,w,h);
                Bitmap result = Bitmap.createBitmap(w,h, Bitmap.Config.RGB_565);
                result.setPixels(resultPixes, 0, w, 0, 0,w, h);
                img.setImageBitmap(result);
            }
        });

    }

    /**
     * A native method that is implemented by the 'native-lib' native library,
     * which is packaged with this application.
     */
    public native int[] getGrayImage(int[] pixels, int w, int h);
}
4. Place the picture named boy under the drawable directory
5. The results of the operation are shown in the figure.


So far, the NDK environment has been determined to be well configured...