1. Create an empty directory RNDemo
2. Create a subdirectory android in RNDemo
3. Copy the android project to the subdirectory android, as shown in the project structure below. 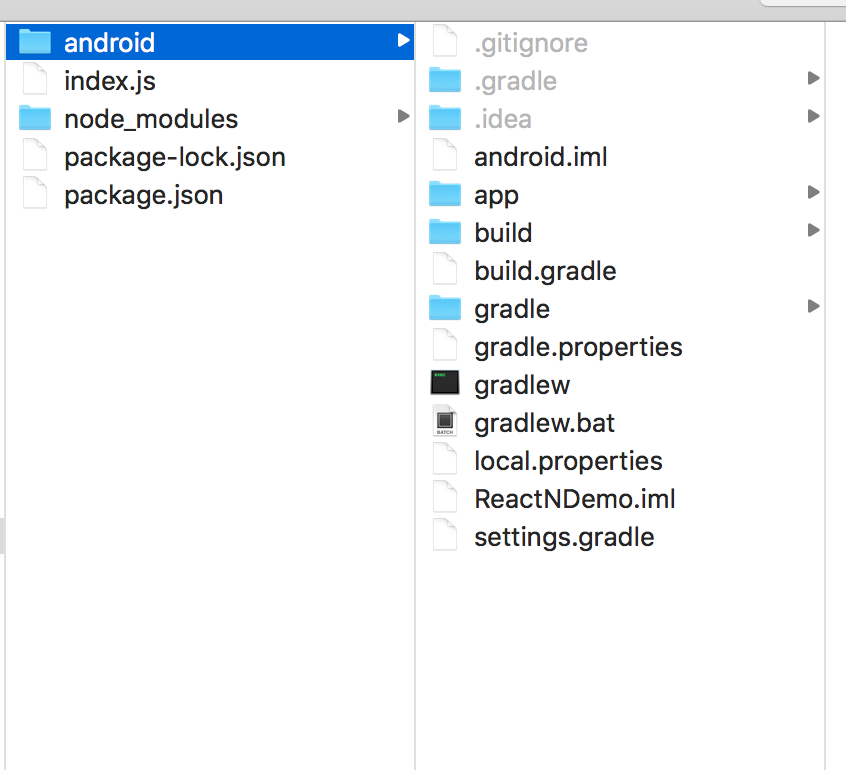
4. Create the package.json file in RNDemo and add the following contents:
{
  "name": "MyReactNativeApp",
  "version": "0.0.1",
  "private": true,
  "scripts": {
    "start": "node node_modules/react-native/local-cli/cli.js start"
  },
  "dependencies": {
    "react": "16.0.0-alpha.6",
    "react-native": "0.44.3"
  }
}
5. Execute the command in the RNDemo root directory:
npm installAfter the command is executed, the node_modules / directory will be generated. (all modules installed through the npm install command will be placed in this directory. In principle, we don't copy, move, modify, upload or load the directory as you go).
6. Add React Native dependency to build.gradle file in your app:
 dependencies {
     ...
     compile "com.facebook.react:react-native:+" // From node_modules.
 }
7. Add a maven dependent entry for React Native in the build.gradle file of the project, which must be written in the "all projects" code block:
allprojects {
    repositories {
        ...
        maven {
            // All of React Native (JS, Android binaries) is installed from npm
            url "$rootDir/../node_modules/react-native/android"
        }
    }
    ...
}
//Make sure the dependency path is correct! To avoid throwing "failed to resolve: com. Facebook. React: react native:0.x.x" Abnormal.
Configuration authority
Next, declare the network in the Android manifest.xml manifest file
<uses-permission android:name="android.permission.INTERNET" />To access the DevSettingsActivity interface (i.e. developer menu), you also need to declare in AndroidManifest.xml:
<activity android:name="com.facebook.react.devsupport.DevSettingsActivity" />The developer menu is generally only used to refresh JavaScript code from the Packager server during development, so you can remove this permission during official release.
Code integration
1. Create index.js in RNDemo root directory (before version 0.49, it was index.android.js file)
2. Add code:
import React from 'react';
import {
  AppRegistry,
  StyleSheet,
  Text,
  View
} from 'react-native';

class HelloWorld extends React.Component {
  render() {
    return (
      <View style={styles.container}>
        <Text style={styles.hello}>Hello, World</Text>
      </View>
    )
  }
}
var styles = StyleSheet.create({
  container: {
    flex: 1,
    justifyContent: 'center',
  },
  hello: {
    fontSize: 20,
    textAlign: 'center',
    margin: 10,
  },
});

AppRegistry.registerComponent('MyReactNativeApp', () => HelloWorld);
3. Configure permissions so that red screen errors in development can be displayed correctly
If your app will run on Android 6.0 (API level 23) or later, make sure you have permission to open the overlay in the development version
if (Build.VERSION.SDK_INT >= Build.VERSION_CODES.M) {
    if (!Settings.canDrawOverlays(this)) {
        Intent intent = new Intent(Settings.ACTION_MANAGE_OVERLAY_PERMISSION,
                                   Uri.parse("package:" + getPackageName()));
        startActivityForResult(intent, OVERLAY_PERMISSION_REQ_CODE);
    }
}
@Override
protected void onActivityResult(int requestCode, int resultCode, Intent data) {
if (requestCode == OVERLAY_PERMISSION_REQ_CODE) {
if (Build.VERSION.SDK_INT >= Build.VERSION_CODES.M) {
if (!Settings.canDrawOverlays(this)) {
// SYSTEM_ALERT_WINDOW permission not granted...
}
}
}
}4.
public class MyReactActivity extends Activity implements DefaultHardwareBackBtnHandler {
    private ReactRootView mReactRootView;
    private ReactInstanceManager mReactInstanceManager;

    @Override
    protected void onCreate(Bundle savedInstanceState) {
        super.onCreate(savedInstanceState);

        mReactRootView = new ReactRootView(this);
        mReactInstanceManager = ReactInstanceManager.builder()
                .setApplication(getApplication())
                .setBundleAssetName("index.android.bundle")
                .setJSMainModuleName("index.android")
                .addPackage(new MainReactPackage())
                .setUseDeveloperSupport(BuildConfig.DEBUG)
                .setInitialLifecycleState(LifecycleState.RESUMED)
                .build();

        // Note that MyReactNativeApp here must correspond to the
        // The first parameter of "AppRegistry.registerComponent()"
        mReactRootView.startReactApplication(mReactInstanceManager, "MyReactNativeApp", null);

        setContentView(mReactRootView);
    }

    @Override
    public void invokeDefaultOnBackPressed() {
        super.onBackPressed();
    }
@Override
protected void onPause() {
    super.onPause();

    if (mReactInstanceManager != null) {
        mReactInstanceManager.onHostPause(this);
    }
}

@Override
protected void onResume() {
    super.onResume();

    if (mReactInstanceManager != null) {
        mReactInstanceManager.onHostResume(this, this);
    }
}

@Override
protected void onDestroy() {
    super.onDestroy();

    if (mReactInstanceManager != null) {
        mReactInstanceManager.onHostDestroy();
    }
}

@Override
 public void onBackPressed() {
    if (mReactInstanceManager != null) {
        mReactInstanceManager.onBackPressed();
    } else {
        super.onBackPressed();
    }
}

@Override
public boolean onKeyUp(int keyCode, KeyEvent event) {
    if (keyCode == KeyEvent.KEYCODE_MENU && mReactInstanceManager != null) {
        mReactInstanceManager.showDevOptionsDialog();
        return true;
    }
    return super.onKeyUp(keyCode, event);
}
}
Run test results
npm startreact-native run-android