<script   type="text/javascript" src="http://static.blog.csdn.net/scripts/category.js"></script>
    <div   class="bog_copyright">
        <p class="copyright_p"> Copyright Statement: This article is an original article of the blogger. It can not be reprinted without the permission of the blogger. Please continue to pay attention to Carson_Ho's blog for more articles. </p>
    </div>
Preface
- In Android development, the use of message push is very common.
In order to reduce the development cost, using third-party push is a popular solution nowadays.
-
Today, I'm going to teach you how to integrate millet push in your application.
- This document is based on millet to push official Demo, and gives a simple push Demo.
- Before reading this document, please read the other two articles I wrote:
The Most Fully Parsed Android Message Push Solution in History
Android Push: Detailed Analysis of Third Party Message Push Platform
Catalog
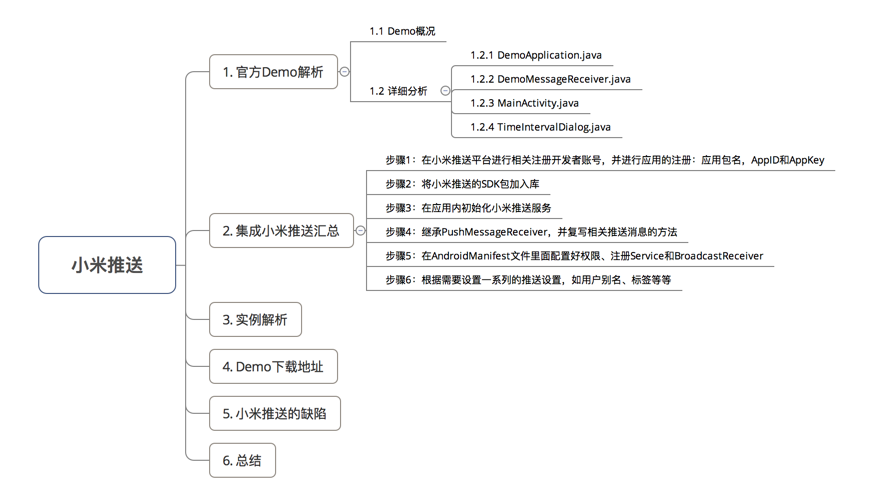
1. Analysis of Official Demo
First of all, we will analyze the official Demo promotion of millet.
Please download it on the official website first. Official Demo and SDK Description Document
1.1 Demo Profile
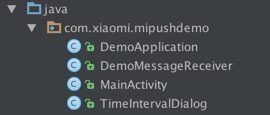
Catalogue description:
DemoApplication class
Inherited from the Application class, its main functions are: setting the ID & Key of App, registering push serviceDemoMessageReceiver class
Inherited from Broadcast Receiver, it receives push messages and processes themMainActivity
Implementing Interface Button Processing-Setting Local Push SchemeTimeIntervalDialog
Set the time interval for push
Next, I'll analyze each class in detail.
1.2 Detailed analysis
1.2.1 DemoApplication class
Inherited from the Application class, its main function is:
- Setting App's ID & Key
- Registration push service
Next, let's look at how these two functions are implemented through the code.
DemoApplication.java
package com.xiaomi.mipushdemo;
import android.app.ActivityManager;
import android.app.ActivityManager.RunningAppProcessInfo;
import android.app.Application;
import android.content.Context;
import android.os.Handler;
import android.os.Message;
import android.os.Process;
import android.text.TextUtils;
import android.util.Log;
import android.widget.Toast;
import com.xiaomi.channel.commonutils.logger.LoggerInterface;
import com.xiaomi.mipush.sdk.Logger;
import com.xiaomi.mipush.sdk.MiPushClient;
import java.util.List;
public class DemoApplication extends Application {
// Use the ID of your own APP (registered on the official website)
private static final String APP_ID = "1000270";
// KEY using your own APP (registered on the official website)
private static final String APP_KEY = "670100056270";
// This TAG retrieves the information it needs in adb logcat by entering adb logcat | grep at the command line terminal
// com.xiaomi.mipushdemo
public static final String TAG = "com.xiaomi.mipushdemo";
private static DemoHandler sHandler = null;
private static MainActivity sMainActivity = null;
//In order to improve the registration rate of push service, the official Demo recommends that the push service be initialized in onCreate of Application
//You can also initialize push services elsewhere as needed
@Override
public void onCreate() {
super.onCreate();
//To determine whether the user has opened App, see the following method definition for details
if (shouldInit()) {
//Registration push service
//After successful registration, the broadcast will be sent to DemoMessage Receiver.
// Registration information can be obtained from the MiPushCommandMessage object parameter in DemoMessageReceiver's onCommandResult method
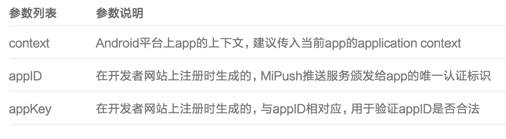
MiPushClient.registerPush(this, APP_ID, APP_KEY);
//Parameter description
//Context: The context of APP on Android platform. It is recommended to pass in the application context of the current app.
//appID: The unique authentication identifier issued to app by the MiPush push service generated at the time of registration on the developer's website
//appKey: Generated at the time of registration on the developer's website, corresponding to the appID, to verify the validity of the appID
}
//The following log settings are related to testing
LoggerInterface newLogger = new LoggerInterface() {
@Override
public void setTag(String tag) {
// ignore
}
@Override
public void log(String content, Throwable t) {
Log.d(TAG, content, t);
}
@Override
public void log(String content) {
Log.d(TAG, content);
}
};
Logger.setLogger(this, newLogger);
if (sHandler == null) {
sHandler = new DemoHandler(getApplicationContext());
}
}
//By judging whether all processes in the phone have the App process or not
//To determine if the App is open
private boolean shouldInit() {
//Through Activity Manager, we can get the running activities in the system.
//Including process, application / package, service and Task information.
ActivityManager am = ((ActivityManager) getSystemService(Context.ACTIVITY_SERVICE));
List<RunningAppProcessInfo> processInfos = am.getRunningAppProcesses();
String mainProcessName = getPackageName();
//Get the unique identity of this App
int myPid = Process.myPid();
//Use an enhanced for loop to remove all processes from the phone
for (RunningAppProcessInfo info : processInfos) {
//Determine whether the App exists in the process by comparing the unique identifier and package name of the process
if (info.pid == myPid && mainProcessName.equals(info.processName)) {
return true;
}
}
return false;
}
public static DemoHandler getHandler() {
return sHandler;
}
public static void setMainActivity(MainActivity activity) {
sMainActivity = activity;
}
//Setting prompt copy by setting Handler
public static class DemoHandler extends Handler {
private Context context;
public DemoHandler(Context context) {
this.context = context;
}
@Override
public void handleMessage(Message msg) {
String s = (String) msg.obj;
if (sMainActivity != null) {
sMainActivity.refreshLogInfo();
}
if (!TextUtils.isEmpty(s)) {
Toast.makeText(context, s, Toast.LENGTH_LONG).show();
}
}
}
}Conclusion:
- Step 1: Determine if App is on - by judging the process in the system
- Through static method
public static void registerPush(Context context, String appID, String appKey)Push service registration, detailed parameters are as follows:
- In order to improve the registration rate, it is better to initialize the push service in onCreate of Application You can also initialize push services elsewhere as needed
1.2.2 DemoMessageReceiver class
Inheritance from PushMessageReceiver (abstract class, inherited from Broadcast Receiver), its main role is:
- Receiving push messages
- Processing push messages
DemoMessageReceiver.java
package com.xiaomi.mipushdemo;

import android.annotation.SuppressLint;
import android.content.Context;
import android.os.Message;
import android.text.TextUtils;
import android.util.Log;

import com.xiaomi.mipush.sdk.ErrorCode;
import com.xiaomi.mipush.sdk.MiPushClient;
import com.xiaomi.mipush.sdk.MiPushCommandMessage;
import com.xiaomi.mipush.sdk.MiPushMessage;
import com.xiaomi.mipush.sdk.PushMessageReceiver;

import java.text.SimpleDateFormat;
import java.util.Date;
import java.util.List;

/**
 * 1,PushMessageReceiver Is an abstract class, which inherits BroadcastReceiver.
 * 2,Need to customize DemoMessageReceiver Registration in AndroidManifest.xml


public class DemoMessageReceiver extends PushMessageReceiver {

    private String mRegId;
    private String mTopic;
    private String mAlias;
    private String mAccount;
    private String mStartTime;
    private String mEndTime;


    //Called when a passing message arrives at the client
    //Function: Through parametersmessageFor further information, please refer to the official. SDK File
    @Override
    public void onReceivePassThroughMessage(Context context, MiPushMessage message) {
        Log.v(DemoApplication.TAG,
                "onReceivePassThroughMessage is called. " + message.toString());
        String log = context.getString(R.string.recv_passthrough_message, message.getContent());
        MainActivity.logList.add(0, getSimpleDate() + " " + log);

        if (!TextUtils.isEmpty(message.getTopic())) {
            mTopic = message.getTopic();
        } else if (!TextUtils.isEmpty(message.getAlias())) {
            mAlias = message.getAlias();
        }

        Message msg = Message.obtain();
        msg.obj = log;
        DemoApplication.getHandler().sendMessage(msg);
    }


//Called when notification message arrives at client
     //Note: Notification messages that do not pop up in the foreground will also be called back when they arrive at the client.
    //Function: through parametersmessageIn order to get information, please see the official. SDK File

    @Override
    public void onNotificationMessageArrived(Context context, MiPushMessage message) {
        Log.v(DemoApplication.TAG,
                "onNotificationMessageArrived is called. " + message.toString());
        String log = context.getString(R.string.arrive_notification_message, message.getContent());
        MainActivity.logList.add(0, getSimpleDate() + " " + log);

        if (!TextUtils.isEmpty(message.getTopic())) {
            mTopic = message.getTopic();
        } else if (!TextUtils.isEmpty(message.getAlias())) {
            mAlias = message.getAlias();
        }

        Message msg = Message.obtain();
        msg.obj = log;
        DemoApplication.getHandler().sendMessage(msg);
    }

    //Called when the user clicks the notification bar message manually
     //Note: Notification messages that do not pop up in the foreground will also be called back when they arrive at the client.
    //Effect:1. Pass parametersmessageIn order to get information, please see the official. SDK File
    //2. Set up the user to click on the message and open the application or Webpage or Other pages

    @Override
    public void onNotificationMessageClicked(Context context, MiPushMessage message) {
        Log.v(DemoApplication.TAG,
                "onNotificationMessageClicked is called. " + message.toString());
        String log = context.getString(R.string.click_notification_message, message.getContent());
        MainActivity.logList.add(0, getSimpleDate() + " " + log);

        if (!TextUtils.isEmpty(message.getTopic())) {
            mTopic = message.getTopic();
        } else if (!TextUtils.isEmpty(message.getAlias())) {
            mAlias = message.getAlias();
        }

        Message msg = Message.obtain();
        if (message.isNotified()) {
            msg.obj = log;
        }
        DemoApplication.getHandler().sendMessage(msg);
    }


    //Used to receive the response result of the client after sending commands to the server.
    @Override
    public void onCommandResult(Context context, MiPushCommandMessage message) {
        Log.v(DemoApplication.TAG,
                "onCommandResult is called. " + message.toString());
        String command = message.getCommand();
        List<String> arguments = message.getCommandArguments();
        String cmdArg1 = ((arguments != null && arguments.size() > 0) ? arguments.get(0) : null);
        String cmdArg2 = ((arguments != null && arguments.size() > 1) ? arguments.get(1) : null);
        String log;
        if (MiPushClient.COMMAND_REGISTER.equals(command)) {
            if (message.getResultCode() == ErrorCode.SUCCESS) {
                mRegId = cmdArg1;
                log = context.getString(R.string.register_success);

            } else {
                log = context.getString(R.string.register_fail);
            }
        } else if (MiPushClient.COMMAND_SET_ALIAS.equals(command)) {
            if (message.getResultCode() == ErrorCode.SUCCESS) {
                mAlias = cmdArg1;
                log = context.getString(R.string.set_alias_success, mAlias);
            } else {
                log = context.getString(R.string.set_alias_fail, message.getReason());
            }
        } else if (MiPushClient.COMMAND_UNSET_ALIAS.equals(command)) {
            if (message.getResultCode() == ErrorCode.SUCCESS) {
                mAlias = cmdArg1;
                log = context.getString(R.string.unset_alias_success, mAlias);
            } else {
                log = context.getString(R.string.unset_alias_fail, message.getReason());
            }
        } else if (MiPushClient.COMMAND_SET_ACCOUNT.equals(command)) {
            if (message.getResultCode() == ErrorCode.SUCCESS) {
                mAccount = cmdArg1;
                log = context.getString(R.string.set_account_success, mAccount);
            } else {
                log = context.getString(R.string.set_account_fail, message.getReason());
            }
        } else if (MiPushClient.COMMAND_UNSET_ACCOUNT.equals(command)) {
            if (message.getResultCode() == ErrorCode.SUCCESS) {
                mAccount = cmdArg1;
                log = context.getString(R.string.unset_account_success, mAccount);
            } else {
                log = context.getString(R.string.unset_account_fail, message.getReason());
            }
        } else if (MiPushClient.COMMAND_SUBSCRIBE_TOPIC.equals(command)) {
            if (message.getResultCode() == ErrorCode.SUCCESS) {
                mTopic = cmdArg1;
                log = context.getString(R.string.subscribe_topic_success, mTopic);
            } else {
                log = context.getString(R.string.subscribe_topic_fail, message.getReason());
            }
        } else if (MiPushClient.COMMAND_UNSUBSCRIBE_TOPIC.equals(command)) {
            if (message.getResultCode() == ErrorCode.SUCCESS) {
                mTopic = cmdArg1;
                log = context.getString(R.string.unsubscribe_topic_success, mTopic);
            } else {
                log = context.getString(R.string.unsubscribe_topic_fail, message.getReason());
            }
        } else if (MiPushClient.COMMAND_SET_ACCEPT_TIME.equals(command)) {
            if (message.getResultCode() == ErrorCode.SUCCESS) {
                mStartTime = cmdArg1;
                mEndTime = cmdArg2;
                log = context.getString(R.string.set_accept_time_success, mStartTime, mEndTime);
            } else {
                log = context.getString(R.string.set_accept_time_fail, message.getReason());
            }
        } else {
            log = message.getReason();
        }
        MainActivity.logList.add(0, getSimpleDate() + "    " + log);

        Message msg = Message.obtain();
        msg.obj = log;
        DemoApplication.getHandler().sendMessage(msg);
    }


    //Used to receive the response result of the client sending the registration command to the server.
    @Override
    public void onReceiveRegisterResult(Context context, MiPushCommandMessage message) {
        Log.v(DemoApplication.TAG,
                "onReceiveRegisterResult is called. " + message.toString());
        String command = message.getCommand();
        List<String> arguments = message.getCommandArguments();
        String cmdArg1 = ((arguments != null && arguments.size() > 0) ? arguments.get(0) : null);
        String log;
        if (MiPushClient.COMMAND_REGISTER.equals(command)) {
            if (message.getResultCode() == ErrorCode.SUCCESS) {
                mRegId = cmdArg1;
                //Print logs: successful registration
                log = context.getString(R.string.register_success);
            } else {
                      //Print Log: Registration Failure
                log = context.getString(R.string.register_fail);
            }
        } else {
            log = message.getReason();
        }

        Message msg = Message.obtain();
        msg.obj = log;
        DemoApplication.getHandler().sendMessage(msg);
    }

    @SuppressLint("SimpleDateFormat")
    private static String getSimpleDate() {
        return new SimpleDateFormat("MM-dd hh:mm:ss").format(new Date());
    }

}
summary
Copy the relevant processing methods of messages in PushMessage Receiver as needed. The following are the details of the relevant methods: PushMessage Receiver, PushMessage Receiver, PushMessage Receiver, PushMessage Receiver, PushMessage Receiver, PushMessage Rec
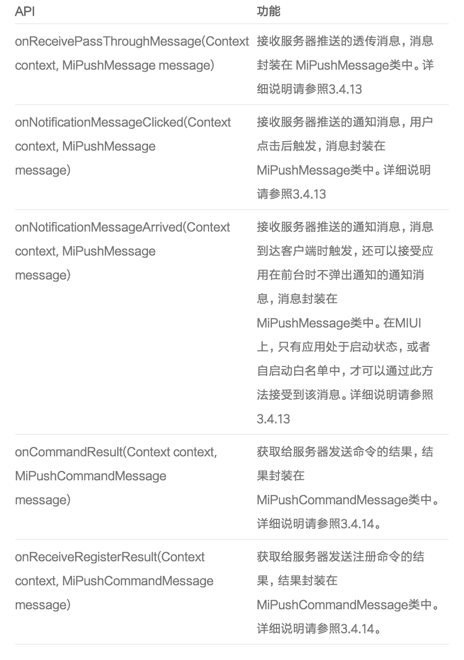
On onCommand Result (Context context, MiPushCommand Message message)
Function: When the client sends the registered push, set alias, cancel alias, subscribe topic, cancel topic and so on to the server, the result is returned from the server.
b. Description of parameters: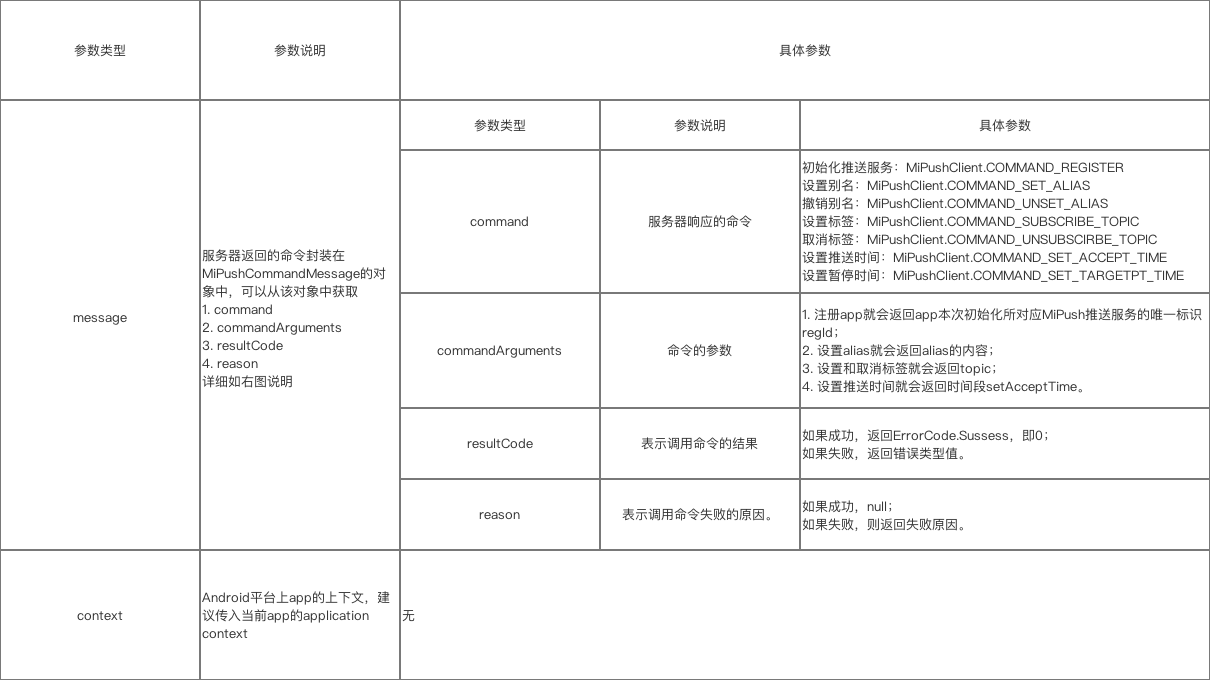
1.2.3 MainActivity
Used to identify users, such as aliases, labels, accounts, etc.
MainActivity.java
public class MainActivity extends Activity {

    public static List<String> logList = new CopyOnWriteArrayList<String>();

    private TextView mLogView = null;

    @Override
    protected void onCreate(Bundle savedInstanceState) {
        super.onCreate(savedInstanceState);
        setContentView(R.layout.activity_main);

        DemoApplication.setMainActivity(this);

        mLogView = (TextView) findViewById(R.id.log);

        // Setting aliases
        findViewById(R.id.set_alias).setOnClickListener(new OnClickListener() {

            @Override
            public void onClick(View v) {
                final EditText editText = new EditText(MainActivity.this);
                new AlertDialog.Builder(MainActivity.this)
                        .setTitle(R.string.set_alias)
                        .setView(editText)
                        .setPositiveButton(R.string.ok, new DialogInterface.OnClickListener() {

                            @Override
                            public void onClick(DialogInterface dialog, int which) {
                                String alias = editText.getText().toString();
//Call the static method to set up MiPushClient.setAlias(MainActivity.this, alias, null);
                            }

                        })
                        .setNegativeButton(R.string.cancel, null)
                        .show();
            }
        });
        // Revocation of aliases
        findViewById(R.id.unset_alias).setOnClickListener(new OnClickListener() {

            @Override
            public void onClick(View v) {
                final EditText editText = new EditText(MainActivity.this);
                new AlertDialog.Builder(MainActivity.this)
                        .setTitle(R.string.unset_alias)
                        .setView(editText)
                        .setPositiveButton(R.string.ok, new DialogInterface.OnClickListener() {

                            @Override
                            public void onClick(DialogInterface dialog, int which) {
                                String alias = editText.getText().toString();
//Call the static method to set up MiPushClient.unsetAlias(MainActivity.this, alias, null);
                            }

                        })
                        .setNegativeButton(R.string.cancel, null)
                        .show();

            }
        });
        // Set account
        findViewById(R.id.set_account).setOnClickListener(new OnClickListener() {

            @Override
            public void onClick(View v) {
                final EditText editText = new EditText(MainActivity.this);
                new AlertDialog.Builder(MainActivity.this)
                        .setTitle(R.string.set_account)
                        .setView(editText)
                        .setPositiveButton(R.string.ok, new DialogInterface.OnClickListener() {

                            @Override
                            public void onClick(DialogInterface dialog, int which) {
                                String account = editText.getText().toString();
//Call the static method to set up MiPushClient.setUserAccount(MainActivity.this, account, null);
                            }

                        })
                        .setNegativeButton(R.string.cancel, null)
                        .show();

            }
        });
        // Cancel account
        findViewById(R.id.unset_account).setOnClickListener(new OnClickListener() {

            @Override
            public void onClick(View v) {
                final EditText editText = new EditText(MainActivity.this);
                new AlertDialog.Builder(MainActivity.this)
                        .setTitle(R.string.unset_account)
                        .setView(editText)
                        .setPositiveButton(R.string.ok, new DialogInterface.OnClickListener() {

                            @Override
                            public void onClick(DialogInterface dialog, int which) {
                                String account = editText.getText().toString();
//Call the static method to set up MiPushClient.unsetUserAccount(MainActivity.this, account, null);
                            }

                        })
                        .setNegativeButton(R.string.cancel, null)
                        .show();
            }
        });
        // Setting labels
        findViewById(R.id.subscribe_topic).setOnClickListener(new OnClickListener() {

            @Override
            public void onClick(View v) {
                final EditText editText = new EditText(MainActivity.this);
                new AlertDialog.Builder(MainActivity.this)
                        .setTitle(R.string.subscribe_topic)
                        .setView(editText)
                        .setPositiveButton(R.string.ok, new DialogInterface.OnClickListener() {

                            @Override
                            public void onClick(DialogInterface dialog, int which) {
                                String topic = editText.getText().toString();
//Call the static method to set up MiPushClient.subscribe(MainActivity.this, topic, null);
                            }

                        })
                        .setNegativeButton(R.string.cancel, null)
                        .show();
            }
        });
        // Revocation label
        findViewById(R.id.unsubscribe_topic).setOnClickListener(new OnClickListener() {

            @Override
            public void onClick(View v) {
                final EditText editText = new EditText(MainActivity.this);
                new AlertDialog.Builder(MainActivity.this)
                        .setTitle(R.string.unsubscribe_topic)
                        .setView(editText)
                        .setPositiveButton(R.string.ok, new DialogInterface.OnClickListener() {

                            @Override
                            public void onClick(DialogInterface dialog, int which) {
                                String topic = editText.getText().toString();
//Call the static method to set up MiPushClient.unsubscribe(MainActivity.this, topic, null);
                            }

                        })
                        .setNegativeButton(R.string.cancel, null)
                        .show();
            }
        });
        // Setting the time to receive messages
        findViewById(R.id.set_accept_time).setOnClickListener(new OnClickListener() {

            @Override
            public void onClick(View v) {
                new TimeIntervalDialog(MainActivity.this, new TimeIntervalInterface() {

                    @Override
                    public void apply(int startHour, int startMin, int endHour,
                                      int endMin) {
                        //Call static methods for settings
                        MiPushClient.setAcceptTime(MainActivity.this, startHour, startMin, endHour, endMin, null);
                    }

                    @Override
                    public void cancel() {
                        //ignore
                    }

                })
                        .show();
            }
        });
        // Pause push
        findViewById(R.id.pause_push).setOnClickListener(new OnClickListener() {

            @Override
            public void onClick(View v) {
                MiPushClient.pausePush(MainActivity.this, null);
            }
        });

        findViewById(R.id.resume_push).setOnClickListener(new OnClickListener() {

            @Override
            public void onClick(View v) {
            //Call static methods for settings
                MiPushClient.resumePush(MainActivity.this, null);
            }
        });
    }

    @Override
    protected void onResume() {
        super.onResume();
        refreshLogInfo();
    }

    @Override
    protected void onDestroy() {
        super.onDestroy();
        DemoApplication.setMainActivity(null);
    }

    public void refreshLogInfo() {
        String AllLog = "";
        for (String log : logList) {
            AllLog = AllLog + log + "\n\n";
        }
        mLogView.setText(AllLog);
    }
}
summary
Different push identifiers, such as aliases, tags and so on, are set for different users according to their needs.
a. Alias
- The developer can set an alias for the specified user and then push the message to that alias. The effect is the same as pushing a message to RegId. Alias is the third user ID besides Regid and UserAccount.
- The developer can cancel an alias for the specified user, and the server will not push the message for that alias.
//Setting aliases
MiPushClient.setAlias(Context context, String alias, String category);

//Revocation of aliases
MiPushClient.unsetAlias(Context context, String alias, String category);
//Parameter description
//context: Android On the platform app In the context of the current situation, suggestions are introduced app Of application context
//alias: Set aliases for specified users / Cancel aliases for specified users
//category: Extended parameters, temporarily useless, filled directlynull

//Get all aliases for the client
public static List<String> getAllAlias(final Context context)
b. User Accoun
- Developers can set userAccount for specified users
- The developer can cancel a userAccount for the specified user, and the server will not push the message to the userAccount.
//Set up
MiPushClient.setUserAccount(final Context context, final String userAccount, String
category)

//Revoke
MiPushClient.unsetUserAccount(final Context context, final String userAccount, String
category)
//Parameter description
//Context: The context of APP on Android platform. It is recommended to pass in the application context of the current app.
//UserAccount: Set userAccount for the specified user / Cancel userAccount for the specified user
//category: Extended parameters, temporarily useless, directly fill in null

//Get all the accounts set by the client
public static List<String> getAllUserAccount(final Context context)
c. Topic
- Developers can combine their business characteristics and label users differently.
- When a message is pushed, the developer can select the corresponding label for each message according to the content of each message and the target user. The developer can realize group distribution according to the subject of subscription, so as to precisely push the message.
//Setting labels
MiPushClient.subscribe(Context context, String topic, String category);
//Revocation label
MiPushClient.unsubscribe(Context context, String topic, String category);
//Parameter description
//context: Android On the platform app In the context of the current situation, suggestions are introduced app Of application context
//topic: Set Subscribed Themes for Designated Users / Unsubscribe Themes for Designated Users
//category: Extended parameters, temporarily useless, filled directlynull

//Get all the labels of the client
public static List<String> getAllTopic(final Context context);
TimeIntervalDialog
Function: Used to set push time - start time + pause time
package com.xiaomi.mipushdemo;

import android.app.Dialog;
import android.content.Context;
import android.os.Bundle;
import android.view.View;
import android.widget.Button;
import android.widget.TimePicker;
import android.widget.TimePicker.OnTimeChangedListener;

//Inheriting the OnTimeChangedListener interface
public class TimeIntervalDialog extends Dialog implements OnTimeChangedListener {


    private TimeIntervalInterface mTimeIntervalInterface;
    private Context mContext;
    private TimePicker mStartTimePicker, mEndTimePicker;
    private int mStartHour, mStartMinute, mEndHour, mEndMinute;

    private Button.OnClickListener clickListener = new Button.OnClickListener() {

        @Override
        public void onClick(View v) {
            switch (v.getId()) {
                case R.id.apply:
                    dismiss();
                    //Setting time parameters
                    mTimeIntervalInterface.apply(mStartHour, mStartMinute, mEndHour, mEndMinute);
                    break;
                case R.id.cancel:
                    dismiss();
                    mTimeIntervalInterface.cancel();
                    break;
                default:
                    break;
            }
        }
    };

    public TimeIntervalDialog(Context context, TimeIntervalInterface timeIntervalInterface,
                              int startHour, int startMinute, int endHour, int endMinute) {
        super(context);
        mContext = context;
        this.mTimeIntervalInterface = timeIntervalInterface;
        this.mStartHour = startHour;
        this.mStartMinute = startMinute;
        this.mEndHour = endHour;
        this.mEndMinute = endMinute;
    }

    public TimeIntervalDialog(Context context, TimeIntervalInterface timeIntervalInterface) {
        this(context, timeIntervalInterface, 0, 0, 23, 59);
    }

    @Override
    protected void onCreate(Bundle savedInstanceState) {
        super.onCreate(savedInstanceState);
        setContentView(R.layout.set_time_dialog);
        setCancelable(true);
        setTitle(mContext.getString(R.string.set_accept_time));
        mStartTimePicker = (TimePicker) findViewById(R.id.startTimePicker);
        mStartTimePicker.setIs24HourView(true);
        mStartTimePicker.setCurrentHour(mStartHour);
        mStartTimePicker.setCurrentMinute(mStartMinute);
        mStartTimePicker.setOnTimeChangedListener(this);
        mEndTimePicker = (TimePicker) findViewById(R.id.endTimePicker);
        mEndTimePicker.setIs24HourView(true);
        mEndTimePicker.setCurrentHour(mEndHour);
        mEndTimePicker.setCurrentMinute(mEndMinute);
        mEndTimePicker.setOnTimeChangedListener(this);
        Button applyBtn = (Button) findViewById(R.id.apply);
        applyBtn.setOnClickListener(clickListener);
        Button cancelBtn = (Button) findViewById(R.id.cancel);
        cancelBtn.setOnClickListener(clickListener);
    }

    @Override
    public void onTimeChanged(TimePicker view, int hourOfDay, int minute) {
        if (view == mStartTimePicker) {
            mStartHour = hourOfDay;
            mStartMinute = minute;
        } else if (view == mEndTimePicker) {
            mEndHour = hourOfDay;
            mEndMinute = minute;
        }
    }

    interface TimeIntervalInterface {
        void apply(int startHour, int startMin, int endHour, int endMin);

        void cancel();
    }
}
summary
- Configuration of push time using a TimeIntervalDialog class that inherits the Dialog class
- Configuration available: setting push time (start-end), pausing push time, restoring push time
//Setting Push Time (Start & End)
MiPushClient.setAcceptTime(Context context, int startHour, int startMin, int endHour,
int endMin, String category)
//Set pause push time and resume push time
pausePush(Context context, String category)`and`resumePush(Context context, String category)
//Parameter description
//Context: The context of APP on Android platform. It is recommended to pass in the application context of the current app.
//startHour: Hours of the start time of the reception period
//startMin: Minutes of the start time of the reception period
//endHour: Hours at the end of the receiving period
//endMin: Minutes at the end of the receiving period
//category: Extended parameters, temporarily useless, directly fill in null
Configuration of Android Manifest files
//The lowest Android version of millet push support is 2.2
<uses-sdk  android:minSdkVersion="8"/>

//Setting up a series of permissions
    <uses-permission android:name="android.permission.WRITE_EXTERNAL_STORAGE" />
    <uses-permission android:name="android.permission.INTERNET" />
    <uses-permission android:name="android.permission.ACCESS_NETWORK_STATE" />
    <uses-permission android:name="android.permission.ACCESS_WIFI_STATE" />
    <uses-permission android:name="android.permission.READ_PHONE_STATE" />
    <uses-permission android:name="android.permission.GET_TASKS" />
    <uses-permission android:name="android.permission.VIBRATE" />

//Here com.xiaomi.mipushdemo is changed to the package name of its own app
    <permission android:name="com.xiaomi.mipushdemo.permission.MIPUSH_RECEIVE" android:protectionLevel="signature" />

//Here com.xiaomi.mipushdemo is changed to the package name of its own app
    <uses-permission android:name="com.xiaomi.mipushdemo.permission.MIPUSH_RECEIVE" />


//Registered Broadcast Receiver & Service
//They are all static registrations because they have to run in the background for a long time.
//Note: There are three broadcasting receivers and four services, including DemoMessageReceiver, which inherits PushMessageReceiver.

        //Four Backstage Services
        <service
          android:enabled="true"
          android:process=":pushservice"
          android:name="com.xiaomi.push.service.XMPushService"/>

        //This service must be added after version 3.0.1 (including version 3.0.1)
        <service
          android:name="com.xiaomi.push.service.XMJobService"
          android:enabled="true"
          android:exported="false"
          android:permission="android.permission.BIND_JOB_SERVICE"
          android:process=":pushservice" />

        //This service must be added after version 2.2.5 (including version 2.2.5)
        <service
          android:enabled="true"
          android:exported="true"
          android:name="com.xiaomi.mipush.sdk.PushMessageHandler" />

        <service android:enabled="true"
          android:name="com.xiaomi.mipush.sdk.MessageHandleService" />


        //The 3 broadcast
        <receiver
          android:exported="true"
          android:name="com.xiaomi.push.service.receivers.NetworkStatusReceiver" >
          <intent-filter>
            <action android:name="android.net.conn.CONNECTIVITY_CHANGE" />
            <category android:name="android.intent.category.DEFAULT" />
          </intent-filter>
        </receiver>

        <receiver
          android:exported="false"
          android:process=":pushservice"
          android:name="com.xiaomi.push.service.receivers.PingReceiver" >
          <intent-filter>
            <action android:name="com.xiaomi.push.PING_TIMER" />
          </intent-filter>
        </receiver>

//Broadcast registration of DemoMessageReceiver inherited from PushMessageReceiver
        <receiver
            android:name="com.xiaomi.mipushdemo.DemoMessageReceiver"
            android:exported="true">
            <intent-filter>
                <action android:name="com.xiaomi.mipush.RECEIVE_MESSAGE" />
            </intent-filter>
            <intent-filter>
                <action android:name="com.xiaomi.mipush.MESSAGE_ARRIVED" />
            </intent-filter>
            <intent-filter>
                <action android:name="com.xiaomi.mipush.ERROR" />
            </intent-filter>
        </receiver>
2. Summary of integrated millet push steps
- Step 1: Register the developer's account on the millet push platform and register the application: Application package name, AppID and AppKey
- Step 2: Add the millet push SDK package to the library
- Step 3: Initialize the millet push service in the application
- Step 4: Inherit PushMessageReceiver and copy the relevant push message method
- Step 5: Configure permissions, registration services and Broadcast Receiver in the Android Manifest file
Permissions in Android 6.0 need to be dynamically acquired
- Step 6: Set up a series of push settings as needed, such as user aliases, labels, etc.
Next, let's follow the steps above to implement a simple millet push Demo step by step.
3. Case analysis
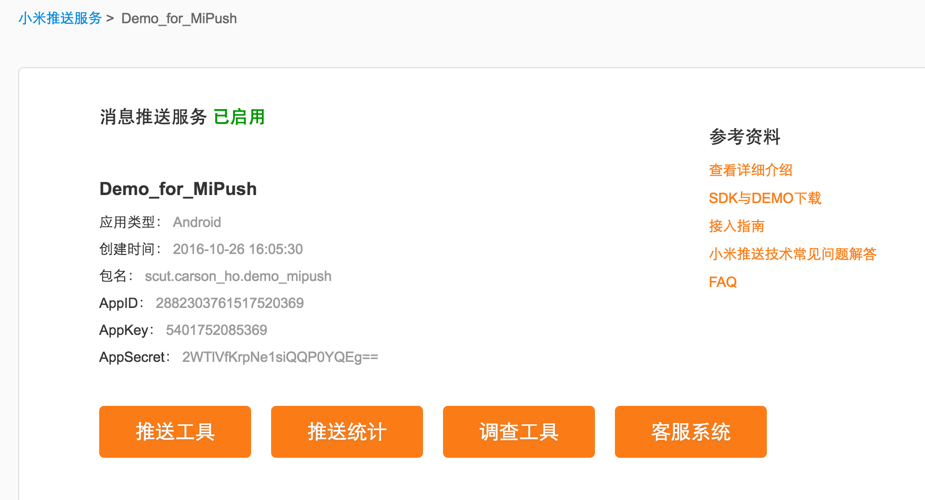
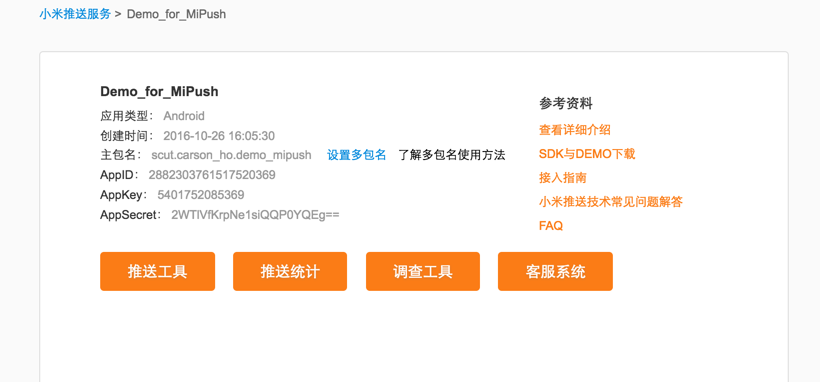
Step 1: Register the developer's account on the millet push platform and register the application: Application package name, AppID and AppKey
Note that the package name entered should be the same as the package name of your App application. 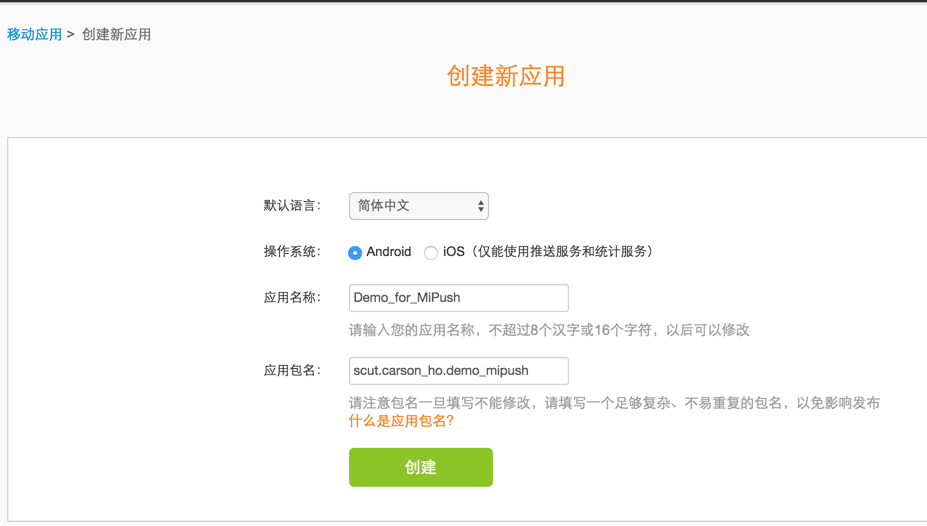
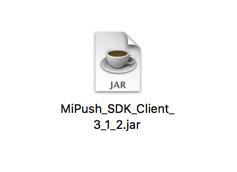
Step 2: Add the millet push SDK package to your application library
Step 3: Initialize the millet push service in the application
In order to improve the registration rate of push service, I choose to initialize the push service in onCreate of Application. *BaseActivity.java*package scut.carson_ho.demo_mipush;
import android.app.ActivityManager;
import android.app.Application;
import android.content.Context;
import android.os.Process;
import com.xiaomi.mipush.sdk.MiPushClient;
import java.util.List;
/**
* Created by Carson_Ho on 16/10/26.
*/
//Mainly inherit Application
public class BaseActivity extends Application {
// Use the ID of your own APP (registered on the official website)
private static final String APP_ID = "2882303761517520369";
// Use the Key of your own APP (registered on the official website)
private static final String APP_KEY = "5401752085369";
//In order to improve the registration rate of push service, I suggest initializing push service in onCreate of Application
//You can also initialize push services elsewhere as needed
@Override
public void onCreate() {
super.onCreate();
if (shouldInit()) {
//Registration push service
//After successful registration, the broadcast will be sent to DemoMessage Receiver.
// Registration information can be obtained from the MiPushCommandMessage object parameter in DemoMessageReceiver's onCommandResult method
MiPushClient.registerPush(this, APP_ID, APP_KEY);
}
}
//By judging whether all processes in the phone have the App process or not
//To determine if the App is open
private boolean shouldInit() {
//Through Activity Manager, we can get the running activities in the system.
//Including process, application / package, service and Task information.
ActivityManager am = ((ActivityManager) getSystemService(Context.ACTIVITY_SERVICE));
List<ActivityManager.RunningAppProcessInfo> processInfos = am.getRunningAppProcesses();
String mainProcessName = getPackageName();
//Get the unique identity of this App
int myPid = Process.myPid();
//Use an enhanced for loop to remove all processes from the phone
for (ActivityManager.RunningAppProcessInfo info : processInfos) {
//Determine whether the App exists in the process by comparing the unique identifier and package name of the process
if (info.pid == myPid && mainProcessName.equals(info.processName)) {
return true;
}
}
return false;
}
}android:name=".BaseActivity"This is the first time that the BaseActivity.java class file is loaded when the application is initialized.
The following picture: 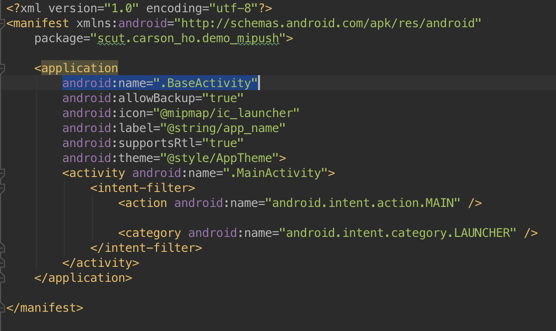
Step 4: Set the subclass to inherit PushMessageReceiver and copy the relevant push message method
Mipush_Broadcast.java
package scut.carson_ho.demo_mipush;

import android.content.Context;

import com.xiaomi.mipush.sdk.ErrorCode;
import com.xiaomi.mipush.sdk.MiPushClient;
import com.xiaomi.mipush.sdk.MiPushCommandMessage;
import com.xiaomi.mipush.sdk.MiPushMessage;
import com.xiaomi.mipush.sdk.PushMessageReceiver;

/**
 * Created by Carson_Ho on 16/10/26.
 */

public class Mipush_Broadcast extends PushMessageReceiver {

    //Called when a passing message arrives at the client
    //Function: Pass-through message can be obtained through parameter message. See official SDK document for details.
    @Override
    public void onReceivePassThroughMessage(Context context, MiPushMessage message) {

        //Print messages for easy testing
        System.out.println("The leaked message arrived.");
        System.out.println("The message is"+message.toString());

    }


//Called when notification message arrives at client
    //Note: Notification messages that do not pop up in the foreground will also be called back when they arrive at the client.
    //Function: Get notification message through parameter message, see official SDK document for details

    @Override
    public void onNotificationMessageArrived(Context context, MiPushMessage message) {
        //Print messages for easy testing
        System.out.println("Notification message arrived");
        System.out.println("The notification message is"+message.toString());
    }

    //Called when the user clicks the notification bar message manually
    //Note: Notification messages that do not pop up in the foreground will also be called back when they arrive at the client.
    //Function: 1. Obtain notification message through parameter message. See official SDK document for details.
    //2. Set up the user to click on the message and open the application or page or other pages

    @Override
    public void onNotificationMessageClicked(Context context, MiPushMessage message) {

        //Print messages for easy testing
        System.out.println("The user clicked on the notification message");
        System.out.println("The notification message is" + message.toString());
        System.out.println("After clicking,Will enter the application" );

    }

    //Used to receive the response result of the client after sending commands to the server.
    @Override
    public void onCommandResult(Context context, MiPushCommandMessage message) {

        String command = message.getCommand();
        System.out.println(command );


        if (MiPushClient.COMMAND_REGISTER.equals(command)) {
            if (message.getResultCode() == ErrorCode.SUCCESS) {

                //Print information to test whether registration is successful or not
                System.out.println("login was successful");

            } else {
                System.out.println("login has failed");
            }
        }
    }

    //Used to receive the response result of the client sending the registration command to the server.
    @Override
    public void onReceiveRegisterResult(Context context, MiPushCommandMessage message) {

        String command = message.getCommand();
        System.out.println(command );

        if (MiPushClient.COMMAND_REGISTER.equals(command)) {
            if (message.getResultCode() == ErrorCode.SUCCESS) {

                //Print logs: successful registration
                System.out.println("login was successful");
            } else {
                //Print Log: Registration Failure
                System.out.println("login has failed");
            }
        } else {
            System.out.println("Other circumstances"+message.getReason());
        }
    }

}
See the specific settings Official SDK Documents The simplest Demo is given here, without much description.
Step 5: Configure permissions, registration services and Broadcast Receiver in the Android Manifest file
AndroidManifest.xml
<?xml version="1.0" encoding="utf-8"?>
<manifest xmlns:android="http://schemas.android.com/apk/res/android"
    package="scut.carson_ho.demo_mipush">

    //Related authority
    <uses-permission android:name="android.permission.WRITE_EXTERNAL_STORAGE" />
    <uses-permission android:name="android.permission.INTERNET" />
    <uses-permission android:name="android.permission.ACCESS_NETWORK_STATE" />
    <uses-permission android:name="android.permission.ACCESS_WIFI_STATE" />
    <uses-permission android:name="android.permission.READ_PHONE_STATE" />
    <uses-permission android:name="android.permission.GET_TASKS" />
    <uses-permission android:name="android.permission.VIBRATE" />


    //Note here that. permission.MIPUSH_RECEIVE is the package name of its own app
    <permission android:name="scut.carson_ho.demo_mipush.permission.MIPUSH_RECEIVE" android:protectionLevel="signature" />

    //Note here that. permission.MIPUSH_RECEIVE is the package name of its own app
    <uses-permission android:name="scut.carson_ho.demo_mipush.permission.MIPUSH_RECEIVE" />

//Note to initialize the BaseActivity.java class
    <application
        android:name=".BaseActivity"
        android:allowBackup="true"
        android:icon="@mipmap/ic_launcher"
        android:label="@string/app_name"
        android:supportsRtl="true"
        android:theme="@style/AppTheme">
        <activity android:name=".MainActivity">
            <intent-filter>
                <action android:name="android.intent.action.MAIN" />

                <category android:name="android.intent.category.LAUNCHER" />
            </intent-filter>
        </activity>


    //Registered Broadcast Receiver and Service
    //They are all static registrations because they have to run in the background for a long time.
    //Note: There are three broadcasting receivers and four services, including DemoMessageReceiver, which inherits PushMessageReceiver.

    //Four Backstage Services
    <service
        android:enabled="true"
        android:process=":pushservice"
        android:name="com.xiaomi.push.service.XMPushService"/>

    //This service must be added after version 3.0.1 (including version 3.0.1)
    <service
        android:name="com.xiaomi.push.service.XMJobService"
        android:enabled="true"
        android:exported="false"
        android:permission="android.permission.BIND_JOB_SERVICE"
        android:process=":pushservice" />

    //This service must be added after version 2.2.5 (including version 2.2.5)
    <service
        android:enabled="true"
        android:exported="true"
        android:name="com.xiaomi.mipush.sdk.PushMessageHandler" />

    <service android:enabled="true"
        android:name="com.xiaomi.mipush.sdk.MessageHandleService" />


    //The 3 broadcast
    <receiver
        android:exported="true"
        android:name="com.xiaomi.push.service.receivers.NetworkStatusReceiver" >
        <intent-filter>
            <action android:name="android.net.conn.CONNECTIVITY_CHANGE" />
            <category android:name="android.intent.category.DEFAULT" />
        </intent-filter>
    </receiver>

    <receiver
        android:exported="false"
        android:process=":pushservice"
        android:name="com.xiaomi.push.service.receivers.PingReceiver" >
        <intent-filter>
            <action android:name="com.xiaomi.push.PING_TIMER" />
        </intent-filter>
    </receiver>

    //Broadcast registration of DemoMessageReceiver inherited from PushMessageReceiver
    <receiver
        android:name=".Mipush_Broadcast"
        android:exported="true">
        <intent-filter>
            <action android:name="com.xiaomi.mipush.RECEIVE_MESSAGE" />
        </intent-filter>
        <intent-filter>
            <action android:name="com.xiaomi.mipush.MESSAGE_ARRIVED" />
        </intent-filter>
        <intent-filter>
            <action android:name="com.xiaomi.mipush.ERROR" />
        </intent-filter>
    </receiver>


    </application>
</manifest>
Step 6: Set up a series of push settings as needed, such as user aliases, labels, etc.
- Here's a simple Demo, so don't overdo the settings
- For more settings, look back at the official Demo parsing above.
Operation result
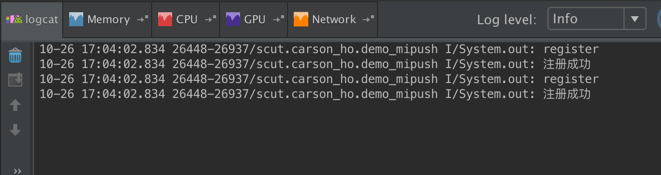
Well, after the client's code is written, you can go to the official website of millet to test the message push.
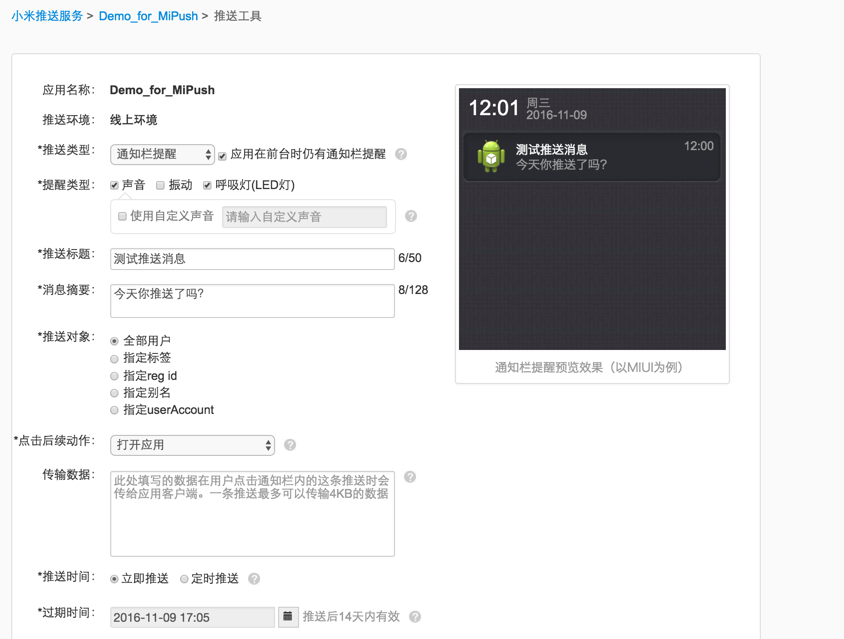
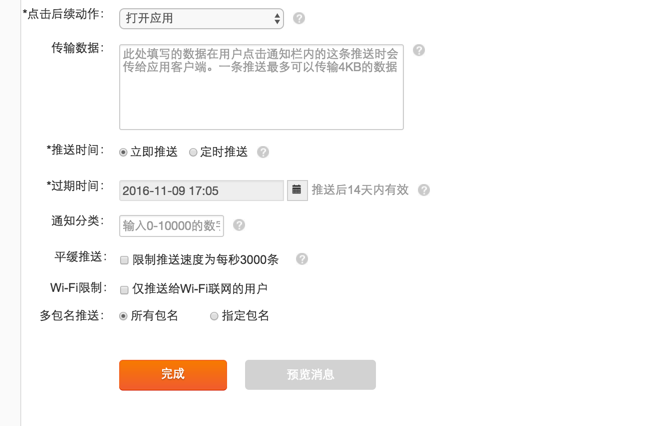
Step 1: Select the application you created in the message push of Millet's official website, and then click "Push Tool"
Step 2: Set up information about push messages
The configuration is very comprehensive and basically meets the need of push.
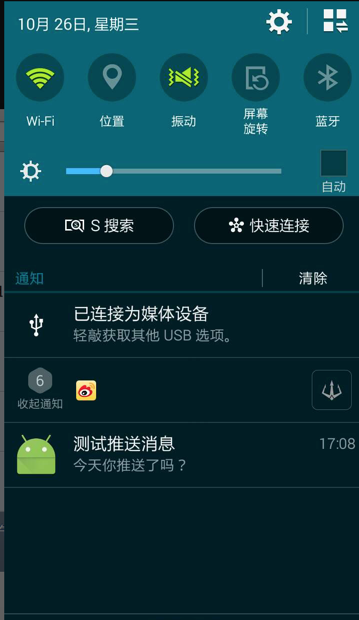
The result of push


4. Demo download address
Carson's Github: Demo_MiPush
5. Thoughts on Millet Pushing (Problems)
The above-mentioned millet push seems simple: initialization push service + related push settings. However, good code should not only work under normal conditions, but also take full account of failure. So, what kind of failure should we consider?
- Background: In the process of initializing push service, it is necessary to contact the millet push server to apply for reg id (push token).
-
Conflict: Initialization process may fail: network problem (no network or weak network signal), server problem causes initialization failure. So when should I initialize again when I fail?
There are no measures to solve this problem in the Demo of millet push.
Solution: Provide retry mechanism in case of initialization failure until initialization is successful (can be determined by checking whether the push token has been obtained). The logic of problem solving is as follows:
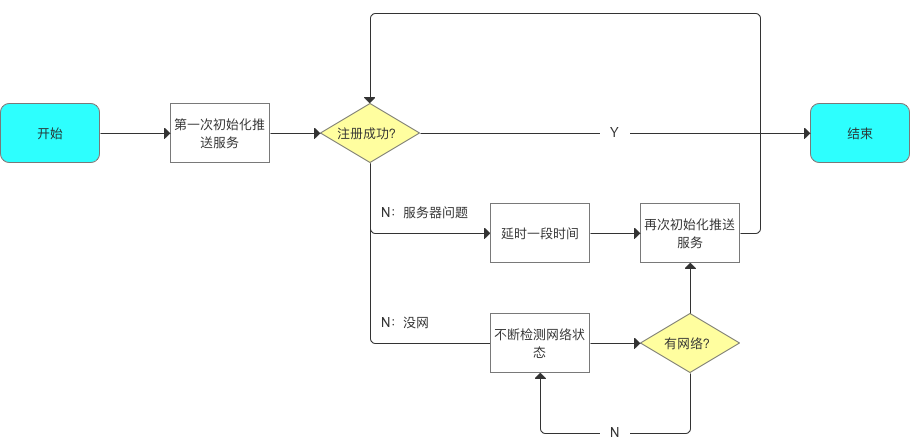
- The specific code is not described too much here. If you want to get the millet push source code with registration retry mechanism, please leave your mailbox in the comments and I will send it to your mailbox in person.
- Knowledge Point Coverage: Network Data Detection-Broadcasting Receiver
- See the other two articles I wrote specifically:
Android: Broadcast Receiver Broadcasting Receiver Broadcasting Receiver
Android: Detecting Network Status & Monitoring Network Changes
- Knowledge Point Coverage: Network Data Detection-Broadcasting Receiver
summary
Considering all the abnormal problems and dealing with them properly can truly reflect the power of the program ape. I hope that when you do code, you don't just do code porter. Writing code alone won't make you grow. The key is thinking.
6. summary
- I believe you already know how to integrate millet push in your Android application.
- Next, I'll go on to explain how to push messages in Android. See
The Most Fully Parsed Android Message Push Solution in History
Android Push: Detailed Analysis of Third Party Message Push Platform - Next, I'll continue to talk about how to integrate the third-party push functions (Huawei push, Aurora push, Personal push, etc.) into Android applications. I'm interested in continuing to pay attention to them. Carson_Ho's Notes on Android Development
Please help! Because your encouragement is my greatest motivation to write!
Reading Related Articles
Android development: the most comprehensive and understandable Android screen adaptation solution
Android development: Handler asynchronous communication mechanism fully parsed (including Looper, Message Queue)
Android development: top Tab navigation bar implementation (TabLayout+ViewPager+Fragment)
Android development: implementation of the bottom Tab menu bar (FragmentTabHost+ViewPager)
Android development: JSON profile and the most comprehensive parsing method!
Android development: an introduction to XML and parsing comparison of DOM, SAX and PULL