2. Linear layout
There are six layouts in Android:
LinearLayout,
Relativelayout,
Tablelayout
FrameLayout,
Absolute layout,
GridLayout
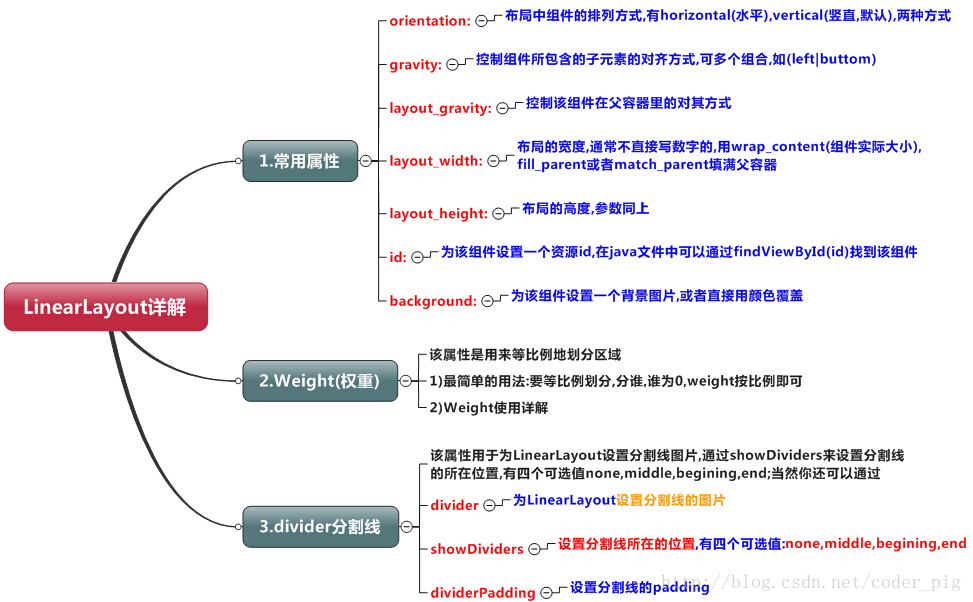
Detailed explanation of weight attribute:
① Simplest usage:
As shown in the figure: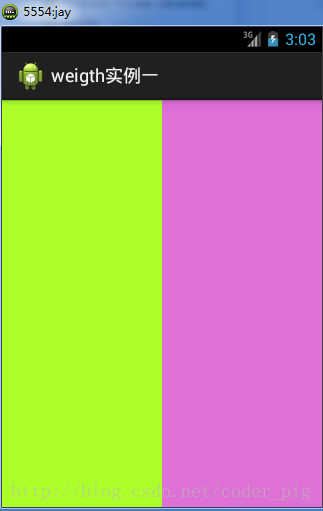
<LinearLayout xmlns:android="http://schemas.android.com/apk/res/android"
    xmlns:tools="http://schemas.android.com/tools"
    android:id="@+id/LinearLayout1"
    android:layout_width="match_parent"
    android:layout_height="match_parent"
    android:orientation="horizontal">

    <LinearLayout
        android:layout_width="0dp"
        android:layout_height="fill_parent"
        android:background="#ADFF2F"
        android:layout_weight="1"/>


    <LinearLayout
        android:layout_width="0dp"
        android:layout_height="fill_parent"
        android:background="#DA70D6"
        android:layout_weight="2"/>

</LinearLayout>
To achieve the 1:1 effect of the first one, you only need to change the weight of the two linearlayouts to 1 and 1 respectively. Usage Summary: divide the horizontal direction according to proportion: set the android:width property of the involved View to 0dp, and then set it to the android weight property to set the proportion; Analogy, for the vertical direction, just set android:height to 0dp, and then set the weight attribute!
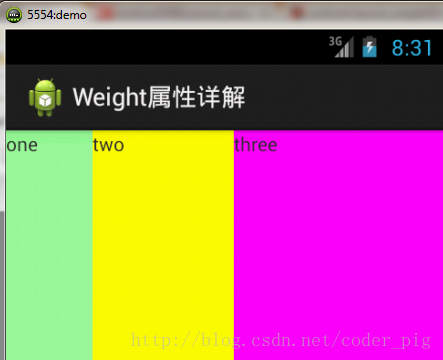
② Detailed explanation of weight attribute:
Of course, if we do not apply the above method of setting to 0dp, we can directly use wrap_content and match_ For parent, you need to parse the weight attribute. There are two cases: wrap_content and match_parent! In addition, it also depends on whether the orientation of LinearLayout is horizontal or vertical, which determines which direction is divided in equal proportion
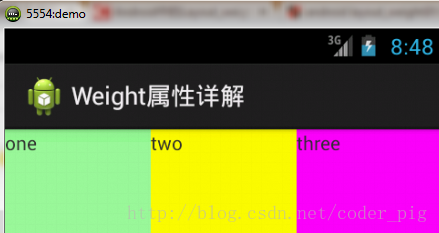
1)wrap_content is relatively simple. It is directly proportional
<LinearLayout xmlns:android="http://schemas.android.com/apk/res/android"
    xmlns:tools="http://schemas.android.com/tools"
    android:id="@+id/LinearLayout1"
    android:layout_width="match_parent"
    android:layout_height="match_parent"
    android:orientation="horizontal" >

    <TextView
        android:layout_weight="1"
        android:layout_width="wrap_content"
        android:layout_height="fill_parent"
        android:text="one"
        android:background="#98FB98"
     />
     <TextView
        android:layout_weight="2"
        android:layout_width="wrap_content"
        android:layout_height="fill_parent"
        android:text="two"
        android:background="#FFFF00"
     />
     <TextView
        android:layout_weight="3"
        android:layout_width="wrap_content"
        android:layout_height="fill_parent"
        android:text="three"
        android:background="#FF00FF"
     />

</LinearLayout>
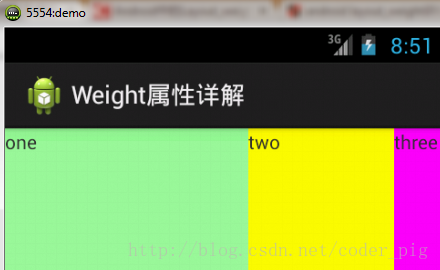
2)match_parent(fill_parent): this needs to be calculated
Let's write this simple code:
<LinearLayout xmlns:android="http://schemas.android.com/apk/res/android"
    xmlns:tools="http://schemas.android.com/tools"
    android:id="@+id/LinearLayout1"
    android:layout_width="match_parent"
    android:layout_height="match_parent" >

    <TextView
        android:layout_weight="1"
        android:layout_width="fill_parent"
        android:layout_height="fill_parent"
        android:text="one"
        android:background="#98FB98"
     />
     <TextView
        android:layout_weight="2"
        android:layout_width="fill_parent"
        android:layout_height="fill_parent"
        android:text="two"
        android:background="#FFFF00"
     />
     <TextView
        android:layout_weight="3"
        android:layout_width="fill_parent"
        android:layout_height="fill_parent"
        android:text="three"
        android:background="#FF00FF"
     />

</LinearLayout>
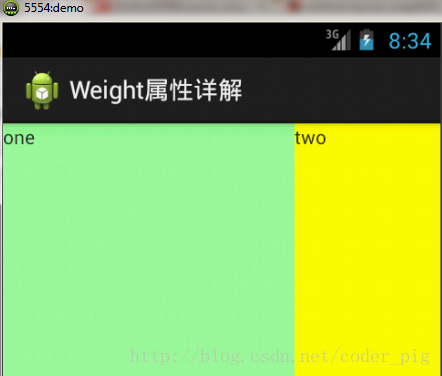
At this time, there will be questions. How could this happen? The ratio is 2:1. So where is the three? There are three in the code, and 3 is set, and the ratio of 1 to 2 is not right. 1:2:3 becomes 2:1:0. How can this happen? A: it's not that simple here. We still need to calculate it
1. The system first assigns the required width fill to three textview s_ Parent, that is, each is filled with its parent control,
2. Then the remaining space = 1 parent_width-3 parents_ Width = - 2 parents_ Width (parent_width refers to the screen width)
3. The actual width of the first TextView should be = fill_ The width of the parent,
That is, parent_ Width + the weight ratio of the remaining space occupied by him is 1 / 6 * the size of the remaining space (- 2 parent_width) = 2 / 3 parent_ width
4. Similarly, the actual width of the second TextView = parent_width + 2/6*(-2parent_width)=1/3parent_width;
5. Actual width of the third TextView = parent_width + 3/6*(-2parent_width)=0parent_width; So the ratio of 2:1:0 is displayed. The third one has no space directly
Same principle calculation
Scale: 1:1:1
Calculate once according to the above calculation method, and the result is: 1 / 3, 1 / 3, 1 / 3,
Then let's try again: 2:3:4
Calculation results: 5 / 9, 3 / 9, 1 / 9,
③ Set the weight attribute in Java code:
setLayoutParams(new LayoutParams(LayoutParams.FILL_PARENT,
        LayoutParams.WRAP_CONTENT, 1));
Set split lines for LinearLayout
① Directly add a view to the layout. The function of this view is to display only one line. The code is also very simple:
<View
    android:layout_width="match_parent"
    android:layout_height="1px"
    android:background="#000000" />
This is a black line in the horizontal direction. Of course, you can change it to other colors or use the picture

② The second is to use a divider attribute of LinearLayout to directly set the split line for LinearLayout. Here, you need to prepare a picture of the line yourself
1)android:divider sets the picture as the split line
2)android:showDividers sets the position of the split line, none, beginning, end, middle (between each two components) 3)dividerPadding sets the Padding of the split line
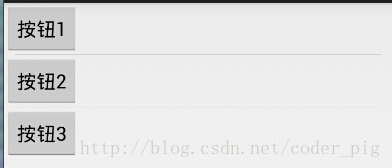
<LinearLayout xmlns:android="http://schemas.android.com/apk/res/android"
    xmlns:tools="http://schemas.android.com/tools"
    android:id="@+id/LinearLayout1"
    android:layout_width="match_parent"
    android:layout_height="match_parent"
    android:divider="@drawable/ktv_line_div"
    android:orientation="vertical"
    android:showDividers="middle"
    android:dividerPadding="10dp"
    tools:context="com.jay.example.linearlayoutdemo.MainActivity" >

    <Button
        android:layout_width="wrap_content"
        android:layout_height="wrap_content"
        android:text="Button 1" />

    <Button
        android:layout_width="wrap_content"
        android:layout_height="wrap_content"
        android:text="Button 2" />

    <Button
        android:layout_width="wrap_content"
        android:layout_height="wrap_content"
        android:text="Button 3" />

</LinearLayout>
matters needing attention:
Using Layout_gravity is a very important issue!!! Question content: arrange two textviews in the horizontal direction of a LinearLayout. What if you want one left and one right? Maybe you will blurt out: "gravity, set a left and a right!" is it really so simple? Have you tried? Write a simple Layout and you will find that it backfires: the code is as follows:
<LinearLayout xmlns:android="http://schemas.android.com/apk/res/android"
    xmlns:tools="http://schemas.android.com/tools"
    android:layout_width="match_parent"
    android:layout_height="match_parent"
    android:orientation="horizontal"
    tools:context="com.jay.example.getscreendemo.MainActivity" >

    <TextView
        android:layout_width="wrap_content"
        android:layout_height="200dp"
        android:layout_gravity="left"
        android:background="#FF7878"
        android:gravity="center"
        android:text="O(∩_∩)O ha-ha~" />

    <TextView
        android:layout_width="wrap_content"
        android:layout_height="200dp"
        android:layout_gravity="right"
        android:background="#FF7428"
        android:gravity="center"
        android:text="(*^__^*) Hee hee" />

</LinearLayout>
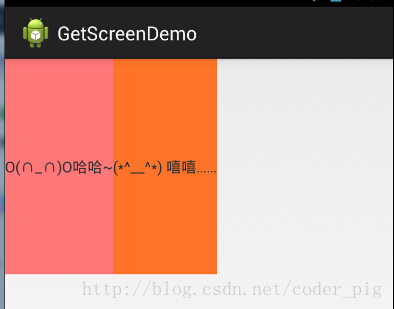
When you see this, you will say: Oh, really not. Why not add a gravity=left attribute to the outer LinearLayout, and then set the layout of the second TextView_ Gravity is right, well, let's try:
<LinearLayout xmlns:android="http://schemas.android.com/apk/res/android"
    xmlns:tools="http://schemas.android.com/tools"
    android:layout_width="match_parent"
    android:layout_height="match_parent"
    android:orientation="horizontal"
    android:gravity="left"
    tools:context="com.jay.example.getscreendemo.MainActivity" >

    <TextView
        android:layout_width="wrap_content"
        android:layout_height="200dp"
        android:background="#FF7878"
        android:gravity="center"
        android:text="O(∩_∩)O ha-ha~" />

    <TextView
        android:layout_width="wrap_content"
        android:layout_height="200dp"
        android:layout_gravity="right"
        android:background="#FF7428"
        android:gravity="center"
        android:text="(*^__^*) Hee hee" />

</LinearLayout>
The result is the same

What should I do?
When android:orientation = "vertical", only the settings in the horizontal direction will work, and the settings in the vertical direction will not work. left, right, center_horizontal is effective. When android:orientation = "horizontal", only the vertical setting works, but the horizontal setting does not. top, bottom, center_vertical is effective.
However, this method seems to be of little use. For example, if you can only set the left-right alignment in the vertical direction, the following effects will appear:
Therefore, RelativeLayout is recommended! Relative layout