1, layout in Android
1. Linear Layout: it is divided into vertical Linear Layout (android:orientation = "vertical") and horizontal Linear Layout (android:orientation = "horizontal" / / horizontal Linear Layout) according to the arrangement direction.
When a linear layout defines an arrangement direction, it will always be arranged in that direction, unless it is redefined by nesting.
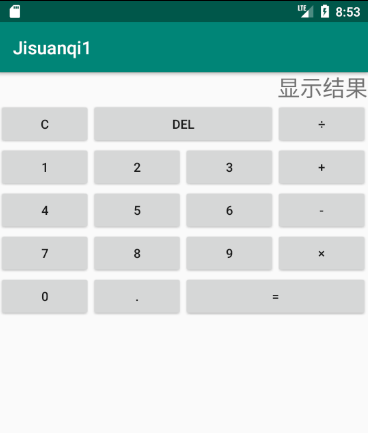
This is the case with our calculator interface, which has several nested horizontal layouts in the original vertical layout.
Common code:
android:layout_weight="number" //Represents the percentage of space left for this control, which is usually used to average the positions between several controls, defined as 1
android:gravity="right"//android:gravity: for the control itself, it is used to set where the "content of the control itself" should be displayed in the "volume of the control itself". The default value is the left side.
android:layout_gravity="right"//android:layout_gravity: relative to the parent element of the control, it sets the position of the control in its parent element.
android:layout_gravity="fill"//Represents a horizontal stretch that fills the parent space, or a vertical stretch that fills the parent space
android:layout_width="match_parent"
android:layout_height="wrap_content"
//The above two methods are respectively to set the width and height of the control key
//Match [parent] indicates the maximum length of inherited parent class. In Android 2.2 and later versions, match [parent] and fill [parent] are the same meaning. The meaning of the two parameters is the same. Match [parent] is more appropriate, so both words can be used from 2.2. Then, if you consider the usage of the lower version, you need to use fill? Parent
//Wrap content indicates the length set to fit the text size; setting the size of a view to wrap content will force the view to expand to show all content. For example, TextView and ImageView controls, set to wrap ﹣ content to display the entire text and image inside them. Layout elements change size based on content. Setting the size of a view to wrap? Content is roughly the same as setting the Autosize property of a Windows control to True.
//Fill parent setting the layout of a component to fill parent will force the component to expand to fill as much space as possible within the layout cell. This is roughly the same as the dockstyle property of the Windows control. Setting a top layout or control to fill "parent" will force it to fit across the screen.
Relative Layout:
android:layout_alignParentLeft="true" //In the upper left corner of the parent container
android:layout_alignParentBottom
android:layout_alignParentTop
android:layout_alignParentRight  //Only works when the parent control is RelativeLayout, not for layouts like LinearLayout
android:layout_centerInParent="true" //Located in the center of the layout container;
layout_centerHorizontal//Located in the horizontal and central position of the layout container;
layout_centerVertical//In the vertical center of the layout container
//Referenced control: position between control and control:
android:layout_below="@id/***" //Under the assembly of
android:layout_toLeftOf="@id/###" /*It is located on the left side of the component, close and parallel*/
//Control to control alignment:
android:layout_alignLeft="@id/***" //Align closely with the left boundary of the * * * assembly and stack them together;
android:layout_alignTop="@id/###" /*Align with the upper boundary of the component*/
Table Layout:
The table layout model manages the child controls in the form of rows and columns. Each row is a TableRow object, which can also be a View object. TableRow can add child controls, each of which is a column. N tablerows are arranged vertically in the form of N rows.
android:shrinkColumns="n":/*Set column n+1 to be contractible. When the collapsible column is too wide (too much content) it will not be squeezed out of the screen. When you need to set multiple columns to be shrinkable, separate the column numbers with commas.*/
android:stretchColumns="n":/*Set the n+1 column as an extensible column to fill the remaining space. If more than one column needs to be extensible, use commas to separate the column numbers that need to be extended.  */
     // Column element (Button) attribute to define child controls.
    android:layout_colum:/*Sets the columns that the control specifies in the TableRow.*/
   android:layout_span:/*Sets the number of columns the control spans.*/
Grid layout:
android:rowCount="5" //Define the maximum number of cells in row as 5
android:columnCount="4"//A lattice with a maximum lattice number of 4
android:layout_columnSpan="4"//Sets how many columns the component spans horizontally
//The functions of Android: layout ' width and Android: layout ' columnspan do not overlap. The former sets the visual horizontal width, while the latter sets that no matter how wide the former is, no other components are allowed to occupy the scope of Android: layout ' columnspan.
android:layout_rowSpan="3"//The grid representing = takes up 3 lines
android:layout_gravity="fill"//If you need to fill the control horizontally or vertically, if you don't write this sentence, two more spaces will be left, but not three spaces / >
Absolute layout:
The child controls of absolute layout need to specify the horizontal and vertical coordinate values relative to this coordinate layout. Mobile applications need to adapt to different screen sizes. However, this layout model can not adapt to the screen size, and the application is relatively small.
android:layout_x="10px"//Horizontal absolute position
android:layout_y="10px"//Vertical absolute position
Frame layout:
The frame layout, which is for the left position by default (you can define the position with Android: layout > gravity = "center"). All controls have their own coordinate positions to display
Frame layout is the simplest form of layout. All views added to this layout are displayed in layers. The first added control is placed at the bottom, and the last view added to the frame layout is displayed at the top. The control of the previous layer will cover the control of the next layer. This display is somewhat like a stack.
2, Methods in the activity file in Android:
private boolean isChar = false;//A Boolean object is used to convert a non Boolean value to a Boolean value (true or false). Check whether the Boolean object is true or false.
StringBuffer// Class can be modified many times, and does not produce new unused objects.
//StringBuilder class is proposed in Java 5. The biggest difference between StringBuilder and StringBuffer is that StringBuilder's method is not thread safe (cannot be accessed synchronously). Because StringBuilder has speed advantage over StringBuffer, StringBuilder class is recommended in most cases. However, when the application requires thread safety, the StringBuffer class must be used.
 super.onCreate(savedInstanceState)//Is the onCreate() method that calls the parent Activity
The following are the main methods supported by StringBuffer class:
digtalB = new StringBuffer();
digtalB.append(0);
StringBuffer	append(boolean b)//Appends the string representation of the boolean parameter to the sequence.
StringBuffer	append(char c)//Append the string representation of the char parameter to this sequence.
StringBuffer	append(char[] str)//Append the string representation of the char array parameter to this sequence.
StringBuffer	append(char[] str, int offset, int len)//Appends the string representation of the subarray of the char array parameter to this sequence.
StringBuffer	append(CharSequence s)//Appends the specified CharSequence to this sequence.
StringBuffer	append(CharSequence s, int start, int end)//Appends the specified sequence CharSequence to this sequence.
StringBuffer	append(double d)//Append the string representation of the double parameter to this sequence.
StringBuffer	append(float f)//Append the string representation of the float parameter to this sequence.
StringBuffer	append(int i)//Append the string representation of the int parameter to this sequence.
StringBuffer	append(long lng)//Append the string representation of the long parameter to this sequence.
StringBuffer	append(Object obj)//Appends the string representation of the Object parameter.
StringBuffer	append(String str)//Appends the specified string to this character sequence.
StringBuffer	append(StringBuffer sb)//The StringBuffer sequence will be specified.
StringBuffer	appendCodePoint(int codePoint)//Append the string representation of the codePoint parameter to this sequence.
StringBuffer	delete(int start, int end)//Delete the characters in the substring of this sequence.
StringBuffer	deleteCharAt(int index)//Delete the specified position of char in this sequence.
StringBuffer	insert(int offset, boolean b)//Inserts a string representation of the boolean parameter in this sequence.
StringBuffer	insert(int offset, char c)//Inserts a string representation of the char parameter in this sequence.
StringBuffer	insert(int offset, char[] str)//Inserts a string representation of the char array parameter in this sequence.
StringBuffer	insert(int index, char[] str, int offset, int len)//Inserts a string representation of the subarray of str array parameters in this sequence.
StringBuffer	insert(int dstOffset, CharSequence s)//The CharSequence that will be specified.
StringBuffer	insert(int dstOffset, CharSequence s, int start, int end)//Will specify the subsequence CharSequence.
StringBuffer	insert(int offset, double d)//Inserts a string representation of the double parameter in this sequence.
StringBuffer	insert(int offset, float f)//Inserts a string representation of the float parameter in this sequence.
StringBuffer	insert(int offset, int i)//Inserts the string representation of the second int parameter into this sequence.
StringBuffer	insert(int offset, long l)//Inserts a string representation of the long parameter in this sequence.
StringBuffer	insert(int offset, Object obj)//Inserts the string representation of the Object parameter into this character sequence.
StringBuffer	insert(int offset, String str)//Inserts a string into this character sequence.
StringBuffer	replace(int start, int end, String str)//Replaces the String in the substring of this sequence with the character in the specified String.
StringBuffer	reverse() //Causes the character sequence to be replaced by the opposite of the sequence.
| Serial number | Method description |
|---|---|
| 1. | public StringBuffer append(String s) appends the specified string to this character sequence. |
| 2. | public StringBuffer reverse() replaces this character sequence with its reverse form. |
| 3. | public delete(int start, int end) removes characters from the substring of this sequence. |
| 4. | public insert(int offset, int i) inserts the string representation of the int parameter into this sequence. |
| 5. | replace(int start, int end, String str) replaces the characters in the substring of this sequence with the characters in the given String. |
Bundle SavedInstanceState save state:
When you press the home key to exit the program interface or recycle the application process, in this case, you can use Bundle SavedInstanceState to open the application again and return to the original state
When an Activity becomes easily destroyed, the onSaveInstanceState of the Activity is executed
Unless the user presses the back button.
btnAdd = (Button) this.findViewById(R.id.btnAdd);//Find by id

