1. Remove the title bar from the system by code
For native Activities, the main ways to clear the header bar are:
Before Activity calls setContentView, call the following code
........
requestWindowFeature(Window.FEATURE_NO_TITLE);
........
However, the above code is invalid for Activities that inherit android. support. v7. app. AppCompat Activity.
To achieve the same effect, the following code must be invoked:
..........
//Call after loading layout
if (getSupportActionBar() != null) {
    getSupportActionBar().hide();
}
..........
Or call:
................
//Called before setContentView
supportRequestWindowFeature(Window.FEATURE_NO_TITLE);
................
For native Dialog Fragments, the way to remove the title bar is:
In the overwritten onCreateView function, call the following code:
..............
getDialog().requestWindowFeature(Window.FEATURE_NO_TITLE);
.............
However, for Dialog Fragment, which inherits android. support. v4. app. Dialog Fragment, the above code is invalid.
At present, the only feasible method of our experiment is to override the onCreate method and call the setStyle function of Dialog Fragment, as follows:
@Override
public void onCreate(Bundle savedInstanceState) {
    super.onCreate(savedInstanceState);

    //style specifies no title
    //Thee is 0, indicating that it is automatically selected by the system.
    int style = DialogFragment.STYLE_NO_TITLE, theme = 0;

    setStyle(style,theme);
}
2. Use of alias resources
An APK running on mobile phones and tablets may need to load different layout files.
At this point, alias resources can be used to address this requirement.
For example, you can create a refs.xml in the res/values directory, which contains:
<?xml version="1.0" encoding="utf-8"?>
<resources>
    <! -- The type attribute determines the actual type of the resource - >
    <! -- The alias resource actually points to the activity_fragment.xml file in the layout Directory - > the
    <item name="activity_masterdetail" type="layout">@layout/activity_fragment</item>
</resources>
The ID of the alias resource is: R. layout. activity_master detail.
Then, we can create a refs.xml file again, but at this point specify its minimum screen width, as shown below: 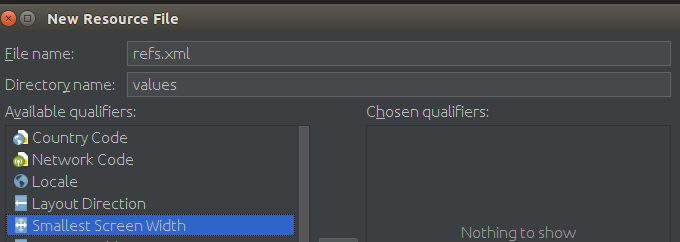

After the above work, there are two refs.xml files in res/values: 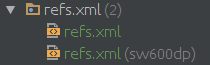
This is equivalent to adding a resource modifier after a refs.xml.
sw refers to the smallest screen size, independent of the current direction of the device.
In the new refs.xml, we add the following:
<?xml version="1.0" encoding="utf-8"?>
<resources>
    <! - At this point, the alias resource actually points to the activity_twopane.xml file in the layout Directory - >
    <item name="activity_masterdetail" type="layout">@layout/activity_twopane</item>
</resources>
When we need to get the resource files of the layout, we can use code like the following:
@Override
protected int getLayoutResId() {
    return R.layout.activity_masterdetail;
}
Then, on a device smaller than the specified size, activity_fragment.xml will be loaded.
On devices larger than the specified size, the activity_twopane.xml file is loaded.
3. Delegate task to managed Activity based on Fragment callback interface
To delegate a work task to a managed activity, it is common practice to define a callback interface called Callbacks by fragment s.
The callback interface defines the work tasks that fragment delegates to Activity. Any Active that intends to host fragments must implement it.
With the callback interface, you don't have to care who is the trustee, and fragment s can call the method of hosting Activity directly.
The callback interface is used in a way similar to the following code:
public class CrimeFragment extends Fragment{
    .............
    private Callbacks mCallbacks;

    //Define an interface
    public interface Callbacks {
        void onCrimeUpdated( );
    }

    @Override
    public void onAttach(Context context) {
        super.onAttach(context);

        //When Fragment attach es to Activity, it is forced to be saved as Callbacks
        mCallbacks = (Callbacks)context;
    }

    @Override
    public void onDetach() {
        super.onDetach();

        //detach assigns null
        mCallbacks = null;
    }
    ...........
    private void updateCrime() {
        CrimeLab.get(getActivity().getApplicationContext()).updateCrime(mCrime);

        //Callbacks are called to define interface functions when needed
        mCallbacks.onCrimeUpdated();
    }
}
Let's look at an implementation example of managed Activity:
public class CrimeListActivity extends SingleFragmentActivity
        implements CrimeListFragment.Callbacks, CrimeFragment.Callbacks {
    ..............
    @Override
    public void onCrimeUpdated() {
        //Another Fragment held by Activity
        CrimeListFragment listFragment = (CrimeListFragment)
                getSupportFragmentManager().findFragmentById(R.id.fragment_container);

        //Calling another Fragment function
        listFragment.updateUI();
    }
}
It can be seen that through the callback interface of Fragment, the communication between multiple Fragments held by the same managed activity can be easily realized.
4,Assets
Android resource system can be used to package images, XML files and other non-Java resources needed by applications.
Apart from resource systems, Android also supports another way of packaging resources, assets.
assets can be seen as a miniature file system packaged with applications, supporting any level of file directory structure.
The way to create assets directory with Android Studio is:
Select the New - > Folder - > Assets menu item in the app module, and the following picture will appear: 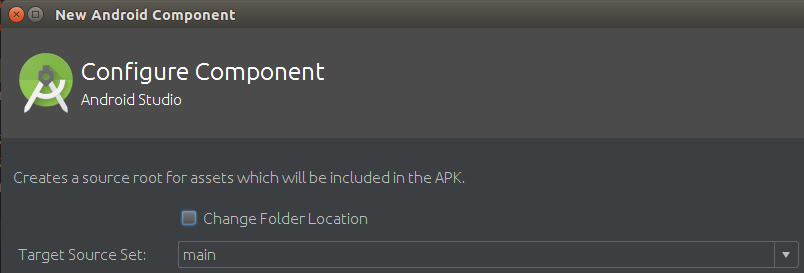
After clicking finish, you can see that a new resource directory assets appears in Apk: 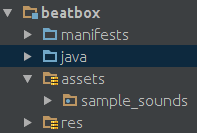
At this point, we can create the directory we need under the assets directory.
If you need to get the files in the assets directory, you need to use AssetManager. The code example is as follows:
.........
//Resource directory name under assets
private static final String SOUNDS_FOLDER = "sample_sounds";

public BeatBox(Context context) {
    //Get Asset Manager with context interface
    mAssetManager = context.getAssets();
    loadSounds();
}

private void loadSounds() {
    String[] soundNames = null;

    try {
        //Get all the file names in the resource directory by using the list interface
        soundNames = mAssetManager.list(SOUNDS_FOLDER);
    } catch (IOException ioe) {
        Log.e(TAG, "Could not list assets", ioe);
    }

    if (soundNames != null) {
        for (String filename : soundNames) {
            //SOUNDS_FOLDER+"/"+fileName to get the path name based on assets file system
            mSounds.add(new Sound(SOUNDS_FOLDER + "/" + filename));
        }
    }
}
......
Once you know the path name of the file, you can use Asset Manager to open the file, for example:
...........
try {
    ..........
    InputStream soundData = mAssetManager.open(assetPath);
    ...........
} catch (IOException ioe) {
    ..........
}
..........
In addition, the file descriptor can also be obtained by using Asset Manager, as follows:
...........
try {
    ...........
    AssetFileDescriptor assetFd = mAssetManager.openFd(assetPath);
    FileDescriptor fd = assetFd.getFileDescriptor();
    ...........
} catch (IOException ioe) {
    ...........
}
...........
5. SoundPool Plays Audio
SoundPool can load a batch of sound resources into memory and support simultaneous playback of multiple audio files.
The sample code for creating SoundPool is as follows:
.............
public BeatBox(Context context) {
    mAssetManager = context.getAssets();

    if (Build.VERSION.SDK_INT > 21) {
        //When SDK_INT > 21, you can use SoundPool.Builder to create SoundPool
        SoundPool. Builder builder = new SoundPool.Builder();

        //Audio stream that can be played at the same time
        builder.setMaxStreams(MAX_SOUNDS);

        //Builder for Audio Attributes
        AudioAttributes.Builder attrBuild = new AudioAttributes.Builder();

        //Audio type
        attrBuild.setLegacyStreamType(AudioManager.STREAM_MUSIC);

         builder.setAudioAttributes(attrBuild.build());

        mSoundPool = builder.build();
    } else {
        //The low version of the construction method has been deprecated
        mSoundPool = new SoundPool(MAX_SOUNDS, AudioManager.STREAM_MUSIC, 0);
    }

    loadSounds();
}
.............
SoundPool needs to load the corresponding audio file before playing the audio. The sample code is as follows:
public void soundPoolPreload() throws IOException {
    for (Sound sound : mSounds) {
        //sound contains the address of the audio file in Assets
        //Using Asset Manager's Interface to Get the afd of Audio Files
        AssetFileDescriptor afd = mAssetManager.openFd(sound.getAssetPath());

        //After SoundPool loads the audio file, it returns an id of type int
        //The id corresponds to the corresponding audio files one by one.
        //The latter parameter of load interface represents priority
        int soundId = mSoundPool.load(afd, 1);
        sound.setSoundId(soundId);

        sound.setBeLoaded(true);
    }
}
After loading the audio, you can play it. The sample code is as follows:
public void play(Sound sound) {
    //Get the id of the audio file
    Integer soundId = sound.getSoundId();
    if (soundId == null) {
        return;
    }

    //The parameters are: audio ID, left channel volume, right channel volume, priority, whether to cycle and playback rate.
    mSoundPool.play(soundId, 1.0f, 1.0f, 1, 0, 1.0f);
}
Finally, the example code for releasing audio is as follows:
public void release() {
    mSoundPool.release();
}
6. Use the setRetainInstance interface to retain Fragment when the device rotates
Fragment has the attribute retainInstance, which defaults to false.
When the device rotates, fragment s are destroyed and rebuilt with managed activity.
Calling the setRetainInstance(true) method retains fragment s, the sample code is as follows:
@Override
public void onCreate(Bundle savedInstanceState) {
    super.onCreate(savedInstanceState);
    setRetainInstance(true);
    ...........
}
Reserved fragment s will not be destroyed with activity.
Instead, it keeps the process alive and passes it on to the new Activity as needed.
The principle of preserving Fragment s is:
When the device configuration changes, Fragment Manager first destroys the fragment view in the queue (because it may be more appropriate to match resources);
Next, the Fragment Manager checks the retainInstance attribute value for each fragment.
If the retainInstance attribute value is false, the Fragment Manager immediately destroys the fragment instance.
Subsequently, to accommodate the new device configuration, the new Fragment Manager of the new Activity creates a new fragment and its view.
If the retainInstance attribute value is true, the view of the fragment is immediately destroyed, but the fragment itself is not destroyed.
To accommodate the new device configuration, when a new Activity is created, the new Fragment Manager finds the retained fragment and recreates its attempts.
Although the reserved fragment has not been destroyed, it has broken away from the dying activity and is in a reserved state.
Although fragment still exists at this time, there is no activity hosting it. Its life cycle is shown in the following figure: 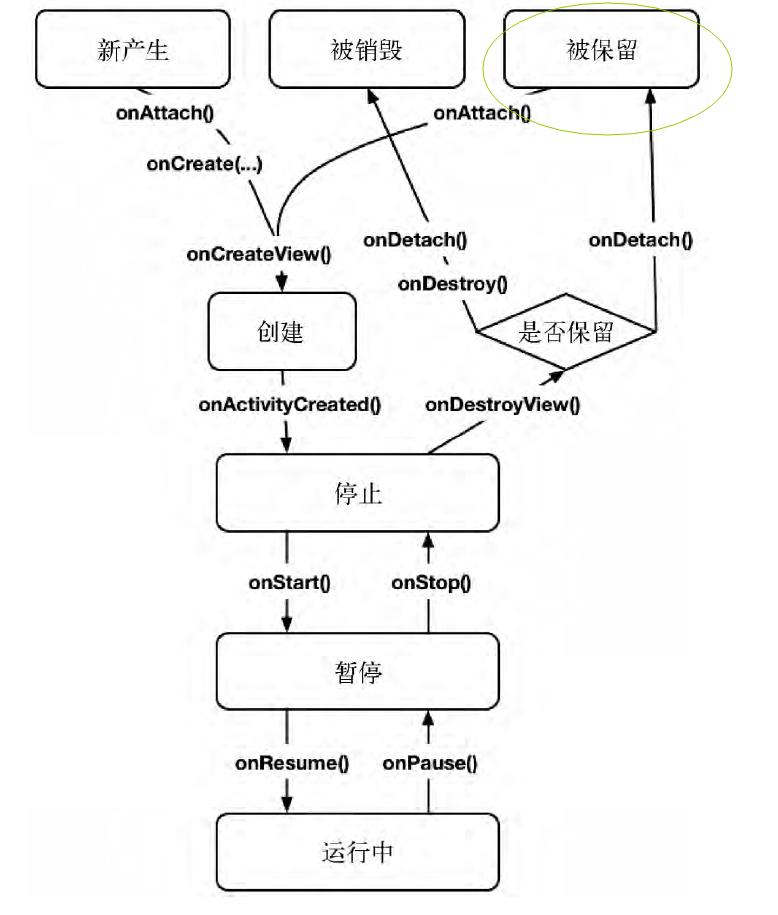
Finally, it should be noted that:
Only when the fragment's setRetainInstance(true) method is invoked and hosted Activity is being destroyed due to device configuration changes,
Fragments are temporarily reserved.
If the activity is destroyed because the operating system needs to reclaim memory, then all fragment s will be destroyed.
Relatively speaking, onSave Instance State can keep data for a longer time.
When the activity process is killed by the system (non-user shutdown) and the system recreates the activity, the data retained in onSave Instance State will be restored.