bitmap
- A dot matrix composed of many points. The points that make up the bitmap are called pixels.
-
Image resolution: refers to the number of pixels per unit length (or area).
If the resolution of the bitmap is 200*200, it means that the bitmap has 40,000 pixels.
-
Color depth: The maximum number of colors a bitmap can achieve is called color depth. For black and white images, a pixel can be represented by a binary bit, such as 0 for black and 1 for white. If there are more than black and white colors, a pixel needs to be represented by multiple bits.
Bitmap formats include monochrome bitmap (1bit), 16-color bitmap (4bit), 256-color bitmap (8bit), 24-bit bitmap (24bit), 32-bit bitmap (32bit), etc.
(. bmp,.dib suffix pictures in bitmap format)
Pictures in Android are bitmap formats
-
The size of a bitmap = the total number of pixels in the bitmap formed * represents the bit number of a pixel + other information of the bitmap file (EXIF information, such as creation time, tool usage, format type, etc.); the unit is bit.
-
Bitmap Defects
-
Bitmap enlargement and reduction will lead to the increase and decrease of pixels and distortion; the appearance of "zigzag"
-
Another disadvantage of bitmaps is that they occupy too much memory. For example, images with 1024 pixels in length and 768 pixels in width and 24-bit color depth need (1024 *768 *24 8) = 2304K byte storage files.
-
vector graphic
-
Vector graphics converts a series of lines and graphs into a series of instructions through a computer, in which only these instructions are stored, not pixels.
-
Vector graphics don't seem to have real bitmap images, but the storage space of vector graphics is much smaller than that of bitmap images. Moreover, vector graphics can not produce real images by stretching, moving, enlarging and other operations.
Reasons for memory overflow caused by large images displayed on Android
-
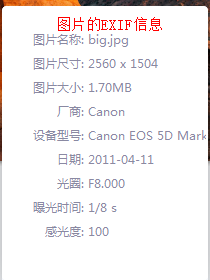
If a 1.69M jgp image is displayed, the resolution is 2560*1504; because the resolution is 2560*1504, there are 3850 240 pixels (385,000 pixels) in all the images.
Because Android uses 32 bits to represent bitmaps (argb: 8 + 8 + 8 + 8 + 8 = 32), that is, each pixel takes up 4 bytes.
So when a 1.69M image is converted into a bitmap, the memory size is 3850240 * 4 = 15400960 byte = 14.6875M; and the memory space occupied by an app runtime
It's about 16M Heap, so a 14.6875M image in an app with 16M running space is likely to cause memory overflow. -
Solutions:
Tuning public static Bitmap decodeFile (String path Name, Options opts) reduces image resolution by setting the sampling ratio to Options
Options opts = new Options();
//4 means (2560/4)* (1504/4) = 3850240/16, that is, the size of the original image decreases 16 times after it is converted into a bitmap.
opts.inSampleSize = 4;
Bitmap bitmap = BitmapFactory.decodeFile("/mnt/sdcard/big.jpg", opts);


//The general sampling ratio in SampleSize is not written directly, but takes the ratio of the resolution of the current picture to the resolution of the screen.

//Take the screen width and height:
WindowManager manager = (WindowManager) getSystemService(WINDOW_SERVICE);
Display display = manager.getDefaultDisplay();
int height =  display.getHeight();
int width = display.getWidth();

//Take the width and height of the picture and get the EXIF information from the picture file
String imgWidth  = null;
String imgHeight  = null;
try {
    //Get additional header information saved in the file
    ExifInterface exif = new ExifInterface("/mnt/sdcard/big.jpg");
    imgHeight =  exif.getAttribute(ExifInterface.TAG_IMAGE_LENGTH) ; //Get the height of the picture
    imgWidth = exif.getAttribute(ExifInterface.TAG_IMAGE_WIDTH) ; //Get the width of the picture
} catch (IOException e) {
    // TODO Auto-generated catch block
    e.printStackTrace();
}
int w =  Integer.parseInt(imgWidth) / width ;
int h =  Integer.parseInt(imgHeight) / height ;

//Generally, the middle value of the ratio of width to height, or the maximum value, is chosen.
opts.inSampleSize = Math.max(w, h) ;//Maximum in Width Ratio and High Ratio
Steps for manipulating bitmap images
-
Create a copy of the original map
//A. Create a copy of the original map -- get a blank bitmap copy from the original map
//For example: Bajuntu, if you want to make a counterfeit, you must have the same breadth and height, otherwise people will see through it at a glance.
Bitmap copyBitmap = Bitmap.createBitmap(bitmap.getWidth(), bitmap.getHeight(), bitmap.getConfig());
-
Define the drawing board and specify the blank paper to be used
//b. Define a drawing board and a picture frame with the original blank paper in it. The name of the table is to be drawn on the paper.
Canvas canvas = new Canvas(copyBitmap);
-
Define Brush
//c. Create a brush
Paint paint = new Paint();
-
Definition matrix
//d. Creating Matrix: 1:1 Scale Picture
Matrix matrix = new Matrix();
//Set the zoom ratio of the image, the width is 20% and the height is 80%.
matrix.setScale(0.2f, 0.8f);
-
Start painting
//e. Start painting: which pair of pictures to start drawing
canvas.drawBitmap(bitmap, matrix, paint);
-
Display the painted picture
//If all the above steps have been completed, it means that there are already images on the blank paper.
iv_target.setImageBitmap(copyBitmap);
Bitmap operation mode:
-
Image zooming
Matrix matrix = new Matrix();
//matrix.setScale(0.2f, 0.8f); // width is 20% of the original map, height is 80% of the original map.
matrix.setScale(2f, 2f);//The width is twice as wide as the original map and the height is twice as high as the original map.
canvas.drawBitmap(bitmap, matrix, paint);// Bitmap is the original map and the target map is the parameter Bitmap passed in the new Canvas
-
Image Translation
Matrix matrix = new Matrix();
matrix.setTranslate(50, 50);
-
Image rotation
Matrix matrix = new Matrix();
//Rotate 90 degrees at the center of the picture.
matrix.setRotate(90 , copyBitmap.getWidth()/2 ,copyBitmap.getHeight()/2);
-
Mirror effect of image
Matrix matrix = new Matrix();
//Turn the horizontal coordinates into negative numbers, and the vertical coordinates should not be changed.
matrix.setScale(-1, 1);

// Since the abscissa becomes negative, the picture goes to the left of the screen and has to be moved back.
//However, note: when moving, you can't use setXXX to move. This setXXX will not be executed on the basis of the original image modification.
matrix.postTranslate(copyBitmap.getWidth(), 0);
-
Image Reflection Effect
Matrix matrix = new Matrix();
//Turn the ordinates into negative numbers, and the abscissa should not be changed.
matrix.setScale(1, -1);

// Because the ordinates have become negative, the picture goes to the bottom of the screen and has to be moved back.
//However, note: when moving, you can't use setXXX to move. This setXXX will not be executed on the basis of the original image modification.
matrix.postTranslate(0, copyBitmap.getHeight());
Note
The difference between getX and getRawX
- getX
What is the distance between the coordinate position of the current click and the left side of the control?
- getRawX
What is the distance between the coordinate position of the current click and the left side of the screen?
bitmap.setPixel(int x, int y, int color);
Set the color of the bitmap at the pixel point coordinates (x,y) to color. To set the color of the bitmap in a certain range, as follows:
    //The color of the pixels in the circle with the radius of 4 and the center of xPoint and yPonit is set to be transparent.
    for (int i = -4; i < 5; i++) {
        for (int j = -4; j < 5; j++) {
            //In order to display a circle by touch, the current i and j must be judged.
            if(Math.sqrt(i*i +j*j) <= 4 ){
                //Make the color of the specified coordinate point transparent
                copyBitmap.setPixel(xPoint+i, yPoint+j, Color.TRANSPARENT);
            }
        }
    }
Color matrix
-
Summary
android can manipulate colors through color matrix (color Matrix class). The color matrix is a 5x4 matrix (Figure 1.1) which can be used to modify the values of RGBA components in images. The color matrix is stored in a one-dimensional array as follows:
[ a, b, c, d, e, f, g, h, i, j, k, l, m, n, o, p, q, r, s, t ]
Through RGBA four channels to directly operate the corresponding color, if you use Photoshop, you will know that sometimes processing pictures by controlling the RGBA color channels to achieve special effects. The effect of this matrix on color is calculated as shown in Figure 1.3.
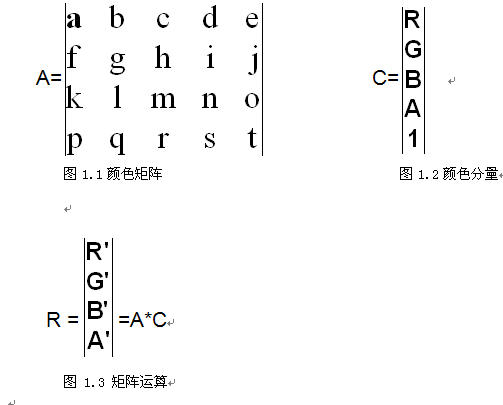
The operation rule of a matrix is to multiply a row of matrix A by a column of matrix C as a row of matrix R.
C matrix is the ARGB information contained in the image. R matrix is a new color component after applying color matrix to C. The operation results are as follows:R' = a*R + b*G + c*B + d*A + e; G' = f*R + g*G + h*B + i*A + j; B' = k*R + l*G + m*B + n*A + o; A' = p*R + q*G + r*B + s*A + t;
The color matrix is not as esoteric as it seems, but it requires very few parameters, and it is very regular that the first line decides red and the second line decides green.
The third row determines blue, the fourth row determines transparency, and the fifth column is the offset of color. -
Using Color Matrix in Android
//Define the color matrix
ColorMatrix cm = new ColorMatrix();
cm.set(new float[] {
1*number, 0, 0, 0, 0, //Operate red, blue and red
0, 1, 0, 0, 0, //Green purple green
0, 0, 1, 0, 0,//Blue, yellow and blue
0, 0, 0, 1, 0 //transparency
});

//Add a color matrix to the brush
paint.setColorFilter(new ColorMatrixColorFilter(cm));

//Draw again on the drawing board, this time with a color matrix
canvas.drawBitmap(srcBitmap, matrix, paint);