Preface
Validation is designed primarily for security reasons, to prevent the machine from doing something directly. As a result, many people have come up with different kinds of validation codes. Here's how to unlock puzzle using Android Custom View.
Design sketch

From the diagram, you can see that there are no particularly difficult points, at most how to randomly trim out the validated image, using Xfermode, the image blending mode, to clip the image.
Core ideas
First, you must first have a picture as a lock. Here is an example.
First we just got the picture, and then we dig a piece in one of the locks as the lock core.To look good, our lock cores should be spaced from top to bottom.

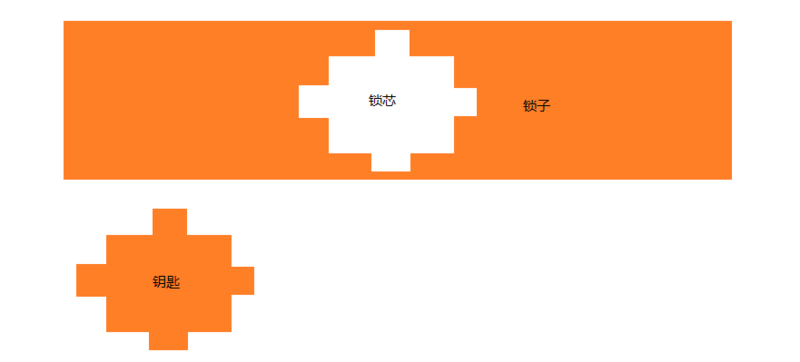
Second, take a picture as the shape of the lock core, then randomly take an X coordinate as the center point of the lock core, and generate the lock core
The green dot is the center point of the picture, the white dot is the size of the whole lock core, the black dot is the shape of the lock core, and the rest shows the contents of the lock because it is transparent.

The third and second drawings get different contents by setting Paint's Xfermode l, which separates the lock, key and lock core.
This should be the core of the puzzle unlocking function, but Paint provides us with Xfermode in Android's drawing, which makes it easy to solve this problem. Because Xfermode offers many modes that you can't master and use at once, you just need to start with a few common ones.Yes.The following will not be redundant, there is a case of drawing rounded pictures for reference, the content is simple to believe you will understand!
https://blog.lost520.cn/study/show-37.html
If you are interested, you can refer to this god's blog: https://blog.csdn.net/harvic880925/article/details/51264653
Draw the core code for locks and keys:
/**
 * Get the lock or key
 * @param lock        lock
 * @param keyTemp     Key Template
 * @param keyLocation Location of the lock where the key is located
 * @param mode        1: Lock, 2: Key
 * @return
 */
private Bitmap getKeyOrLock(Bitmap lock, Bitmap keyTemp, Rect keyLocation, int mode) {
    //Set Bitmap size based on Model
    int width = lock.getWidth();
    int height = lock.getHeight();
    if (mode == 2) {
        width = keyTemp.getWidth();
        height = keyTemp.getHeight();
    }
    Bitmap result = Bitmap.createBitmap(width, height, Bitmap.Config.ARGB_8888);//Draw results
    Canvas canvas = new Canvas(result);//Drawing board
    Paint paint = new Paint();//Paint brush
    //Different PorterDuffXfermode l settings for different masking effects depending on the model
    if (mode == 1) {//Draw lock
        canvas.drawBitmap(keyTemp, keyLocation.left, keyLocation.top, paint);//Draw DST
        paint.setXfermode(new PorterDuffXfermode(PorterDuff.Mode.SRC_OUT));
        canvas.drawBitmap(lock, 0, 0, paint);//Draw SRC
    } else {//Draw Key
        canvas.drawBitmap(keyTemp, 0, 0, paint);//Draw DST
        paint.setXfermode(new PorterDuffXfermode(PorterDuff.Mode.SRC_IN));
        canvas.drawBitmap(lock, -keyLocation.left, -keyLocation.top, paint);//Draw SRC
    }
    return result;
}

Fourth, draw the lock (with the lock core) and the key to a specific location.
Locks can be tiled directly, the drawing of the lock core can be randomly selected, and the key is drawn on the leftmost side for the user to slide.

Fifth, detect the user dragging to verify that the key and the center point of the lock core are coincident.
Override the onTouchEvent function in View to detect a user's drag. When the user points the key and drags the lock, the center point of the key and the lock is calculated to merge (with a specific offset), and the user releases the key and calls back the processing results directly.The five parts have basically completed the function of puzzle unlock.

Core Code
Split lock and key:
/**
 * Get the lock or key
 *
 * @param lock        lock
 * @param keyTemp     Key Template
 * @param keyLocation Location of the lock where the key is located
 * @param mode        1: Lock, 2: Key
 * @return
 */
private Bitmap getKeyOrLock(Bitmap lock, Bitmap keyTemp, Rect keyLocation, int mode) {
    //Set Bitmap size based on Model
    int width = lock.getWidth();
    int height = lock.getHeight();
    if (mode == 2) {
        width = keyTemp.getWidth();
        height = keyTemp.getHeight();
    }
    Bitmap result = Bitmap.createBitmap(width, height, Bitmap.Config.ARGB_8888);//Draw results
    Canvas canvas = new Canvas(result);//Drawing board
    Paint paint = new Paint();//Paint brush
    //Different PorterDuffXfermode l settings for different masking effects depending on the model
    if (mode == 1) {//Draw lock
        canvas.drawBitmap(keyTemp, keyLocation.left, keyLocation.top, paint);//Draw DST
        paint.setXfermode(new PorterDuffXfermode(PorterDuff.Mode.SRC_OUT));
        canvas.drawBitmap(lock, 0, 0, paint);//Draw SRC
    } else {//Draw Key
        canvas.drawBitmap(keyTemp, 0, 0, paint);//Draw DST
        paint.setXfermode(new PorterDuffXfermode(PorterDuff.Mode.SRC_IN));
        canvas.drawBitmap(lock, -keyLocation.left, -keyLocation.top, paint);//Draw SRC
    }
    return result;
}
Draw a specific size picture:
/**
 * Draw pictures to a specific size
 *
 * @param bitmap picture
 * @param width  width
 * @param height height
 * @return
 */
private Bitmap resizeBitmap(Bitmap bitmap, int width, int height) {
    Bitmap result = Bitmap.createBitmap(width, height, Bitmap.Config.ARGB_8888);
    Canvas canvas = new Canvas(result);
    Rect rect = new Rect(0, 0, width, height);
    canvas.drawBitmap(bitmap, null, rect, null);
    return result;
}
Layout:
<?xml version="1.0" encoding="utf-8"?>
<LinearLayout xmlns:android="http://schemas.android.com/apk/res/android"
    xmlns:app="http://schemas.android.com/apk/res-auto"
    xmlns:tools="http://schemas.android.com/tools"
    android:layout_width="match_parent"
    android:layout_height="match_parent"
    android:orientation="vertical"
    tools:context="com.demo.qylost.puzzleunlockdemo.MainActivity">
    <com.demo.qylost.puzzleunlockdemo.PuzzleUnlockView
        android:id="@+id/puzzleUnlockView"
        android:layout_width="match_parent"
        android:layout_height="wrap_content" />
    <Button
        android:id="@+id/btnUpdate"
        android:layout_width="match_parent"
        android:layout_height="wrap_content"
        android:background="?selectableItemBackground"
        android:text="Change picture"
        android:textColor="@color/colorAccent" />
    <Button
        android:id="@+id/btnRefresh"
        android:layout_width="match_parent"
        android:layout_height="wrap_content"
        android:background="?selectableItemBackground"
        android:text="Refresh"
        android:textColor="@color/colorAccent" />
    <TextView
        android:id="@+id/txtStatus"
        android:layout_width="match_parent"
        android:layout_height="wrap_content"
        android:gravity="center"
        android:text="Status: XXX"
        android:textColor="@color/colorAccent" />
</LinearLayout>
Backstage:
//Get related controls
Button btnUpdate = findViewById(R.id.btnUpdate);
Button btnRefresh = findViewById(R.id.btnRefresh);
//Custom Puzzle Unlock View
final PuzzleUnlockView puzzleUnlockView = findViewById(R.id.puzzleUnlockView);
//Display status
final TextView txtStatus = findViewById(R.id.txtStatus);

//Change picture
btnUpdate.setOnClickListener(new View.OnClickListener() {
    @Override
    public void onClick(View v) {
        puzzleUnlockView
          .setLockBitmap(BitmapFactory.decodeResource(getResources(), R.mipmap.lock2));
    }
});
//Refresh
btnRefresh.setOnClickListener(new View.OnClickListener() {
    @Override
    public void onClick(View v) {
        puzzleUnlockView.refreshLock();
    }
});
//Verification Callback
puzzleUnlockView.setOnLockResultListener(new PuzzleUnlockView.OnLockResultListener() {
    @Override
    public void onResult(boolean result) {
        if (result) {
            txtStatus.setText("Status: Success");
        } else {
            txtStatus.setText("Status: Failed");
            puzzleUnlockView.refreshLock();//Refresh
        }
    }
});