Seeing the effect is still very basic. Here's how to implement it. 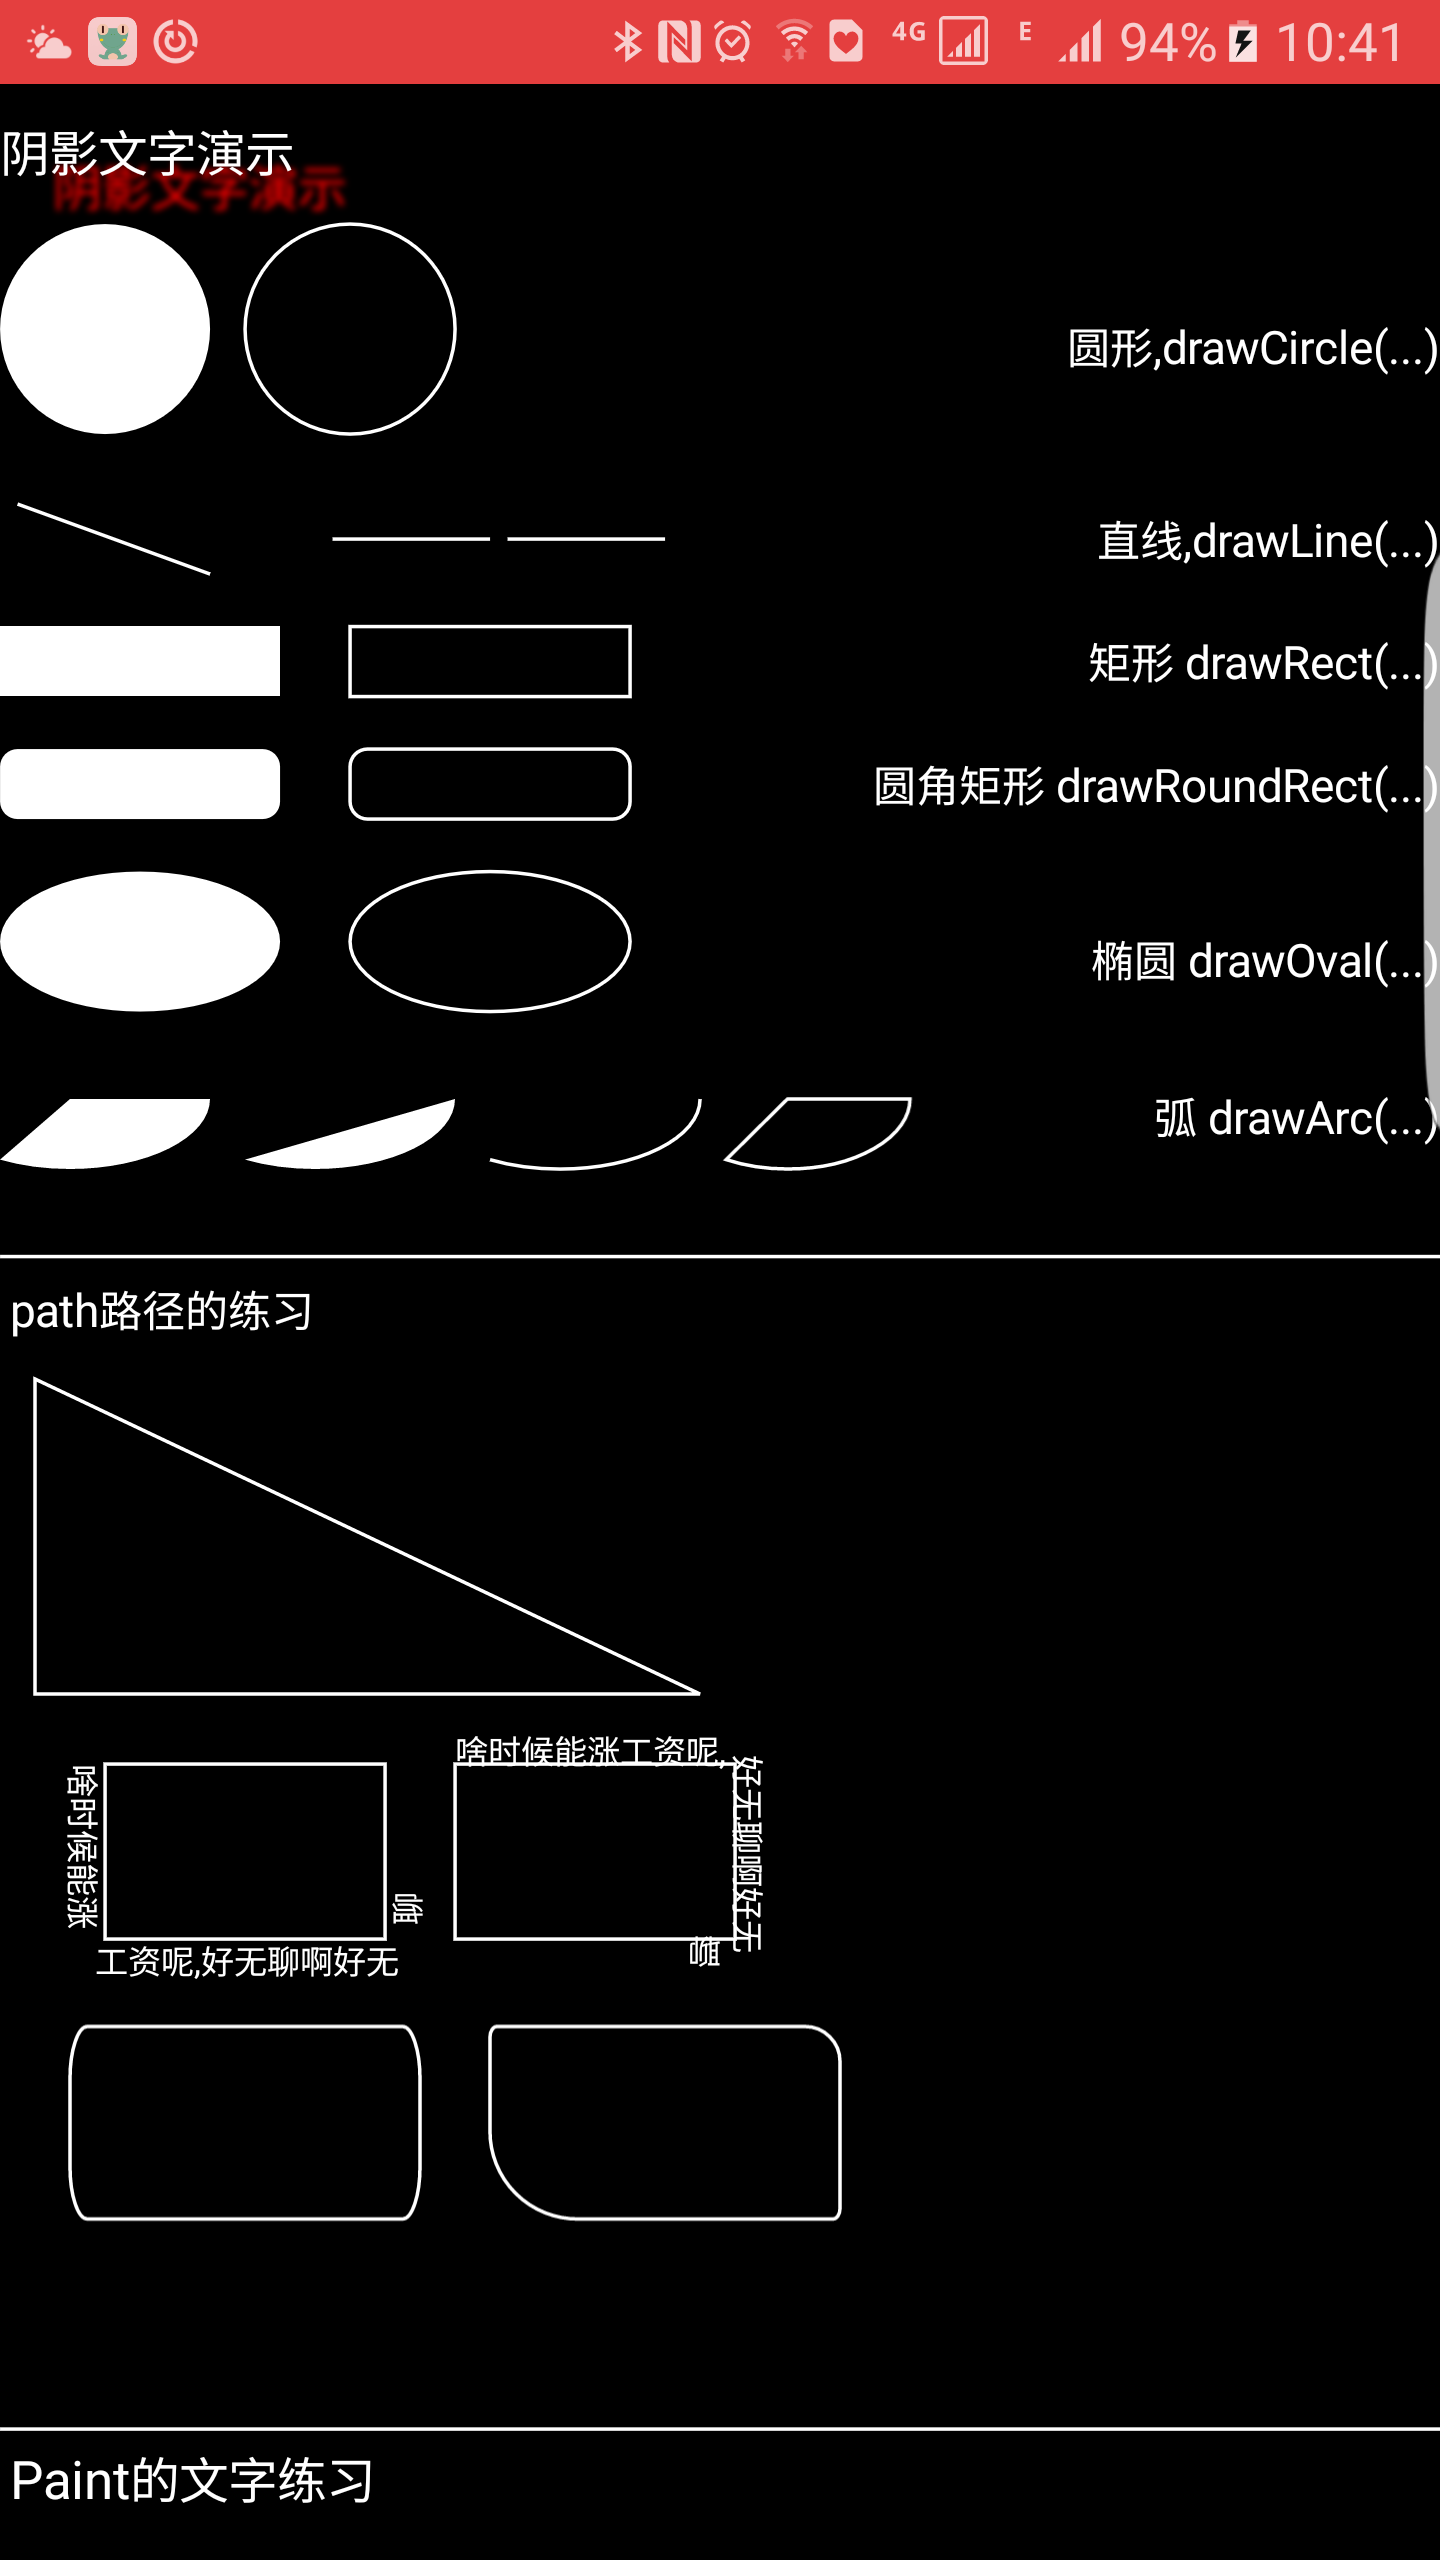
Source download: Find the SuGraphics BaseCanvasPaintActivity class, mobile phone view effect level interface into the selection graphics module
Paint and Canvas
Customized View should be familiar with these two attributes. Paint brush, Canvas canvas. With these two conditions, we can do a lot of things.
If you want to draw a figure directly, use Canvas. If you want to set some attributes such as text thickness, size and color, use Paint.
When we want to customize the use of View, we need to cultivate the idea of creating Paint brush objects in constructors instead of onDraw(), because onDraw may refresh frequently in the future. If some initialization operations are set up in onDraw, it will be meaningless and waste resources.
Let's look at the basic property settings for Paint:
Note that the mDensity variable in this article or subsequent articles is the current screen density ratio, which is used in the code to fit all sizes of mobile phones. For example (720 * 1080 (ratio 2), 1080 * 1920 (ratio 3), 1440 * 2560 (ratio 4))
//Start setting up the basic information of the brush
   mPaint.setAntiAlias(true);                              //Anti-aliasing of brushes
   mPaint.setColor(Color.WHITE);                           //Set the color of the brush
   mPaint.setStyle(Paint.Style.FILL);                      //Set the type of graphics filling that is drawn, filling is internal filling, stroke is border-only, content is not filled.
   mPaint.setStrokeWidth(mDensity * 2);                    //Set the width of the border. For example, the width of the rectangle, the width of the text. Receiving arguments are pixel units.
   mPaint.setTextSize(mDensity * 20);                      //Set the font size when drawing text
Paint Sets Fill Style
setStyle (Paint.Style style)
- Paint.Style.FILL fills the interior
- Paint.Style.FILL_AND_STROKE Fill and Stroke
- Paint.Style.STROKE only sketches without filling
Take a look at the effect: because fill and fill_and_strong are similar and do not post the effect 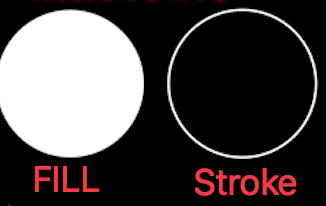
Text Adding Shadows
setShadowLayer (float radius, float dx, float dy, int color)
Description of parameters:
- Radius: The bigger the value, the more blurred it is. Essentially, the radius of each pixel blurred.
- dx: Horizontal shift offset of shadows in the stratum
- dy: Shadow migration offset in vertical direction
- Color: The color that generates shadows
Code instance
mPaint.setShadowLayer(mDensity*5, mDensity*15, mDensity*10, Color.RED );
canvas.drawText("Shadow Text Demonstration", 0, 25*mDensity, mPaint);
Set background color for Canvas
If you want to set the background color of the current canvas, it is actually to add a color layer to the canvas, and finally merge the effect. There are two ways:
- canvas.drawColor(Color.BLUE);
- canvas.drawRGB(255, 255, 0); // Both functions are used to set the background color.
Draw a straight line
drawLine (float startX, float startY, float stopX, float stopY, Paint paint)
Description of parameters:
- startX: startX coordinates
- startY: Start point Y coordinates
- stopX: Endpoint X coordinates
- stopY: Endpoint Y coordinates
Code example:
//Method1 Single straight line
canvas.drawLine(mDensity*5, 0, mDensity*60, mDensity*20, mPaint);
//Method2 Multiple lines
//Define a number as4Multiples float Array of types
float[] pts = {mDensity * 95,mDensity*10,
               mDensity*140,mDensity*10,
               mDensity*145,mDensity*10,
               mDensity*190,mDensity*10};
canvas.drawLines(pts,mPaint);
Effect demonstration: 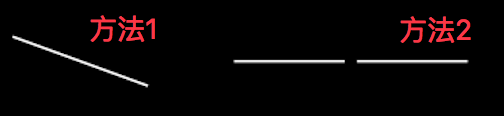
Method 2: Draw a line according to an array of point sets, which can be multiple lines. It's better to define the size of the array as a multiple of 4. Because every two values of the array correspond to the xy point of the point, and only two points can determine a straight line. So the premise of a straight line is four values.
Draw points
Single point
drawPoint (float x, float y, Paint paint)Multiple points
drawPoints (float[] pts, Paint paint)

drawPoints (float[] pts, int offset, int count, Paint paint)
Code example:
canvas.drawPoint(100, 100, paint);
float []pts={10,10,100,100,200,200,400,400};
canvas.drawPoints(pts, 2, 4, paint);
Draw rectangle
Rect or RectF is used here. These two are auxiliary classes of rectangle, basically the same. According to the four points on the left, right down to determine a rectangle.
The most commonly used creation methods are Rect rect = new Rect(10, 10, 50, 30);
drawRect (float left, float top, float right, float bottom, Paint paint)

drawRect (RectF rect, Paint paint)

drawRect (Rect rect, Paint paint)
There's nothing to say about the parameters, either when drawing a rectangle, make it clear that the upper left and the lower right, or pass in a rectangular auxiliary class object.
Code example:
//Draw rectangular solid
canvas.drawRect(0,0,mDensity*80, mDensity*20,mPaint);           //parameter12The point at the upper left corner of the rectangle, parameter34The point at the lower right corner of the rectangle
//Rectangular hollow
mPaint.setStyle(Paint.Style.STROKE);
canvas.drawRect(new RectF(mDensity*100,0, mDensity*180,mDensity*20),mPaint);
Code effect: 
Fillet rectangle
drawRoundRect (RectF rect, float rx, float ry, Paint paint)
- rx: Radius of the X-axis that generates a rounded ellipse
- ry: The radius of the Y-axis that generates a rounded ellipse
Compared with rectangle, it only needs to specify four more rounded corner attributes to display.
Code example:
//Solid rectangle with rounded corners
canvas.drawRoundRect(new RectF(0,0,mDensity*80, mDensity*20), mDensity*5, mDensity*5 ,mPaint);      //parameter2,3 Fillet xy Radius of radian
//Rectangular hollow with rounded corners
mPaint.setStyle(Paint.Style.STROKE);
canvas.drawRoundRect(new RectF(mDensity*100,0,mDensity*180, mDensity*20), mDensity*5, mDensity*5 ,mPaint);
Code effect:

circular
drawCircle (float cx, float cy, float radius, Paint paint)
Description of parameters:
- cx: x-point coordinates of the center of a circle
- cy: y-point coordinates of the center of a circle
- Radius: radius of a circle
Ellipse
drawOval (RectF oval, Paint paint)
The ellipse is generated from the rectangle, and the ellipse figure is established by taking the X-axis of the rectangle as the ellipse and the Y-axis of the rectangle as the ellipse.
So you just need to pass in a RectF, which is not demonstrated here.
arc
An arc is part of an ellipse, and an ellipse is generated from a rectangle, so of course an arc is also generated from a rectangle.
drawArc (RectF oval, float startAngle, float sweepAngle, boolean useCenter, Paint paint)
Description of parameters:
- startAngle: Start Angle: The default is 0 in the positive direction of the x axis of the coordinate system. The positive value rotates clockwise and the negative value reverses.
- SwepAngle: How many angles need to be displayed from the beginning to the end. This angle has a positive value of clockwise rotation.
- useCenter: It's a boolean. If true, there's a line from the beginning to the center of the circle, and from the end to the center of the circle. On the contrary, there's no line.
In arc drawing, different graphics can be generated by boolean of the method and the filling attributes of the brush.
For example:

Code example:
//Arc has two sides fill ed solid fan-shaped solid
  RectF rectF_ArcStart1 = new RectF(-mDensity * 20, 0, mDensity * 60, mDensity * 40);
  canvas.drawArc(rectF_ArcStart1,0,120,true, mPaint);      //arg2: For the starting point, the starting point is 0 degrees from the positive direction of the x coordinate system. How many angles are arg3 selected to rotate clockwise?
  //A part of an arc without solid circles on both sides.
  RectF rectF_ArcStart2 = new RectF(mDensity*50,0,mDensity*130, mDensity*40);
  canvas.drawArc(rectF_ArcStart2,0,120,false, mPaint);
  //Arc without hollow arc edges on both sides
  mPaint.setStyle(Paint.Style.STROKE);
  RectF rectF_ArcEnd1 = new RectF(mDensity*120,0,mDensity*200, mDensity*40);
  canvas.drawArc(rectF_ArcEnd1,0,120,false, mPaint);
  //Arc has hollow fan-shaped border with two sides
  mPaint.setStyle(Paint.Style.STROKE);
  RectF rectF_ArcEnd2 = new RectF(mDensity*190,0,mDensity*260, mDensity*40);
  canvas.drawArc(rectF_ArcEnd2,0,120,true, mPaint);
II. Path and DrawTetx Exercises
canvas objects can not only draw the specified rectangle directly, but also draw graphics through custom Path paths, such as gesture drawing, irregular trajectory and so on.
canvas.drawPath(Path path, Paint paint)
Path straight line
To draw a straight line path, you just need to find a starting point, and then you can draw a straight line without stopping. Every time you draw a straight line, the starting point is the end point of the last time.
Commonly used functions:
- Move To (float x, float y): Move the next starting point directly to a certain location.
- lineTo(float x, float y): Draw the connection point from the last starting point to the specified point, and you can call it all the time.
- Close: If the end point of the last Path's path does not coincide with the start point, then calling close() connects the start and end points to form a close.
Code example:
Path path = new Path();
   path.moveTo(10*mDensity, 10*mDensity);                        //Set the starting point
   path.lineTo(10*mDensity, 100*mDensity);                       //The end of the first line is also the beginning of the second line.
   path.lineTo(200*mDensity,100*mDensity);                       //Draw the second straight line
   path.close();//closed loop
   canvas.drawPath(path, mPaint);
Code diagrams: 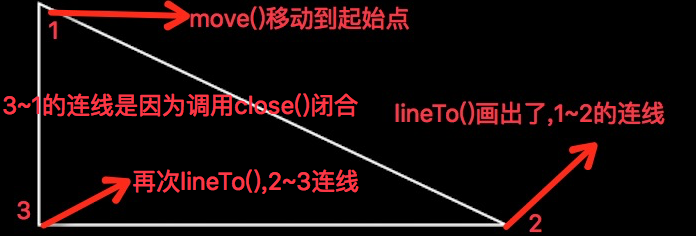
You can see that we can plan any path and then call drawPath to draw it once. We only call the lineTo() method twice above, meaning two lines, but the effect is three lines, which means close() closure, and the end is connected.
Path rectangle
When using Path paths to draw a graph, there is an additional concept of order, such as clockwise or counterclockwise.
addRect (float left, float top, float right, float bottom, Path.Direction dir)
addRect (RectF rect, Path.Direction dir)
Adding paths to Path is similar to directly utilizing canvas.drawRect(), but here is a Path.Direction parameter that indicates the order in which the rectangle is drawn.
Path.Direction.CCW: Abbreviated as counter-clockwise, it refers to the creation of a counter clockwise rectangular path
Path.Direction.CW: Abbreviation for clockwise, which means creating a clockwise rectangular path
In this way, it may not be easy to understand the direct drawing. We can combine the text to draw according to the path to see the effect.
Look at the results first.

So it's obvious that there's a difference. Here's the implementation code.
//Reverse Generation of Rectangles
      Path CCWRectpath = new Path();
      RectF rect1 =  new RectF(30*mDensity, 10*mDensity, 110*mDensity, 60*mDensity);
      CCWRectpath.addRect(rect1, Path.Direction.CCW);

      //Progressive Generation
      Path CWRectpath = new Path();
      RectF rect2 =  new RectF(130*mDensity, 10*mDensity, 210*mDensity, 60*mDensity);
      CWRectpath.addRect(rect2, Path.Direction.CW);

      //Draw these two paths first
      canvas.drawPath(CCWRectpath, mPaint);
      canvas.drawPath(CWRectpath, mPaint);
      mPaint.setStyle(Paint.Style.FILL);
      mPaint.setTextSize(10*mDensity);
      //Draw text and parameters according to path order2As path, parameter3:The offset of each side's header from the origin,The left side of the text begins as an integer. parameter4: Each line of text and its pathyAxis offset,It can be understood that the bigger the value, the farther it is..
      canvas.drawTextOnPath("When will wages be raised?,What a bore! What a bore!",CCWRectpath,0,10*mDensity,mPaint);
      canvas.drawTextOnPath("When will wages be raised?,What a bore! What a bore!",CWRectpath,0,0*mDensity,mPaint);
You can see that the first half of the rectangle is drawn according to the path, but we can't see any effect, so we use the canvas.drawTextOnPath() function, which is similar to the drawText() used before. Parametric 2 is to draw the text according to the path path path path of the incoming path object. Parametric 3, 4, is actually the offset. Parametric 3 represents how far from the starting point of the path, we can Think about whether every paragraph has spaces. That's what it means. Parameter 4 is the distance from the path (up and down offset), for example, the composition of the college entrance examination has drawn a horizontal line so that we can write on it. When passing in 0, we press the line to write, and when passing in 10, we move up 10, the position from line 10.
Path rounded rectangle
Remember that canvas can also directly draw RoundRect (), in fact, canvas has several in the path, and also added Bessel curve and so on.
Path rounded rectangle can be more flexible. The four rounded corners drawn by canvas are equal. At that time, we added rounded rectangle by path, but we can set the range of rounded corners separately.
addRoundRect(RectF rect, float rx, float ry, Direction dir)
addRoundRect(RectF rect, float[] radii, Direction dir)
Look directly at the picture: 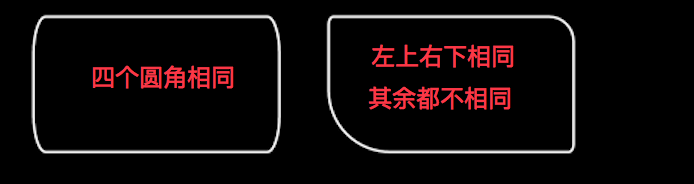
Looking at the picture behind, every corner is different.
Code implementation:
Path pathRoundRect = new Path();
   RectF rectRoundCCW =  new RectF(20*mDensity, 25*mDensity, 120*mDensity, 80*mDensity);
   pathRoundRect.addRoundRect(rectRoundCCW, 5*mDensity, 15*mDensity , Path.Direction.CCW);        //arg2,3: Radius of horizontal and vertical axes for generating ellipses

   RectF rectRoundCW =  new RectF(140*mDensity,25*mDensity, 240*mDensity, 80*mDensity);
   float radii[] ={2*mDensity,3*mDensity,
                   10*mDensity,10*mDensity,
                   2*mDensity,3*mDensity,
                   25*mDensity,25*mDensity};           //Must be8Value, Corresponding to four angles, Two of them are in a pile. xy.
   pathRoundRect.addRoundRect(rectRoundCW, radii, Path.Direction.CCW);
   canvas.drawPath(pathRoundRect, mPaint);
We can directly call a function with four parameters to specify that the four corners are equal. We can also call a function with three parameters. The second of this function receives an array. This array must be eight, and if there are less than eight, there will be corner crossing anomaly. Because this function needs to specify four corners. Each corner contains two points, so it needs at least eight. It satisfies this function.
Other Path Graphics
In fact, it is similar to drawXXX corresponding to canvas, so it is not explained one by one.
Circular: addCircle (float x, float y, float radius, Path.Direction dir)
Ellipse: addOval (RectF oval, Path.Direction dir)
Arc: addArc (RectF oval, float start Angle, float sweep Angle)
Sebel: QuadTo (float x1, float y1, float x 2, float y2) will be explained in detail later.
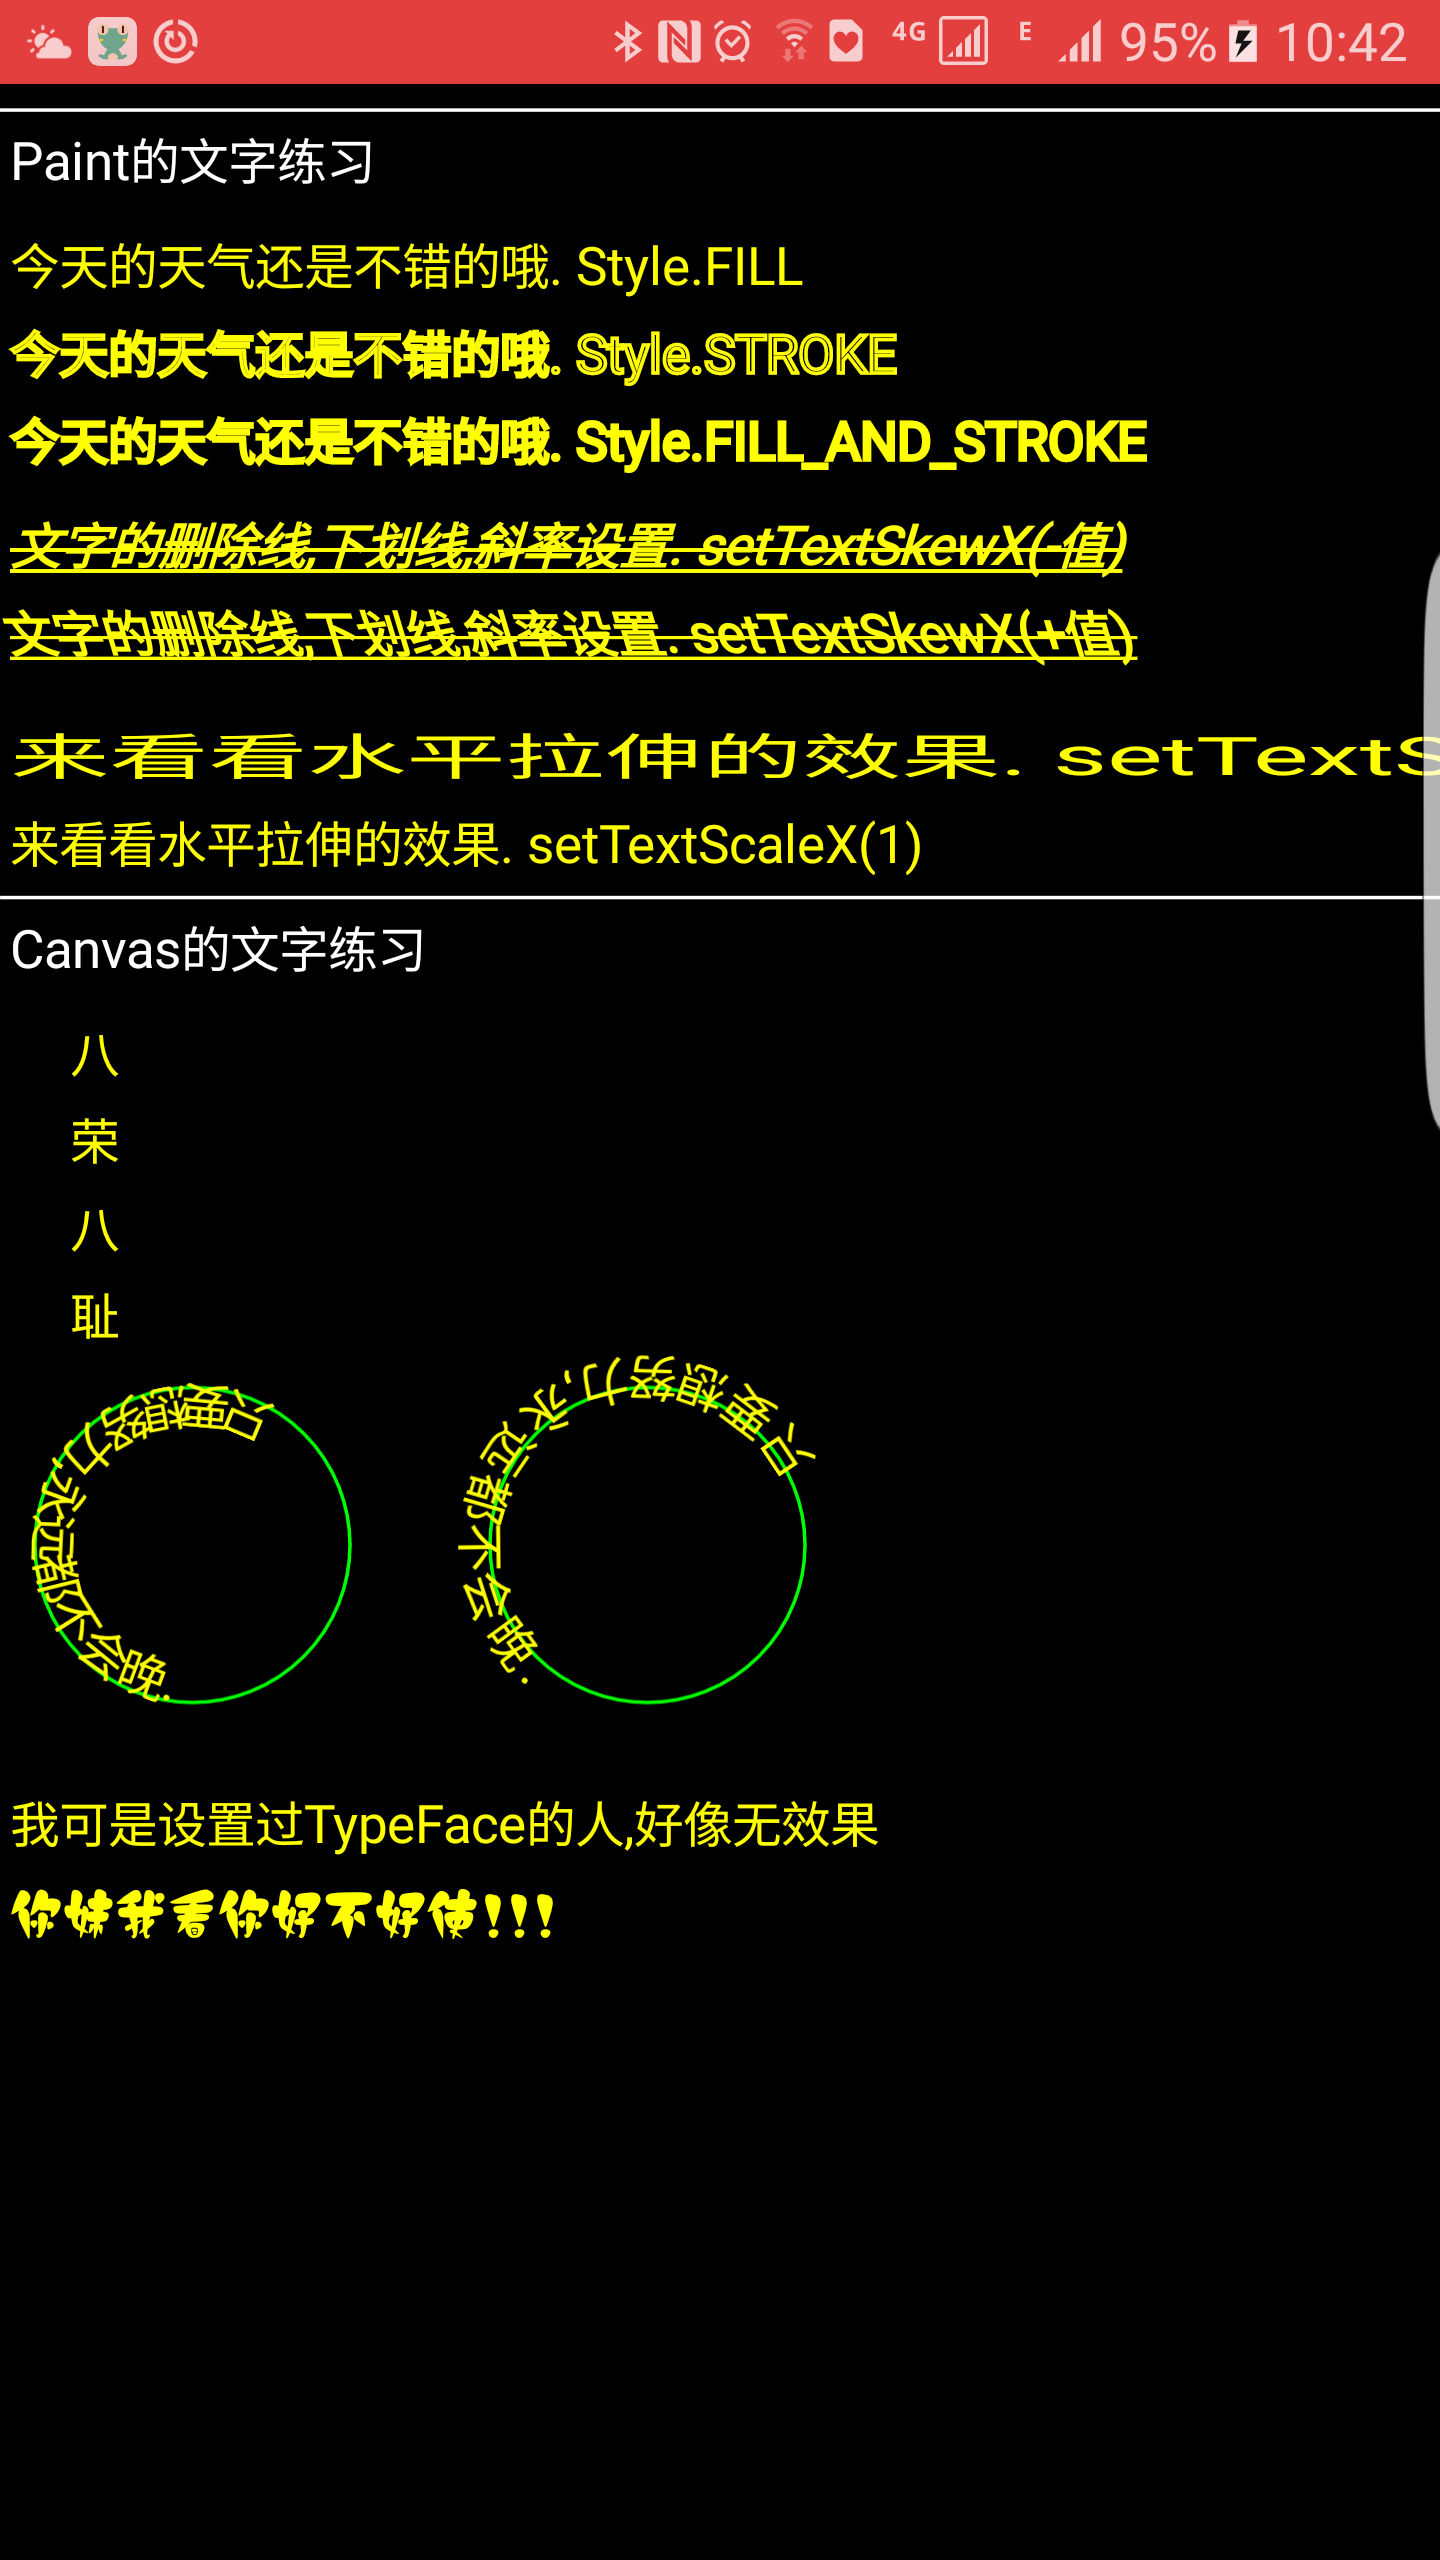
Paint Settings for Text Properties
We often use brush attributes to write as basic attributes, and then some bold underlines tilt as style attributes.
General attribute
setStrokeWidth(10) //stroke width
setAntiAlias(true) //Whether to open anti-aliasing
setTextSize(20) //Set text size
setStyle(Paint.Style.FILL) //Setting Fill Style
setTextAlign(Align.CENTER) //Set text alignment to start with Left alignment by default
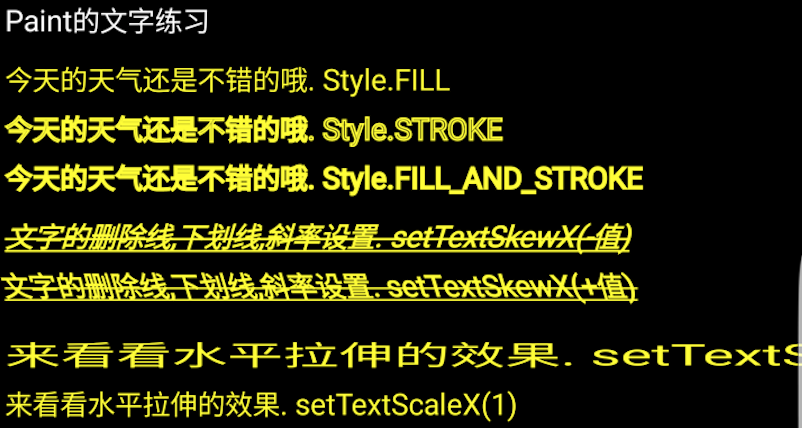
//Style attribute
setFakeBoldText(true) //Set to bold
setUnderlineText(true) //Set Underlines
setTextSkewX(0.5f) //Set the negative slope to the right and the positive slope to the left.
setStrikeThruText(true) //Setting Delete Line
setTextScaleX(2) //Horizontal stretch
Direct pasting effect
canvas Drawing Method for Text Correspondence
1. General Drawing
drawText (String text, float x, float y, Paint paint)
drawText (CharSequence text, int start, int end, float x, float y, Paint paint)
drawText (String text, int start, int end, float x, float y, Paint paint)
drawText (char[] text, int index, int count, float x, float y, Paint paint)
We often use the first, 34 for intercepting a part of the display, not often used.
The second receives CharSequence, which is a powerful object because it can not only write characters but also add bitmap. However, charSequence does not seem to be supported in canvas. So this function loses its meaning.
2. Drawing at specified locations
drawPosText (char[] text, int index, int count, float[] pos, Paint paint)
drawPosText (String text, float[] pos, Paint paint)
Let's go straight to the second constructor. This function draws text based on the point of float of the array you specify. So when we use it, we should pay attention to the ratio of the length of the string drawn to the length of the set array 1:2. Otherwise, we may make mistakes.
Code example:
float []pos=new float[]{20*mDensity,25*mDensity,
                               20*mDensity,50*mDensity,
                               20*mDensity,75*mDensity,
                               20*mDensity,100*mDensity};    //Notice the array here.,Two pairs., Logarithm must be equal to drawPostText The string length of,Otherwise, there will be cross-border anomalies.
   canvas.drawPosText("Eight honors and Eight Disgraces", pos, mPaint);//Two constructors
Picture example: 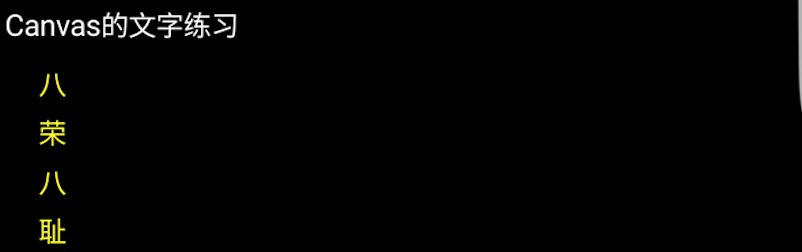
3. Drawing text according to path
As I said in the drawing above, let's show it again with circles.
Key code:
canvas.drawTextOnPath("Just think hard,It's never too late..", circlePath, 45*mDensity, 0, mPaint);
   //Second path, change hoffset,voffset parameter values ,parameter3Distance from the starting point of migration path, parameter4The effect of outward expansion
   canvas.drawTextOnPath("Just think hard,It's never too late..", circlePath2, 20*mDensity, 8*mDensity, mPaint);
Code diagrams: 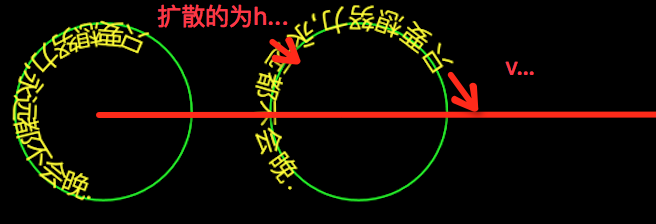
TypeFace of Font
Typeface is designed to set font styles, specified by paint.setTypeface(). You can specify the font style in the system, or you can specify a custom style file to get it. To build a Typeface, you can specify the normal style, Italic style, bold style and so on. If there is no relevant text in the specified style, the style will be displayed with the default style of the system. Generally, the default is Song style.
The Construction Method of Typeeface
create(String familyName, int style) //Load the text style that comes with the system directly by specifying the font name
create(Typeface family, int style) //Constructing text styles through other Typeface variables
createFromAsset(AssetManager mgr, String path) //Display font styles by fetching external fonts from Asset
createFromFile(String path)//Create directly from the path
createFromFile(File path)//Create font styles from external paths
defaultFromStyle(int style)//Create default fonts
//If we want to create a TypeFace object quickly, we use the default method defaultFromStyle() where style has four attributes:

Typeface.NORMAL //Normal body
Typeface.BOLD //bold
Typeface.ITALIC //Italics
Typeface.BOLD_ITALIC //Rough italics
//Setting fonts to pass into familyName strings, whether in Song or in italics, is ineffective. = =
Custom font
Put the font package of the ttf suffix into the project's ___________ / Under app/src/main/assets/Fonts, if no Fonts folder is created manually.
Then the code is as follows:
//Setting up custom fonts
       Typeface myTypeFace = Typeface.createFromAsset(getContext().getAssets(), "Fonts/jian_luobo.ttf");
       mPaint.setTypeface(myTypeFace);
       canvas.drawText("Your sister, I think you're okay.!!!",10,50*mDensity, mPaint);
Code legend: 