
LiveData
Problems LiveData can solve
1 Loading pages or other ways to trigger the request server to get data
- Successful acquisition of desired data from the server requires rendering to the interface
Whether we need to implement step 2 manually or cumbersome is LiveData's point of pain.
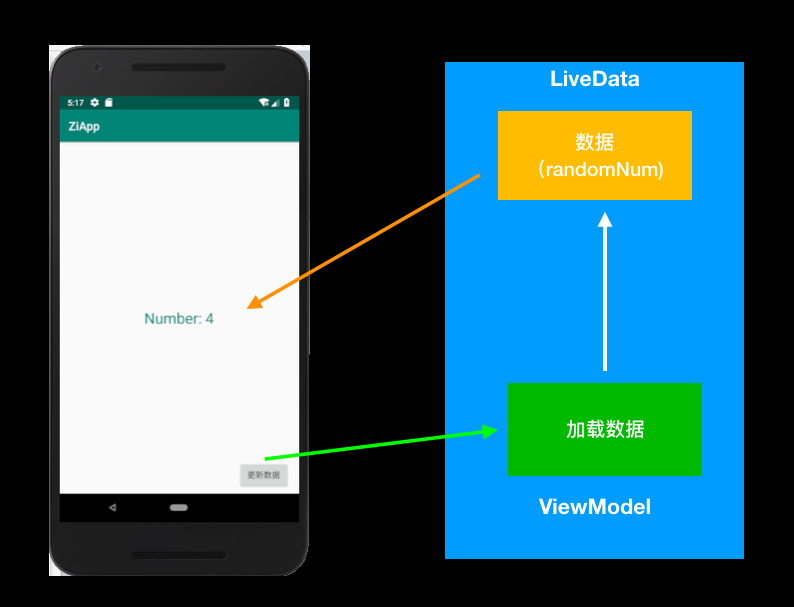
Definition of LiveData
LiveData is an observable data holder, closely related to Lifecycle. Two of them are worth noting: one is that his data carrier and his changes can be detected; the other is that he is related to the life cycle, that is, he knows whether the life cycle has changed.
Create LiveData
In the last share, we used ViewModel to modify the String type to MutableData < String >
private MutableData<String> myRandomNumber;
Next, take a look at the MutableData class, which inherits LiveData and provides two methods: postValue and setValue (executed in UI threads), and postValue (run in Background threads) to be used when requesting the server to update the value.
public class MutableData<T> extends LiveData<T> {

    @Override
    protected void postValue(T value) {
        super.postValue(value);
    }

    @Override
    protected void setValue(T value) {
        super.setValue(value);
    }
}
Then we revamped our getNumber and create methods
public MutableData<String> getNumber(){
        Log.i(TAG, "Get Number: ");
        if(myRandomNumber == null){
            myRandomNumber = new MutableData<>();
            createNumber();
        }
        return myRandomNumber;
    }

    public void createNumber(){
        Log.i(TAG, "createNumber: ");
        Random random = new Random();
        myRandomNumber.setValue("Number: " + (random.nextInt(10 - 1) + 1));
    }
- If myRandom Number, we create a new MutableData <>() instance to assign to him
- In createNumber, myRandomNumber is assigned by setValue method.
Add a button in Activity to simulate the action of getting data update interface
 <Button android:layout_width="wrap_content" android:layout_height="wrap_content"
            android:text="Update data"
            android:onClick="updateRandNum"
            app:layout_constraintEnd_toEndOf="@+id/main2_textView" android:layout_marginEnd="8dp"
            android:layout_marginBottom="8dp" app:layout_constraintBottom_toBottomOf="parent"/>
We get the data through the createNumber function simulation, and let the button trigger the updateRandNum method.
   public void updateRandNum(View view) {
       model.createNumber();
    }
Get data through getNumber method, and then give Observer method to deal with how to update the interface when the data changes, so that the data and interface are not linked together.
LiveData<String> randomNum = model.getNumber();
        randomNum.observe(this, new Observer<String>() {
            @Override
            public void onChanged(@Nullable String s) {
                textView.setText(s);
            }
        });
Once Activity is destroyed, that connection ceases to exist.
- Observable data can be observed to update the interface
- In onCreate, you can define how LiveData updates update the interface
Benefits of using LiveData - We can focus on the business without spending energy on how to update the interface after updating the data.
- When Lifecycle Owner is destroy ed, the relationship between observation and observation automatically ends.
- Random does not cause memory overflow problems
What is Room
In fact, Room packages SQLite to provide better Api usage
Advantages of ROOM
In applications, data is sometimes stored locally. Early developers must be familiar with or use the lightweight Android small data SQlite, but the recent launch of Room by google may be better than SQlite, and its advantages are obvious.
- Room does not need to know some query statements about SQL
- Room provides syntactic correctness checks for SQLite during compilation
- Data can be easily mapped to java objects in Room without template code
- Room can easily associate ViewModel with LiveData.
Introducing Room Dependency
To use Room, we need to introduce some dependencies, which can be referred to in the following code
    def roomVersion = "1.1.1"

    implementation "android.arch.persistence.room:runtime:$roomVersion"
    annotationProcessor "android.arch.persistence.room:compiler:$roomVersion"
    androidTestImplementation "android.arch.persistence.room:testing:$roomVersion"
Create ViewModel
Here, create NoteViewModel to implement ViewModel by inheriting Android ViewModel
public class NoteViewModel extends AndroidViewModel {

    private static final String TAG = "NoteViewModel";

    public NoteViewModel(@NonNull Application application) {
        super(application);
    }

    @Override
    protected void onCleared() {
        super.onCleared();
        Log.i(TAG, "onCleared: ");
    }
}
Define Activity
Use the created noteViewModel in activity through previous learning
public class Main2Activity extends AppCompatActivity {


    private String TAG = this.getClass().getSimpleName();
    private NoteViewModel noteViewModel;

    private MainActivityDataViewModel model;
    @Override
    protected void onCreate(Bundle savedInstanceState) {
        super.onCreate(savedInstanceState);
        setContentView(R.layout.activity_main2);


        noteViewModel = ViewModelProviders.of(this).get(NoteViewModel.class);

    }

    public void updateRandNum(View view) {
        Snackbar.make(view,"To update",Snackbar.LENGTH_LONG)
                .setAction("To update",null).show();
    }
}
Define Entities
Define schema for data tables
@Entity(tableName = "notes")
public class Note {

}
Note is associated with Room by adding the annotation @Entity, where the tableName parameter is the table in the SQLite corresponding to Note, and the Schema of notes is determined by the structure of the Note class.
Define DAO
After creating the NoteDao class and adding @Dao, this class will provide some ways to access the database.
@Dao
public class NoteDao {
}
Define the database
By adding annotation @Database to the abstract class NoteRoomDataBase, and adding tables contained in the database to the annotation, only Note.class is added here, and the version number is specified. exportSchema = false can suppress compile-time alerts.
@Database(entities = Note.class,version = 1,exportSchema = false)
public abstract class NoteRoomDatabase extends RoomDatabase {
public abstract NoteDao noteDao();
}
- It inherits RoomDatabase and is an abstract class, as highlighted above.
@Database(entities = Note.class,version = 1)
public abstract class NoteRoomDatabase extends RoomDatabase {

    public abstract NoteDao noteDao();

    private static volatile NoteRoomDatabase noteRoomInstance;

    static NoteRoomDatabase getDatabase(final Context context){
        if(noteRoomInstance == null){
            synchronized (NoteRoomDatabase.class){
                if(noteRoomInstance == null){
                    noteRoomInstance = Room.databaseBuilder(context.getApplicationContext(),
                            NoteRoomDatabase.class,"note_database")
                            .build();
                }
            }
        }
        return noteRoomInstance;
    }
}
- Developers familiar with java multithreading should not be unfamiliar with volatile and synchronized code, but it doesn't matter if they don't know it, just to prevent multiple threads from operating on the same object at the same time.
Then we use the database Builder method of Room to construct the database instance, which is in the form of singleton.
Insert data into Room
First, create an editing interface, which is entered from the main interface, in which you can see a text input box (EditText) and a confirmation button. After entering the text, click the button to return to the main interface and bring the content of the text box back to the main interface.
public class NewNoteActivity extends AppCompatActivity {

    private EditText editText;
    private Button button;

    @Override
    protected void onCreate(Bundle savedInstanceState) {
        super.onCreate(savedInstanceState);
        setContentView(R.layout.activity_new_note);

        button = findViewById(R.id.save_btn);
        button.setOnClickListener(new View.OnClickListener() {
            @Override
            public void onClick(View view) {

            }
        });
    }
}
Modify the button behavior of the main interface and jump to the NewNoteActivity interface just created.
    public void updateRandNum(View view) {
//        Snackbar.make(view, "update", Snackbar.LENGTH_LONG)
//                setAction("Update", null).show();

        Intent intent = new Intent(Main2Activity.this,NewNoteActivity.class);
        startActivityForResult(intent,1);
    }
To add fields to Entity, each Entity needs a primary key to define the primary key using @PrimaryKey
@Entity(tableName = "notes")
public class Note {


    @PrimaryKey
    @NonNull
    private String id;

    @NonNull
    public String getId() {
        return id;
    }

    @NonNull
    public String getNote() {
        return this.note;
    }

    @NonNull

    @ColumnInfo(name = "note")
    private String note;

    public Note(String id,String note){
        this.id = id;
        this.note = note;
    }


}
Next, insert the Note into the NoteDao interface to insert the Note into the database notes table. You need to add a comment to indicate insert for this method.
@Dao
public interface NoteDao {

    @Insert
    void insert(Note note);
}
With Dao and Entity ready, we go back to NoteViewModel and need to instantiate a database object noteDB and associate it with noteDao.
    private NoteDao noteDao;
    private NoteRoomDatabase noteDB;

    public NoteViewModel(@NonNull Application application) {
        super(application);

        noteDB = NoteRoomDatabase.getDatabase(application);
        noteDao = noteDB.noteDao();

    }
Then it implements a specific insert (insert method), because the reading and writing of the database are asynchronous, so the Insert AsyncTask task is defined here to perform the insertion of data in the background, inserting a note record into the table notes of the data.
 public void insert(Note note){
        new InsertAsyncTask(noteDao).execute(note);
    }
Insert AsyncTask task is used to run the insertion of data in the background.
 private class InsertAsyncTask extends AsyncTask<Note, Void, Void> {

        NoteDao mNoteDao;

        public InsertAsyncTask(NoteDao noteDao) {
            this.mNoteDao = noteDao;
        }

        @Override
        protected Void doInBackground(Note... notes) {
            mNoteDao.insert(notes[0]);
            return null;
        }
    }
Receive the return value from NewNoteActivity in the onActivityResult method to create note to insert into the database
    @Override
    protected void onActivityResult(int requestCode, int resultCode, @Nullable Intent data) {
        super.onActivityResult(requestCode, resultCode, data);

        //
        final String note_id = UUID.randomUUID().toString();
        Note note = new Note(note_id,data.getStringExtra(NewNoteActivity.NOTE_ADDED));
        noteViewModel.insert(note);

        if(requestCode == 1 && resultCode == RESULT_OK){
            Toast.makeText(getApplicationContext(),"Successful Preservation",Toast.LENGTH_LONG).show();
        }else {
            Toast.makeText(getApplicationContext(),"Unsaved",Toast.LENGTH_LONG).show();
        }
    }
- Call noteViewModel.insert(note); insert data