This article will show you how to use and troubleshoot custom views to achieve timeline effects, and how to analyze and implement custom views.Knowledge required: Paint, Canvas, custom view drawing process.
Welcome to leave a message for communication.
1. There are already many examples of RecycleView implementing timelines. Why bother using custom view s to implement timelines?
First look at the final desired effect:
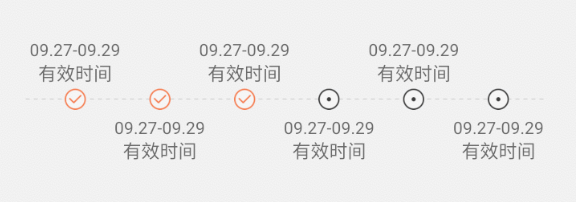
From the above figure, the following points can be summarized:
- Each stage should display time, stage name, status icon, dashed line in the middle;
- Interlaced text display;
- Texts in adjacent stages can intersect vertically.
- The number of timelines is uncertain, but they are screen-full and non-sliding; if only the last two are achieved, using RecycleView is undoubtedly the best option, but the best way to achieve the whole effect at the same time is to use a custom view.
2. How to start?
I believe there are also people like me who know about the use of custom drawing processes view, canvas, path, paint, but really don't know where to start and how to start the first step.My personal summary is: you want too much and don't start late, so if you have an idea, you must try it!Don't think about the perfect result you want to show when you finish your first run, but break it up into non-repeating pieces with the whole in mind, then draw the repeating blocks, and then come up with a step-by-step mentality.
So the first step is to split the view you want to achieve into a small, drawable block with no duplicates. For the current timeline effect you want to achieve, the smallest drawable block without duplicates is the block with only one time node as shown in the diagram:

It includes:
- A dashed line vertically centered;
- An icon representing the status;
- A text block showing time;
- A text block showing the stage name;
3. Start Drawing
With the above analysis, the next step is to start drawing.
1. Draw the middle line
First draw the dashed line. If the dashed line does not know how to draw it, you can draw a solid line first, and then look for a way to draw the dashed line.
Using drawLine(float startX, float startY, float stopX, float stopY, @NonNull Paint paint) as a method of drawing lines in canvas, you know from the parameters that you need to know the starting and ending coordinates of the line and a paint object. Because it is a straight line vertically centered and crosses the entire control, you can determine that the y coordinates of the two points are the same, that is, the x of the starting point is half the height of the control.The coordinate is 0, and the x coordinate of the end point is the width of the control.That is, you can draw this line once you know the width and height of the control.Get the width and height of the control, which can be obtained in the onMeasure method:
@Override
protected void onMeasure(int widthMeasureSpec, int heightMeasureSpec) {
    super.onMeasure(widthMeasureSpec, heightMeasureSpec);
    mViewWidth = MeasureSpec.getSize(widthMeasureSpec) - dip2px(mContext, mSafeDistance * 2);
    mViewHeight = MeasureSpec.getSize(heightMeasureSpec);
}
Code for drawing lines (added in the onDraw method, and the other drawing methods below are also added in the onDraw method):
// Define brushes and set related properties
Paint mLinePaint = new Paint();
mLinePaint.setColor(Color.parseColor("#999999"));
mLinePaint.setStrokeWidth(1);
mLinePaint.setStyle(Paint.Style.STROKE);
// Draw dashed lines
canvas.drawLine(0, mViewHeight / 2, mViewWidth, mViewHeight / 2, mLinePaint);
2. Draw icons
canvas icon drawing method: drawBitmap(@NonNull Bitmap bitmap, float left, float top, @Nullable Paint paint), according to the parameters of the method to analyze how to prepare the value, there is a bitmap object, starting coordinates and paint.The bitmap object converts the resource file drawable to bitmap format; coordinates are the center point of the control.Code for drawing icons:
// Icon x, y coordinates
Bitmap statusBitmap = BitmapFactory.decodeResource(mContext.getResources(), R.mipmap.ic_no_pass);
float bX = mViewWidth / 2;
// The vertical center point is at the top of the icon, so subtract half the bitmap height
float bY = mViewHeight / 2 - statusBitmap.getHeight() / 2f;
Paint mBitmapPaint = new Paint();
mBitmapPaint.setFilterBitmap(true);
canvas.drawBitmap(statusBitmap, bX, bY, mBitmapPaint);
3. Draw Text
The way canvas draws text: drawText(@NonNull String text, float x, float y, @NonNull Paint paint), still knows what to draw, the starting coordinate point, and paint from the method.When the text is above the icon, the y-coordinate of the text needs to use the y-coordinate of the icon to subtract the distance from the text to the icon, which is the same as the x-coordinate of the picture; when the text is below the icon, the y-coordinate of the text needs to use the y-coordinate of the icon plus the distance from the text to the icon.Code for drawing text:
// Define Brush
Paint mDatePaint = new Paint();
mDatePaint.setColor(Color.parseColor("#666666"));
mDatePaint.setTextSize(dip2px(mContext, 12));
mDatePaint.setStyle(Paint.Style.FILL);
mDatePaint.setTextAlign(Paint.Align.CENTER);
mDatePaint.setAntiAlias(true);

Paint mNamePain = new Paint();
mNamePain.setColor(Color.parseColor("#666666"));
mNamePain.setTextSize(dip2px(mContext, 13));
mNamePain.setStyle(Paint.Style.FILL);
mNamePain.setTextAlign(Paint.Align.CENTER);
mNamePain.setAntiAlias(true);

// Define coordinate variables
float dateX = bX + statusBitmap.getWidth() / 2f;
float dateY;
dateY = mViewHeight / 2 - dip2px(mContext, 19);

// Picture text, on icons
canvas.drawText("Effective Time", dateX, dateY, mNamePain);
canvas.drawText("09.27-09.29", dateX, dateY - dateTextHeight mDatePaint);

// Picture text, under icons
dateY = mViewHeight / 2 + dip2px(mContext, 19);
canvas.drawText("09.27-09.29", dateX, dateY, mDatePaint);
canvas.drawText("Effective Time", dateX, dateY + dateTextHeigh, mNamePain);
4. From Part to Whole
Now that you've finished drawing with only one point in time, consider how to draw if you have more than one point in time.When there is only one point in time, the coordinates are calculated by the width and height of the control. When there are two points in time, you need to divide the control into two parts first, and then calculate the corresponding coordinates in the equal part to complete the drawing.When there are three time points, they need to be divided into three parts, and then the corresponding coordinates are calculated in their respective parts to complete the drawing.So the way to get a plot regardless of the number of points in time will not change. What you need to change is the coordinates of the points used in the plot.Actually, you can see that when there are many points, you need to loop through them, and the code is as follows:
// When multiple points are obtained, the width of each part of the itevW is equal to the width of the control when there is only one point in time above
float itemW = mViewWidth / mDataList.size();
for (int i = 0; i < mDataList.size(); i++) {
    // Complete related calculations, drawing
}
5. Perfect
At this point, the whole analysis and drawing is almost finished.
Method of drawing dashed lines: mLinePaint.setPathEffect (new DashPathEffect (new float[]{10,10},0));
A problem was encountered when drawing the dashed line. The dashed line effect was not displayed on the phone. Later, it was found that hardware acceleration needed to turn off the view layer: setLayerType(View.LAYER_TYPE_SOFTWARE, null);
Attention should be paid to the calculation of center points when drawing text
Initialization of variables such as paint, bitmap is recommended in the initialization method, not in the onDraw method.
4. Summary
Be sure to look and try more about customizing view s.
Last
This year, I spent a month to collect and organize a set of knowledge system. If you have the idea of in-depth and systematic learning, you can click Portal I will send all the information I have collected and sorted to you to help you progress faster.