Preface:
I haven't written a technology blog for a long time. Many of android's COOL CUSTOM VIew effects are related to Bessel curves, such as water ripple effects, rocket effects, etc. Bessel curves and xfermode will be studied and used from this chapter. The corresponding effect will be shown in gif pictures in the future, which is more intuitive.
Summary:
This article mainly introduces the Bessel curve, and the simple use of the second and third order Bessel curve.
Text:
1. What is the Bessel curve?
Bessel curve, also known as Bezier curve or Bezier curve, is a mathematical curve applied to binary graphics applications. Bessel curve is composed of line segments and nodes, which are pivots that can be dragged, and line segments are like elastic bands that can be stretched. It is an important parametric curve in computer graphics.
Here we steal two pictures. We combine the commonly used first-order Bessel curve, second-order Bessel curve and third-order Bessel curve to understand:
1) First order Bessel curve:

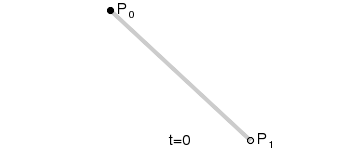

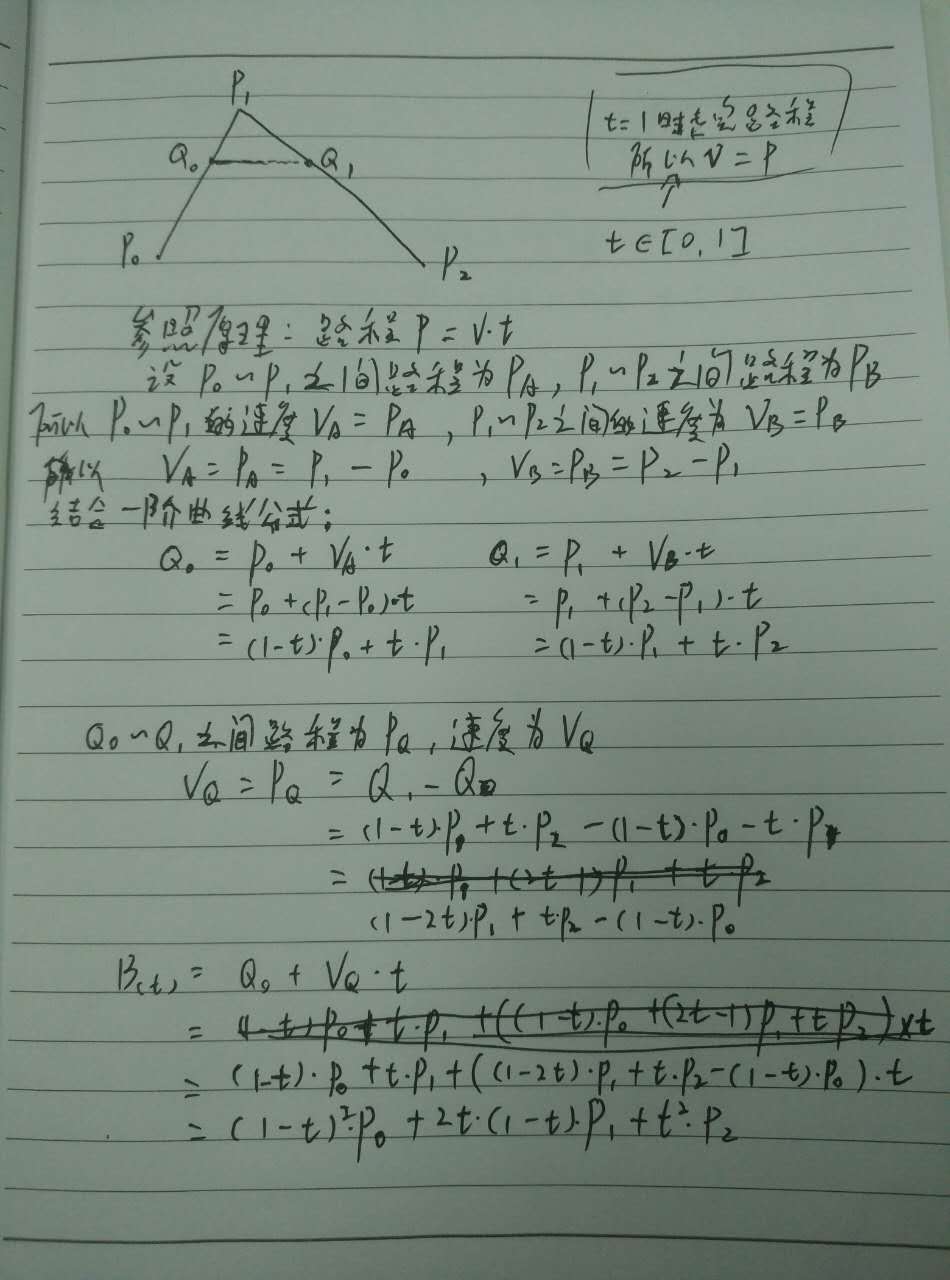
The first-order Bessel curve shows a straight line between two points. B(t) is the coordinate of the point in t time, P0 is the starting point and P1 is the end point.
Coordinate B(t)=P+P(P1-P)*t=1-t)*P+P 1*t
2) Second order Bessel curve:

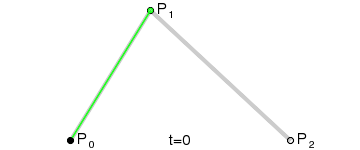
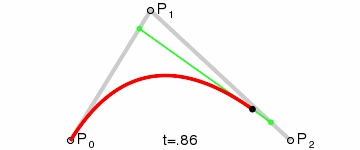
The second-order Bessel curve shows a parabola. The continuous point Q0 between P0 and P1 describes a line segment, the continuous point Q1 between P1 and P2, a line segment, the continuous point B(t) between Q0 and Q1, and a second-order Bessel curve. Fig. Q0 is regarded as the point of the green line segment on P 0-P 1, and Q1 is regarded as the point of the green line segment on P 1-P 2.
Attached Handwritten Estimation Process of Overeating Lotus Root :
:
3) Third-order Bessel curve:

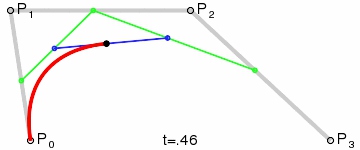
The concrete principle and calculation formula can refer to the second-order Bessel curve calculation method.
General Bessel Curve Formula:

Explanation: The continuous point line from P0 to P1 is tangent to the Bessel curve.
2. Relevant Use of Bessel Curve in android
The Path class in Android provides a way to draw Bessel curves.
1) Second order Bessel curve:
       //Set Path to Move to Start Position 100,300
        mPath.moveTo(100,300);
        //Set up auxiliary point 250,300 Set up terminal point 400,300
        mPath.quadTo(250,300,400,300);
Now we need to change the coordinates of auxiliary points into dynamic ones by combining onTouch events to realize the parabolic effect with a straight line of knowledge.
   @Override
    protected void onDraw(Canvas canvas) {

        mPath.reset();
        mPaint.setColor(Color.parseColor("#ff0000"));
        mPaint.setStrokeWidth(5);
        mPaint.setStyle(Paint.Style.STROKE);

        //Set Path to Move to Start Position 100,300
        mPath.moveTo(100,300);
        //Set up auxiliary point 250,300 Set up terminal point 400,300
        mPath.quadTo(supX,supY,400,300);
        canvas.drawPath(mPath,mPaint);
        super.onDraw(canvas);

    }
@Override
public boolean onTouchEvent(MotionEvent event) {
switch(event.getAction()){
case MotionEvent.ACTION_MOVE:
supX = event.getX();
supY = event.getY();
invalidate();
break;
default:
break;
}
return true;
}
Now the curve changes with the auxiliary point, but the position of the auxiliary point is not intuitive enough to see the relationship between the auxiliary point and the parabola. The auxiliary point is shown below.
Now we can also see the auxiliary points:canvas.drawPoint(supX,supY,mPaint);

2) Third-order Bessel curve:
Use the cubilTo method in the Path class.
x1,y1 are the coordinates of the first auxiliary point; x2,y2 are the coordinates of the second auxiliary point; x3,y3 are the coordinates of the end point.cubicTo(float x1, float y1, float x2, float y2,float x3, float y3)
Draw the effect and auxiliary points directly:
   @Override
    protected void onDraw(Canvas canvas) {

        mPath.reset();
        mPaint.setColor(Color.parseColor("#ff0000"));
        mPaint.setStrokeWidth(10);
        mPaint.setStyle(Paint.Style.STROKE);

        //Set Path to Move to Start Position 100,300
        mPath.moveTo(100,300);
        //Set up auxiliary points 250,500, 550,150, set end points 800,300
        mPath.cubicTo(250,500,550,150,800,300);
        canvas.drawPath(mPath,mPaint);

        //Drawing the first auxiliary point
        canvas.drawPoint(250,500,mPaint);
        //Drawing the second auxiliary point
        canvas.drawPoint(550,150,mPaint);

        super.onDraw(canvas);

    }
The use of Bessel curve to achieve the effect of water ripple will be introduced in the next article.