
Author: itfitness link: https://www.jianshu.com/p/f08...
Contents of this document:
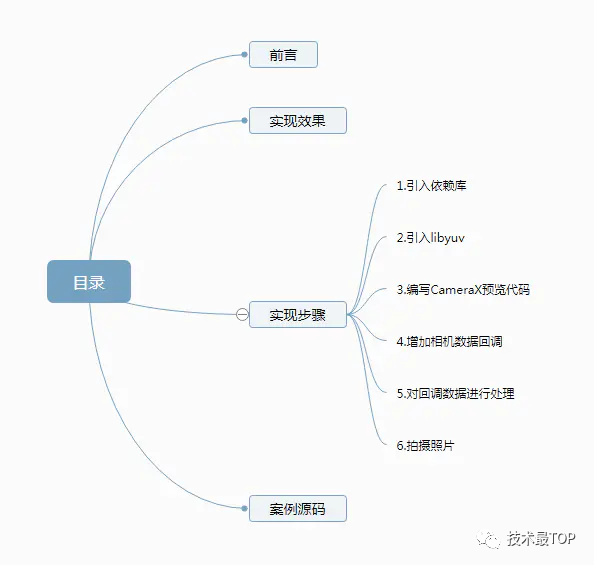
preface
Previously, a user-defined Camera filter (Android user-defined Camera filter) was implemented with Camera, but it ran a little stuck. This time, Camerax was used to achieve the same effect, which was found to be very smooth. I hope it can help students in need.
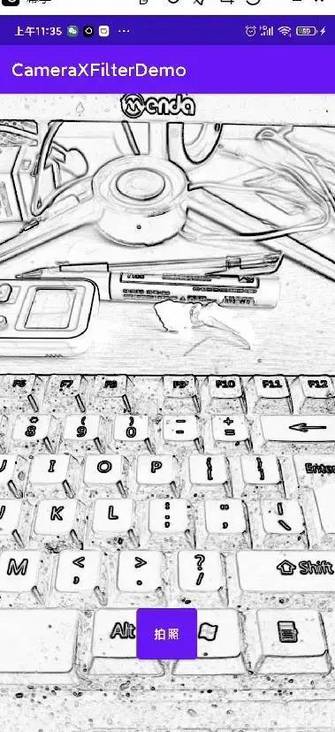
Realization effect

Implementation steps
1. Import dependency Library
The dependency libraries I introduced here include CameraX, gpuimage (filter Library) and Utilcodex (an easy-to-use tool class)
// CameraX core library using camera2 implementation
    implementation "androidx.camera:camera-camera2:1.0.1"
// CameraX Lifecycle Library
    implementation "androidx.camera:camera-lifecycle:1.0.1"
// CameraX View class
    implementation "androidx.camera:camera-view:1.0.0-alpha27"

    implementation'jp.co.cyberagent.android.gpuimage:gpuimage-library:1.4.1'
    implementation 'com.blankj:utilcodex:1.30.6'
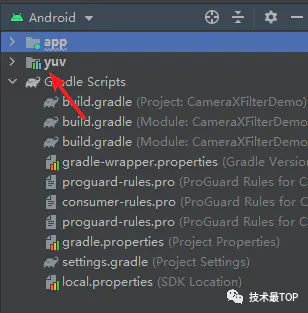
2. Introduce libyuv
Here I use this case( https://github.com/theeasiest... )libyuv inside, as follows
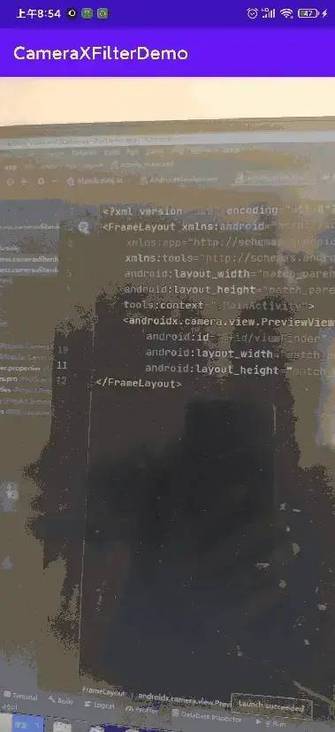
3. Write CameraX preview code
The layout code is as follows
<?xml version="1.0" encoding="utf-8"?>
<FrameLayout xmlns:android="http://schemas.android.com/apk/res/android"
    xmlns:app="http://schemas.android.com/apk/res-auto"
    xmlns:tools="http://schemas.android.com/tools"
    android:layout_width="match_parent"
    android:layout_height="match_parent"
    tools:context=".MainActivity">
    <androidx.camera.view.PreviewView
        android:id="@+id/viewFinder"
        android:layout_width="0dp"
        android:layout_height="0dp" />
</FrameLayout>
The code for opening camera preview in Activity is as follows, which are basically the case codes officially provided by Google
class MainActivity : AppCompatActivity() {
    private lateinit var cameraExecutor: ExecutorService
    override fun onCreate(savedInstanceState: Bundle?) {
        super.onCreate(savedInstanceState)
        setContentView(R.layout.activity_main)

        cameraExecutor = Executors.newSingleThreadExecutor()
        // Request camera permissions
        if (allPermissionsGranted()) {
            startCamera()
        } else {
            ActivityCompat.requestPermissions(
                this, REQUIRED_PERMISSIONS, REQUEST_CODE_PERMISSIONS)
        }
    }

    private fun allPermissionsGranted() = REQUIRED_PERMISSIONS.all {
        ContextCompat.checkSelfPermission(
            baseContext, it) == PackageManager.PERMISSION_GRANTED
    }

    override fun onRequestPermissionsResult(
        requestCode: Int, permissions: Array<String>, grantResults:
        IntArray) {
        super.onRequestPermissionsResult(requestCode, permissions, grantResults)
        if (requestCode == REQUEST_CODE_PERMISSIONS) {
            if (allPermissionsGranted()) {
                startCamera()
            } else {
                Toast.makeText(this,
                    "Permissions not granted by the user.",
                    Toast.LENGTH_SHORT).show()
                finish()
            }
        }
    }
    private fun startCamera() {
        val cameraProviderFuture = ProcessCameraProvider.getInstance(this)
        cameraProviderFuture.addListener(Runnable {
            val cameraProvider: ProcessCameraProvider = cameraProviderFuture.get()
            val preview = Preview.Builder()
                .build()
                .also {
                    it.setSurfaceProvider(viewFinder.surfaceProvider)
                }
            val cameraSelector = CameraSelector.DEFAULT_BACK_CAMERA
            try {
                cameraProvider.unbindAll()
                cameraProvider.bindToLifecycle(
                    this, cameraSelector, preview)
            } catch(exc: Exception) {
                Log.e(TAG, "Use case binding failed", exc)
            }
        }, ContextCompat.getMainExecutor(this))
    }

    override fun onDestroy() {
        super.onDestroy()
        cameraExecutor.shutdown()
    }

    companion object {
        private const val TAG = "CameraXBasic"
        private const val REQUEST_CODE_PERMISSIONS = 10
        private val REQUIRED_PERMISSIONS = arrayOf(Manifest.permission.CAMERA)

    }
}
Here you can preview the camera
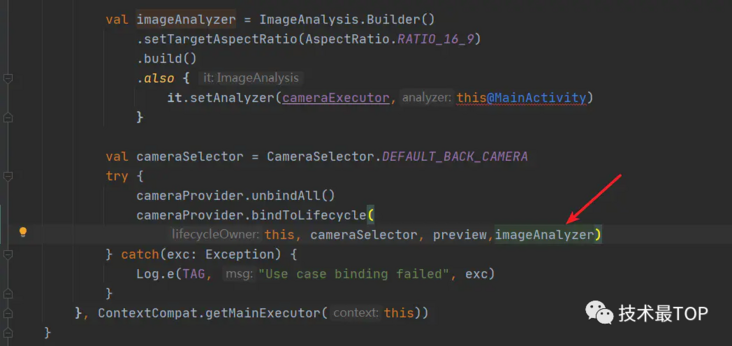
4. Add camera data callback
If we want to increase the filter effect, we must operate on the camera data. Here, we get the modifiable data by getting the camera data callback
val imageAnalyzer = ImageAnalysis.Builder()
                //Set the callback data ratio to 16:9
                .setTargetAspectRatio(AspectRatio.RATIO_16_9)
                .build()
                .also {
                    it.setAnalyzer(cameraExecutor,this@MainActivity)
                }
Here we also need to bind
In addition, we also need to implement the ImageAnalysis.Analyzer interface in the Activity. The data is obtained in the callback method of this interface, as shown below, in which the ImageProxy contains the image data
override fun analyze(image: ImageProxy) {

}
5. Process callback data
We process the image and add filters in the camera data callback method. Of course, before that, we also need to create a GPUImage object and set the filter type
private var bitmap:Bitmap? = null
private var gpuImage:GPUImage? = null
//Create the GPUImage object and set the filter type. Here I use the sketch filter
private fun initFilter() {
        gpuImage = GPUImage(this)
        gpuImage!!.setFilter(GPUImageSketchFilter())
    }
@SuppressLint("UnsafeOptInUsageError")
    override fun analyze(image: ImageProxy) {
        //Convert Android YUV data to libYuv data
        var yuvFrame = yuvUtils.convertToI420(image.image!!)
        //Rotate the image (because the recalled camera data is horizontal, it needs to be rotated 90 degrees)
        yuvFrame = yuvUtils.rotate(yuvFrame, 90)
        //Create Bitmap based on image size
        bitmap = Bitmap.createBitmap(yuvFrame.width, yuvFrame.height, Bitmap.Config.ARGB_8888)
        //Convert the image to Argb format and fill it on the Bitmap
        yuvUtils.yuv420ToArgb(yuvFrame,bitmap!!)
        //Use GpuImage to add a filter to the image
        bitmap = gpuImage!!.getBitmapWithFilterApplied(bitmap)
        //Since this is not a UI thread, you need to update the UI on the UI thread
        img.post {
            img.setImageBitmap(bitmap)
            //The next data will be recalled only after the ImageProxy is closed
            image.close()
        }

    }
6. Take photos
Here we add a button to take pictures
<?xml version="1.0" encoding="utf-8"?>
<FrameLayout xmlns:android="http://schemas.android.com/apk/res/android"
    xmlns:app="http://schemas.android.com/apk/res-auto"
    xmlns:tools="http://schemas.android.com/tools"
    android:layout_width="match_parent"
    android:layout_height="match_parent"
    tools:context=".MainActivity">
    <androidx.camera.view.PreviewView
        android:id="@+id/viewFinder"
        android:layout_width="match_parent"
        android:layout_height="match_parent" />
    <ImageView
        android:id="@+id/img"
        android:scaleType="centerCrop"
        android:layout_width="match_parent"
        android:layout_height="match_parent"/>
    <Button
        android:id="@+id/bt_takepicture"
        android:layout_gravity="center_horizontal|bottom"
        android:layout_marginBottom="100dp"
        android:text="photograph"
        android:layout_width="70dp"
        android:layout_height="70dp"/>
</FrameLayout>
Then we add the logic of taking pictures in the Activity, which is actually to convert Bitmap into pictures and save them to SD card. Here we use the Utilcodex tool introduced before. When we click the button, isTakePhoto It will change to true, and then the image will be saved in the callback of the camera
bt_takepicture.setOnClickListener {
            isTakePhoto = true
        }
In addition, we add variable control and do not process callback data when taking photos
@SuppressLint("UnsafeOptInUsageError")
    override fun analyze(image: ImageProxy) {
        if(!isTakePhoto){
            //Convert Android YUV data to libYuv data
            var yuvFrame = yuvUtils.convertToI420(image.image!!)
            //Rotate the image (because the recalled camera data is horizontal, it needs to be rotated 90 degrees)
            yuvFrame = yuvUtils.rotate(yuvFrame, 90)
            //Create Bitmap based on image size
            bitmap = Bitmap.createBitmap(yuvFrame.width, yuvFrame.height, Bitmap.Config.ARGB_8888)
            //Convert the image to Argb format and fill it on the Bitmap
            yuvUtils.yuv420ToArgb(yuvFrame,bitmap!!)
            //Use GpuImage to add a filter to the image
            bitmap = gpuImage!!.getBitmapWithFilterApplied(bitmap)
            //Since this is not a UI thread, you need to update the UI on the UI thread
            img.post {
                img.setImageBitmap(bitmap)
                if(isTakePhoto){
                    takePhoto()
                }
                //The next data will be recalled only after the ImageProxy is closed
                image.close()
            }
        }else{
            image.close()
        }
    }
 /**
     * photograph
     */
    private fun takePhoto() {
        Thread{
            val filePath = File(getExternalFilesDir(Environment.DIRECTORY_DOWNLOADS),"${System.currentTimeMillis()}save.png")
            ImageUtils.save(bitmap,filePath.absolutePath,Bitmap.CompressFormat.PNG)
            ToastUtils.showShort("Successful shooting")
            isTakePhoto = false
        }.start()
    }
The effect is as follows
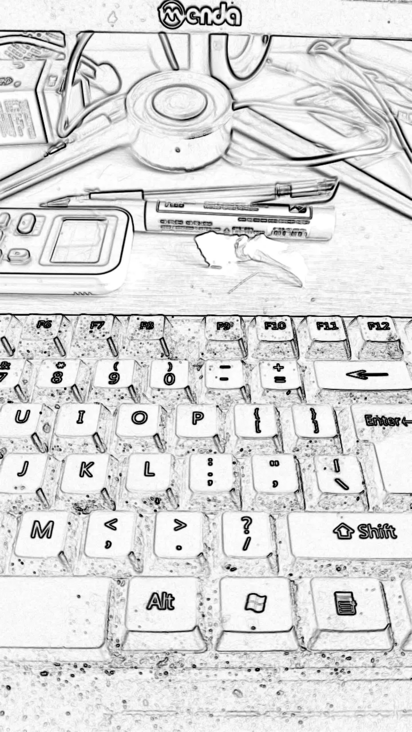
The saved pictures are in the following directory

The saved pictures are as follows
Only through continuous learning and progress can we not be eliminated by the times. Pay attention to me and share knowledge every day!