The core logic of the test paper scanning module is data acquisition, decoding and recognition, image cutting, and the processing of recognition results and cutting results, which constitutes the main logic of the whole module. The implementation of the whole logic is shown in the following figure:
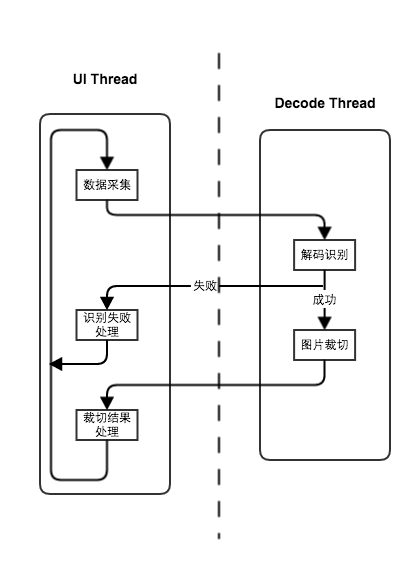
In the module, besides the UI thread, a Deocde thread is also opened to deal with image decoding, recognition and cropping. The reason for this is that image data processing is time-consuming, and if processed in UI threads, there is a risk of ANR. At the same time, the fluency of the whole module is better, and the structure of the module is clearer.
So how do threads interact? The most commonly used handler messaging mechanism is adopted in this module. Because you can pass larger image data between threads through the Message of Handler (note that if you pass larger data in Intent's Bundle, you will crash and report errors). See the following code:
  @Override
  public void run() {
    Looper.prepare();
    handler = new DecodeHandler(activity);
    handlerInitLatch.countDown();
    Looper.loop();
  }
- 1
- 2
- 3
- 4
- 5
- 6
- 7
- 8
- 1
- 2
- 3
- 4
- 5
- 6
- 7
- 8
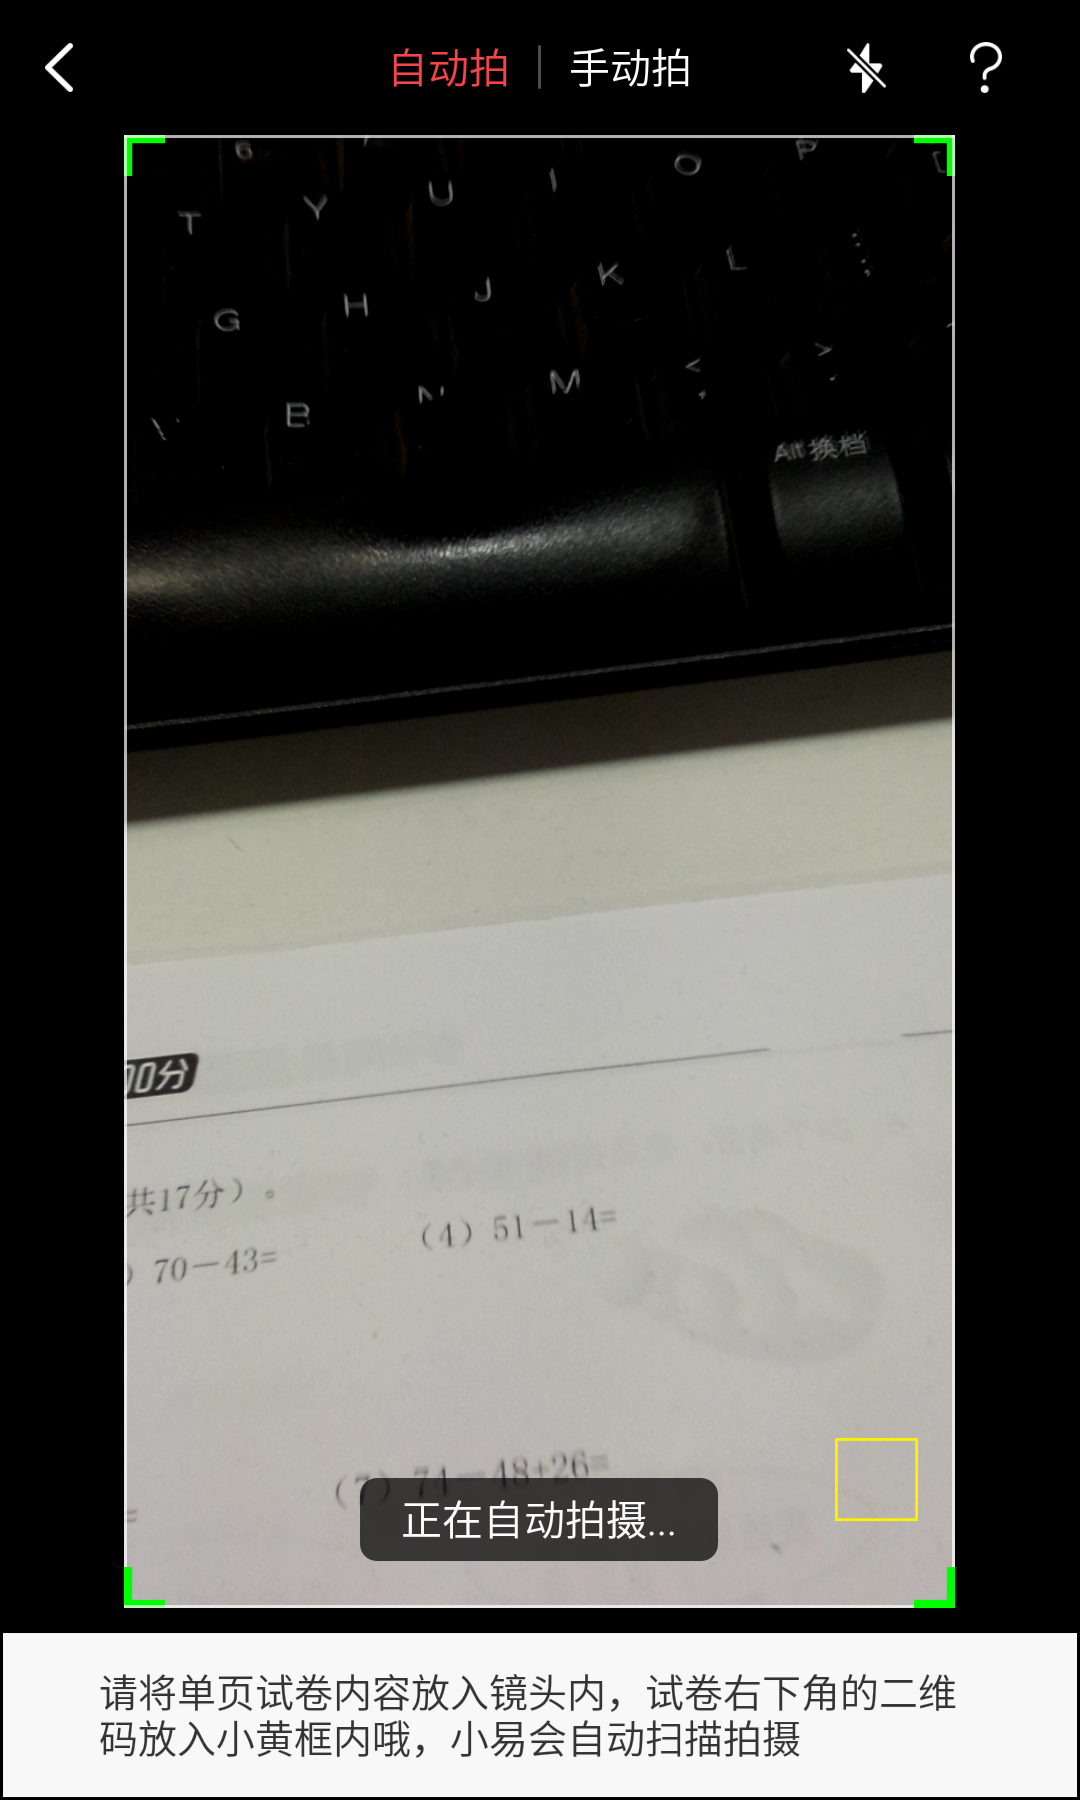
The above method is the run method of DecodeThread, in which we initialize the Handler object DecodeHandler corresponding to the current thread. DecodeHandler initialization is a contextual activity that needs to be passed into the current main thread, through which we can get the main thread's Handler object. In this way, the main thread and the decoding thread can be linked, and the message can be easily passed between them. The final module acquisition interface is as follows:
Relevant Implementation of Module Development
The logic of the whole scanner module is trivial, so it is not explained one by one. Following are some key points in the development and Camera's experience in hardware development. Record here to avoid repeating wheel building in the future.
Flash setting
- Turn on the flash
public void turnOnFlash(){
        if(camera != null){
            try {
                Camera.Parameters parameters = camera.getParameters();
                parameters.setFlashMode(Camera.Parameters.FLASH_MODE_TORCH);
                camera.setParameters(parameters);
            } catch (Exception e) {
                e.printStackTrace();
            }
        }
}- 1
- 2
- 3
- 4
- 5
- 6
- 7
- 8
- 9
- 10
- 11
- 1
- 2
- 3
- 4
- 5
- 6
- 7
- 8
- 9
- 10
- 11
- flash off
  public void turnOffFlash(){
        if(camera != null){
            try {
                Camera.Parameters parameters = camera.getParameters();
                parameters.setFlashMode(Camera.Parameters.FLASH_MODE_OFF);
                camera.setParameters(parameters);
            } catch (Exception e) {
                e.printStackTrace();
            }
        }
}- 1
- 2
- 3
- 4
- 5
- 6
- 7
- 8
- 9
- 10
- 11
- 1
- 2
- 3
- 4
- 5
- 6
- 7
- 8
- 9
- 10
- 11
Preview Picture Resolution Selection
The resolution selection logic of preview pictures is: 1920*1080 is selected, otherwise the maximum resolution supported by hardware is selected, and the proportion of pictures is 16:9.
private static Point findBestPreviewSizeValue(List<Camera.Size> sizeList, Point screenResolution) {
      int bestX = 0;
      int bestY = 0;
      int size = 0;
      for(int i = 0; i < sizeList.size(); i ++){
          // If there is a consistent resolution, it returns directly
          if(sizeList.get(i).width == DEFAULT_WIDTH && sizeList.get(i).height == DEFAULT_HEIGHT){
              Log.d(TAG, "get default preview size!!!");
              return new Point(DEFAULT_WIDTH, DEFAULT_HEIGHT);
          }

          int newX = sizeList.get(i).width;
          int newY = sizeList.get(i).height;
          int newSize = Math.abs(newX * newX) + Math.abs(newY * newY);
          float ratio = (float)newY / (float)newX;
          Log.d(TAG, newX + ":" + newY + ":" + ratio);
          if (newSize >= size && ratio != 0.75) {  // Make sure the picture is 16:9
              bestX = newX;
              bestY = newY;
              size = newSize;
          } else if (newSize < size) {
              continue;
          }
      }

      if (bestX > 0 && bestY > 0) {
          return new Point(bestX, bestY);
      }
      return null;
}- 1
- 2
- 3
- 4
- 5
- 6
- 7
- 8
- 9
- 10
- 11
- 12
- 13
- 14
- 15
- 16
- 17
- 18
- 19
- 20
- 21
- 22
- 23
- 24
- 25
- 26
- 27
- 28
- 29
- 30
- 1
- 2
- 3
- 4
- 5
- 6
- 7
- 8
- 9
- 10
- 11
- 12
- 13
- 14
- 15
- 16
- 17
- 18
- 19
- 20
- 21
- 22
- 23
- 24
- 25
- 26
- 27
- 28
- 29
- 30
Resolution Selection of Photographs
In the list of hardware-supported resolution of photographic pictures, the resolution selection logic of photographic pictures:
- 1920 * 1080
- Choose a screen resolution larger than 16:9
- Choose the image resolution as large as possible and the image ratio is 16:9.
 private static Point findBestPictureSizeValue(List<Camera.Size> sizeList, Point screenResolution){
        List<Camera.Size> tempList = new ArrayList<>();

        for(int i = 0; i < sizeList.size(); i ++){
            // If there is a consistent resolution, it returns directly
            if(sizeList.get(i).width == DEFAULT_WIDTH && sizeList.get(i).height == DEFAULT_HEIGHT){
                Log.d(TAG, "get default picture size!!!");
                return new Point(DEFAULT_WIDTH, DEFAULT_HEIGHT);
            }
            if(sizeList.get(i).width >= screenResolution.x && sizeList.get(i).height >= screenResolution.y){
                tempList.add(sizeList.get(i));
            }
        }

        int bestX = 0;
        int bestY = 0;
        int diff = Integer.MAX_VALUE;
        if(tempList != null && tempList.size() > 0){
            for(int i = 0; i < tempList.size(); i ++){
                int newDiff = Math.abs(tempList.get(i).width - screenResolution.x) + Math.abs(tempList.get(i).height - screenResolution.y);
                float ratio = (float)tempList.get(i).height / tempList.get(i).width;
                Log.d(TAG, "ratio = " + ratio);
                if(newDiff < diff && ratio != 0.75){  // Make sure the picture is 16:9
                    bestX = tempList.get(i).width;
                    bestY = tempList.get(i).height;
                    diff = newDiff;
                }
            }
        }

        if (bestX > 0 && bestY > 0) {
            return new Point(bestX, bestY);
        }else {
            return findMaxPictureSizeValue(sizeList);
        }
}- 1
- 2
- 3
- 4
- 5
- 6
- 7
- 8
- 9
- 10
- 11
- 12
- 13
- 14
- 15
- 16
- 17
- 18
- 19
- 20
- 21
- 22
- 23
- 24
- 25
- 26
- 27
- 28
- 29
- 30
- 31
- 32
- 33
- 34
- 35
- 36
- 1
- 2
- 3
- 4
- 5
- 6
- 7
- 8
- 9
- 10
- 11
- 12
- 13
- 14
- 15
- 16
- 17
- 18
- 19
- 20
- 21
- 22
- 23
- 24
- 25
- 26
- 27
- 28
- 29
- 30
- 31
- 32
- 33
- 34
- 35
- 36
Preview Mode Cyclic Autofocus
Autofocus is supported in preview mode. The current processing logic is to delay sending Message messages in the callback method onAutoFocus of AutoFocus Callback. In this way, after the last focusing is completed, the next automatic focusing Message will be sent after a fixed time delay, so as to achieve the purpose of cyclic focusing.
 @Override
    public void onAutoFocus(boolean success, Camera camera) {
        Log.d(TAG, "onAutoFocus");
        PaperScanConstant.isAutoFocusSuccess = true;
        if (autoFocusHandler != null) {
            Message message = autoFocusHandler.obtainMessage(autoFocusMessage, success);
            autoFocusHandler.sendMessageDelayed(message, AUTOFOCUS_INTERVAL_MS);
            autoFocusHandler = null;
        } else {
            Log.d(TAG, "Got auto-focus callback, but no handler for it");
        }
}- 1
- 2
- 3
- 4
- 5
- 6
- 7
- 8
- 9
- 10
- 11
- 12
- 1
- 2
- 3
- 4
- 5
- 6
- 7
- 8
- 9
- 10
- 11
- 12
Preview screen display without distortion
If the resolution ratio of preview pictures is not the same as that of the area displaying the captured pictures on the mobile screen, the picture will be stretched or compressed. In order to solve this problem, we need to achieve a better user experience. In the layout of the module, the display area of the screen is calculated dynamically to ensure that the proportion of the preview area is consistent with the resolution ratio of the picture.
The pits in module development
Sweeping module development, because it is dealing with mobile phone hardware Camera, based on the current market Android There are many models of mobile phones and a wide range of ROM s on board. No pit is impossible!!! The following is the relevant pits in the development process of this module.
The resolution of some machine photographs is not high
In the process of development, we have encountered such a situation that on some computers, clearly focused, the resolution of the mobile phone is also very high, but the resolution of the photos taken is very small. The reason is that the default image resolution is different for different mobile ROM s. Some mobile phones have high default resolution, so the photos are clear; others have the lowest default resolution, so no matter how high the resolution of the mobile phone is, the photos taken are still very blurred. The solution is that you need to display the image resolution settings for taking pictures:
parameters.setPreviewSize(cameraResolution.x, cameraResolution.y);
parameters.setPictureSize(pictureResolution.x, pictureResolution.y);- 1
- 2
- 1
- 2
Some of the machines took pictures and rotated.
Or because of the fragmentation of Android phones, the default rotation angle of each phone is different. Initially, the module rotates 90 degrees by default, which is not a problem on most computers. But when it comes to Nexus 5X, something goes wrong, which is caused by the top and bottom of the picture. After consulting relevant information, Google officials provided the following methods to solve this problem.
public void setCameraDisplayOrientation(int cameraId, android.hardware.Camera camera) {
        android.hardware.Camera.CameraInfo info = new android.hardware.Camera.CameraInfo();
        android.hardware.Camera.getCameraInfo(cameraId, info);
        int rotation = BaseApplication.getInstance().getCurrentActivity().getWindowManager().getDefaultDisplay()
                .getRotation();
        int degrees = 0;
        switch (rotation) {
            case Surface.ROTATION_0: degrees = 0; break;
            case Surface.ROTATION_90: degrees = 90; break;
            case Surface.ROTATION_180: degrees = 180; break;
            case Surface.ROTATION_270: degrees = 270; break;
        }

        int result;
        if (info.facing == Camera.CameraInfo.CAMERA_FACING_FRONT) {
            result = (info.orientation + degrees) % 360;
            result = (360 - result) % 360;  // compensate the mirror
        } else {  // back-facing
            result = (info.orientation - degrees + 360) % 360;
        }
        // Recording the rotation angle of the local camera
        PaperScanConstant.cameraRotation = result;
        camera.setDisplayOrientation(result);
    }

    private int findFrontFacingCameraID() {
        int cameraId = -1;
        // Search for the back facing camera
        int numberOfCameras = Camera.getNumberOfCameras();
        for (int i = 0; i < numberOfCameras; i++) {
            Camera.CameraInfo info = new Camera.CameraInfo();
            Camera.getCameraInfo(i, info);
            if (info.facing == Camera.CameraInfo.CAMERA_FACING_BACK) {
                Log.d(TAG, "Camera found");
                cameraId = i;
                break;
            }
        }
        return cameraId;
}- 1
- 2
- 3
- 4
- 5
- 6
- 7
- 8
- 9
- 10
- 11
- 12
- 13
- 14
- 15
- 16
- 17
- 18
- 19
- 20
- 21
- 22
- 23
- 24
- 25
- 26
- 27
- 28
- 29
- 30
- 31
- 32
- 33
- 34
- 35
- 36
- 37
- 38
- 39
- 40
- 1
- 2
- 3
- 4
- 5
- 6
- 7
- 8
- 9
- 10
- 11
- 12
- 13
- 14
- 15
- 16
- 17
- 18
- 19
- 20
- 21
- 22
- 23
- 24
- 25
- 26
- 27
- 28
- 29
- 30
- 31
- 32
- 33
- 34
- 35
- 36
- 37
- 38
- 39
- 40
Frequent clicks on the screen app crash
Because the application supports the function of auto-focusing by clicking on the screen, but on some computers, users frequently click on the screen to auto-focusing, and the application crashes. The reason is that on some ROM s, when the last focus is not completed, the next focus will collapse. The solution is to set the flag bit so that the next focusing can be done only after the last focusing is completed.
The third ROM banned the camera privilege of the application
Some third-party ROM s have their own privilege management mechanism, when the application's camera privileges are prohibited, access to the scan page, will crash. This interactive experience is certainly not very good. After the interaction request is forbidden, there still needs to be a gentle reminder to remind the user to set the page and re-grant the application camera permission. However, the system does not provide an interface to say that the current application of this permission is prohibited. Therefore, a compromise scheme is adopted in the module. When the prison application does not have camera privileges, the opening of the camera will collapse. So we capture the exception that opens Camera, and when we catch the exception, the bullet box reminds the user to open the privilege.
  try {
        CameraManager.get().openDriver(surfaceHolder);
  } catch (Throwable tr){
        showOpenCameraErrorDialog();
        return;
}- 1
- 2
- 3
- 4
- 5
- 6
- 1
- 2
- 3
- 4
- 5
- 6
Pad Enter Sweep Page Application Crash
In fact, on-line, when a user uses pad, he crashes as soon as he enters the scanned page. Because the first time our application enters the scanner page, the default is to turn on the device flash. But the pad didn't have a flash, so it collapsed. Initially, the following methods were used to check whether the device supports flash:
getPackageManager().hasSystemFeature(PackageManager.FEATURE_CAMERA_FLASH)- 1
- 1
But it failed. The reason is that many pad ROMs have been changed from mobile ROMs, which may not be so thorough. So when you call the above code on Pad for judgment, you still return true. This is the only way to turn to try catch. It is to capture the abnormality when switching the flash, so that the problem of the breakdown of the switch flash on the Pad can be solved.
Automatic shutdown of flash after taking pictures of some machines
Part of the machine, when the flash is on, click the Photo button and the flash is off. At present, no reason has been found, only special processing can be added to the module. For the mobile phone with this problem at present, after taking a picture, actively switch on and off the flash again, so that after taking a picture, the flash can still be on. Only in the process of taking pictures, there will be flashing flashes.
The preview picture was stuck after some of the machines had taken pictures.
Part of the machine, when click to take a picture to complete the shooting, the back stop. This phenomenon occurs because Camera stops Preview when taking pictures, and after taking pictures, some machines can be restored to Preview, while others can't. So just call Camera's startPreview() method once after the photo is taken.