in use Java SH framework, has been lamenting the convenience of annotations ah, on the principle of annotations, you can refer to another piece of my article Java annotations in detail . Latest time to study Android The use of annotations, today to share with you.
The use of annotations in android uses the open source framework androidannotations on GitHub. Download address . This open source framework should be the most widely used android annotation framework at present, mainly because it has many annotation tags designed to meet most of our daily development needs. androidannotations packages many methods that can be extracted into annotation labels for our use. I'll give you a specific demonstration later.
Well, back to the point, let's see how to use this stuff.
First step
Download androidannotations
After downloading the file, we will see two jar packages: 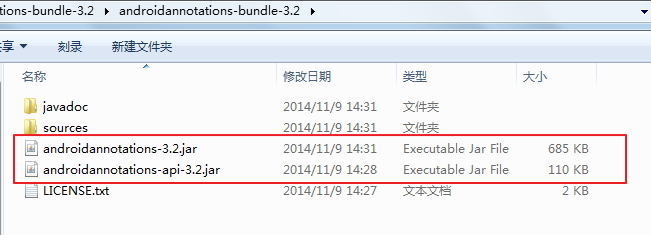
The second step
Configure the framework on eclipse:
1. Create a new android project, copy androidannotations-api-3.2.jar to the libs folder, and create a new folder in the project, called compile-lib, copy androidannotations-3.2.jar file into it. As shown in the picture: 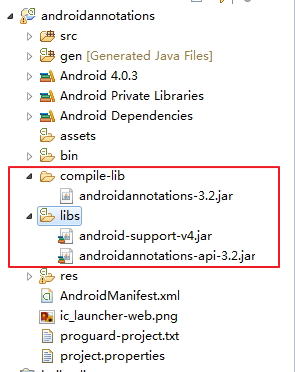
2. Select the project, right-click, select Properties, and you can see it on the left side of the new window. Java Compiler, select Annotation Processin under Java Compiler, and then select Enable project specific Settings on the right to allow some special settings for the project. As shown in the picture: 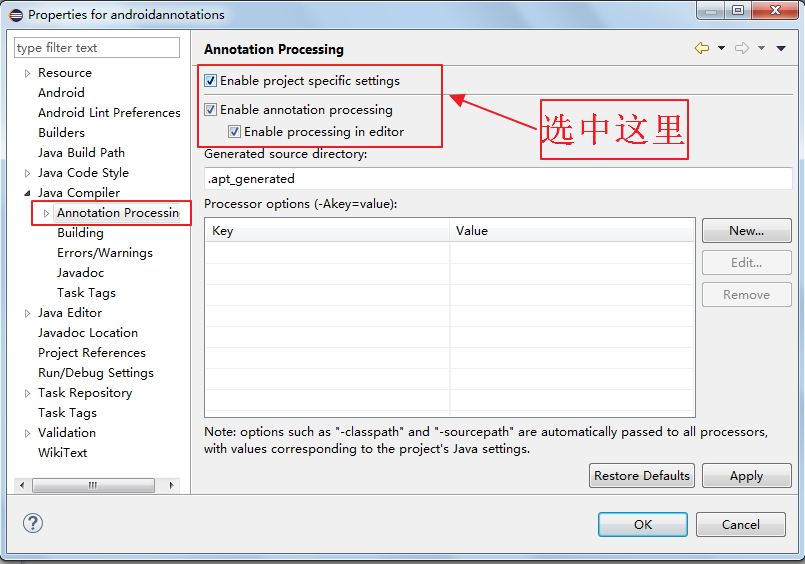
3. Expand Annotation Processin, select Factory Path, click Enable project specific Settings on the right, and finally click Add JARs to add the jar package. As shown in the picture: 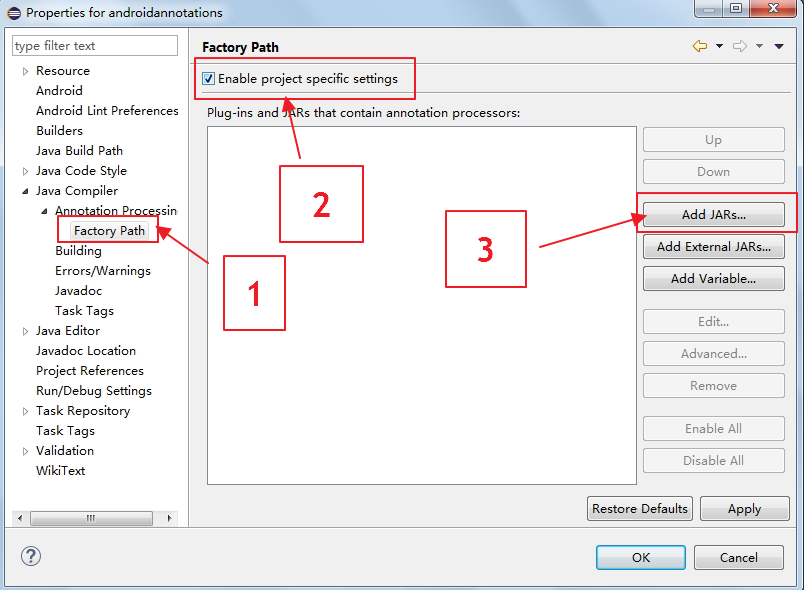
4. Select the jar package in our newly created folder and click OK all the way, as shown in the figure. 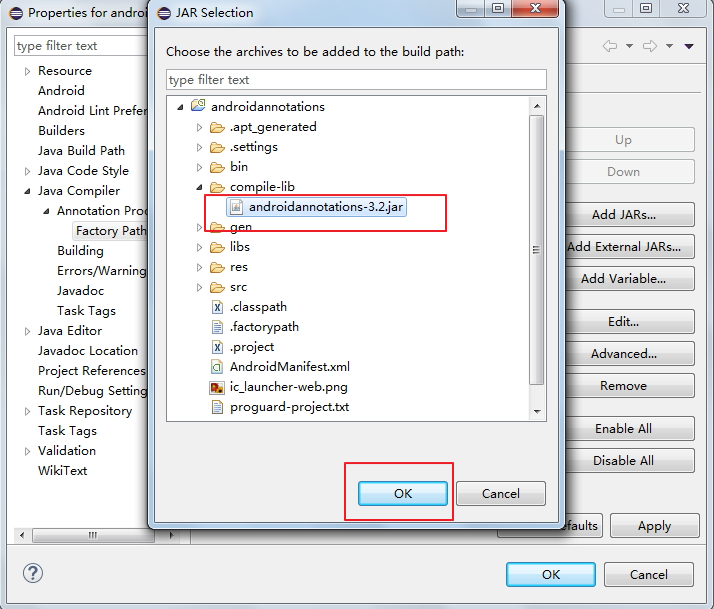
OK, so far our development environment configuration is complete.
The third step
test Successful configuration
Enter @E on an Activity to see what prompts you:
If you see @EActivity, congratulations on the successful configuration. If not, please check the above steps.
As shown in the picture:

The fourth step
Now that we have the configuration, let's look at how to use androidannotations.
1. Use of Activity Annotations
To modify the activity configuration in the manifest file, we need to add a:
        <activity
            android:name=".MainActivity_"
            android:label="@string/app_name" >
            <intent-filter>
                <action android:name="android.intent.action.MAIN" />

                <category android:name="android.intent.category.LAUNCHER" />
            </intent-filter>
</activity>- 1
- 2
- 3
- 4
- 5
- 6
- 7
- 8
- 9
- 1
- 2
- 3
- 4
- 5
- 6
- 7
- 8
- 9
As for why we should change MainActivity to MainActivity, I will explain it later. Then add annotations on MainActivity:
@EActivity(R.layout.activity_main)
public class MainActivity extends Activity {- 1
- 2
- 1
- 2
Remove setContentView(R.layout.activity_main) from the onCreate() method; as shown in Figure 1:
    @Override
    protected void onCreate(Bundle savedInstanceState) {
        super.onCreate(savedInstanceState);
}- 1
- 2
- 3
- 4
- 1
- 2
- 3
- 4
For convenience, we first add some controls to the main layout file:
<LinearLayout xmlns:android="http://schemas.android.com/apk/res/android"
    xmlns:tools="http://schemas.android.com/tools"
    android:layout_width="match_parent"
    android:layout_height="match_parent"
    android:paddingBottom="@dimen/activity_vertical_margin"
    android:paddingLeft="@dimen/activity_horizontal_margin"
    android:paddingRight="@dimen/activity_horizontal_margin"
    android:paddingTop="@dimen/activity_vertical_margin"
    android:orientation="vertical"
    tools:context="com.example.androidannotations.MainActivity" >

    <TextView
        android:id="@+id/textView1"
        android:layout_width="wrap_content"
        android:layout_height="wrap_content"
        android:text="@string/hello_world" />

    <Button
        android:id="@+id/button1"
        android:layout_width="wrap_content"
        android:layout_height="wrap_content"
        android:text="Button1" />

    <Button
        android:id="@+id/button2"
        android:layout_width="wrap_content"
        android:layout_height="wrap_content"
        android:text="Button2" />

    <Button
        android:id="@+id/button3"
        android:layout_width="wrap_content"
        android:layout_height="wrap_content"
        android:text="Button3" />

    <Button
        android:id="@+id/button4"
        android:layout_width="wrap_content"
        android:layout_height="wrap_content"
        android:text="Button4" />
    <Button
        android:id="@+id/button5"
        android:layout_width="wrap_content"
        android:layout_height="wrap_content"
        android:text="Go TO Next Activity" />
    <Button
        android:id="@+id/button6"
        android:layout_width="wrap_content"
        android:layout_height="wrap_content"
        android:text="Multithread events" />

    <TextView
        android:id="@+id/textView2"
        android:layout_width="wrap_content"
        android:layout_height="wrap_content"
        android:text="TextView" />

    <TextView
        android:id="@+id/textView3"
        android:layout_width="wrap_content"
        android:layout_height="wrap_content"
        android:text="TextView" />

    <TextView
        android:id="@+id/textView4"
        android:layout_width="wrap_content"
        android:layout_height="wrap_content"
        android:text="TextView" />

</LinearLayout>- 1
- 2
- 3
- 4
- 5
- 6
- 7
- 8
- 9
- 10
- 11
- 12
- 13
- 14
- 15
- 16
- 17
- 18
- 19
- 20
- 21
- 22
- 23
- 24
- 25
- 26
- 27
- 28
- 29
- 30
- 31
- 32
- 33
- 34
- 35
- 36
- 37
- 38
- 39
- 40
- 41
- 42
- 43
- 44
- 45
- 46
- 47
- 48
- 49
- 50
- 51
- 52
- 53
- 54
- 55
- 56
- 57
- 58
- 59
- 60
- 61
- 62
- 63
- 64
- 65
- 66
- 67
- 68
- 69
- 70
- 1
- 2
- 3
- 4
- 5
- 6
- 7
- 8
- 9
- 10
- 11
- 12
- 13
- 14
- 15
- 16
- 17
- 18
- 19
- 20
- 21
- 22
- 23
- 24
- 25
- 26
- 27
- 28
- 29
- 30
- 31
- 32
- 33
- 34
- 35
- 36
- 37
- 38
- 39
- 40
- 41
- 42
- 43
- 44
- 45
- 46
- 47
- 48
- 49
- 50
- 51
- 52
- 53
- 54
- 55
- 56
- 57
- 58
- 59
- 60
- 61
- 62
- 63
- 64
- 65
- 66
- 67
- 68
- 69
- 70
At this time, let's run to see if there are any errors in the system without laying out Activity. 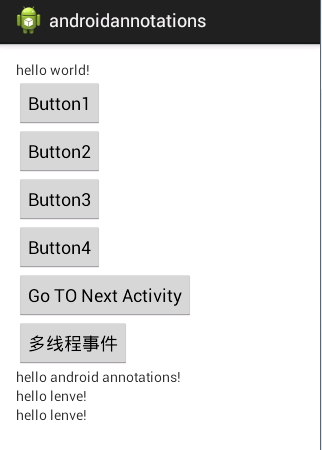
No crash, all content is displayed normally, so @EActivity(R.layout.activity_main) replaces setContentView(R.layout.activity_main); this is more convenient to use.
Another comment related to Activity is introduced. In the process of using Activity, we often need to redefine the title bar, so we need to hide the default title bar of the system. How can we achieve this?
@WindowFeature({ Window.FEATURE_NO_TITLE , Window.FEATURE_INDETERMINATE_PROGRESS})
@EActivity(R.layout.activity_main)
public class MainActivity extends Activity {- 1
- 2
- 3
- 1
- 2
- 3
Design sketch:
The title bar is successfully hidden, which is more convenient than any other way we hide the title.
2. Instance control annotations
Instantiated control annotation is another very useful annotation in androidannotations. It also solves the most tedious work in our development process. Normally, we instantiate a control to use findViewById, get the control and then strengthen it to the type we need. The code is large and boring. So what surprise does androidannotations bring us?
There are four TextView s on our main layout file. I use the following three ways to instantiate them:
    @ViewById(R.id.textView1)
    TextView tv1;

    @ViewById
    TextView textView2;

    @ViewsById({R.id.textView3,R.id.textView4})
List<TextView> list;- 1
- 2
- 3
- 4
- 5
- 6
- 7
- 8
- 1
- 2
- 3
- 4
- 5
- 6
- 7
- 8
The first is @ViewById(R.id.textView1), which is a very standard way of writing. After declaring a control, you use the @ViewById annotation to specify the ID of the control in the annotation, which is equivalent to replacing such a line of code:
TextView tv1 = (TextView) this.findViewById(R.id.textView1);- 1
- 1
Second: I didn't specify the ID to be used for this annotation tag, so how does it instantiate? Without specifying, androidannotations uses the control name as the id, and my second control name is textView2, which is the same as the layout ID in xml, so you don't need to specify the ID in the annotations.
Third, if you want to declare multiple controls, you can put them into a List collection and then specify multiple IDS in the annotations.
After the control is instantiated, the control can be assigned a value immediately after:
    @AfterViews
    public void initTextView(){
        tv1.setText("hello world!");
        textView2.setText("hello android annotations!");
        for(TextView tv:list){
            tv.setText("hello lenve!");
        }
}- 1
- 2
- 3
- 4
- 5
- 6
- 7
- 8
- 1
- 2
- 3
- 4
- 5
- 6
- 7
- 8
This method is executed after the instance has completed the control.
3. Event annotations
The more events we use in our development, androidannotations, almost all provide us with annotations:
    @TextChange
    @AfterTextChange
    @BeforeTextChange
    @EditorAction
    @FocusChange
    @CheckedChange
    @Touch
    @Click
    @LongClick
    @ItemClick
    @ItemLongClick
    @ItemSelect
    @OptionsItem
    @SeekBarProgressChange
    @SeekBarTouchStart
    @SeekBarTouchStop
- 1
- 2
- 3
- 4
- 5
- 6
- 7
- 8
- 9
- 10
- 11
- 12
- 13
- 14
- 15
- 16
- 17
- 18
- 1
- 2
- 3
- 4
- 5
- 6
- 7
- 8
- 9
- 10
- 11
- 12
- 13
- 14
- 15
- 16
- 17
- 18
Here I choose a simple, but also the most commonly used, to say, is to throw a brick to attract jade:
    @Click({R.id.button1,R.id.button2,R.id.button3})
    public void btn_click(View v){
        switch (v.getId()) {
        case R.id.button1:
            Toast.makeText(this,"btn1", Toast.LENGTH_LONG).show();
            break;
        case R.id.button2:
            Toast.makeText(this,"btn2", Toast.LENGTH_LONG).show();
            break;
        case R.id.button3:
            Toast.makeText(this,"btn3", Toast.LENGTH_LONG).show();
            break;
        }
    }

    @Click(R.id.button4)
    public void btn4_click(){
        Toast.makeText(this,"btn4", Toast.LENGTH_LONG).show();
}- 1
- 2
- 3
- 4
- 5
- 6
- 7
- 8
- 9
- 10
- 11
- 12
- 13
- 14
- 15
- 16
- 17
- 18
- 19
- 1
- 2
- 3
- 4
- 5
- 6
- 7
- 8
- 9
- 10
- 11
- 12
- 13
- 14
- 15
- 16
- 17
- 18
- 19
Add the @Click annotation above the method to indicate which control click event it is. If it is a click event of multiple events, indicate multiple id s. In the method, use the v.getId() method to distinguish. If you set click events for only one control, look at the example of button4.
In fact, the annotations of events are relatively simple, so I won't say much about them. You can check them out if you are interested. Official documents.
4. Thread annotations
That's probably the most exciting comment I've ever heard. Here are two annotations for you.
@Background
@UiThread- 1
- 2
- 1
- 2
Undoubtedly, @Background lets methods run in sub-threads, while @UiThreaad lets methods run in UI threads.
Let's implement a simple effect, click a button, and let a TextView automatically update the value.
    @Background
    public void doInBackground(){
        try {
            for (int i = 0; i < 100; i++) {
                tvShowNumber(i);
                Thread.sleep(1000);
            }
        } catch (InterruptedException e) {
            e.printStackTrace();
        }
    }

    @UiThread
    public void tvShowNumber(int i) {
        list.get(1).setText(i+"");
}- 1
- 2
- 3
- 4
- 5
- 6
- 7
- 8
- 9
- 10
- 11
- 12
- 13
- 14
- 15
- 16
- 1
- 2
- 3
- 4
- 5
- 6
- 7
- 8
- 9
- 10
- 11
- 12
- 13
- 14
- 15
- 16
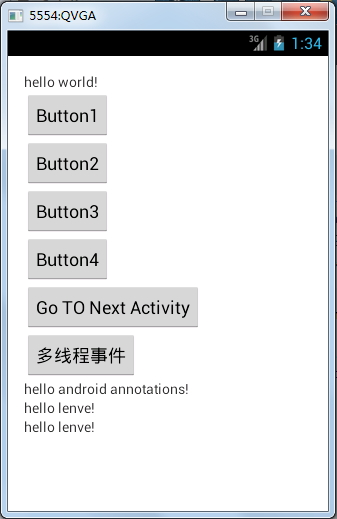
First, in the doInBackground method, tvShowNumber(i) is executed every 1 second; method, if this method runs in the main thread, it will cause ANR exceptions, so it must run in the sub-thread, but the update of UI threads in the sub-thread is not allowed in android, so we need to add @UiThread tag on the tvShowNumber method, indicating that the method runs in the UI thread.
Look at the picture. 
There's a complete abandonment of annoying Message s and Handler s (applause here).
5. Value-passing annotations between Activities
Jumping between activities often requires data transfer. Bundle is needed to get these data in the new Activities. It's also very troublesome to judge whether it's empty. Let's see how Androidan otations can solve this problem:
Create a new Second Activity. Note that you need to modify the manifest file by adding:
        <activity
            android:name=".SecondActivity_"
            android:label="@string/title_activity_second" >
</activity>- 1
- 2
- 3
- 4
- 1
- 2
- 3
- 4
SecondActivity receives two parameters from MainActivity, one is name and the other is address. Let's first look at the code in MainActivity:
    @Click(R.id.button5)
    public void go2NextActivity(){
        //Note the second Activity here.
        Intent intent = new Intent(this,SecondActivity_.class);
        intent.putExtra("name", "Zhang San");
        intent.putExtra("address", "xi'an");
        startActivity(intent);
}- 1
- 2
- 3
- 4
- 5
- 6
- 7
- 8
- 1
- 2
- 3
- 4
- 5
- 6
- 7
- 8
Get the value from MainActivity in the EcondActivity:
    @Extra("name")
    String username;
    @Extra
String address;- 1
- 2
- 3
- 4
- 1
- 2
- 3
- 4
As above, if the parameter name is the same, it is not necessary to specify the parameter name in the commentary, otherwise it should be specified. This automatically gets the value from MainActivity. If the value passed from MainActivity is null, it will not report an error, and the system will automatically handle the exception.
6. Resource file annotations
We can also use annotations to use resource files, such as adding a string to strings.xml:
<string name="welcome">hello China,Hello xi\'an and guangzhou</string>- 1
- 1
In the program we refer to this value:
@StringRes(R.string.welcome)
String welcome;- 1
- 2
- 1
- 2
So welcome automatically gets the value here. Note that the @StringRes imported package is import org.android annotations.annotations.res.StringRes; it's not Android's own package, so don't be fooled.
Design sketch: 
7 On the Reasons for ____________
Finally, to solve the problem of adding to the list file, to answer this question, please select the item first, right-click, and cancel the previous point of apt_generated. 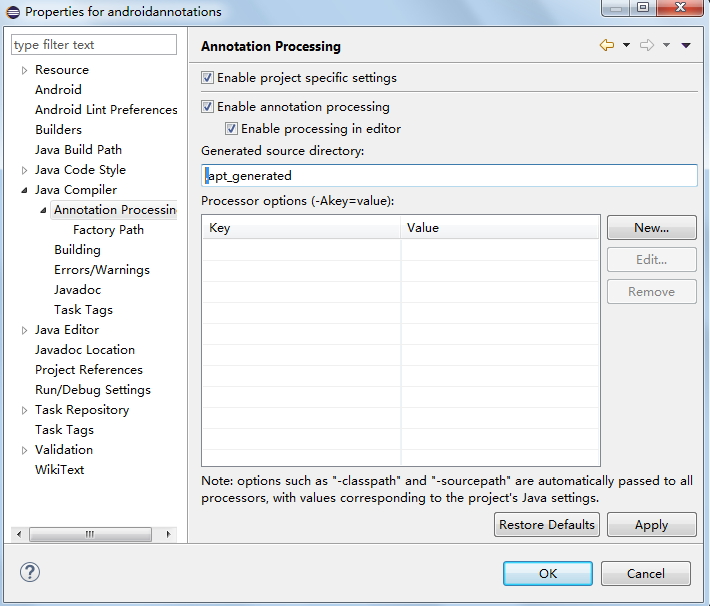
After the cancellation, we added a folder to our project: 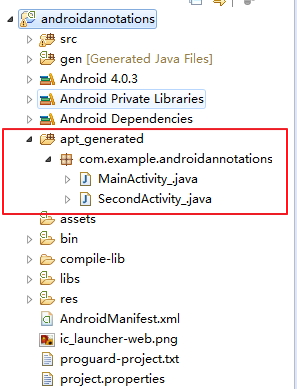
The Activity in the folder here is the new Activeness we just created, but there is only an underscore. Let's open these Activities and see: 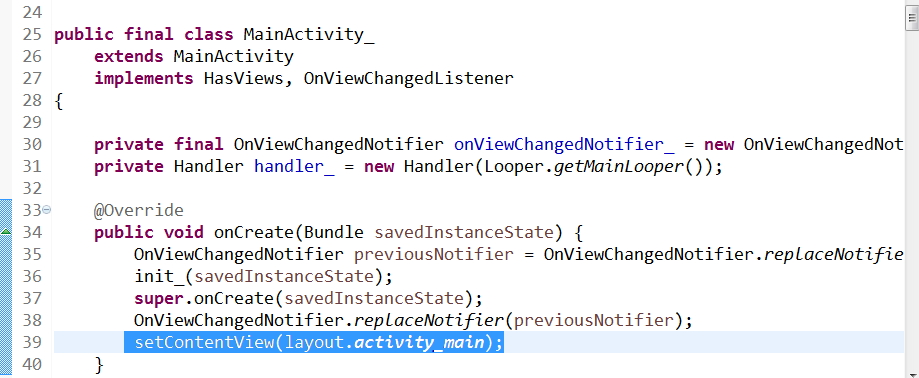
We annotate the layout file and it's generated for us here, so we end up compiling with the file here, which is why the list file has to be underlined.
Matters needing attention
Finally, it's important to note that any code that uses annotations must not be privately modified, but protected at most, because when androidannotations uses annotations to generate real source code, if our stuff is privately modified, it can't call these things, so it can only be modified with protected at most.
More usage of androidannotations can be consulted Official documents
Okay, I'll introduce you to the use of Androidannotations. If you have any questions, please leave a message. Source code download of this project.