Next we went on to research the development of android infrared. In this article, we started with the most open source grid air conditioning code on the Internet. That's good. Say nothing more, start!!
1. First let's get to know the encoding format of Gree Air Conditioning, which is available on the Internet
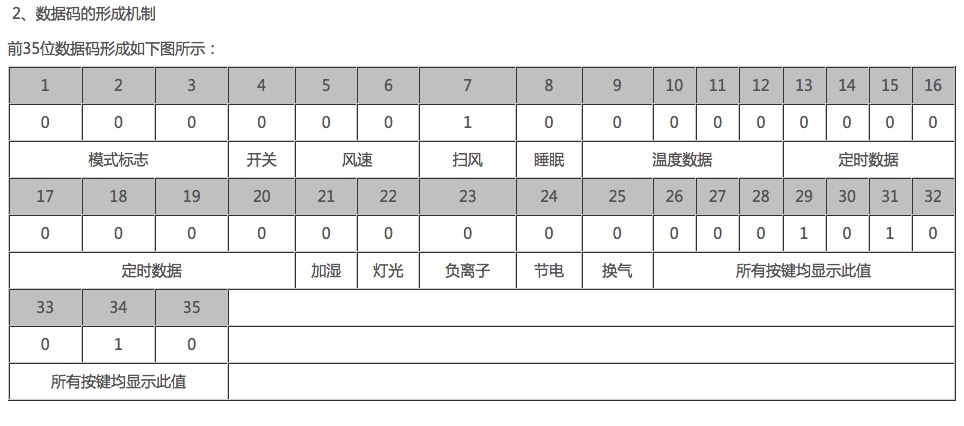
The infrared code of the Gree air conditioner remote control (YB0F2) is composed of the following, arranged in the order of decoding
Start Code (S)+35-bit Data Code+Connection Code (C)+32-bit Data Code
Level widths for various codes:
The data code consists of "0" and "1":
The level width of 0 is 600us low + 600us high.
Level width of 1 is: 600us low + 1600us high
Start code S level width is: 9000us low level + 4500us high level
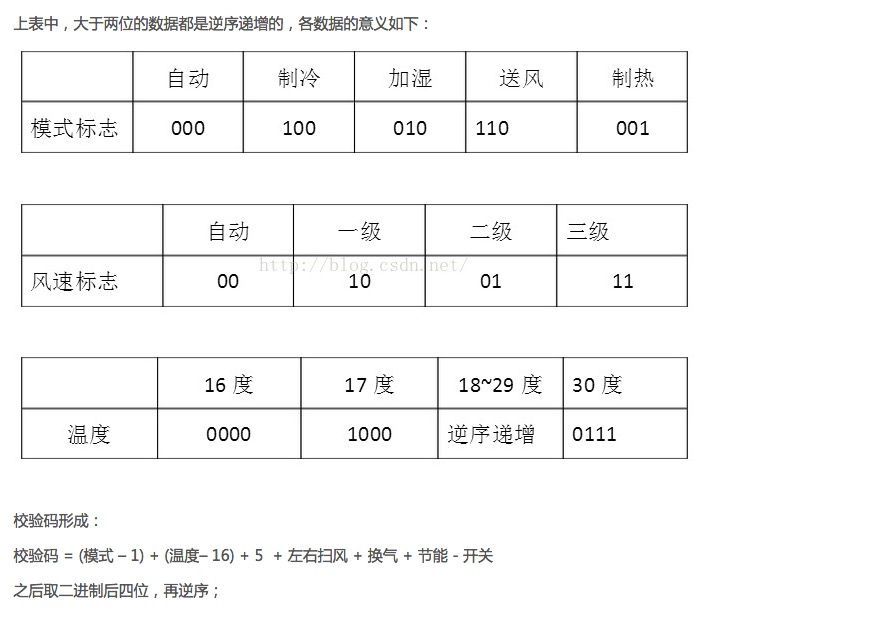
Data code see below


After knowing about these messy codes, everyone in the county has a question, there is an egg to use, don't rush to make small numbers to stitch together image points.
2. Data Stitching
(four parts: starting code + 35 data code + connection code + 32 data code)
1 bit + 35 bit + 1 bit + 32 bit = 69 bit X2=138 Time (each made up of one high and one low)
Since this is a command code that can be used in many places, we'll create a new class and take it out as follows: the code has a clear comment and look at it
package com.gaoyu.smarttools.date;

/**
 * Created by ${Gaoyu} on 17/6/3.
 * <p>
 * <p>
 * Here is the air conditioning remote control code
 * The infrared code of the Gree air conditioner remote control (YB0F2) is composed of the following, arranged in the order of decoding
 * Start Code (S)+35-bit Data Code+Connection Code (C)+32-bit Data Code
 * Level widths for various codes:
 * The data code consists of "0" and "1":
 * 0 The level width is 600us low + 600us high.
 * 1 The level width is: 600us low + 1600us high
 * Start code S level width is: 9000us low level + 4500us high level
 * Connection code C level width is: 600us low level + 20000us high level
 * <p>
 * The formation mechanism of the check codes is as follows:
 * Check code = [(mode-1) + (temperature-16) + 5 +left and right sweepers + ventilation + energy saving] take the last four bits of binary and reverse the order;
 * <p>
 * For example: if you need to set a state, mode 4, 30 C, left and right sweepers, ventilation off, energy saving off, then the check code is:
 * (4 – 1)+(30-16)+5+1+0+0= 15,The lower four digits are 0111 and the reverse is 1110
 * <p>
 * To facilitate encoding, the encoder can be in positive order, the decoder can reverse the order, and the decoder decodes the low bytes before the high bytes.
 * In addition, the effect of timing data on the final checkcode is not tested because this function is rarely used.
 */

public class CodeCommand {
    //Coding Rules
    //Start code S level width is: 9000us low level + 4500us high level
    public static final int startdown = 9000;
    public static final int startup = 4500;

    //Connection code C level width is: 600us low level + 20000us high level
    public static final int connectdown = 600;
    public static final int connectup = 20000;

    //The data code consists of 0,1:
    //The level width of 0 is 600us low + 600us high.
    public static final int zerodown = 600;
    public static final int zeroup = 600;

    //Level width of 1 is: 600us low + 1600us high
    public static final int onedown = 600;
    public static final int oneup = 1600;

    //Command format (numerical splicing within arrays)


    //Mode automatic array (sweeper) on
    public static final int[] auto = {
            startdown, startup,//Start Code
            zerodown, zeroup, zerodown, zeroup, zerodown, zeroup,//1-3
            onedown, oneup, zerodown, zeroup, zerodown, zeroup,//4-6
            onedown, oneup, zerodown, zeroup, zerodown, zeroup,//7-9
            zerodown, zeroup, zerodown, zeroup, zerodown, zeroup,//10-12
            zerodown, zeroup, zerodown, zeroup, zerodown, zeroup,//13-15
            zerodown, zeroup, zerodown, zeroup, zerodown, zeroup,//16-18
            zerodown, zeroup, zerodown, zeroup, zerodown, zeroup,//19-21
            zerodown, zeroup, zerodown, zeroup, zerodown, zeroup,//22-24
            zerodown, zeroup, zerodown, zeroup, zerodown, zeroup,//25-27
            zerodown, zeroup, onedown, oneup, zerodown, zeroup,//28-30
            onedown, oneup, zerodown, zeroup, zerodown, zeroup,//31-33
            onedown, oneup, zerodown, zeroup,//End of Top 35-Bit Data 34-35
            connectdown, connectup,//Start 32 bits after connection code
            zerodown, zeroup, zerodown, zeroup, zerodown, zeroup,//36-38
            zerodown, zeroup, zerodown, zeroup, zerodown, zeroup,//39-41
            zerodown, zeroup, zerodown, zeroup, onedown, oneup,//42-44
            zerodown, zeroup, zerodown, zeroup, zerodown, zeroup,//45-47
            zerodown, zeroup, zerodown, zeroup, zerodown, zeroup,//48-50
            zerodown, zeroup, zerodown, zeroup, zerodown, zeroup,//51-53
            zerodown, zeroup, zerodown, zeroup, zerodown, zeroup,//54-56
            zerodown, zeroup, zerodown, zeroup, zerodown, zeroup,//57-59
            zerodown, zeroup, zerodown, zeroup, zerodown, zeroup,//60-62
            zerodown, zeroup, //63
            zerodown, zeroup, onedown, oneup,zerodown, zeroup, onedown, oneup,//End of 32 bits after 64-67 (4-bit test code)

    };

}
3. Construct the main interface to call the array layout we configured above. It's super simple
//Require an api greater than 19 similar to if below for judgment purposes
@RequiresApi(api = Build.VERSION_CODES.KITKAT)

public class InfraredActivity extends BaseActivity implements View.OnClickListener {
    //Get Infrared Control Class
    private ConsumerIrManager IR;
    //Show Details
    private TextView tv_detail;
    private Button btn_AirConditioner_GL;
    //Determine if there is infrared function
    boolean IRBack;


    @Override
    protected void onCreate(Bundle savedInstanceState) {
        super.onCreate(savedInstanceState);
        setContentView(R.layout.activity_infrared);
        inItEvent();
        inItUI();
    }


    //Initialize UI
    private void inItUI() {
        tv_detail = (TextView) findViewById(R.id.tv_detail);
        btn_AirConditioner_GL = (Button) findViewById(R.id.btn_AirConditioner_GL);
        btn_AirConditioner_GL.setOnClickListener(this);
    }


    //Initialize Transaction
    private void inItEvent() {
        //Get ConsumerIrManager instance
        IR = (ConsumerIrManager) getSystemService(CONSUMER_IR_SERVICE);

        //If the sdk version is greater than 4.4, do you have infrared functionality (android version of mobile phone)
        if (Build.VERSION.SDK_INT >= Build.VERSION_CODES.KITKAT) {
            IRBack = IR.hasIrEmitter();
            if (!IRBack) {
                showToast("Sorry, there is no infrared function on this device!");
            } else {
                showToast("Infrared device ready");//Next steps are available
            }
        }
    }

    /**
     * Emit Infrared Signal
     * You can view the log ConsumerIr for this tag
     * @param carrierFrequency Frequency of infrared transmission, general remote control board is 38KHz
     * @param pattern          Turn on and off infrared time in microseconds
     */
    private void sendMsg(int carrierFrequency, int[] pattern) {
        IR.transmit(carrierFrequency, pattern);

        showToast("Send Successfully");
        String content = null;
        for(int i = 0;i<pattern.length;i++){
            content += String.valueOf(pattern[i])+",";
        }
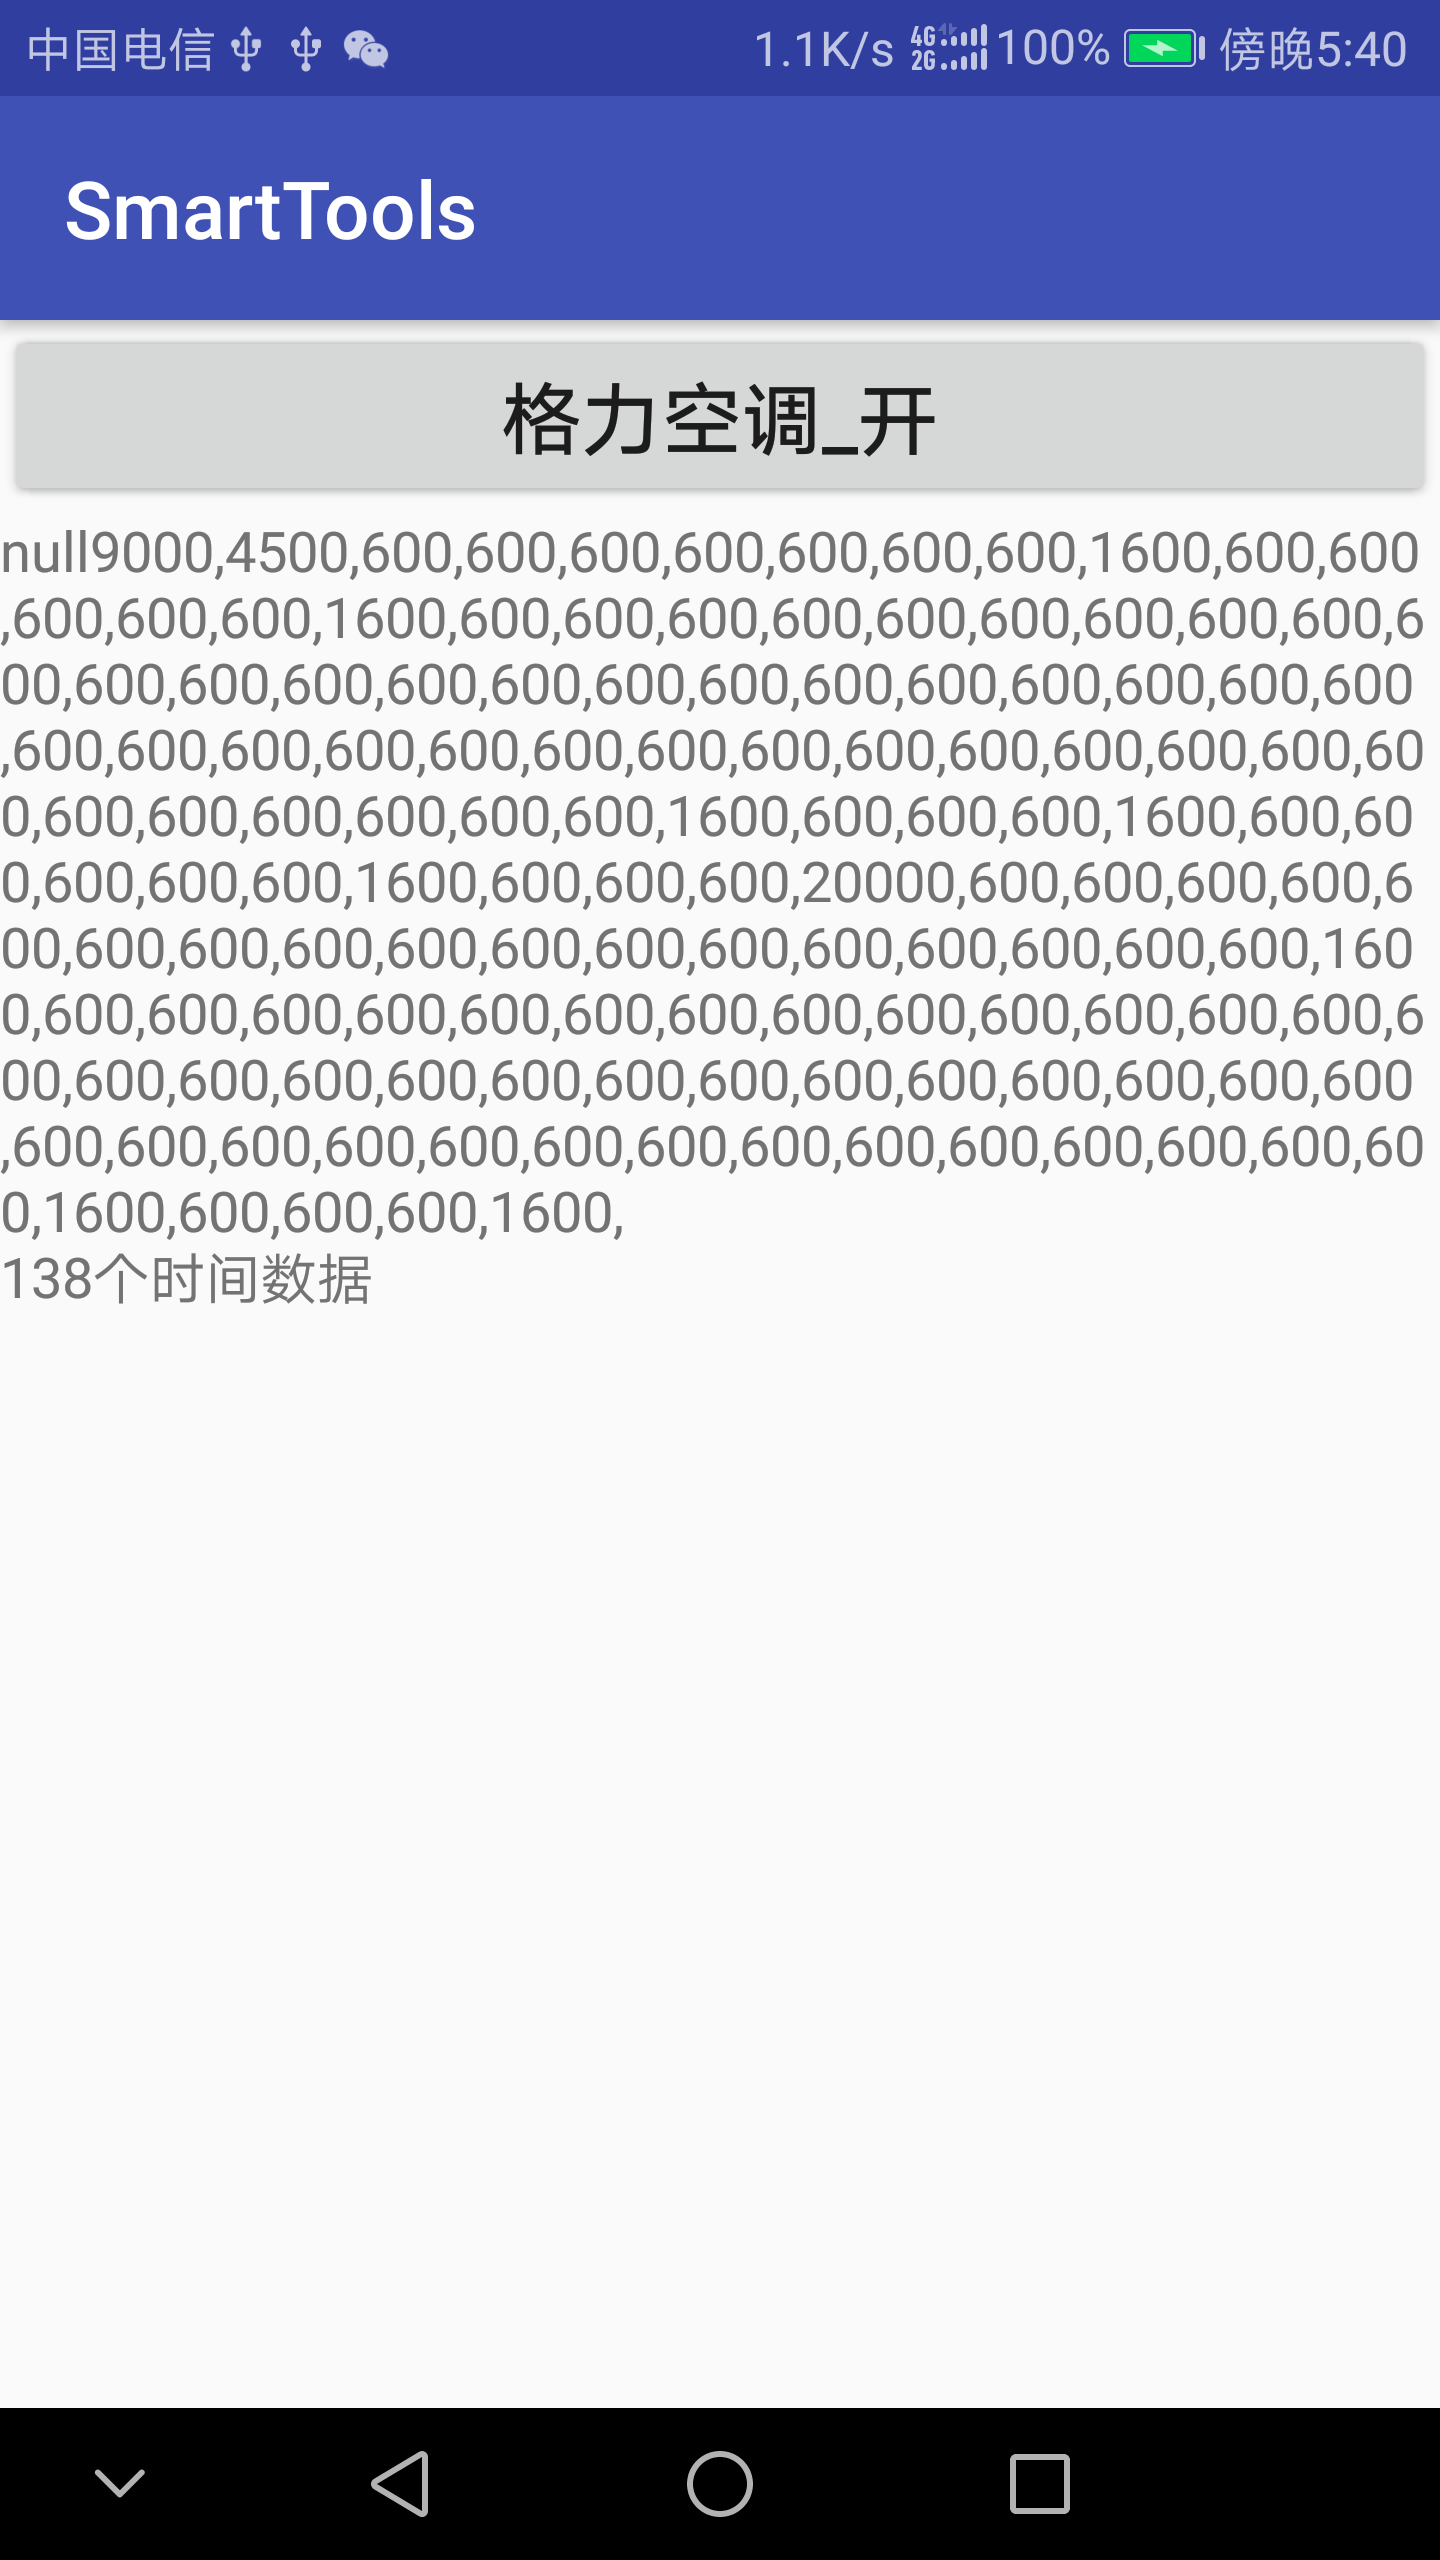
        tv_detail.setText(content+"\n"+(pattern.length)+"Time data");
    }

    @Override
    public void onClick(View v) {
        switch (v.getId()) {
            case R.id.btn_AirConditioner_GL:
                if (IRBack) {
                    sendMsg(38000, CodeCommand.auto);
                } else {
                    showToast("Sorry, there is no infrared function on this device!");
                }
                break;
        }
    }
}
4. Running as follows 