Articles Catalogue
Preface
Do technology, only understand the principle, in order to meet the situation without panic, hands, heart code. This article focuses on the source code of Flutter's startup process on Android platform.
Start-up process
Entry Activity
When we create a Flutter app project, open the source code in the android directory, we will find a MainActivity inherited from Flutter Activity. The whole MainActivity is very simple, only add a line of code under onCreate, Generated Plugin Registrant. RegiserWith (this), then what is the holy of Flutter Activity? The source code of Flutter Activity is in the jar package of Flutter SDK. To study the source code of Flutter SDK, the first thing is to download a set of SDK source code. We can download it in GitHub. engine source code
public class MainActivity extends FlutterActivity {
  @Override
  protected void onCreate(Bundle savedInstanceState) {
    super.onCreate(savedInstanceState);
    GeneratedPluginRegistrant.registerWith(this);
  }
}
engine\src\flutter\shell\platform\android\io\flutter\app\FlutterActivity.java
Omit part of the source code, delete the comments and the code is as follows
public class FlutterActivity extends Activity implements
FlutterView.Provider, PluginRegistry, ViewFactory {
    private static final String TAG = "FlutterActivity";

    private final FlutterActivityDelegate delegate = new FlutterActivityDelegate(this, this);

    private final FlutterActivityEvents eventDelegate = delegate;
    private final FlutterView.Provider viewProvider = delegate;
    private final PluginRegistry pluginRegistry = delegate;

    @Override
    protected void onCreate(Bundle savedInstanceState) {
        super.onCreate(savedInstanceState);
        eventDelegate.onCreate(savedInstanceState);
    }

    @Override
    protected void onStart() {
        super.onStart();
        eventDelegate.onStart();
    }

    @Override
    protected void onResume() {
        super.onResume();
        eventDelegate.onResume();
    }

    @Override
    protected void onDestroy() {
        eventDelegate.onDestroy();
        super.onDestroy();
    }

   // Some source codes are omitted.
}
You can see that FlutterActivity inherits from Activity and implements three interfaces. The lifecycle method of FlutterActivity is handled by a proxy class, FlutterActivity Delegate.
engine\src\flutter\shell\platform\android\io\flutter\app\FlutterActivityDelegate.java
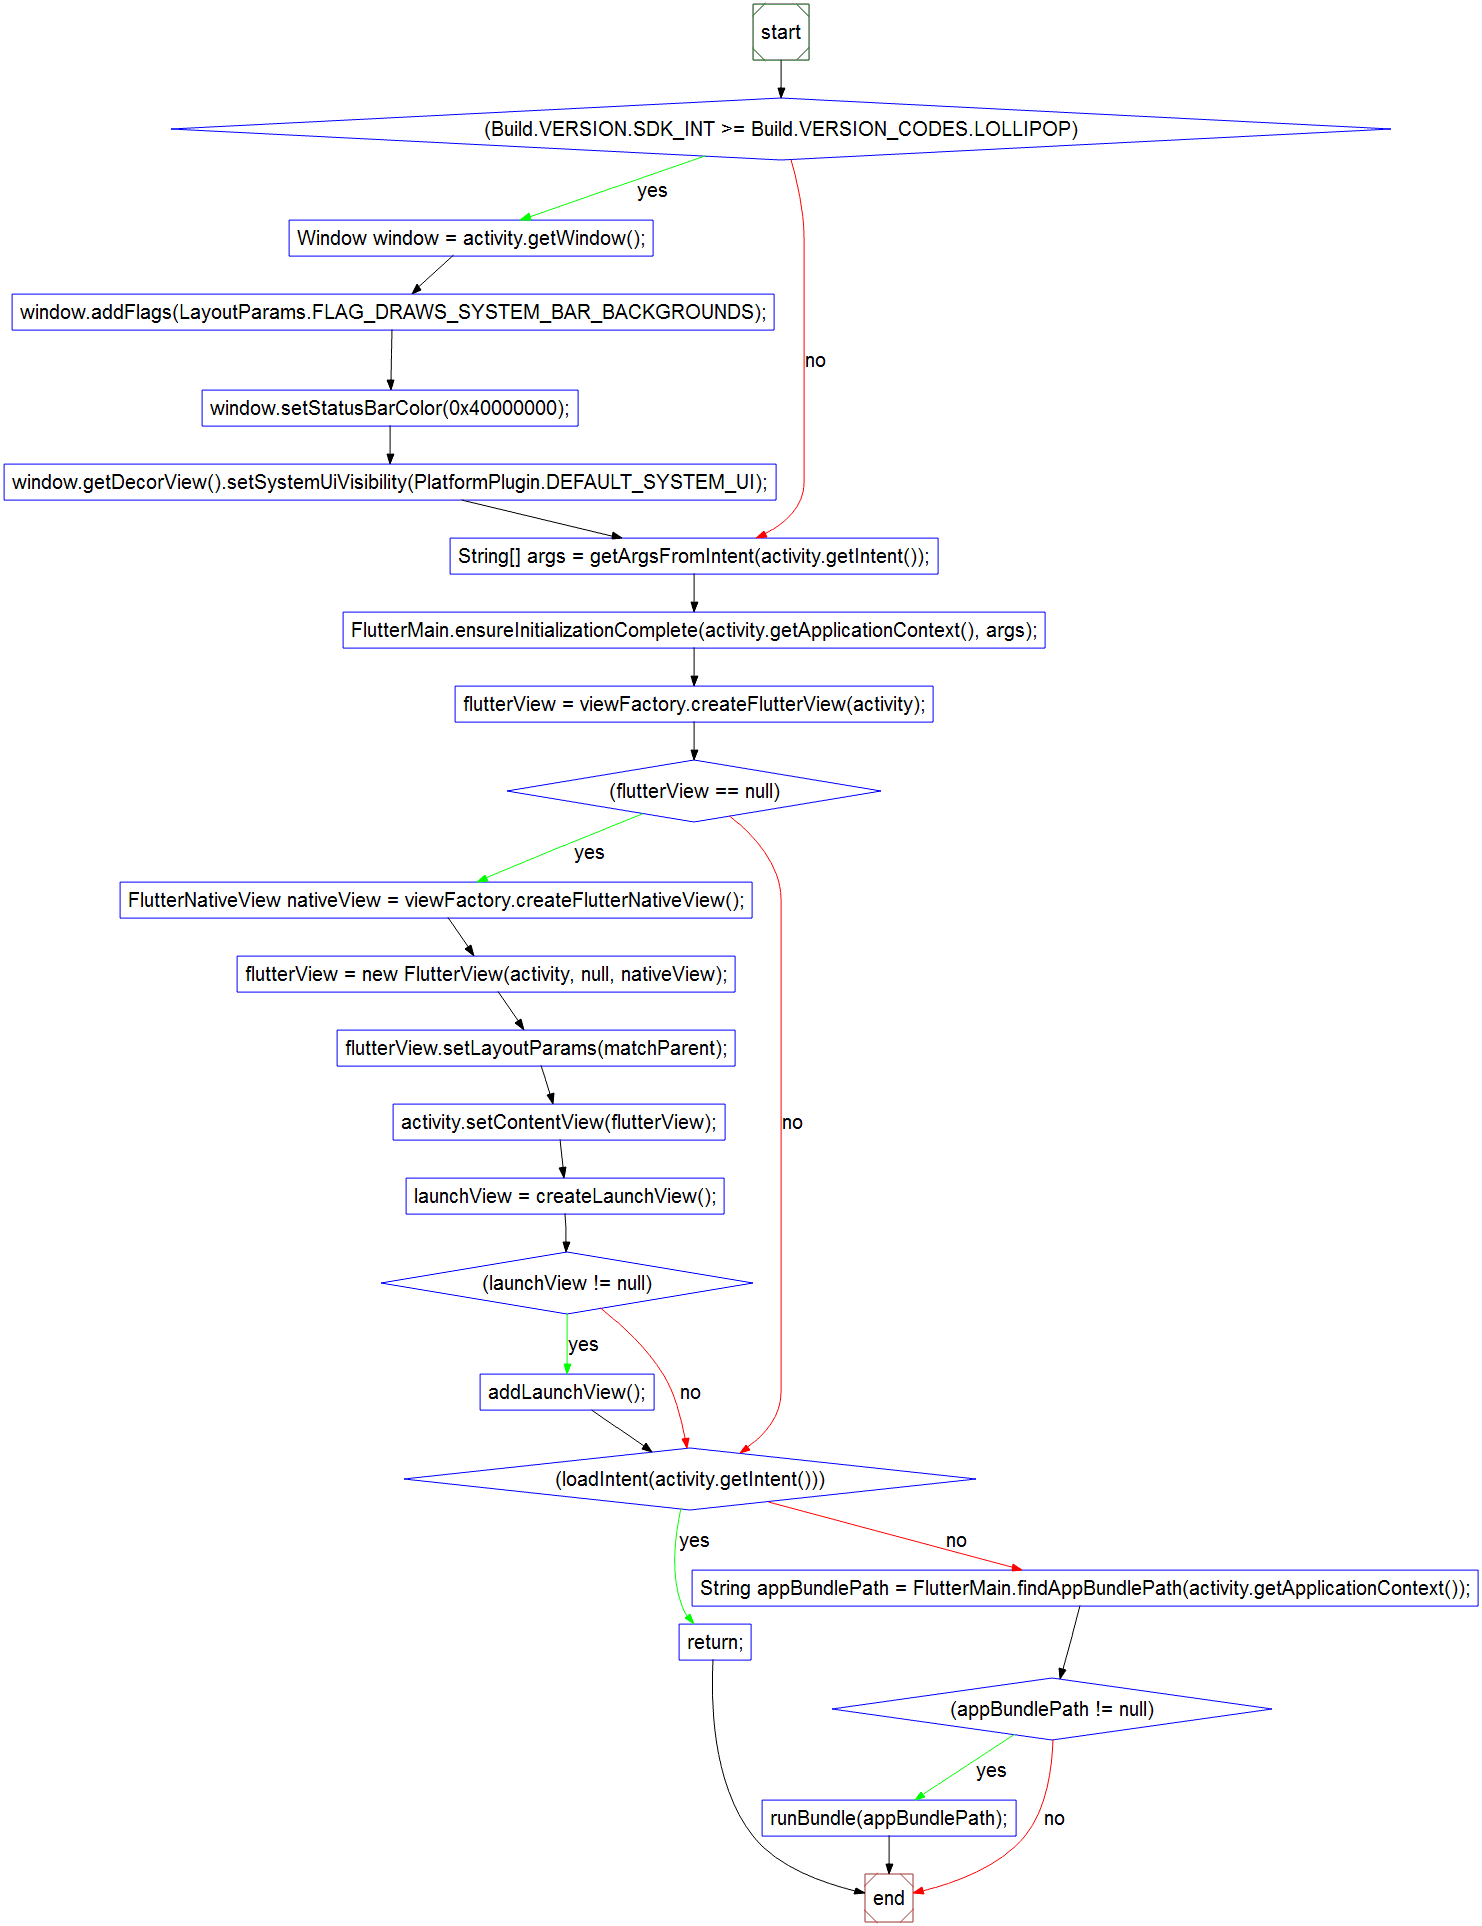
    @Override
    public void onCreate(Bundle savedInstanceState) {
        // Set up the immersive status bar according to the current version of the system
        if (Build.VERSION.SDK_INT >= Build.VERSION_CODES.LOLLIPOP) {
            Window window = activity.getWindow();
            window.addFlags(LayoutParams.FLAG_DRAWS_SYSTEM_BAR_BACKGROUNDS);
            window.setStatusBarColor(0x40000000);
            window.getDecorView().setSystemUiVisibility(PlatformPlugin.DEFAULT_SYSTEM_UI);
        }
        // Get the parameter information passed in by intent
        String[] args = getArgsFromIntent(activity.getIntent());
        // Initialize some parameter configuration information, including packaged flutter code path, application storage directory, engine cache directory, etc.
        FlutterMain.ensureInitializationComplete(activity.getApplicationContext(), args);

        flutterView = viewFactory.createFlutterView(activity);
        // Where you really create contentView
        if (flutterView == null) {
            FlutterNativeView nativeView = viewFactory.createFlutterNativeView();
            flutterView = new FlutterView(activity, null, nativeView);
            flutterView.setLayoutParams(matchParent);
            activity.setContentView(flutterView);
            launchView = createLaunchView();
            if (launchView != null) {
                addLaunchView();
            }
        }

        if (loadIntent(activity.getIntent())) {
            return;
        }

        String appBundlePath = FlutterMain.findAppBundlePath(activity.getApplicationContext());
        if (appBundlePath != null) {
            runBundle(appBundlePath);
        }
    }
Naturally, we need to find the onCreate method. I added a little comment to the above code. We need to quickly locate the key code, what is the key code, and see the activity.setContentView(flutterView); here is the key code, and finally we see the familiar setContentView. Here we can't help but ask, what kind of View is this flutterView?
We knew from the beginning that ViewFactory was implemented by FlutterActivity, where the createFlutterView method is also implemented in FlutterActivity, but this method always returns to empty. Looking at the createFlutterNativeView method, it still returns to empty.
    @Override
    public FlutterNativeView createFlutterNativeView() {
        return null;
    }

    @Override
    public FlutterNativeView createFlutterNativeView() {
        return null;
    }
The real flutterView here is actually generated by flutterView = new FlutterView(activity, null, nativeView) and passed to setContentView.
Next, you can see the FlutterView source code directly (omitting some of the code)
public class FlutterView extends SurfaceView implements BinaryMessenger, TextureRegistry {
    private static final String TAG = "FlutterView";

    public FlutterView(Context context, AttributeSet attrs, FlutterNativeView nativeView) {
        super(context, attrs);

        Activity activity = getActivity(getContext());
        if (activity == null) {
            throw new IllegalArgumentException("Bad context");
        }

        if (nativeView == null) {
            mNativeView = new FlutterNativeView(activity.getApplicationContext());
        } else {
            mNativeView = nativeView;
        }

        dartExecutor = mNativeView.getDartExecutor();
        flutterRenderer = new FlutterRenderer(mNativeView.getFlutterJNI());
        mIsSoftwareRenderingEnabled = FlutterJNI.nativeGetIsSoftwareRenderingEnabled();
        mMetrics = new ViewportMetrics();
        mMetrics.devicePixelRatio = context.getResources().getDisplayMetrics().density;
        setFocusable(true);
        setFocusableInTouchMode(true);

        mNativeView.attachViewAndActivity(this, activity);

        mSurfaceCallback = new SurfaceHolder.Callback() {
            @Override
            public void surfaceCreated(SurfaceHolder holder) {
                assertAttached();
                mNativeView.getFlutterJNI().onSurfaceCreated(holder.getSurface());
            }

            @Override
            public void surfaceChanged(SurfaceHolder holder, int format, int width, int height) {
                assertAttached();
                mNativeView.getFlutterJNI().onSurfaceChanged(width, height);
            }

            @Override
            public void surfaceDestroyed(SurfaceHolder holder) {
                assertAttached();
                mNativeView.getFlutterJNI().onSurfaceDestroyed();
            }
        };
        getHolder().addCallback(mSurfaceCallback);

        mActivityLifecycleListeners = new ArrayList<>();
        mFirstFrameListeners = new ArrayList<>();

        // Create all platform channels
        navigationChannel = new NavigationChannel(dartExecutor);
        keyEventChannel = new KeyEventChannel(dartExecutor);
        lifecycleChannel = new LifecycleChannel(dartExecutor);
        localizationChannel = new LocalizationChannel(dartExecutor);
        platformChannel = new PlatformChannel(dartExecutor);
        systemChannel = new SystemChannel(dartExecutor);
        settingsChannel = new SettingsChannel(dartExecutor);

        // Create and setup plugins
        PlatformPlugin platformPlugin = new PlatformPlugin(activity, platformChannel);
        addActivityLifecycleListener(platformPlugin);
        mImm = (InputMethodManager) getContext().getSystemService(Context.INPUT_METHOD_SERVICE);
        mTextInputPlugin = new TextInputPlugin(this, dartExecutor);
        androidKeyProcessor = new AndroidKeyProcessor(keyEventChannel, mTextInputPlugin);
        androidTouchProcessor = new AndroidTouchProcessor(flutterRenderer);

        // Send initial platform information to Dart
        sendLocalesToDart(getResources().getConfiguration());
        sendUserPlatformSettingsToDart();
    }
As you can see, FlutterView is actually SurfaceView in Android, because SurfaceView is double-buffered and can update UI in sub-threads with high performance, so it is usually used for game development and live video broadcasting. After a simple source code analysis, we can generally understand how Flutter is implemented on Android. The whole app developed by Flutter is rendered in an Activity, which is a bit like the so-called one-page application that is popular in front-end nowadays.
In addition, various platform plug-ins and platform channel s are created for data transfer between Flutter layer and native code.
Environment Initialization
Now let's look back at some of the code we just missed and see what they did.
The onCreate function calls FlutterMain.ensureInitializationComplete(activity.getApplicationContext(), args)
    /**
     * Blocks until initialization of the native system has completed.
     */
    public static void ensureInitializationComplete(@NonNull Context applicationContext, @Nullable String[] args) {
        if (Looper.myLooper() != Looper.getMainLooper()) {
          throw new IllegalStateException("ensureInitializationComplete must be called on the main thread");
        }
        if (sSettings == null) {
          throw new IllegalStateException("ensureInitializationComplete must be called after startInitialization");
        }
        if (sInitialized) {
            return;
        }
        try {
            sResourceExtractor.waitForCompletion();

            List<String> shellArgs = new ArrayList<>();
            shellArgs.add("--icu-symbol-prefix=_binary_icudtl_dat");

            ApplicationInfo applicationInfo = getApplicationInfo(applicationContext);
            shellArgs.add("--icu-native-lib-path=" + applicationInfo.nativeLibraryDir + File.separator + DEFAULT_LIBRARY);

           // ...omit...

            if (sSettings.getLogTag() != null) {
                shellArgs.add("--log-tag=" + sSettings.getLogTag());
            }

            String appBundlePath = findAppBundlePath(applicationContext);
            String appStoragePath = PathUtils.getFilesDir(applicationContext);
            String engineCachesPath = PathUtils.getCacheDirectory(applicationContext);
            nativeInit(applicationContext, shellArgs.toArray(new String[0]),
                appBundlePath, appStoragePath, engineCachesPath);

            sInitialized = true;
        } catch (Exception e) {
            Log.e(TAG, "Flutter initialization failed.", e);
            throw new RuntimeException(e);
        }
    }
The method annotations clearly tell us that this is a blocking method until the underlying initialization is complete. This means that the execution of this method will affect the startup speed of app. In general, this method does several things. It guarantees that the initialization operation runs in the main thread, calls sResourceExtractor.waitForCompletion() to complete the extraction of resource files, splices all relevant shell Args parameters, including those in intent, configures the dart code compiler product appBundle path, and applies storage and quotation. Engine cache directory and other information,
Finally, the information is initialized at the c++ layer by executing the nativeInit function.
Create splash view
Next, it's worth mentioning that after creating FlutterView, a createLaunchView method is called.
    private View createLaunchView() {
        if (!showSplashScreenUntilFirstFrame()) {
            return null;
        }
        final Drawable launchScreenDrawable = getLaunchScreenDrawableFromActivityTheme();
        if (launchScreenDrawable == null) {
            return null;
        }
        final View view = new View(activity);
        view.setLayoutParams(matchParent);
        view.setBackground(launchScreenDrawable);
        return view;
    }
This method, in fact, is to add a splash view after Flutter starts. As you know, there will be a short period of white screen time after the Flutter application is launched, which is the reason why the white screen is created. The current solution is to manually add a well-designed flash page and smooth it over. So how to modify the default white screen page and set up our own splash view?
    private Drawable getLaunchScreenDrawableFromActivityTheme() {
        TypedValue typedValue = new TypedValue();
        if (!activity.getTheme().resolveAttribute(
            android.R.attr.windowBackground,
            typedValue,
            true)) {
            return null;
        }
        if (typedValue.resourceId == 0) {
            return null;
        }
        try {
            return activity.getResources().getDrawable(typedValue.resourceId);
        } catch (NotFoundException e) {
            Log.e(TAG, "Referenced launch screen windowBackground resource does not exist");
            return null;
        }
    }
As you can see, this Drawable is actually taken from the theme's Windows Background. We open styles.xml in the app project.
    <style name="LaunchTheme" parent="@android:style/Theme.Black.NoTitleBar">
        <!-- Show a splash screen on the activity. Automatically removed when Flutter draws its first frame -->
        <item name="android:windowBackground">@drawable/launch_background</item>
    </style>
As you can see, Windows Background is actually designated launch_background and found under the drawable folder.
<layer-list xmlns:android="http://schemas.android.com/apk/res/android">
    <item android:drawable="@android:color/white" />

    <!-- You can insert your own image assets here -->
    <!-- <item>
        <bitmap
            android:gravity="center"
            android:src="@mipmap/launch_image" />
    </item> -->
</layer-list>
Here, the default background is set to white, and a friendly example of setting up pictures is given. Open the annotated code and you can set your splash view.
Application Start
We know that when Android app starts, the first thing we call is the onCreate of Application. Now let's take a look at what the Application of Flutter application does.
flutter\shell\platform\android\io\flutter\app\FlutterApplication.java
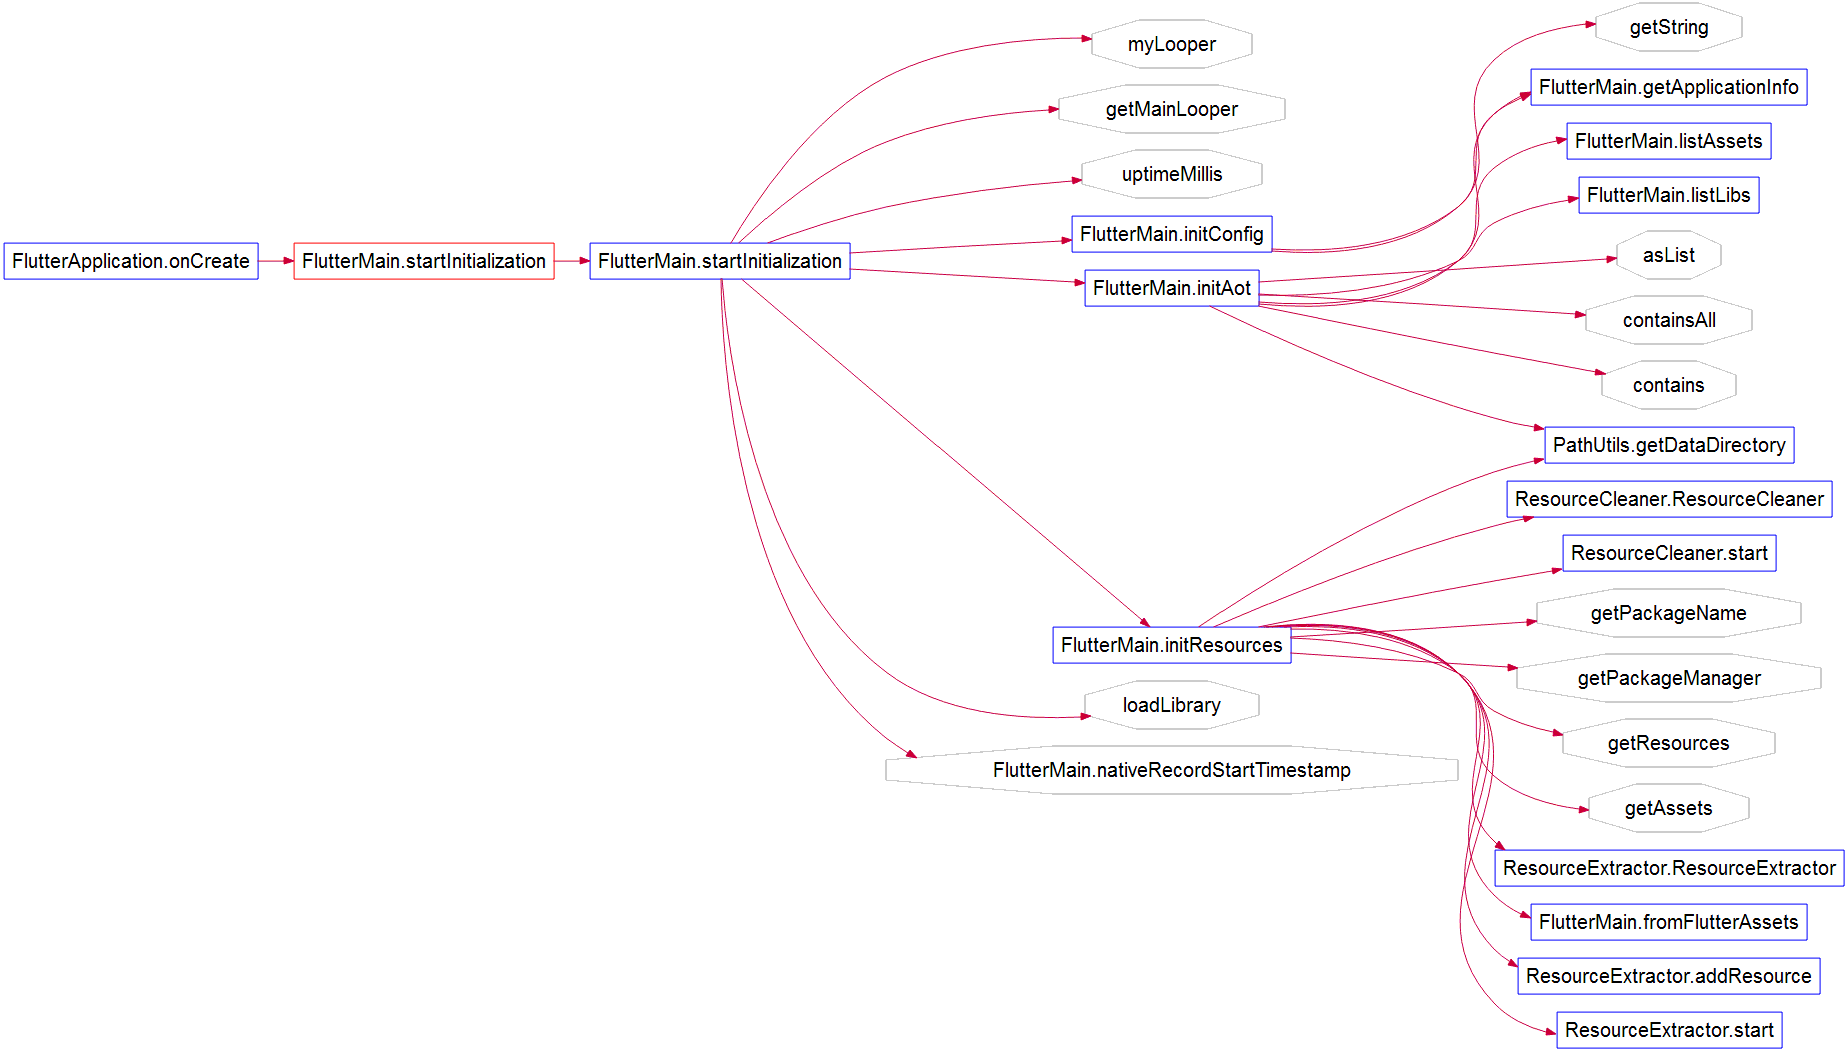
public class FlutterApplication extends Application {
    @Override
    @CallSuper
    public void onCreate() {
        super.onCreate();
        FlutterMain.startInitialization(this);
    }

    private Activity mCurrentActivity = null;
    public Activity getCurrentActivity() {
        return mCurrentActivity;
    }
    public void setCurrentActivity(Activity mCurrentActivity) {
        this.mCurrentActivity = mCurrentActivity;
    }
}
The whole Flutter Application is relatively simple, mainly calling FlutterMain.startInitialization(this) to start initialization.
    public static void startInitialization(@NonNull Context applicationContext, @NonNull Settings settings) {
        if (Looper.myLooper() != Looper.getMainLooper()) {
          throw new IllegalStateException("startInitialization must be called on the main thread");
        }
        // Do not run startInitialization more than once.
        if (sSettings != null) {
          return;
        }

        sSettings = settings;

        long initStartTimestampMillis = SystemClock.uptimeMillis();
        initConfig(applicationContext);
        initAot(applicationContext);
        initResources(applicationContext);

        System.loadLibrary("flutter");
        long initTimeMillis = SystemClock.uptimeMillis() - initStartTimestampMillis;
        nativeRecordStartTimestamp(initTimeMillis);
    }
The method annotations show that it is used to initialize the underlying Flutter engine, mainly doing a few things.
- Initialization configuration
- Gets whether precompiled mode is available
- Initialize and extract resource files
- Load libflutter.so
Java Layer Associates with Flutter Engine
When so of the engine is loaded in Flutter Application, we can't help asking, where was the Flutter engine created and how was it associated with native Java code?
The FlutterNativeView is created in the FlutterView construction method, and you can see the FlutterNativeView construction method.
    public FlutterNativeView(@NonNull Context context, boolean isBackgroundView) {
        mContext = context;
        mPluginRegistry = new FlutterPluginRegistry(this, context);
        mFlutterJNI = new FlutterJNI();
        mFlutterJNI.setRenderSurface(new RenderSurfaceImpl());
        this.dartExecutor = new DartExecutor(mFlutterJNI);
        mFlutterJNI.addEngineLifecycleListener(new EngineLifecycleListenerImpl());
        attach(this, isBackgroundView);
        assertAttached();
    }
Here we mainly create the Flutter JNI object and call a key method attach to track the method calls all the way.
    private void attach(FlutterNativeView view, boolean isBackgroundView) {
        mFlutterJNI.attachToNative(isBackgroundView);
        dartExecutor.onAttachedToJNI();
    }
flutter\shell\platform\android\io\flutter\embedding\engine\FlutterJNI.java
  public void attachToNative(boolean isBackgroundView) {
    ensureRunningOnMainThread();
    ensureNotAttachedToNative();
    nativePlatformViewId = nativeAttach(this, isBackgroundView);
  }

  private native long nativeAttach(FlutterJNI flutterJNI, boolean isBackgroundView);
Finally, it is found that a native method is called and the Flutter JNI instance object itself is passed into the C++ layer. Here, how can we find the C++ source code corresponding to the native method?
I'll introduce the simplest fool-like method here. You can download a FileLocatorPro tool. It's a text search artifact on Windows platform. It's recommended that you install one.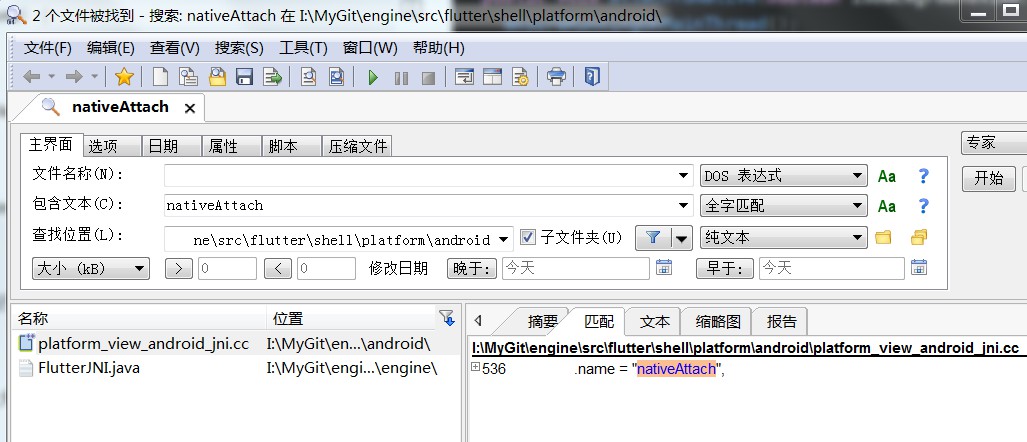
In order to search faster, we not only set the downloaded Flutter engine source path in, but also abbreviate a little scope. Here, I set the flutter shell platform Android in the source directory as the search path. In addition, I can also fill in *. cc in the file name column to indicate that only files with. cc as the suffix are searched. Here. cc is the C++ source file suffix name. Finally, we found the matching content in seconds.
flutter\shell\platform\android\platform_view_android_jni.cc
static const JNINativeMethod flutter_jni_methods[] = {
      // Start of methods from FlutterNativeView
      {
          .name = "nativeAttach",
          .signature = "(Lio/flutter/embedding/engine/FlutterJNI;Z)J",
          .fnPtr = reinterpret_cast<void*>(&AttachJNI),
      }
This is a structured array, you can see that the corresponding function pointer of nativeAttach is AttachJNI. We continue to find AttachJNI function in the current file, which is the concrete implementation of nativeAttach method in Java layer.
// Called By Java
static jlong AttachJNI(JNIEnv* env,
                       jclass clazz,
                       jobject flutterJNI,
                       jboolean is_background_view) {
  fml::jni::JavaObjectWeakGlobalRef java_object(env, flutterJNI);
  auto shell_holder = std::make_unique<AndroidShellHolder>(
      FlutterMain::Get().GetSettings(), java_object, is_background_view);
  if (shell_holder->IsValid()) {
    return reinterpret_cast<jlong>(shell_holder.release());
  } else {
    return 0;
  }
}
The main thing the C++ code does here is create an Android ShellHolder object by making_unique, so we need to find a way to construct the Android ShellHolder class.
flutter/shell/platform/android/android_shell_holder.cc
AndroidShellHolder::AndroidShellHolder(
    flutter::Settings settings,
    fml::jni::JavaObjectWeakGlobalRef java_object,
    bool is_background_view)
    : settings_(std::move(settings)), java_object_(java_object) {
  static size_t shell_count = 1;
  auto thread_label = std::to_string(shell_count++);

  FML_CHECK(pthread_key_create(&thread_destruct_key_, ThreadDestructCallback) ==
            0);

  if (is_background_view) {
    thread_host_ = {thread_label, ThreadHost::Type::UI};
  } else {
    thread_host_ = {thread_label, ThreadHost::Type::UI | ThreadHost::Type::GPU |
                                      ThreadHost::Type::IO};
  }

  // ...omit...

  // The current thread will be used as the platform thread. Ensure that the
  // message loop is initialized.
  fml::MessageLoop::EnsureInitializedForCurrentThread();
  fml::RefPtr<fml::TaskRunner> gpu_runner;
  fml::RefPtr<fml::TaskRunner> ui_runner;
  fml::RefPtr<fml::TaskRunner> io_runner;
  fml::RefPtr<fml::TaskRunner> platform_runner =
      fml::MessageLoop::GetCurrent().GetTaskRunner();
  if (is_background_view) {
    auto single_task_runner = thread_host_.ui_thread->GetTaskRunner();
    gpu_runner = single_task_runner;
    ui_runner = single_task_runner;
    io_runner = single_task_runner;
  } else {
    gpu_runner = thread_host_.gpu_thread->GetTaskRunner();
    ui_runner = thread_host_.ui_thread->GetTaskRunner();
    io_runner = thread_host_.io_thread->GetTaskRunner();
  }
  flutter::TaskRunners task_runners(thread_label,     // label
                                    platform_runner,  // platform
                                    gpu_runner,       // gpu
                                    ui_runner,        // ui
                                    io_runner         // io
  );

  shell_ =
      Shell::Create(task_runners,             // task runners
                    settings_,                // settings
                    on_create_platform_view,  // platform view create callback
                    on_create_rasterizer      // rasterizer create callback
      );

  platform_view_ = weak_platform_view;
  FML_DCHECK(platform_view_);

  is_valid_ = shell_ != nullptr;

  // ...omit...
}
This method has a lot of code, omit part of the code, we see the most important places, first of all, there are four threads, in addition to the current thread as a platform thread, but also created three new threads.
- gpu thread
- ui thread
- io thread
Here is the map, from Idle Fish Technology Blog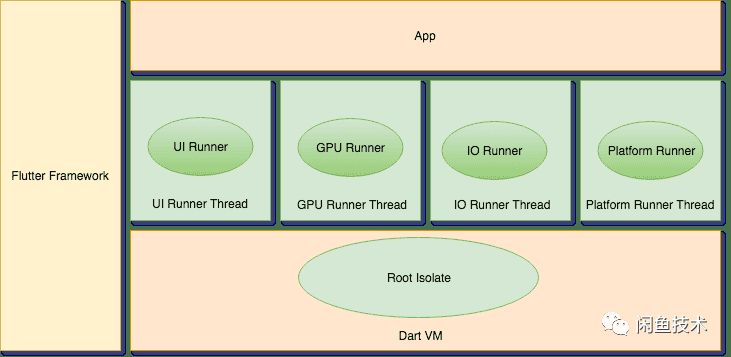
Each of the four threads holds a TaskRunner object, through which some operations are subsequently put into the corresponding thread to execute.
-
Platform Task Runner's thread can be understood as the main thread, which not only deals with interaction with Engine, but also processes messages from the platform.
-
UI Task Runner is used to execute Dart root isolate code, which is simply the main thread of Dart language. The Dart code we write basically runs on this thread. Therefore, the thread busy will lead to UI carton, if there are heavy computing tasks, such as encryption, decompression, etc., should be another isolate in Dart to execute the code. It is important to note that a separate isolate cannot interact with the Flutter engine, as shown in development, i.e., plug-ins cannot be invoked in a newly created isolate, such as operating SQlite databases in a new isolate, which can be used if such a requirement exists. Flutter Isolate Library
-
GPU Task Runner is used to execute related calls to the device GPU. The main task is to configure and manage the GPU resources needed for each frame drawing. If the thread is jammed, the program jammed directly. Normally, neither platform code nor Dart code can directly manipulate the thread.
-
IO Runner mainly reads compressed image formats from image storage (such as disk), processes image data, and prepares GPU Runner for rendering. That is, transactions related to disk IO are handled.
Finally, you see the call to the following function, which is where the engine was created
shell_ =
      Shell::Create(task_runners,             // task runners
                    settings_,                // settings
                    on_create_platform_view,  // platform view create callback
                    on_create_rasterizer      // rasterizer create callback
      );
If you are interested, you can find the relevant source code and keep track of the source code to see how the engine was created.
\flutter\shell\common\shell.cc
Run Dart code
By decompiling the apk generated by Flutter, we clearly know that the Dart code compiled products, including related resource files, are actually packaged in Android assets directory. Where is the Dart code loaded and executed?
At the end of the onCreate method of FlutterActivityDelegate is the following code
 String appBundlePath = FlutterMain.findAppBundlePath(activity.getApplicationContext());
 if (appBundlePath != null) {
     runBundle(appBundlePath);
 }
Here we first get the path of the resource file extracted in the directory under which the application belongs, and then call runBundle to load and execute. The runBundle method finally calls a native method in Flutter JNI
  private native void nativeRunBundleAndSnapshotFromLibrary(
      long nativePlatformViewId,
      @NonNull String[] prioritizedBundlePaths,
      @Nullable String entrypointFunctionName,
      @Nullable String pathToEntrypointFunction,
      @NonNull AssetManager manager
  );
The call procedure is as follows. Click on the big picture
summary
-
onCreate flow chart in Flutter Activity Delegate
Object Call Diagram, Click on the big picture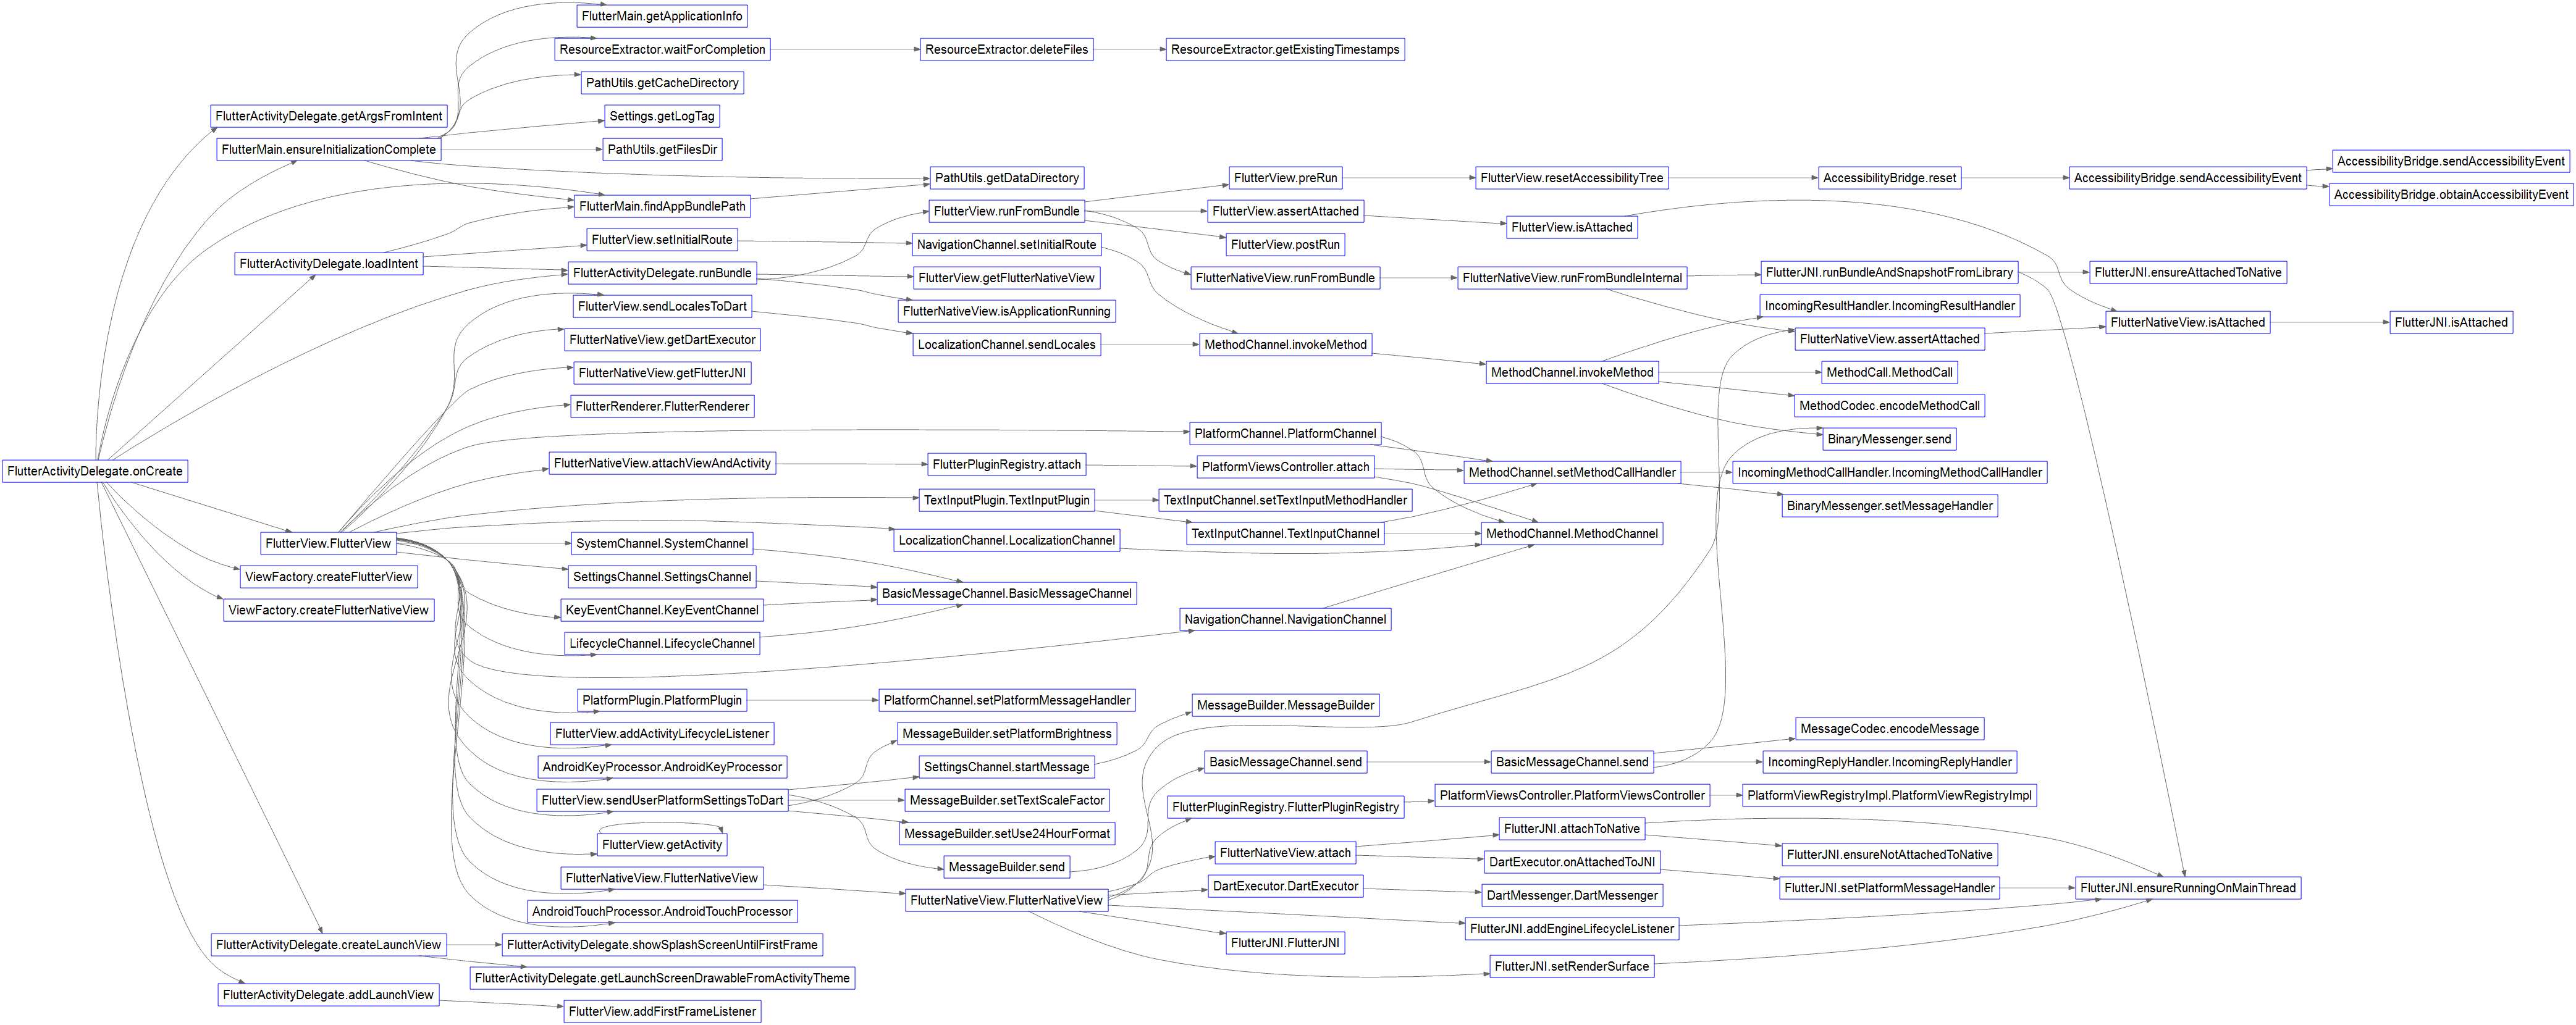
FlutterMain.ensureInitializationComplete method call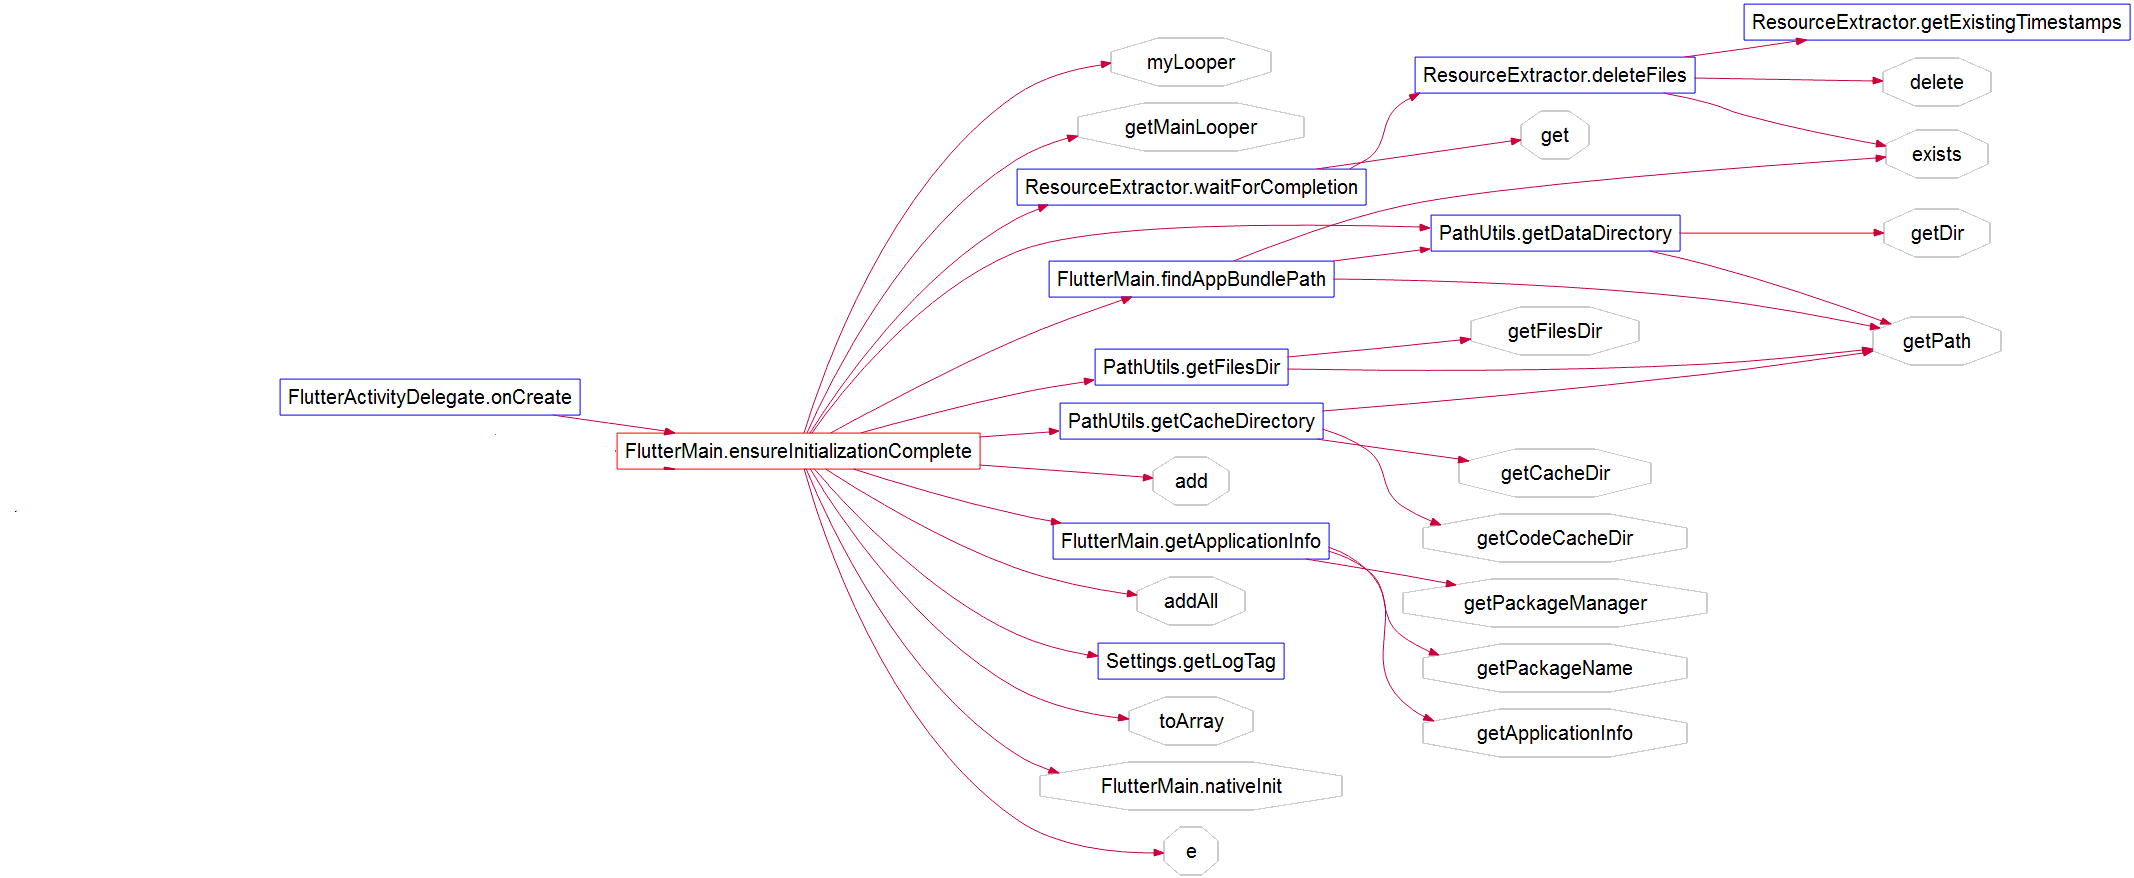
-
onCreate call in Flutter Application
-
FlutterView Creation
Click on the big picture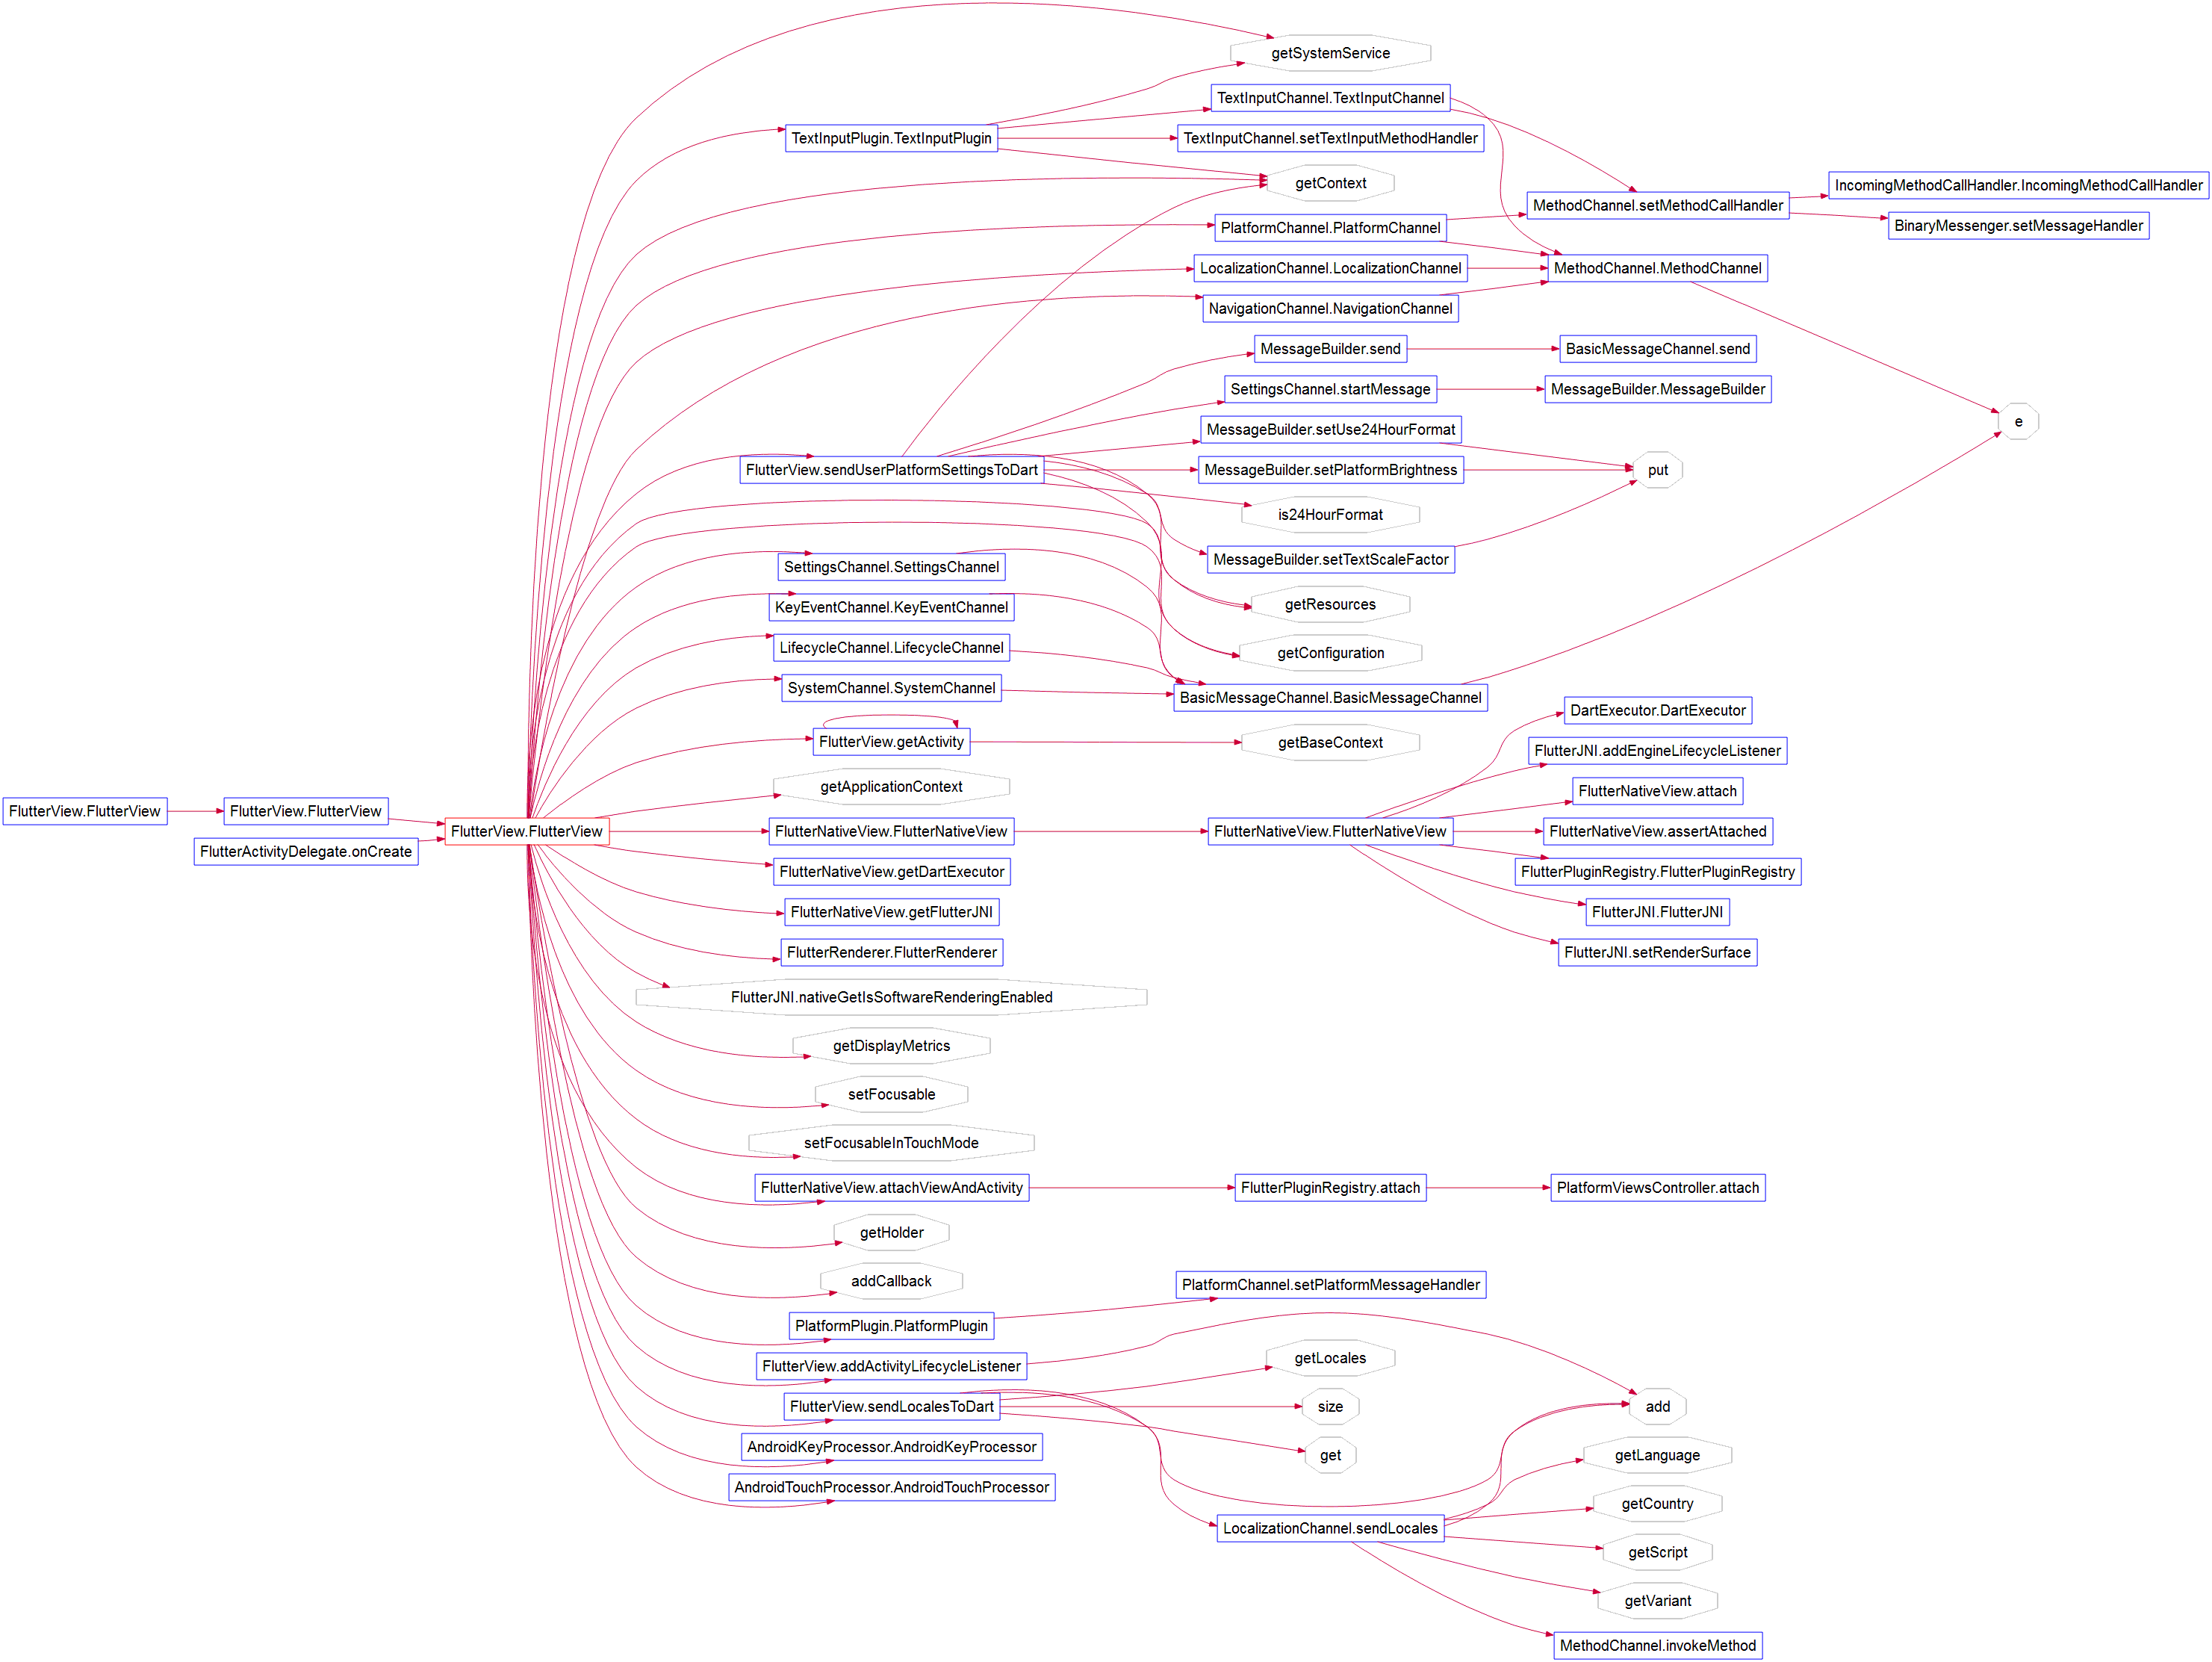
-
Flutter NativeView Creation
Click on the big picture

Welcome to my public number: Programming from 0 to 1