html is called hypertext markup language. Note that it's just a markup language, not a programming language.
Preparation specification:
-
Composed of tags (html, div, p, h1, etc.)
-
Tags appear in pairs (< HTML >... < / HTML >), with some exceptions, such as < img SRC = "" / >, < br / >
- Marked with hierarchy
<html>
    <head>
    </head>
    <body>
    </body><html>
- Marked with content text or properties
<title>This is a label</title><meta name="" content=""></meta>
be careful:
-
html is case insensitive
- I suggest you use double quotes
Of course, single quotation mark is OK, but double quotation mark is professional performance
html basic structure
<!DOCTYPE html><html lang="en">    <head>
        <meta charset="UTF-8">
        <title>Title</title>    </head>    <body>    </body></html>
-
doctype: it must be written like this
-
html: in fact, it's OK not to write it. In order to standardize, it's better to write it
-
head: used to set the information of the web page, such as the title, small icon, etc
- body: Web content (visual label)
Special symbols
- Space: [semicolon is required]
Note that if you write a space here, it means you have added a space. If you write more than one space, there will only be one space
OK, now let's create a new one called index.html You can create a txt file on the desktop, modify the extension to HTML, and then open it by selecting sublime or other editors. Captain here is to build a flash project, and then create a new one under the templates folder. Here is to remind you that in the future, you can try to use English where you can, such as folder name, file name, etc., otherwise there will be various problems waiting for you.
If you use pycharm IDE, you will find that it will help you to write a template. Here, we suggest that you clear it and write it yourself to make a deep impression:
<!DOCTYPE html><html>
    <head>
        <title>The first class</title>
        <meta charset="UTF-8"/>
    </head>
    <body>
        Hello World!    </body></html>
Write Hello World! You start HTML learning~
First of all, let's talk about what visual tags are. In a word, the tags that can be seen in & lt; body & gt; are visual tags, such as & lt; P & gt;, & lt; body & gt;, & lt; div & gt;, etc., so they are visual tags, while the tags that & lt; style & gt;, & lt; meta & gt; can't be seen in & lt; body & gt; are non visual tags. Note: only visual tags can be styled with css.
Common visual labels
Only a few representative ones are mentioned here. In fact, all labels are similar, just like pens and pencils. They are used for writing, but their functions are different.
- div
<!DOCTYPE html>
<html>
    <head>
        <title>The first class</title>
        <meta charset="UTF-8"/>
        <style>
            div{
                border:1px solid green;
            }
            span{
                border:1px solid red;
            }
        </style>

    </head>
    <body>
        <div>This is a div</div>
        <span>This is a span</span>
    </body>
</html>
Please don't worry about the content not mentioned in the code page above. We will talk about it later. Display:
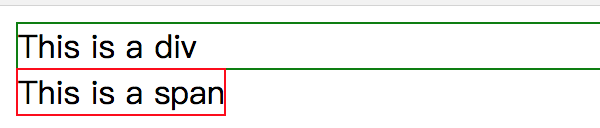
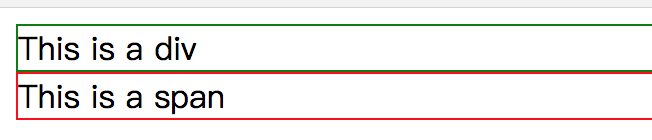
It is found that the box above is longer. The following is the same as the text length. This is because there is a display attribute. The default value of div label display is block, and the default value of span label display is inline. So if I change the display value of span label to block, the two displays will be the same:
<!DOCTYPE html><html>
    <head>
        <title>The first class</title>
        <meta charset="UTF-8"/>
        <style>
            div{                border:1px solid green;                                display: block;                        }
            span{                border:1px solid red;                                display: block;                        }
        </style>

    </head>
    <body>
        <div>This is a div</div>
        <span>This is a span</span>
    </body></html>
Display:
(the content in the style tag in the code is how css modifies the visual tag.)
Let's add a p tag:
<!DOCTYPE html><html>
    <head>
        <title>The first class</title>
        <meta charset="UTF-8"/>
        <style>
            div{                border:1px solid green;                                display: block;                        }
            span{                border:1px solid red;                                display: block;                        }
            p{                border: 1px solid palevioletred;                        }
        </style>

    </head>
    <body>
        <div>This is a div</div>
        <span>This is a span</span>
        <p>This is a p</p>
    </body></html>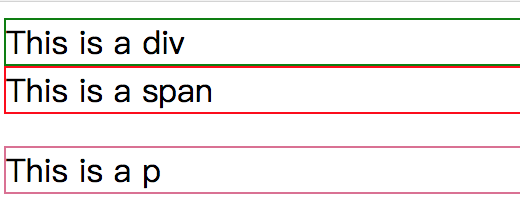
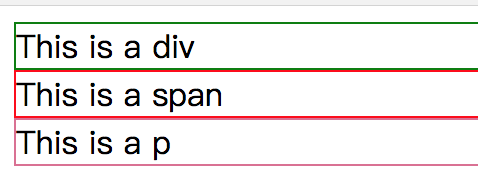
It is found that there is a blank line between the p tag and the above content. This is because the default value of the margin property of the p tag is not 0. If you want to remove the blank line, you only need to modify the margin value of the p tag to 0 in style:
<!DOCTYPE html><html>
    <head>
        <title>The first class</title>
        <meta charset="UTF-8"/>
        <style>
            div{                border:1px solid green;                                display: block;                        }
            span{                border:1px solid red;                                display: block;                        }
            p{                border: 1px solid palevioletred;                                margin: 0px;                        }
        </style>

    </head>
    <body>
        <div>This is a div</div>
        <span>This is a span</span>
        <p>This is a p</p>
    </body></html>
See the page style change to this:
- a label
The a-tag becomes a hyperlink because it has an href attribute, while the div tag does not have an href attribute. In the future, we will use the a-tag * * to jump to a page or submit a form
<!DOCTYPE html><html>
    <head>
        <title>The first class</title>
        <meta charset="UTF-8"/>
        <style>
            div{                border:1px solid green;                                display: block;                        }
            span{                border:1px solid red;                                display: block;                        }
            p{                border: 1px solid palevioletred;                                margin: 0px;                        }
        </style>

    </head>
    <body>
        <div>This is a div</div>
        <span>This is a span</span>
        <p>This is a p</p>
        <a href="https://www.baidu.com "> Baidu</a>
    </body></html>
It should be noted here that the protocol must be added when writing the address of the href attribute, that is, http or https or file. If not, the page will jump wrong.
In addition, you can see that the page is written in the current page, jump. In many cases, the page Jump needs to open a new tab, so we need to add a target attribute to the a tab, with a value of_ blank:
<a href="https://www.baidu.com " target="_ Blank "> Baidu</a>
The default value of this target is_ self.
- img label
Let's first look at the document structure: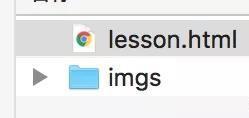
Here, the current location of our files is lesson.html , so now the value given by the img attribute src needs to enter the imgs folder, so we can use the relative path to express it. See the code:
<!DOCTYPE html><html>
    <head>
        <title>The first class</title>
        <meta charset="UTF-8"/>

    </head>
    <body>
        <a href="https://www.baidu.com " target="_ Blank "> Baidu</a>
        <img src="imgs/0.png">
    </body></html>
The above src is followed by the relative path.
Page display:
src is not only used to set the image path, but also used to set the alt attribute. The alt attribute is used for the search engine, so that the page you write can be searched by the search engine. In addition, it also has the width and height attributes. For example, the picture just now is relatively large. Now we need to change the size of the picture, just:
<img src="imgs/0.png" width="5%" height="5%">
If you want your picture to be a picture on the network, you only need to paste the address of the picture you want to put on, for example, the background of Baidu, then you only need to look at the address of Baidu:
Then copy the address and paste it into your src path:
<img src="https://www.baidu.com/img/bd_logo1.png" width="50%" height="50%">
However, it should be noted that if the picture is a picture on the network, you must make sure that there is a network, or the picture will not be displayed.
- ul li label
These two labels are lists.
<!DOCTYPE html><html>
    <head>
        <title>The first class</title>
        <meta charset="UTF-8"/>

    </head>
    <body>
        <a href="https://www.baidu.com " target="_ Blank "> Baidu</a>
        <img src="https://www.baidu.com/img/bd_logo1.png" width="10%" height="10%">
        <ul>
            <li>first line</li>
            <li>Second line</li>
            <li>The third line</li>
        </ul>
    </body></html>
Display:
You may say that besides ul li, there are ol li. Don't worry so much. Just remember this.
Remember, as long as there is a fixed style list in the page, use ul li, for example: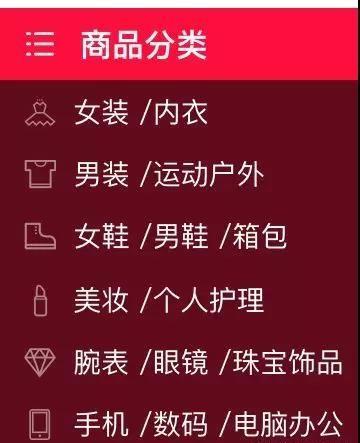
If you don't believe me, please go to tmall.
- table
Form. As I said before, today's will prevail. tr for row, td for column.
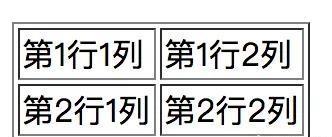
<table>
    <tr>
        <td>Row 1, column 1</td>
        <td>Row 1, column 2</td>
    </tr>
    <tr>
        <td>Line 2, column 1</td>
        <td>Line 2, column 2</td>
    </tr></table>
Display: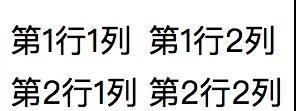
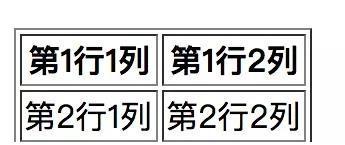
If you want to display the border, you can add a border attribute:
<table border="1">...</table>
Also know that table has been used very little, because there is browser compatibility, many times it is replaced by ul li. You will think that the tbody mentioned last time is not written now. In fact, even if we don't write a browser, we will add: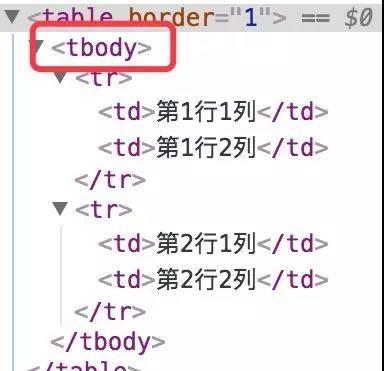
tbody in the figure above is what the browser added to us by default. In addition, if the first row of the table needs to be bold, you can change tr to th:
<table border="1">
    <tr>
        <th>Row 1, column 1</th>
        <th>Row 1, column 2</th>
    </tr>
    <tr>
        <td>Line 2, column 1</td>
        <td>Line 2, column 2</td>
    </tr></table>
th is used as the header. The default font is centered.
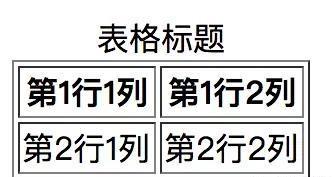
And caption as the title of the table:
<table border="1">
    <caption>Table title</caption>
    <tr>
        <th>Row 1, column 1</th>
        <th>Row 1, column 2</th>
    </tr>
    <tr>
        <td>Line 2, column 1</td>
        <td>Line 2, column 2</td>
    </tr></table>
tbody, caption and so on need not be remembered.
Consolidated table:
<table border="1">
    <caption>Table title</caption>
    <tr>
        <th>Row 1, column 1</th>
        <th>Row 1, column 2</th>
        <th>fraction</th>
    </tr>
    <tr>
        <td>Line 2, column 1</td>
        <td>Line 2, column 2</td>
        <td>10</td>
    </tr>
    <tr>
        <td colspan="2">Total score</td>
        <td>20</td>
    </tr></table>
After adding colspan="2" to the td tag, we can merge two lines: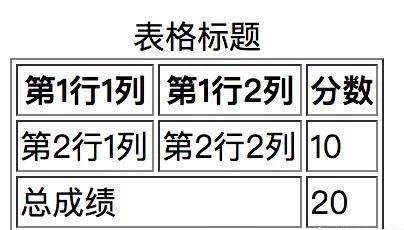
Finally, let me show you an example. The picture comes from https://nba.hupu.com/teams :
<!DOCTYPE html><html>
    <head>
        <title>The first class</title>
        <meta charset="UTF-8"/>

    </head>
    <body>
        <a href="https://www.baidu.com " target="_ Blank "> Baidu</a>
        <img src="https://www.baidu.com/img/bd_logo1.png" width="10%" height="10%">
        <ul>
            <li>first line</li>
            <li>Second line</li>
            <li>The third line</li>
        </ul>
        <table border="1">
            <caption>Table title</caption>
            <tr>
                <th>Row 1, column 1</th>
                <th>Row 1, column 2</th>
                <th>fraction</th>
                <th>A whole line</th>
            </tr>
            <tr>
                <td><img src="imgs/0.png"></td>
                <td><img src="imgs/1.png"></td>
                <td><img src="imgs/2.png"></td>
                <td rowspan="3"><img src="imgs/logo.png"></td>
            </tr>
            <tr>
                <td><img src="imgs/3.png"></td>
                <td><img src="imgs/4.png"></td>
                <td><img src="imgs/5.png"></td>
            </tr>
            <tr>
                <td><img src="imgs/6.png"></td>
                <td><img src="imgs/7.png"></td>
                <td><img src="imgs/8.png"></td>
            </tr>
        </table>
    </body></html>
If for software testing, interface testing, automation testing, interview experience exchange. If you are interested, you can add software test exchange: 1085991341, and there will be technical exchanges with peers.
Display: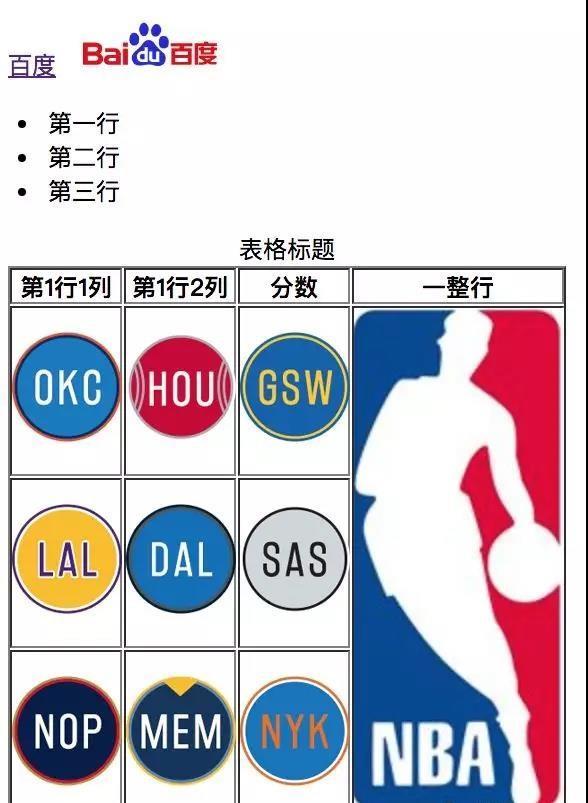
I can write the above example. There is no problem with table.
If you want to learn, you have to work harder. If you don't work hard, you can't teach anyone.
The above content hopes to be helpful to you. Friends who have been helped are welcome to like and comment.