This is a series of articles. If you haven't read the first episode, please jab here: Alibaba Nacos registration center of Spring Cloud series (I)
This article introduces the construction of Nacos registry cluster environment.
Construction of Nacos cluster environment
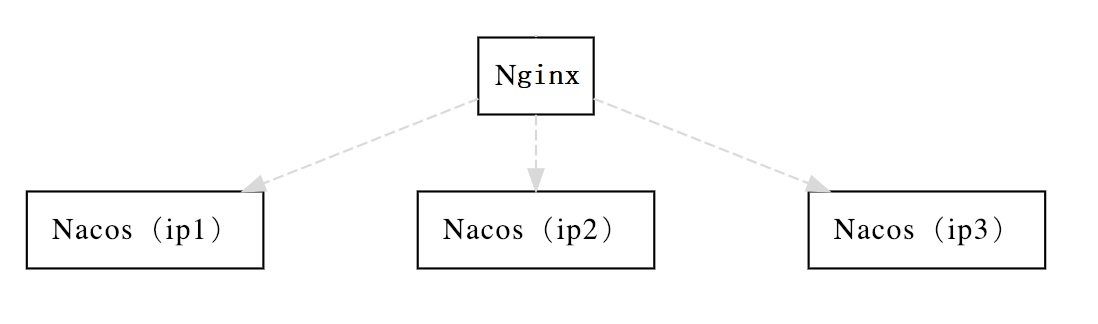
The cluster mode is the same as our usual capacity expansion. It can be forwarded to multiple nodes through Nginx, as shown in the following figure:
For convenience and convenience, you can use the direct connection ip mode. In the configuration, you can write it as follows:
spring:
  # Configure Nacos registry
  cloud:
    nacos:
      discovery:
        enabled: true # If you do not want to use Nacos for service registration and discovery, set it to false
        server-addr: 192.168.10.101:8848,192.168.10.102:8848,192.168.10.103:8848 # Nacos server address
PS: if it's just for learning, you can directly start three instances locally by modifying the port. In this paper, three servers are used to build the environment, which is actually simpler.
Environmental preparation
Nacos single node, that is, the standalone mode we just used, uses the embedded database to store data by default, which is not convenient to observe the basic situation of data storage. After version 0.7, the ability to support MySQL data source has been added. When building a cluster, we need to connect Nacos with MySQL for data storage. If you want to build a highly available cluster environment, at least the following conditions should be met:
- JDK 1.8+;
- Maven 3.2.x+;
- MySQL 5.6.5 + (it is recommended to use at least the active / standby mode in production or the highly available database);
- Only three or more Nacos nodes can form a cluster.
Download source code or installation package
Nacos can be obtained through source code and distribution package.
Source mode
Download the source code from Github.
git clone https://github.com/alibaba/nacos.git
cd nacos/
mvn -Prelease-nacos -Dmaven.test.skip=true clean install -U
ls -al distribution/target/

// change the $version to your actual path
cd distribution/target/nacos-server-$version/nacos/bin
Distribution package method
You can https://github.com/alibaba/nacos/releases Download the latest stable version of the Nacos Server package.
Configure cluster profile
Unzip the installation package.
tar -zxvf nacos-server-1.2.1.tar.gz -C /usr/local/ # Extract the file to the local directory
Copy the configuration file in the directory nacos/conf of Nacos cluster.conf.example And rename to cluster.conf , each line is configured as ip:port. (please configure 3 or more nodes)
192.168.10.101:8848
192.168.10.102:8848
192.168.10.103:8848
Configure MySQL database
Before 0.7 version of Nacos, the embedded database Apache Derby was used by default to store data (the embedded database will start with Nacos without additional installation); support for MySQL data source was added in 0.7 version and later.
MySQL data source
Environment requirements: MySQL 5.6.5 + (it is recommended to use at least the active standby mode or the highly available database for production);
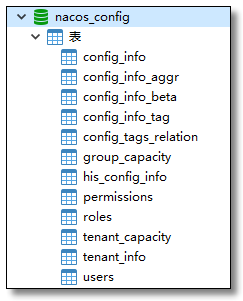
Initialize MySQL database
Create database nacos_config.
SQL source file address: https://github.com/alibaba/nacos/blob/master/distribution/conf/nacos-mysql.sql , or under the directory conf of Nacos server, find nacos-mysql.sql File, run the file, and the result is as follows:
application.properties to configure
Modify nacos/conf/application.properties The following content of the file.
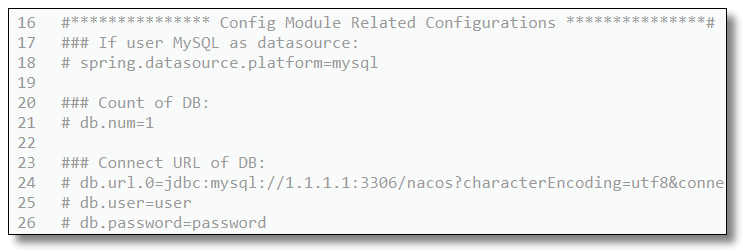
The final modification results are as follows:
#*************** Config Module Related Configurations ***************#
### If user MySQL as datasource:
# Specify MySQL as the data source
spring.datasource.platform=mysql

### Count of DB:
# Number of database instances
db.num=1

# Database connection information, if MySQL version 8.0 + needs to add serverTimezone=Asia/Shanghai
### Connect URL of DB:
db.url.0=jdbc:mysql://127.0.0.1:3306/nacos_config?characterEncoding=utf8&connectTimeout=1000&socketTimeout=3000&autoReconnect=true&serverTimezone=Asia/Shanghai
db.user=root
db.password=1234
If you use MySQL 8.0 + as I do, there will be an error when you start Nacos. Don't panic. Create the plugins/mysql folder in the Nacos installation directory, and put it in the 8.0 + version of mysql-connector-java-8.0 xx.jar , restart Nacos, and you will be prompted to change the driver class of MySQL.

Start server
Linux/Unix/Mac
Start in the directory nacos/bin of Nacos.
Start command (in no parameter mode, cluster mode):
sh startup.sh
View startup record
Via / nacos/logs/nacos.log (detailed log) or / nacos/conf/start.out (start record) to see if the start is successful.
View command:
tail -f /usr/local/nacos/logs/start.out
Start successful output result:
2020-04-29 22:47:56,204 INFO Nacos is starting...

2020-04-29 22:47:56,556 INFO Nacos logs files: /usr/local/nacos/logs/

2020-04-29 22:47:56,556 INFO Nacos conf files: /usr/local/nacos/conf/

2020-04-29 22:47:56,556 INFO Nacos data files: /usr/local/nacos/data/

2020-04-29 22:47:56,556 INFO Nacos started successfully in cluster mode.
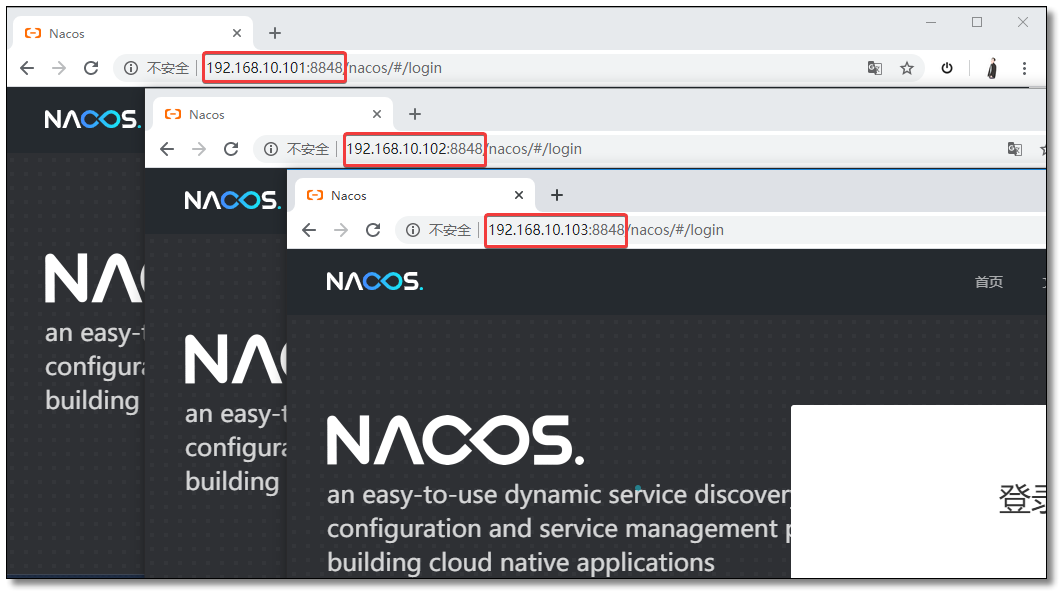
visit
To access the following connection, the default username / password is nacos/nacos:
- http://192.168.10.101:8848/nacos/
- http://192.168.10.102:8848/nacos/
- http://192.168.10.103:8848/nacos/
Shut down the server
Linux/Unix/Mac
sh shutdown.sh
test
Direct ip mode
Commodity service application. yml configuration file.
server:
  port: 7070 # port

spring:
  application:
    name: product-service # apply name
  # Configure Nacos registry
  cloud:
    nacos:
      discovery:
        enabled: true # If you do not want to use Nacos for service registration and discovery, set it to false
        server-addr: 192.168.10.101:8848,192.168.10.102:8848,192.168.10.103:8848 # Nacos server address, cluster direct ip mode
Order service application. yml configuration file.
server:
  port: 9090 # port

spring:
  application:
    name: order-service # apply name
  # Configure Nacos registry
  cloud:
    nacos:
      discovery:
        enabled: true # If you do not want to use Nacos for service registration and discovery, set it to false
        server-addr: 192.168.10.101:8848,192.168.10.102:8848,192.168.10.103:8848 # Nacos server address, cluster direct ip mode
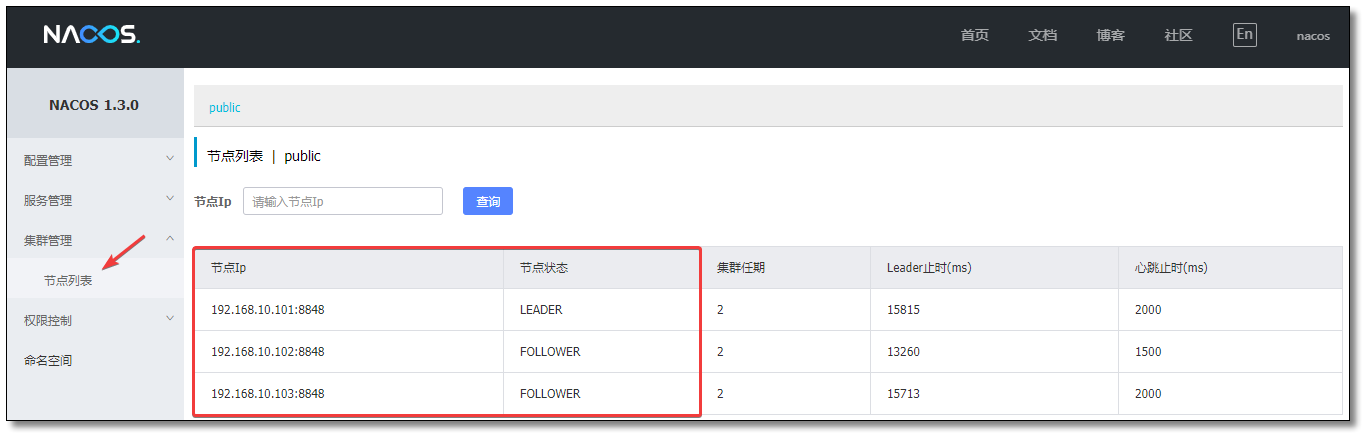
Start the Nacos cluster. From the figure below, you can see that there are three cluster nodes, among which 192.168.10.101:8848 is the leader.
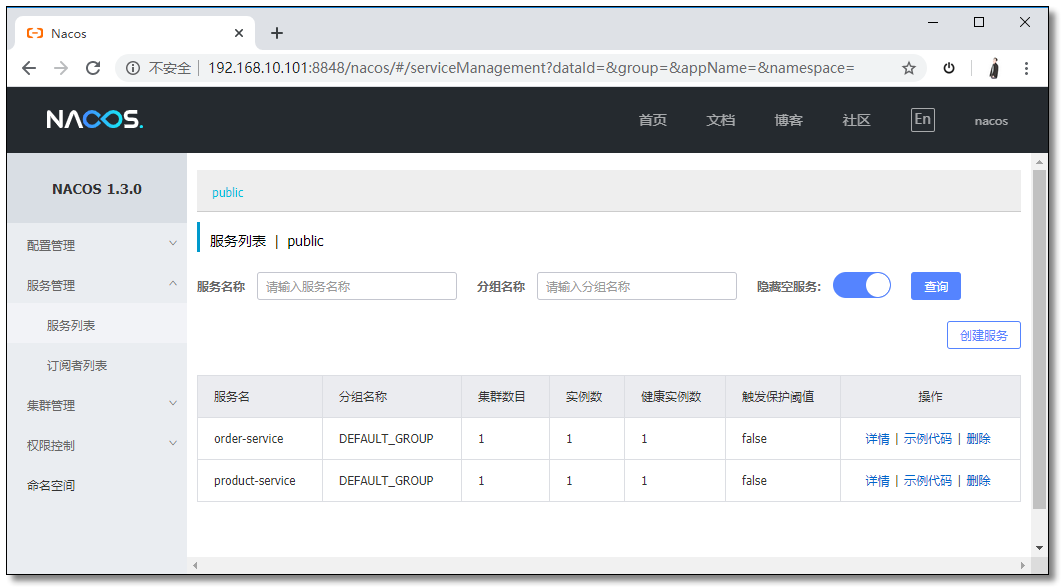
From the service list, you can see that the service is registered to Nacos.
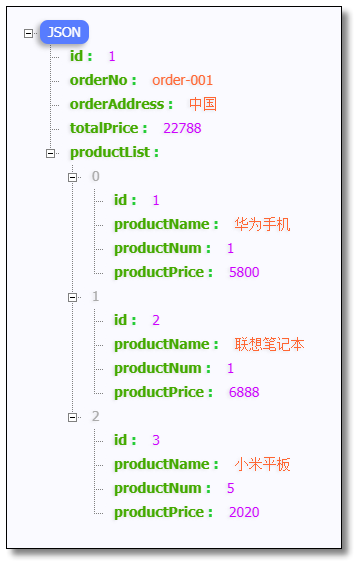
Visit: http://localhost:9090/order/1 The results are as follows:
Nginx forwarding
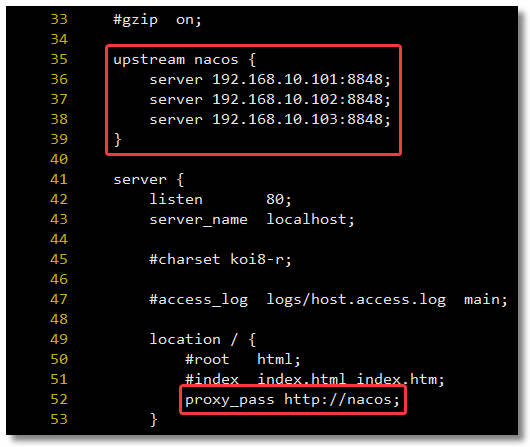
Start another server 192.168.10.100, install Nginx, and configure the forwarding rules.
upstream nacos {
    server 192.168.10.101:8848;
    server 192.168.10.102:8848;
    server 192.168.10.103:8848;
}
Commodity service application. yml configuration file.
server:
  port: 7070 # port

spring:
  application:
    name: product-service # apply name
  # Configure Nacos registry
  cloud:
    nacos:
      discovery:
        enabled: true # If you do not want to use Nacos for service registration and discovery, set it to false
        server-addr: 192.168.10.100:80 # Nacos server address, cluster version Nginx forwarding
Order service application. yml configuration file.
server:
  port: 9090 # port

spring:
  application:
    name: order-service # apply name
  # Configure Nacos registry
  cloud:
    nacos:
      discovery:
        enabled: true # If you do not want to use Nacos for service registration and discovery, set it to false
        server-addr: 192.168.10.100:80 # Nacos server address, cluster version Nginx forwarding
Start the Nacos cluster. From the figure below, you can see that there are three cluster nodes, among which 192.168.10.101:8848 is the leader.
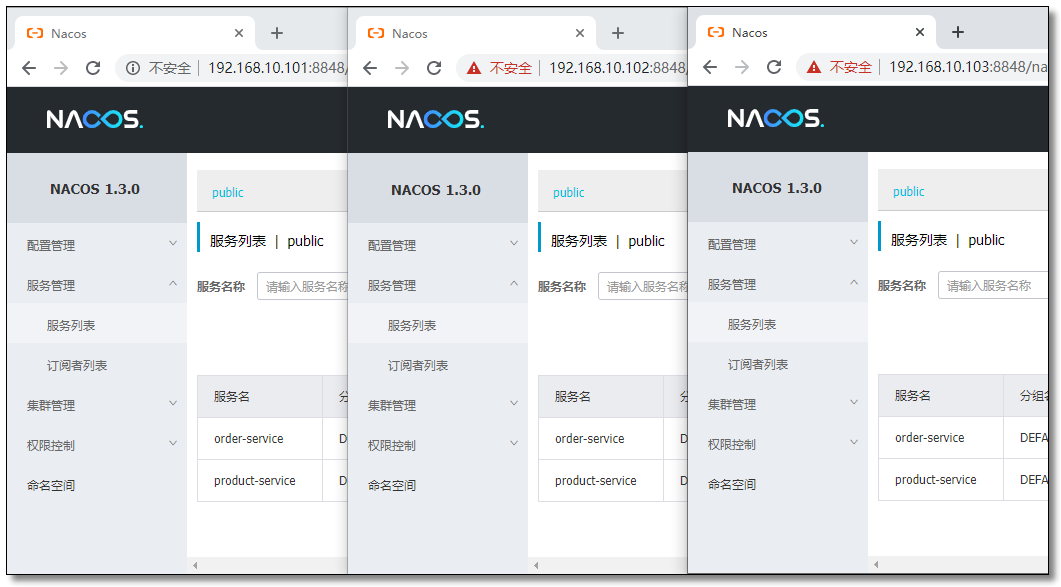
From the service list, you can see that the service is registered to Nacos.
Visit: http://localhost:9090/order/1 The results are as follows:
At this point, all the knowledge points in the Nacos registry are finished.

This paper adopts Intellectual sharing "signature - non-commercial use - no deduction 4.0 international" License Agreement.
You can go through classification See more about Spring Cloud The article.
🤗 Your comments and forwarding are my biggest support.
📢 Scan the code and follow Mr. halloward's "document + video". Each article is provided with a special video explanation, which makes learning easier~