
Author|Good Name Alibaba Technical Expert
background
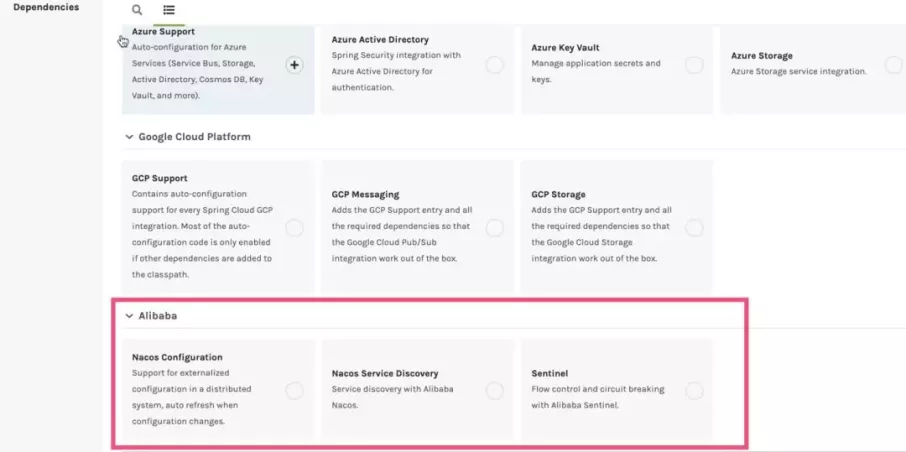
I believe many people have used start.spring.io to initialize their own Spring Boot project. This tool provides developers with a wide range of optional components and can be packaged in a variety of ways, making it easy for developers to use.Recently, Alibaba's Nacos and Sentinel have also entered the start.spring.io option to further facilitate the use of Alibaba cloud products by developers.
However, in the generated project skeleton, only component coordinate information is available, and the corresponding usage method and Demo code are missing; therefore, developers still need to look for relevant usage tutorials or sample codes; if not found correctly, or versions do not match, it will take a lot of time to troubleshoot and solve problems; these problems are invisibly increasing the workload of users.
We will split the abstract level of software engineering from top to bottom and get the following levels: industry, solution, application, function, component; obviously, start.spring.io currently only provides component level support.Expand the component layer and you will find such a life cycle: component introduction, component configuration, function development, online operation and maintenance.Start.spring.io also only implements component introduction.
Our goal is to ** "make Ali cloud the best cloud for most Java developers"**.To achieve this goal, can you take a few more steps forward and add typical usage methods, sample codes and instructions of components to the project on the basis of solving the problem of "component introduction"?
With this in mind, we went online to our own bootstrap site, start.aliyun.com:
Of course, in line with the principle of not repeating wheels, we no longer build a set of bottom-level engineering generation frameworks, but use Spring Initializr to accomplish this part of the functionality.On this basis, focus on adding new features to serve the broad range of developers.
Spring Initializr: https://github.com/spring-io/initializr
At start.aliyun.com, we offer developers the following convenience features:
- A separate DemoCode and corresponding configuration sample are provided for each component (released this time);
- Built-in engineering instructions to reduce user's difficulty finding documents (partial implementation);
- Developers need only subtract, not add (partial implementation);
- Provide solutions for multi-component integration (under development);
- Follow up regularly on updates to start.spring.io to make it easier for you to use the latest spring features.
start.aliyun.com: https://start.aliyun.com/
In the future, we need to help developers continue on this road, not only to do a good job of component integration, but also to continue to support upwards, providing faster building capabilities at the multifunctional, service and application levels.
In this paper, around the spring initializer framework, starting.spring.io is taken as an example to give you a comprehensive introduction on how to use and extend this framework, and the underlying operating principles.
Usage Papers
Because spring-initializer provides flexible scalability and rich default implementations, it is also very flexible and versatile to use; for illustration purposes, let's look directly at how Spring uses this framework by starting.spring.io.
1. Basic usage
The principle of basic usage is to write as little or no code as possible.Configuration alone allows the creation of initializr projects.
Dependency Introduction
To use spring-initializer, you first need to introduce this framework.It's easy to rely directly on the bom:
<dependencyManagement>
    <dependencies>
        <dependency>
            <groupId>io.spring.initializr</groupId>
            <artifactId>initializr-bom</artifactId>
            <version>0.9.0.BUILD-SNAPSHOT</version>
            <type>pom</type>
            <scope>import</scope>
        </dependency>
    </dependencies>
</dependencyManagement>
With this bom dependency, we no longer care about information such as the version of internal components.
In general, we need to introduce specific components:
<dependency>
            <groupId>io.spring.initializr</groupId>
            <artifactId>initializr-generator-spring</artifactId>
        </dependency>
        <dependency>
            <groupId>io.spring.initializr</groupId>
            <artifactId>initializr-version-resolver</artifactId>
        </dependency>
        <dependency>
            <groupId>io.spring.initializr</groupId>
            <artifactId>initializr-web</artifactId>
        </dependency>
Specific uses of each sub-module are listed here for your reference:
- initializr-actuator: Additional information for monitoring diagnostics, which is temporarily ignored;
- initializr-bom: a BOM dependency for external use;
- initializr-docs: Use documentation;
- initializr-generator: core project generation library;
- initializr-generator-spring: Used to generate a typical spring boot project;
- initializr-generator-test: test framework;
- initializr-metadata: The metadata infrastructure for all aspects of the project;
- initializr-service-sample: Basic use case;
- initializr-version-resolver: Version number resolution capability;
- initializr-web: A web entry for use by three-party clients.
Basic Configuration
- Once you've finished introducing the framework, you need to do some basic configuration
- Which languages are supported: Java, groovy, Kotlin
- Which versions are supported: 1.8, 11, 13
- Which packaging methods are supported: jar, war
Configure all this information into the application.yml file as follows:
initializr:
    packagings:
    - name: Jar
      id: jar
      default: true
    - name: War
      id: war
      default: false
  javaVersions:
    - id: 13
      default: false
    - id: 11
      default: false
    - id: 1.8
      name: 8
      default: true
  languages:
    - name: Java
      id: java
      default: true
    - name: Kotlin
      id: kotlin
      default: false
    - name: Groovy
      id: groovy
      default: false
Where name is optional and id is mandatory.
For each configuration item, there can be a default value (default is true), in addition to these basic configurations, we need to define the types of projects that can be supported:
initializr:
    types:
    - name: Maven Project
      id: maven-project
      description: Generate a Maven based project archive.
      tags:
        build: maven
        format: project
      default: true
      action: /starter.zip
    - name: Maven POM
      id: maven-build
      description: Generate a Maven pom.xml.
      tags:
        build: maven
        format: build
      default: false
      action: /pom.xml
    - name: Gradle Project
      id: gradle-project
      description: Generate a Gradle based project archive.
      tags:
        build: gradle
        format: project
      default: false
      action: /starter.zip
    - name: Gradle Config
      id: gradle-build
      description: Generate a Gradle build file.
      tags:
        build: gradle
        format: build
      default: false
      action: /build.gradle
By default, initializr already supports four project types:
- /pom.xml Generate a Maven pom.xml configuration file
- /build.gradle Generate Gradle Configuration File
- /starter.zip Generates zip-compressed project files
- /starter.tgz Generate tgz compressed project files
With tags, we can define how different configurations are compiled (build) and packaged (format).
Configure Basic Dependencies
Once the basic configuration is complete, you can configure the optional dependent components.
Dependency configuration takes dependency as the key and is also configured under application.yml initializer. Here is a simple example:
initializr:
  dependencies:
    - name: Web
      content:
        - name: Web
          id: web
          description: Full-stack web development with Tomcat and Spring MVC
        - name: Developer Tools
      content:
        - name: Spring Boot DevTools
          id: devtools
          groupId: org.springframework.boot
          artifactId: spring-boot-devtools
          description: Provides fast application restarts, LiveReload, and configurations for enhanced development experience.
        - name: Lombok
          id: lombok
          groupId: org.projectlombok
          artifactId: lombok
          description: Java annotation library which helps to reduce boilerplate code.
Grouping is defined under dependencies.Grouping facilitates display and quick lookup, so no id is required, only name information is required; the content of each group is the specific content of the group, that is, the component definition under this group; multiple definitions are supported in a list; and each group can set the configuration information common to components within the current group.
Each dependency contains the following basic information:
- id: Unique identifier of the component
- GroupId & artifactId: Coordinates of the component
- Name: display name
- description: Descriptive information, mainly for display purposes
- Version: component version
About groupId & artifactId: If coordinates are set, the coordinate positioning component here will be used in the generated project; if coordinates are not set, the framework will consider this a standard spring-boot component and automatically add spring-boot-starter-{id} as the generated dependent coordinates.
About version: If version information is set directly on the component, the framework will use this value directly as the version on which the component depends; however, many times, the version of the component will be affected by the spring-boot version, which requires a special definition & Management of the version.
Configuration Dependent Version Management
Here, you need to first understand the version naming rules: a typical version generally contains the following four information: large version, small version, modified version, version qualifier.
Version ranges have an upper and lower bounds, which can be represented by square brackets [] or parentheses ().Square brackets represent the closed interval of the upper and lower bounds, and parentheses represent the open interval of the upper and lower bounds.
For example: "[1.1.6.RELEASE,1.3.0.M1)" represents all versions from 1.1.6.RELEASE to 1.3.0.M1 (including 1.1.6.RELEASE, but not 1.3.0.M1).
Also, you can use a single version number as the version range, such as "1.2.0.RELEASE".The version range of a single version number represents "from this version and all subsequent versions".
If you need to use the concept of "the latest Release version", you can use a letter x to represent the specific version number.
For example, 1.4.x.BUILD-SNAPSHOT represents the latest snapshot version of 1.4.x.
Another example is: if expression is required, all versions from 1.1.0.RELEASE to 1.3.x can be expressed in [1.1.0.RELEASE,1.3.x.RELEASE].
In addition, version qualifiers are sequential (ascending):
- M: Milestone Version
- RC: Publish candidate versions
- RELEASE: Release Version
- BUILD-SNAPSHOT: Snapshot version built for development
So the snapshot version has the highest priority among all the qualifiers.Assuming a component requires the latest version of Spring Boot, you can use 1.5.x.BUILD-SNAPSHOT (assuming version 1.5 is the latest version of Spring Boot).
Finally, the versions discussed in the version scope refer to the Spring Boot version, not the component's own version.
As mentioned earlier, you can use the version property to define the specific version number of a component; however, if the component version is associated with a version of Spring Boot, you need to use compatibilityRange to configure the dependent version range.
Compatibility Range can be defined in two places:
- Defined directly on a component (or Bom)
This is defined to represent a component that supports only one version range of Spring Boot, such as the following configuration:
initializr:
  dependencies:
    - name: Stuff
      content:
        - name: Foo
          id: foo
          ...
          compatibilityRange: 1.2.0.M1
        - name: Bar
          id: bar
          ...
          compatibilityRange: "[1.5.0.RC1,2.0.0.M1)"
Foo can support all versions after Spring boot 1.2.0; Bar can only support versions between Spring Boot 1.5.0 and 2.0.0 without 2.0.0;
- Defined under the component's mappgin property
You can support different settings for components under different versions of SpringBoot (you can reset some or all of the properties of the component), and artifactId is specifically defined in the following example:
initializr:
  dependencies:
    - name: Stuff
      content:
        - name: Foo
          id: foo
          groupId: org.acme.foo
          artifactId: foo-spring-boot-starter
          compatibilityRange: 1.3.0.RELEASE
          mappings:
            - compatibilityRange: "[1.3.0.RELEASE,1.3.x.RELEASE]"
              artifactId: foo-starter
            - compatibilityRange: "1.4.0.RELEASE"
In this example, foo uses foo-starter as the artifactId of coordinates at 1.3 of Spring Boot, or foo-spring-boot-starter as the value of artifactId in 1.4.0.RELEASE and later versions;
**Manage versions with Bom:** Sometimes you need to manage component versions in a Bom fashion; you don't need to set a version number separately for components at this time.
To use Bom, first configure the Bom definition:
initializr:
  env:
    boms:
      my-api-bom:
        groupId: org.acme
        artifactId: my-api-dependencies
        version: 1.0.0.RELEASE
        repositories: my-api-repo-1
Note: Bom information, defined under initializr.env.boms.
Its properties and dependent components are basically the same, coordinates, versions; Bom also supports version range management.
Once you have defined the Bom, you need to reference it in the component:
initializr:
  dependencies:
    - name: Other
      content:
        - name: My API
          id : my-api
          groupId: org.acme
          artifactId: my-api
          bom: my-api-bom
Once the user selects my-api component, the framework automatically adds my-api-dependencies Bom dependencies to the generated project.
2. Advanced customization
Enable Caching
If you started the start.spring.io project, you'll find such output in your log as "Fetching boot metadata from spring.io/project_metadata/spring-boot". To avoid checking Spring Boot versions too frequently, the official recommendation is to use it with the cache.
First, you need to introduce a cache framework:
<dependency>
    <groupId>javax.cache</groupId>
    <artifactId>cache-api</artifactId>
</dependency>
<dependency>
    <groupId>org.ehcache</groupId>
    <artifactId>ehcache</artifactId>
</dependency>
Then add the @EnableCaching annotation on the SpringBootApplication class:
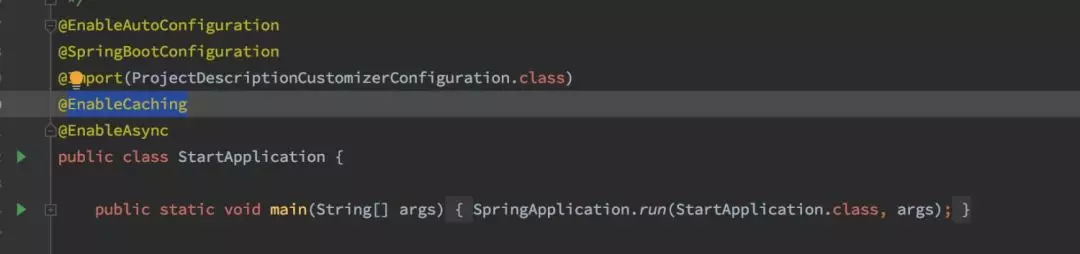
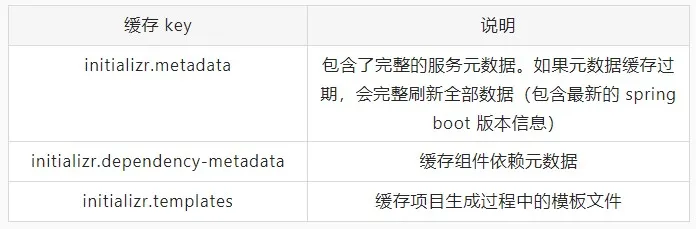
If you need to define your own cache, you can adjust the following cache configuration:
**Add Demo code: ** If you need to add Demo code to your project, because different components have different functions.
** Add separate configurations for different components: ** Remember the spring.factories mentioned in the principles section?Yes, if we want to add our own configuration items, we need to add an extension entry here for the sample code for different components.
io.spring.initializr.generator.project.ProjectGenerationConfiguration=\
com.alibaba.alicloud.initializr.extension.dependency.springboot.SpringCloudProjectGenerationConfiguration
In SpringCloudProjectGeneration Configuration, we identify different components through the ConditionalOnRequestedDependency annotation:
@ProjectGenerationConfiguration
public class SpringCloudAlibabaProjectGenerationConfiguration {
    private final InitializrMetadata metadata;
    private final ProjectDescription description;
    private final IndentingWriterFactory indentingWriterFactory;
    private final TemplateRenderer templateRenderer;
    public SpringCloudAlibabaProjectGenerationConfiguration(InitializrMetadata metadata,
                                                            ProjectDescription description,
                                                            IndentingWriterFactory indentingWriterFactory,
                                                            TemplateRenderer templateRenderer) {
        this.metadata = metadata;
        this.description = description;
        this.indentingWriterFactory = indentingWriterFactory;
        this.templateRenderer = templateRenderer;
    }
    @Bean
    @ConditionalOnRequestedDependency("sca-oss")
    public OSSDemoCodeContributor ossContributor() {
        return new OSSDemoCodeContributor(description, templateRenderer);
    }
    ......
}
The code above creates an OSSDemoCodeContributor for generating Demo code when the sca-oss component is selected.
**Generate specific Demo code:**Continue with the OSSDemoCodeContributor example, which is a ProjectContributor that completes the call when it is created in the project file space.We need to add metadata information, such as ProjectDescription, needed in the build process for this Contributor to be instantiated.
Code generation is a simple process that directly reuses the mstache template engine provided in the framework.
We put the Demo code directly under the resources folder as a template:
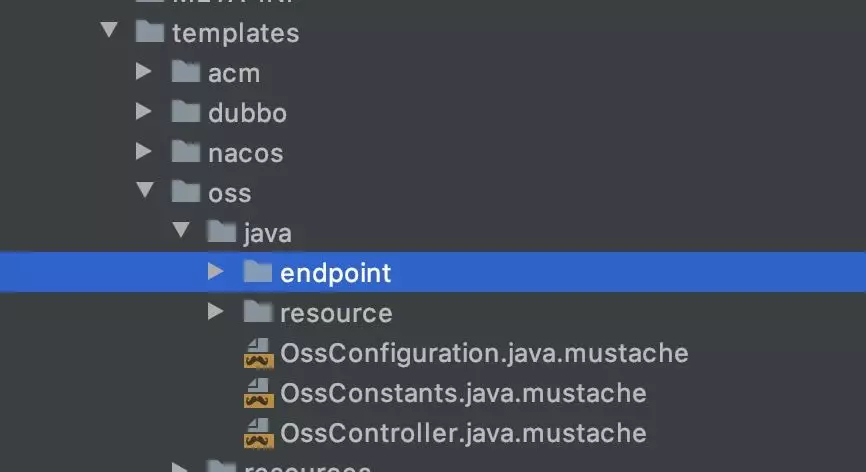
We then parse the template files through the template engine and copy them to the project directory:
private void writeCodeFile(TemplateRenderer templateRenderer, Language langeuage,
                               Map<String, Object> params, Path path, String temp) throws IOException {
        ......
        Path pkgPath = Generate Package Path
        Path filePath = Generated Code File Path
        // Rendering Template
        String code = templateRenderer.render(temp, params);
        // demo file write
        Files.createDirectories(pkgPath);
        Files.write(filePath, code.getBytes("UTF-8"));
    }
In addition to the template code, we typically need to write module configuration information in the applicatioin.properties file.
Here, you can still use code generation: creating templates, parsing templates, and appending files.Specific code is not pasted here, readers can play their own.
Principle Paper
The Principles section mainly describes how spring.initializr implements project construction and provides rich extensibility as a framework.
In the Principles section, we divide the execution of initializer into two phases: the startup phase and the generation phase.
- Start-up phase: start application, load configuration, expand information initialization;
- Generation phase: A complete process for project generation, from receiving requests to returning content.
1. Startup phase
Before you start the process again, take a look at initializr's extension system.
The entire architecture makes extensive use of spring's spi mechanism, so let's see what spring.factories are in common:
- initializr-generator/src/main/resources/META-INF/spring.factories
- initializr-generator-spring/src/main/resources/META-INF/spring.factories
- initializr-web/src/main/resources/META-INF/spring.factories
- initializr-actuator/src/main/resources/META-INF/spring.factories
- start-site/src/main/resources/META-INF/spring.factories
Only one of them is in start.spring.io, and the other four are in the initializr project (see the reference for each spring.factories).
Note, however, that these spring.factories definitions only represent what extensions each SPI has.Different SPI implementations are created and used entirely at different stages.
During the application startup phase, only one spi is actually loaded (regardless of actuator): io.spring.initializr.web.autoconfigure.InitializrAutoConfiguration.
@Configuration
@EnableConfigurationProperties(InitializrProperties.class)
public class InitializrAutoConfiguration {
    @Bean
    @ConditionalOnMissingBean
    public ProjectDirectoryFactory projectDirectoryFactory()
    @Bean
    @ConditionalOnMissingBean
    public IndentingWriterFactory indentingWriterFactory()
    @Bean
    @ConditionalOnMissingBean(TemplateRenderer.class)
    public MustacheTemplateRenderer templateRenderer(Environment environment, ObjectProvider<CacheManager> cacheManager)
    @Bean
    @ConditionalOnMissingBean
    public InitializrMetadataUpdateStrategy initializrMetadataUpdateStrategy(RestTemplateBuilder restTemplateBuilder,
            ObjectMapper objectMapper)
    @Bean
    @ConditionalOnMissingBean(InitializrMetadataProvider.class)
    public InitializrMetadataProvider initializrMetadataProvider(InitializrProperties properties,
            InitializrMetadataUpdateStrategy initializrMetadataUpdateStrategy)
    @Bean
    @ConditionalOnMissingBean
    public DependencyMetadataProvider dependencyMetadataProvider()
    @Configuration
    @ConditionalOnWebApplication
    static class InitializrWebConfiguration {
        @Bean
        InitializrWebConfig initializrWebConfig()
        @Bean
        @ConditionalOnMissingBean
        ProjectGenerationController<ProjectRequest> projectGenerationController(
                InitializrMetadataProvider metadataProvider, ApplicationContext applicationContext)
        @Bean
        @ConditionalOnMissingBean
        ProjectMetadataController projectMetadataController(InitializrMetadataProvider metadataProvider,
                DependencyMetadataProvider dependencyMetadataProvider)
        @Bean
        @ConditionalOnMissingBean
        CommandLineMetadataController commandLineMetadataController(InitializrMetadataProvider metadataProvider,
                TemplateRenderer templateRenderer)
        @Bean
        @ConditionalOnMissingBean
        SpringCliDistributionController cliDistributionController(InitializrMetadataProvider metadataProvider)
    }
}
Here are a few things to do:
- Initialize Metadata Provider
- Create Template Engine
- Create directories, indent factories
- Initialize web configuration
- Create a web entry for spring mvc
- Various ProjectGeneration Controllers
One of the most critical metadata loading sections uses the EnableConfiguration Properties annotation to write configuration items in the spring environment to InitializrProperties:
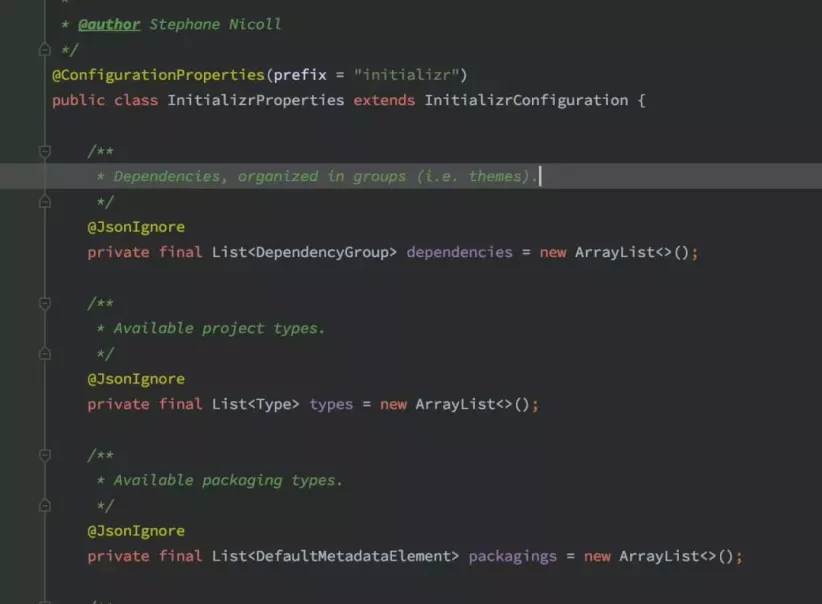
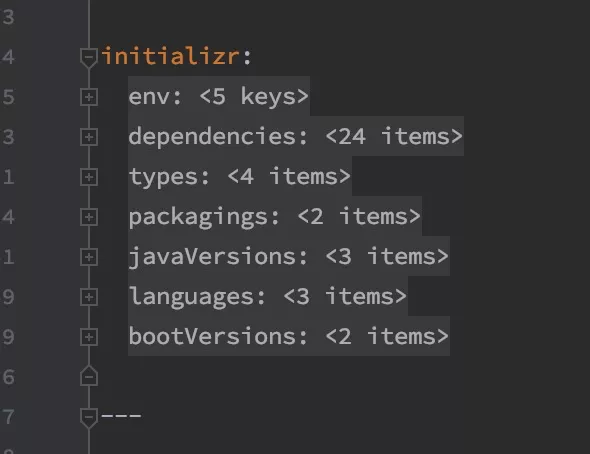
In the application.yml file, you can find the following configuration information, which is the configuration storage point for the actual project dependency metadata:
Overall, the start-up phase is relatively simple, which is why start.spring.io only takes a few seconds to start.
More logic is left in the project generation phase.
2. Generation phase
During the build phase, spring-initializr uses an interesting implementation: the initializr framework creates a separate context for each project build to store the various bean s that need to be used in the build process.
Start with a time series diagram:
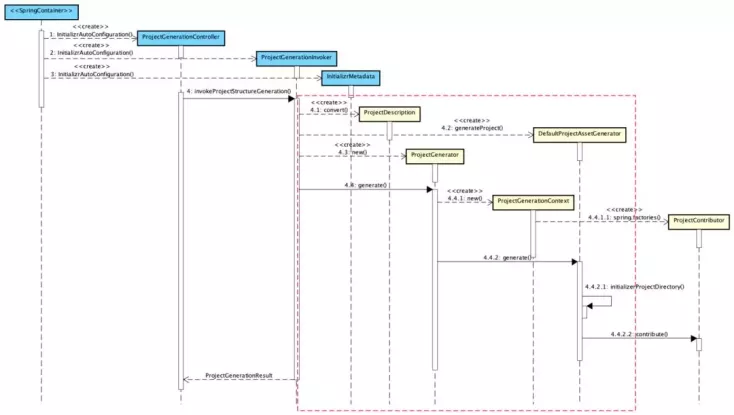
- Blue classes are created and populated at the start of the application; their lifecycle is consistent with the entire application;
- Yellow classes are generated during a specific project build process; their life cycle ends within a project build process.
As you can see from the above time series diagram, a typical creation behavior usually begins when the ProjectGeneration Controller receives a web-side creation request, and finally enters the core construction process of the ProjectGenerator through a middle-tier transformation, ProjectGeneration nInvoker.
Main process
The following diagram is the core building process of the ProjectGenerator:
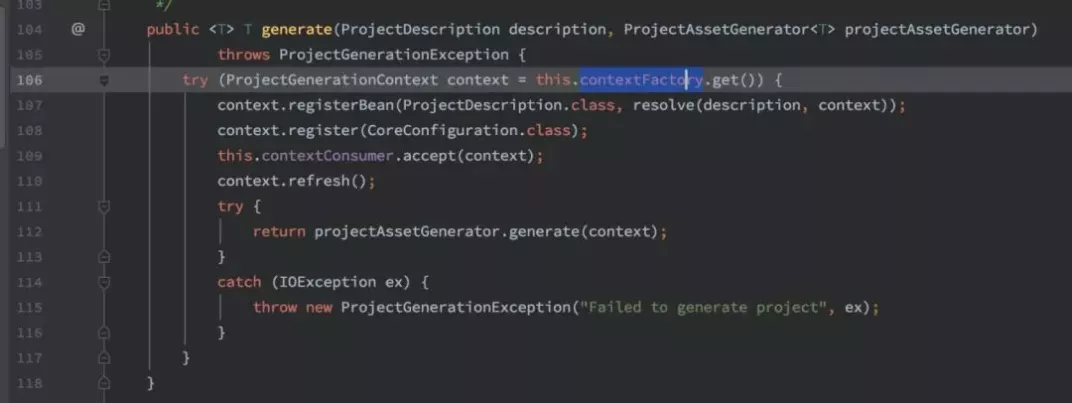
A new ProjectGenerationContext is built with contextFactory in 106 rows.
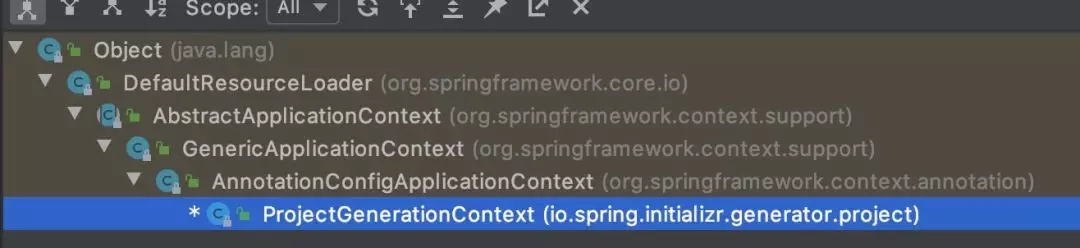
Take a look at this context's inheritance relationship, originally from the AnnotationConfigApplicationContext provided by spring.
Did you find anything by combining the refresh() method of 110 lines?This is the refresh process for spring's ApplicationContext.
The resolve method on line 107 registers a ProjectDescription Provider with the context in the following code:
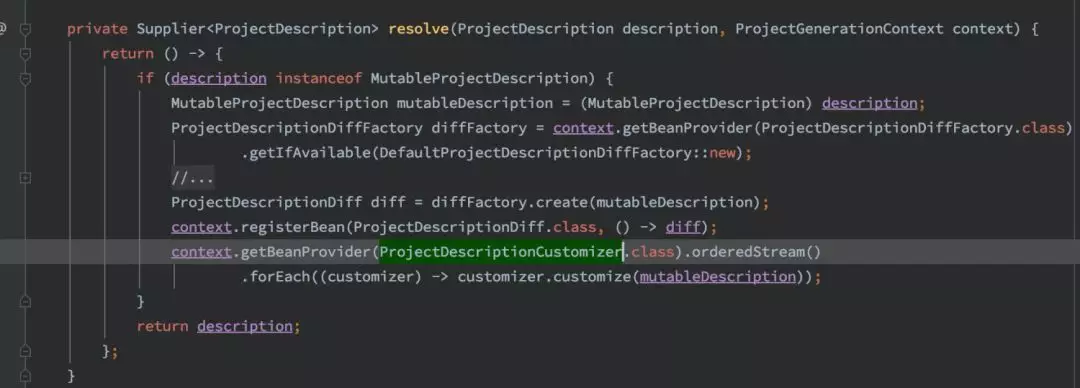
Since the Provider is registered, this logic runs when the Context executes refresh.
Here the ProjectDescription onCustomizer is an extension to the ProjectDescription used to make adjustments to the ProjectDescription passed in by the user.Here are mainly some mandatory dependency adjustments, such as language versions.
Now look at line 108, where you register a Configuration with the Context.
So what does this Configuration contain?Let's look at this code:
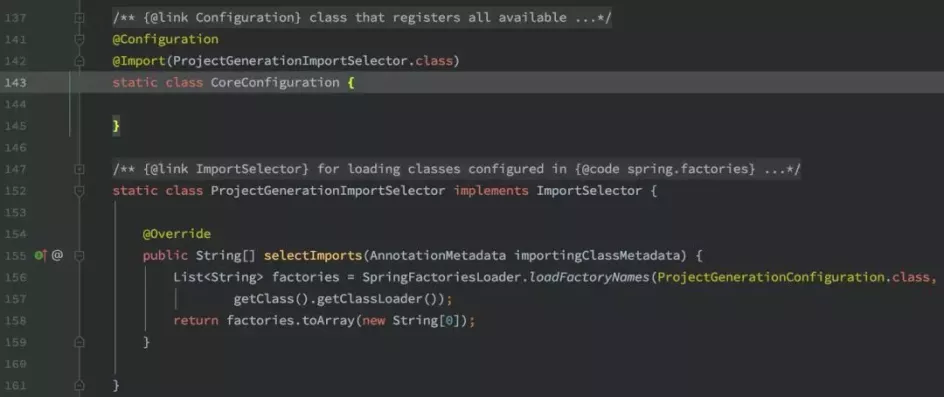
ProjectGeneration Configuration!!!There are many implementations of this SPI in spring.factories mentioned earlier (see Resources).
Originally, initializr's entire extension system started to create instances here.
Line 109 of ProjectGenerator accept s a consumer; it actually calls the following code:
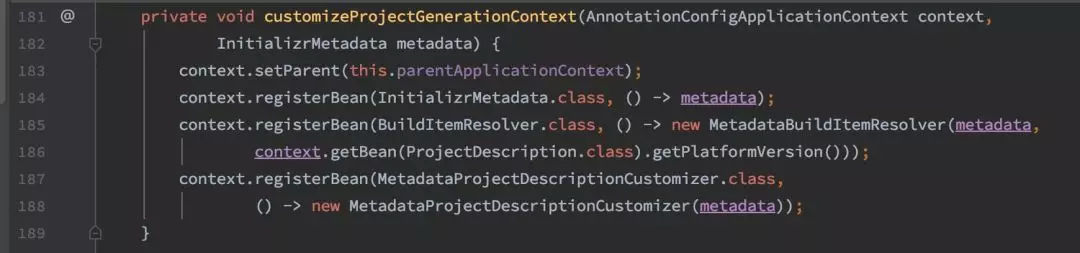
setParent sets the main context of the application to the parent node of this ProjectGenerationContext.
Metadata objects are registered with this ProjectGenerationContext.
Finally, on line 112 of the ProjectGenerator, the project AssetGenerator's generate method is called as follows:
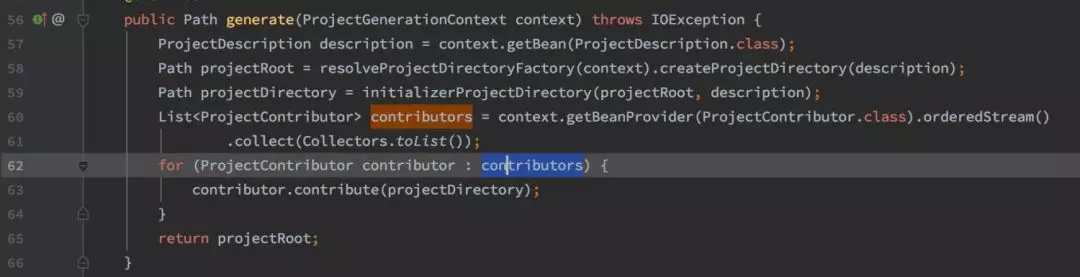
From the code above, you can see that the actual project construction work here is actually a lot of ProjectContributor s overlay together;
At this point, the main process has ended.
We can see that in the main process, no file writing is done (only the root folder is created); it simply defines a set of mechanisms and processes for data loading and extended loading, with all specific implementations as part of the extension.
Extend process
Spring-initializer provides two main ways to extend: ProjectContributor and xxxxxCustomizer.
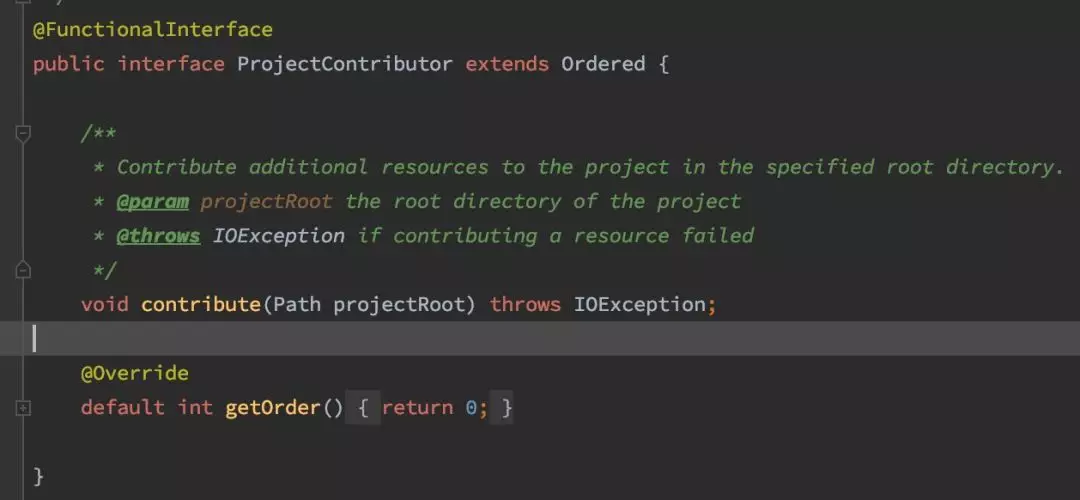
As you can see from the method signature, there is only one project root path for participation, and it is the responsibility of some people project files to this path.This extension point is very flexible and can support almost any code, profile writing.
During the implementation process, the dependencies can be acquired through the ProjectGenerationContext, and then the file generation can be completed through custom logic.
The following is the ProjectContributor implementation provided by initializr and start.spring.io:
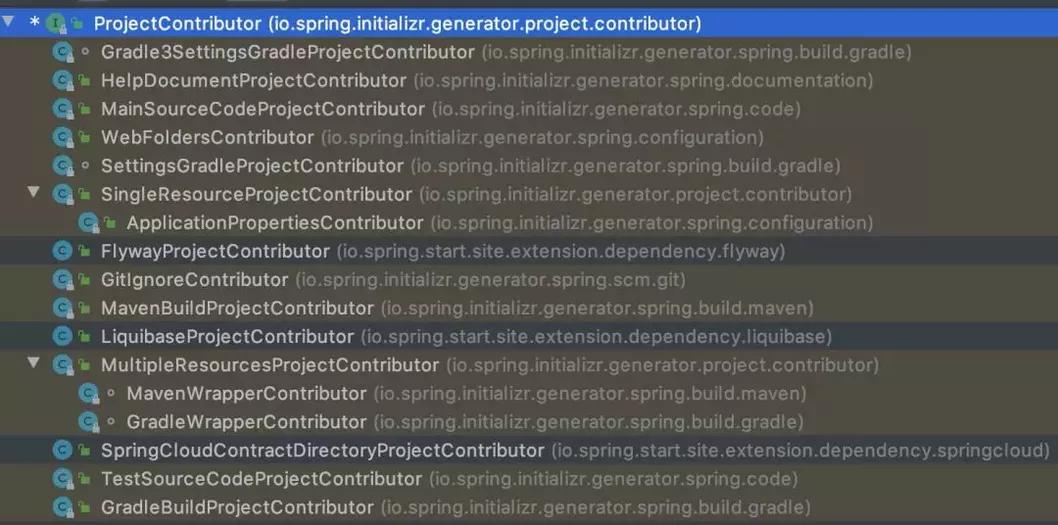
Take a look at the main implementations:
- MavenBuildProjectContributor: Write maven project pom.xml file;
- WebFoldersContributor: Create a resource folder for a web project;
- ApplicationPropertiesContributor: Write to the application.properties file;
- MainSourceCodeProjectContributor: Writes the application entry class xxApplication.java file;
- HelpDocumentProjectContributor: Writes the Help document HELP.md file.
xxxxxCustomizer is not a unified interface to ProjectContributor, but I understand it as a sentiment and a corresponding naming convention; each Customizer has its own distinct name, as well as a clear trigger logic and responsibility boundary.
The following list describes the Customizer provided by the framework:
- MainApplicationTypeCustomizer: Customize MainApplicationClass;
- MainCompilation Unit Customizer: Customize the MainApplication compilation unit;
- MainSourceCodeCustomizer: Customize MainApplication source code;
- BuildCustomizer: Customize the configuration content of the project building tools;
- GitIgnoreCustomizer: A.gitignore file for a custom project;
- HelpDocumentCustomizer: Help documentation for custom projects;
- InitializrMetadata Customizer: Custom project initialization configuration metadata; this Customizer is special and is called by the framework when the metadata configuration is first loaded;
- ProjectDescriptionCustomizer: Customize the ProjectDescription; that is, allow adjustments to the project description information before generating the project file;
- ServletInitializerCustomizer: Customize the configuration content of the web application on the class;
- TestApplicationTypeCustomizer: Customize the test Application class;
- TestSourceCodeCustomizer: Customize the source code for the test Application class.
Reference material
1. Related Links
- initializr documentation
https://docs.spring.io/initializr/docs/current-SNAPSHOT/reference/html/
- spring-initializr project address
https://github.com/spring-io/initializr
- start.spring.io project address
https://github.com/spring-io/start.spring.io
2. Details of spring.factories
initializr-generator/src/main/resources/META-INF/spring.factoriesio.spring.initializr.generator.buildsystem.BuildSystemFactory=\
io.spring.initializr.generator.buildsystem.gradle.GradleBuildSystemFactory,\
io.spring.initializr.generator.buildsystem.maven.MavenBuildSystemFactory
io.spring.initializr.generator.language.LanguageFactory=\
io.spring.initializr.generator.language.groovy.GroovyLanguageFactory,\
io.spring.initializr.generator.language.java.JavaLanguageFactory,\
io.spring.initializr.generator.language.kotlin.KotlinLanguageFactory
io.spring.initializr.generator.packaging.PackagingFactory=\
io.spring.initializr.generator.packaging.jar.JarPackagingFactory,\
io.spring.initializr.generator.packaging.war.WarPackagingFactory
initializr-generator-spring/src/main/resources/META-INF/spring.factories:
io.spring.initializr.generator.project.ProjectGenerationConfiguration=\
io.spring.initializr.generator.spring.build.BuildProjectGenerationConfiguration,\
io.spring.initializr.generator.spring.build.gradle.GradleProjectGenerationConfiguration,\
io.spring.initializr.generator.spring.build.maven.MavenProjectGenerationConfiguration,\
io.spring.initializr.generator.spring.code.SourceCodeProjectGenerationConfiguration,\
io.spring.initializr.generator.spring.code.groovy.GroovyProjectGenerationConfiguration,\
io.spring.initializr.generator.spring.code.java.JavaProjectGenerationConfiguration,\
io.spring.initializr.generator.spring.code.kotlin.KotlinProjectGenerationConfiguration,\
io.spring.initializr.generator.spring.configuration.ApplicationConfigurationProjectGenerationConfiguration,\
io.spring.initializr.generator.spring.documentation.HelpDocumentProjectGenerationConfiguration,\
io.spring.initializr.generator.spring.scm.git.GitProjectGenerationConfiguration
initializr-web/src/main/resources/META-INF/spring.factories:
org.springframework.boot.autoconfigure.EnableAutoConfiguration=\
io.spring.initializr.web.autoconfigure.InitializrAutoConfiguration
org.springframework.boot.env.EnvironmentPostProcessor=\
io.spring.initializr.web.autoconfigure.CloudfoundryEnvironmentPostProcessor
initializr-actuator/src/main/resources/META-INF/spring.factories:
org.springframework.boot.autoconfigure.EnableAutoConfiguration=\
io.spring.initializr.actuate.autoconfigure.InitializrActuatorEndpointsAutoConfiguration,\
io.spring.initializr.actuate.autoconfigure.InitializrStatsAutoConfiguration
start-site/src/main/resources/META-INF/spring.factories:
io.spring.initializr.generator.project.ProjectGenerationConfiguration=\
io.spring.start.site.extension.build.gradle.GradleProjectGenerationConfiguration,\
io.spring.start.site.extension.build.maven.MavenProjectGenerationConfiguration,\
io.spring.start.site.extension.dependency.DependencyProjectGenerationConfiguration,\
io.spring.start.site.extension.dependency.springamqp.SpringAmqpProjectGenerationConfiguration,\
io.spring.start.site.extension.dependency.springboot.SpringBootProjectGenerationConfiguration,\
io.spring.start.site.extension.dependency.springcloud.SpringCloudProjectGenerationConfiguration,\
io.spring.start.site.extension.dependency.springdata.SpringDataProjectGenerationConfiguration,\
io.spring.start.site.extension.dependency.springintegration.SpringIntegrationProjectGenerationConfiguration,\
io.spring.start.site.extension.dependency.springrestdocs.SpringRestDocsProjectGenerationConfiguration,\
io.spring.start.site.extension.description.DescriptionProjectGenerationConfiguration,\
io.spring.start.site.extension.code.kotin.KotlinProjectGenerationConfiguration
Author Information: Chen Dawn (Flower Name: Good Name) Alibaba Technical Expert.Currently on the Application Container & Service Framework team, a member of the Spring Cloud Alibaba project, we are committed to making Ali cloud the best cloud for Java developers.In 2014, joined B2B, and participated in Double 11, 618 operations many times.

"Alibaba Cloud Native Focus on the technology areas such as micro services, Serverless, containers, Service Mesh, focus on cloud native popular technology trends, cloud native large-scale floor practices, and make a public number that best understands cloud native developers."<br />/