Small knowledge, big challenge! This article is participating“ Essential knowledge for programmers ”Creative activities.
Preface: five days ago, I released many UI of login interface and initiated voting: https://juejin.cn/post/7010922696988966919
From that day on, I found my ui little sister and used a c up of milk tea in exchange for her cut. Then, after two days of work, I started to use fluent to implement it. However, this design drawing does not perform well on many android phones. As a result, it is not good 😭, Then I must not give it to everyone

Half done, found that the effect is not good, I have encapsulated it, so I think we can download it and change it
Then I chose another one. This time, adhering to the principle that men bring a little green, I realized it!!!
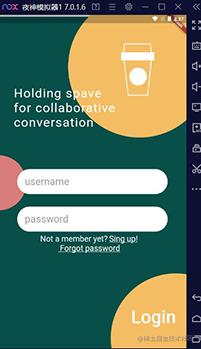
design sketch:

I'm a little tired, but I still encapsulate the data, so give me a compliment 😘 The code data is basically encapsulated, and the interface adaptation is also done. The code that needs to be modified can be put into the project at the end of the article. Please read the article carefully, otherwise it may not run 😜
analysis:
1. Data encapsulation
2. Guide page · slide left and right
3. Guide page · bottom animation processing (follow animation)
4. The guide page · judgment slides to the last, jumps to the login interface, and removes it from memory
5. Home page · input box processing
6. Home page · forget password, register button and login button
Note: for screen adaptation, use the shutter_ Screenutil: ^ 5.0.0 (you can write it yourself, so you only need to write what you need, and the code will be clearer)
1. Data encapsulation
For better subsequent maintenance, we need to encapsulate data. If there is an interface, we also need to encapsulate the interface table:
class TextData {
  static String welcome = "Holding spave\nfor collaborative\nconversation"; //Welcome speech
  static String login = "Login"; // Sign in
  static String name = "username"; //Name box prompt
  static String password = "password";
  static String register = "Not a member yet? Sing up!\n Forgot password"; //Login button
  static String welcomeImage = "images/welcome.png"; //Welcome interface background
  static String loginBackImage = "images/loginBack.png"; //Login interface background
}
2. Slide left and right
It can be seen from the rendering that it is a Widget that can move left and right. In this scenario, PageView is very suitable. In order to adapt, we need to use Stack to wrap PageView:
return Scaffold(
    body: Stack(
    childern:[
    ....
    ]
  ));
Here, for better modification, I choose PageView.builder(). You only need to edit the required boot Widget.
Look at the code:
1. We need to use a PageController to control PageView
PageController _pageController;
2. Define an int variable to record the current boot page
int _currentPage = 0;
3. When you use it yourself, you can use the array to store the Widget, and the replacement comments are given in the code 😉
4. Process the data when the page slide changes in onPageChanged
PageView.builder(
  itemBuilder: (context, index) {
    return Stack(
      children: [
        Container(
          width: 1.sw,
          height: 1.sh,
          child: Image.asset(
            TextData.welcomeImage,
            fit: BoxFit.fill,
          ),
        ),
        Positioned(
          left: 60.w,
          bottom: 200,
          child: Text(TextData.welcome,
              style: TextStyle(fontSize: 50.sp, color: Colors.white)), ///The blogger writes freely and everyone modifies it by themselves
        ),
      ],
    );
  },
  onPageChanged: (int index) {
    setState(() {
      _currentPage = index; ///Saves the subscript of the current page
    });
  },
  itemCount: 5, //Change to your own Widget
  scrollDirection: Axis.horizontal,
  reverse: false,
  controller: _pageController,
),
3. Guide page · bottom animation processing (follow animation)
I suggest adding the subscript of the current interface to the diamond. Unfortunately, my little sister ui didn't draw it for me 😭
This is how to draw a diamond with an arc:

We define a double to store the M coefficient:
double radius = 1.sw / 20; //This value is for adaptation
We also need to analyze and process the animation during motion, which is very similar to the third-order Bezier curve:

p0, p1, p2 and p3 define cubic Bezier curves in plane or three-dimensional space. The curve starts from p0 to p1 and goes from p2 to p3. Generally, it does not pass through p1 or p2; These two points only provide direction information there. The distance between p0 and p1 determines the "length" of the curve towards p2 before it turns to p3.
According to this formula, I calculate the animation path:
void _canvasBesselPath(Path path) {

  Point p1 = Point(x: radius*2,y: radius);
  Point p2 = Point(x: radius,y: radius*2);
  Point p3 = Point(x: 0,y: radius);
  Point p4 = Point(x: radius,y: 0);

  if (isToRight) {
    if (percent <= 0.2) {
      p1.x = radius*2 + radius*percent/0.2;
    } else if (percent <= 0.4) {
      p4.x = p2.x = radius + radius*(percent-0.2)/0.2;
      p1.x = p2.x + radius*2;
    } else if (percent <= 0.6) {
      p3.x = radius*(percent - 0.4)/0.2;
      p4.x = p2.x = p3.x + radius*2;
      p1.x = radius*4;
    } else if (percent <= 0.8) {
      p3.x = radius + radius*(percent - 0.6)/0.2;
      p4.x = p2.x = radius*3;
      p1.x = radius*4;
    } else if (percent <= 0.9) {
      p3.x = 2*radius+radius*(percent - 0.8)/0.3;
      p4.x = p2.x = radius*3;
      p1.x = radius*4;
    } else if (percent <= 1.0) {
      p3.x = 2*radius+radius*(1 - percent)/0.3;
      p4.x = p2.x = radius*3;
      p1.x = radius*4;
    }
  } else {
    if (percent <= 0.2) {
      p3.x = - radius*percent/0.2;
    } else if (percent <= 0.4) {
      p3.x = -radius - radius*(percent-0.2)/0.2;
      p4.x = p2.x = p3.x + 2*radius;
    } else if (percent <= 0.6) {
      p3.x = - 2*radius;
      p4.x = p2.x = - radius*(percent - 0.4)/0.2;
      p1.x = p2.x + radius*2;
    } else if (percent <= 0.8) {
      p3.x = -2*radius;
      p4.x = p2.x = -radius;
      p1.x = p2.x + radius*2 - radius*(percent - 0.6)/0.2;
    } else if (percent <= 0.9) {
      p3.x = -2*radius;
      p4.x = p2.x = -radius;
      p1.x = p2.x + radius - radius*(percent - 0.8)/0.4;
    } else if (percent <= 1.0) {
      p3.x = -2*radius;
      p4.x = p2.x = -radius;
      p1.x = p2.x + radius - radius*(1 - percent)/0.4;
    }
  }

  final p1Radius = p2.y - p1.y;
  final p24LeftRadius = p2.x - p3.x;
  final p24RightRadius = p1.x - p2.x;
  final p3Radius = p2.y - p3.y;
  path.moveTo(p1.x, p1.y);
  path.cubicTo(
      p1.x, p1.y + p1Radius*M,
      p2.x + p24RightRadius*M, p2.y,
      p2.x, p2.y
  );
  path.cubicTo(
      p2.x - p24LeftRadius*M, p2.y,
      p3.x, p3.y + p3Radius*M,
      p3.x, p3.y
  );
  path.cubicTo(
      p3.x, p3.y - p3Radius*M,
      p4.x - p24LeftRadius*M, p4.y,
      p4.x, p4.y
  );
  path.cubicTo(
      p4.x + p24RightRadius*M, p4.y,
      p1.x , p1.y - p1Radius*M,
      p1.x, p1.y
  );
}
We also need to calculate the landing point of each time: (it has been adaptive, XDM can rest assured)
Define an int variable to compare with the current page subscript:
int preInteger = 0;
Then listen to the PageView controller:
@override
void initState() {
  super.initState();
  _pageController = PageController(viewportFraction: 1);
  _pageController.addListener(() {
    curPosition = _pageController.page;
    if (curPosition.toInt() == curPosition) {
      preInteger = curPosition.toInt();
    } else if (curPosition > preInteger) {
      isToRight = true;
    } else {
      isToRight = false;
    }
    setState(() {});
  });
}
Use Transform.translate to locate the path (using):
Calculate the value of offSetX for positioning, abscissa:
double percent;
if (isToRight) {
  percent = curPosition - curPosition.toInt();
} else {
  percent = 1 - curPosition + curPosition.toInt();
}

double offsetPercent;
if (isToRight) {
  if (percent <= 0.8) {
    offsetPercent = curPosition.toInt() + percent / 0.8;
  } else {
    offsetPercent = curPosition.ceil().toDouble();
  }
} else {
  if (percent <= 0.8) {
    offsetPercent = curPosition.ceil() - percent / 0.8;
  } else {
    offsetPercent = curPosition.toInt().toDouble();
  }
}

double deviceWidth = 1.sw;
double offSetX = deviceWidth * 0.2 +
    (deviceWidth - radius * 2 - deviceWidth * 0.2) * offsetPercent / 5 - 20;
most important of all:
double offSetX = deviceWidth * 0.2 +
    (deviceWidth - radius * 2 - deviceWidth * 0.2) * offsetPercent / 5 - 20;
This sentence is the key to locate and calculate the abscissa!
Here is the usage code:
Transform.translate(
  offset: Offset(offSetX, 0), ///offSetx for positioning
  child: Stack(
    children: [
      CustomPaint(
        painter: BesselView( ///This is the animation path calculated above
            radius: radius,
            percent: percent,
            isToRight: isToRight,
            color: Colors.white),
      ),
      // Text(currentPage.toString(),style: TextStyle(fontSize: 50.sp),) originally wanted to write subscripts by yourself, but the style was annotated if it was difficult to see
    ],
  ),
)
Complete implementation, you can look at the source code
4. The guide page · judgment slides to the last, jumps to the login interface, and removes it from memory
Judge onPageChanged in PageView. When the subscript during sliding exceeds the defined Widget array, we jump to:
pushReplacement jump method: change the current page to the target page (that is, there are only two pages in the stack: the first page and the current page, and the current page will return to the first page naturally). Use the following statement to complete the replacement jump.
onPageChanged: (int index) {
  print("The current page is $index");
  if (index + 1 == 5) {
    print("Jump to home page");
    ///Clear boot page
    Navigator.pushReplacement(context,
        MaterialPageRoute(builder: (context) => LoginPage()));
  }
  setState(() {
    _currentPage = index;
  });
},
5. Home page · input box processing
This is very routine, but I have encapsulated this effect for you:
import 'package:flutter/material.dart';

inputTextItem(
    {FocusNode focusNode,
    TextEditingController controller,
    TextInputType textInputType,
    String hintText,
    double hintFontSize,
    double cursorHeight = 2.0,
    ValueChanged onPress,
    bool obscureText = false,
    Key key}) {
  return TextField(
    controller: controller,
    focusNode: focusNode,
    keyboardType: textInputType,
    obscureText: obscureText,
    cursorHeight: cursorHeight,
    decoration: InputDecoration(
      isCollapsed: true,
      contentPadding: EdgeInsets.symmetric(horizontal: 0, vertical: 8),
      //Content inner margin, influence height
      border: InputBorder.none,
      filled: false,
      fillColor: Color.fromARGB(255, 225, 225, 225),
      hintText: hintText,
      hintStyle: TextStyle(fontSize: hintFontSize, color: Colors.grey,
          textBaseline: TextBaseline.alphabetic),
    ),
    onSubmitted: onPress,
  );
}
6. Home page · forget password, register button and login button
Here we mainly want to tell you some properties of Text that are not commonly used, and simply handle the string. Tell Xiaobai:
style: TextStyle(
  color: Colors.white,
  fontSize: 32.sp,
  decoration: TextDecoration.underline,
),
decoration: TextDecoration.underline, text underline
decoration: TextDecoration.lineThrough, delete line
Dashed and dashed lines:
decoration: TextDecoration.overline,
decorationStyle: TextDecorationStyle.dashed,
Well, it took five days to fix it, and it's finally finished! Give me a compliment, brother 😜
If you need the source code, leave a message in the comment area and you will reply soon (you don't want to build a warehouse. Next time, the whole one will be released comprehensively) 🐮🐴