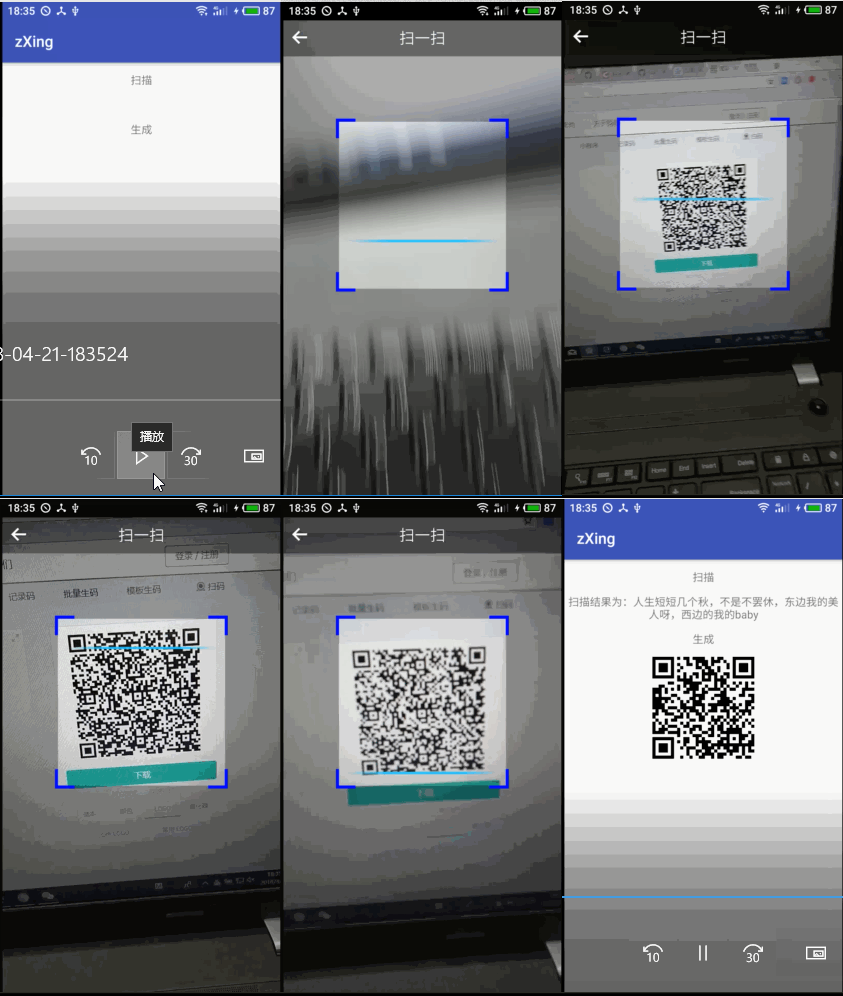
Ten thousand years ago, I wanted to write an article to record the implementation of the QR code function. I didn't expect that it would be now. Today is Saturday~~~
Now there are a lot of tripartite libraries about scanning code on the Internet. Of course, these are all extended based on the framework of zxing. Here I record two ways: one is to meet the basic needs, the other is to meet some expansibility needs. It is more convenient to use than zxing, after all, it has carried out secondary encapsulation.
Two ways:
1.zxing - meet basic needs
2.Android zxing Library - can meet some of my scalability needs
Mode 1: zxing
Effect

Pre configured
1. First add in the repositories of build.gradle(Project:XXXX):
allprojects {
    repositories {
        google()
        jcenter()
        maven { url 'https://jitpack.io' }
    }
}
2. Then add in dependencies of build.gradle(Module:app):
compile 'com.github.yuzhiqiang1993:zxing:2.1.6'- Jurisdiction
1. General permission to join
<uses-permission android:name="android.permission.CAMERA" />
<uses-permission android:name="android.permission.FLASHLIGHT" />
<uses-feature android:name="android.hardware.camera" />
<uses-feature android:name="android.hardware.camera.autofocus" />
<uses-permission android:name="android.permission.VIBRATE" />
<uses-permission android:name="android.permission.WAKE_LOCK" />
<uses-permission android:name="android.permission.READ_EXTERNAL_STORAGE" />
<uses-permission android:name="android.permission.WRITE_EXTERNAL_STORAGE" />
2. Dynamic permission application for 6.0
Manifest.permission.CAMERA
Manifest.permission.READ_EXTERNAL_STORAGE- Sweep mode
1.ZxingConfig configuration (it depends on the situation. If it only meets the basic functions, it is unnecessary to pay attention to it)
//ZxingConfig config = new ZxingConfig();
//config.setShowbottomLayout(true); / / bottom layout (including flash and album)
//config.setPlayBeep(true); / / play prompt
//config.setShake(true); / / shake or not
//config.setShowAlbum(true); / / show album or not
//config.setShowFlashLight(true); / / show flash or not
2. Trigger scan event
        //Here, config is some properties wrapped by the original author
        mBtn.setOnClickListener(new View.OnClickListener() {
            @Override
            public void onClick(View view) {
                //If you don't send it to ZxingConfig, you can do it in two lines of code
                Intent intent = new Intent(MainActivity.this, CaptureActivity.class);
//                intent.putExtra(Constant.INTENT_ZXING_CONFIG, config);
                startActivityForResult(intent, REQUEST_CODE_SCAN);
            }
        });
2.onActivityResult callback
  @Override
    protected void onActivityResult(int requestCode, int resultCode, Intent data) {
        super.onActivityResult(requestCode, resultCode, data);

        // Scan QR code / barcode return
        if (requestCode == REQUEST_CODE_SCAN && resultCode == RESULT_OK) {
            if (data != null) {
                String content = data.getStringExtra(Constant.CODED_CONTENT);
                mContent.setText("The scan results are:" + content);
            }
        }
}- Generate QR code
Trigger build event
  //Define QR code data
        final String data="I love you, dear girl";
        mCreate.setOnClickListener(new View.OnClickListener() {
            @Override
            public void onClick(View view) {
                if (TextUtils.isEmpty(data)) {
                    Toast.makeText(MainActivity.this, "data Can not be empty", Toast.LENGTH_SHORT).show();
                    return;
                }
                Bitmap bitmap = null;
                try {
                    /**
                    * contentEtString: String content
                    * w: Picture width
                    * h: Picture height
                    * logo: Pass null directly without logo
                    * */
                    Bitmap logo = BitmapFactory.decodeResource(getResources(), R.mipmap.ic_launcher);
                    //If the logo is set to null, there is no picture in the QR code Center. The size can be set by yourself. As for the display position, set it in your own layout
                    bitmap = CodeCreator.createQRCode(data, 400, 400, null);
                    mIvCreate.setImageBitmap(bitmap);
                } catch (WriterException e) {
                    e.printStackTrace();
                }
            }
        });
Full Demo code
- MainActivity
package com.example.yongliu.zxing;

import android.content.Intent;
import android.graphics.Bitmap;
import android.graphics.BitmapFactory;
import android.os.Bundle;
import android.support.v7.app.AppCompatActivity;
import android.text.TextUtils;
import android.view.View;
import android.widget.ImageView;
import android.widget.TextView;
import android.widget.Toast;

import com.google.zxing.WriterException;
import com.yzq.zxinglibrary.android.CaptureActivity;
import com.yzq.zxinglibrary.bean.ZxingConfig;
import com.yzq.zxinglibrary.common.Constant;
import com.yzq.zxinglibrary.encode.CodeCreator;

public class MainActivity extends AppCompatActivity {

    private int REQUEST_CODE_SCAN = 111;
    private TextView mContent;
    private TextView mCreate;
    private ImageView mIvCreate;

    @Override
    protected void onCreate(Bundle savedInstanceState) {
        super.onCreate(savedInstanceState);
        setContentView(R.layout.activity_main);

        TextView mBtn = findViewById(R.id.btn);
        mContent = findViewById(R.id.content);
        mCreate = findViewById(R.id.create);
        mIvCreate = findViewById(R.id.ic_create);

        final ZxingConfig config  = new ZxingConfig();
        config.setShowAlbum(false);
        config.setShowFlashLight(false);
        config.setShowbottomLayout(false);

        mBtn.setOnClickListener(new View.OnClickListener() {
            @Override
            public void onClick(View view) {
                //If you don't send it to ZxingConfig, you can do it in two lines of code
                Intent intent = new Intent(MainActivity.this, CaptureActivity.class);
//                intent.putExtra(Constant.INTENT_ZXING_CONFIG, config);
                startActivityForResult(intent, REQUEST_CODE_SCAN);
            }
        });

        //Define QR code data
        final String data="I love you, dear girl";
        mCreate.setOnClickListener(new View.OnClickListener() {
            @Override
            public void onClick(View view) {
                if (TextUtils.isEmpty(data)) {
                    Toast.makeText(MainActivity.this, "data Can not be empty", Toast.LENGTH_SHORT).show();
                    return;
                }
                Bitmap bitmap = null;
                try {
                    /**
                    * contentEtString: String content
                    * w: Picture width
                    * h: Picture height
                    * logo: Pass null directly without logo
                    * */
                    Bitmap logo = BitmapFactory.decodeResource(getResources(), R.mipmap.ic_launcher);
                    //If the logo is set to null, there is no picture in the QR code Center. The size can be set by yourself. As for the display position, set it in your own layout
                    bitmap = CodeCreator.createQRCode(data, 400, 400, null);
                    mIvCreate.setImageBitmap(bitmap);
                } catch (WriterException e) {
                    e.printStackTrace();
                }
            }
        });
    }

    @Override
    protected void onActivityResult(int requestCode, int resultCode, Intent data) {
        super.onActivityResult(requestCode, resultCode, data);

        // Scan QR code / barcode return
        if (requestCode == REQUEST_CODE_SCAN && resultCode == RESULT_OK) {
            if (data != null) {
                String content = data.getStringExtra(Constant.CODED_CONTENT);
                mContent.setText("The scan results are:" + content);
            }
        }
    }
}
- activity_main
<?xml version="1.0" encoding="utf-8"?>
<LinearLayout
    xmlns:android="http://schemas.android.com/apk/res/android"
    xmlns:app="http://schemas.android.com/apk/res-auto"
    xmlns:tools="http://schemas.android.com/tools"
    android:layout_width="match_parent"
    android:layout_height="match_parent"
    android:orientation="vertical"
    tools:context="com.example.yongliu.zxing.MainActivity">

    <TextView
        android:id="@+id/btn"
        android:layout_width="match_parent"
        android:layout_height="45dp"
        android:gravity="center"
        android:text="scanning"/>

    <TextView
        android:id="@+id/content"
        android:layout_width="match_parent"
        android:layout_height="wrap_content"
        android:gravity="center"
        />

    <TextView
        android:id="@+id/create"
        android:layout_width="match_parent"
        android:layout_height="45dp"
        android:gravity="center"
        android:text="generate"/>

    <ImageView
        android:id="@+id/ic_create"
        android:layout_gravity="center"
        android:layout_width="wrap_content"
        android:layout_height="wrap_content"/>
</LinearLayout>