Advanced react component
Introduction to component communication
A component is an independent and closed unit. By default, only the component's own data can be used. In the process of componentization, we split a complete function into multiple components to better complete the functions of the whole application. In this process, it is inevitable to share some data among multiple components. In order to realize these functions, it is necessary to break the independent closure of components and let them communicate with the outside world. This process is component communication.
props of components
- The component is closed, and receiving external data should be realized through props
- props is used to receive data passed to components
- Receive data:
- The function component receives data through the parameter props, which is an object
- Class component receives data through this.props
- Transferring data: adding attributes to component labels
Function component
const Hello = (props) => {
    console.log(props);
    return (
        <div>props:{props.name}</div>
    )
}

// Render
ReactDOM.render(<Hello name="jack" />, document.getElementById('root'))
Batch transfer data:
function Hello(props) {
  const {name, age, gender} = props;
  return (
    <h2>{name}-{age}-{gender}</h2>
  )
}

const data = {
  name: 'a',
  age: 19,
  gender: 'female'
}

// Batch transfer data. The curly braces here indicate that the inside is a js expression. Under normal circumstances, you can't write... Data directly,
// For example, console.log(...data) will report an error. This is allowed in react
ReactDom.render(<Hello {...data} />, document.getElementById('root'));
Class component
class App extends React.Component {

    render() {
        console.log(this.props);
        return (
            <div>
                props: {this.props.name}
            </div>
        )
    }
}

// Render
ReactDOM.render(<App name="jack" />, document.getElementById('root'))
Note: when using class components, if the constructor is written, props should be passed to constructor and super as parameters, otherwise props cannot be obtained through this in the constructor. However, even if the props parameter is not passed to the constructor, this.props can be used normally in other places, such as the render method.
Technical point: the super function must be called in the constructor of the inherited class, and super represents the constructor of the parent class. ES6 requires that the constructor of a subclass must execute the super function once, otherwise an error will be reported. But this in the super function points to an instance of the current class.
Whether the constructor accepts props and passes it to super depends on whether you want to access props through this in the constructor.
- When the constructor receives the props parameter, super does not pass props. At this time, this.props is undefined. Of course, props can be used normally (without this in the front)
- When the constructor receives the props parameter, super also passes props. You can get the object through this.props
class App extends React.Component {
  constructor(props) {
    super(props);
  }
  render() {
    // Whether props is passed in the constructor has nothing to do with it
    return (
        <div>
          props:{this.props.name}
        </div>
    )
  }
}
data type
- Any type of data that can be passed to a component
- props is a read-only object. It can only read the value of the attribute and cannot modify the object
import React from 'react'
import ReactDom from 'react-dom'

function Hello(props) {
  console.log(props);
  props.fn();
  return (
      <div>
        <h1>name:{props.name}</h1>
        {props.tag}
      </div>
  )
}

ReactDom.render(
    <Hello
        name="Xiao Ming"
        age={18} // If you want to pass a numeric type, you need to wrap it with {}
        age2='8'
        colors={['red','green']}
        fn={() => {console.log('Ah, ah')}} // Can transfer function
        tag={<p>This is a p label</p>}         // tag tags can be passed
    />, document.getElementById('root'));
Props defaults to True
If you do not assign a value to prop, its default value is true. The following two JSX expressions are equivalent:
<MyTextBox autocomplete />

<MyTextBox autocomplete={true} />
props depth
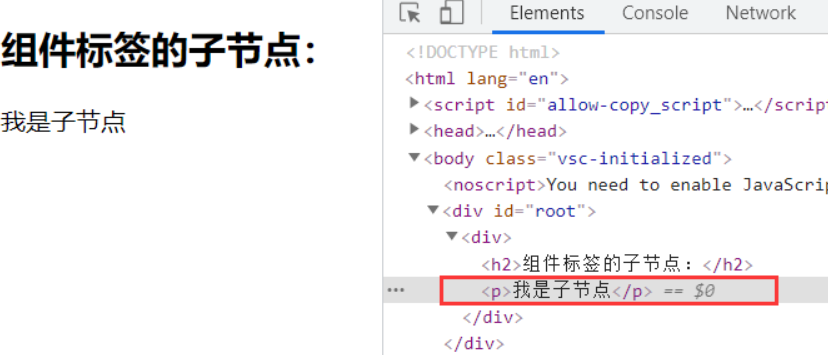
children attribute
- children attribute: indicates the child node of the component label. props has this attribute when the component label has child nodes
- The children attribute is the same as ordinary props. The value can be any value (text, React element, component, or even function)
class App extends React.Component {
  render() {
    console.log(this.props);
    return (
        <div>
          <h2>Child node of component label:</h2>
          {this.props.children} // I am a child node
        </div>
    )
  }
}

ReactDom.render(
    <App name="hello">
      <p>I am a child node</p>
    </App>, document.getElementById('root'));
Property expansion
If you already have a props object, you can use the expansion operator... To pass the entire props object in JSX. The following two components are equivalent:
function App1() {
  return <Greeting firstName="Ben" lastName="Hector" />;
}

function App2() {
  const props = {firstName: 'Ben', lastName: 'Hector'};
  return <Greeting {...props} />;
}
You can also choose to keep only the props that the current component needs to receive, and use the expansion operator to pass other props down.
const Button = props => {
  const { kind, ...other } = props;
  const className = kind === "primary" ? "PrimaryButton" : "SecondaryButton";
  return <button className={className} {...other} />;
};

const App = () => {
  return (
    <div>
      <Button kind="primary" onClick={() => console.log("clicked!")}>
        Hello World!
      </Button>
    </div>
  );
};
In the above example, kind's prop will be safely retained, and it will_ No_ Is passed to an element in the DOM. All other props will be passed through... Other object, so that the application of this component can be very flexible. You can see that it passes an onClick and children attributes.
props verification
- Props verification: allows you to specify the type and format of props when creating components
- Function: capture errors caused by props when using components, give clear error prompts, and increase the robustness of components
Use steps
- Installation package prop types NPM I prop types
- Import prop types package
- Use * * component name. propTypes = {} * * to add verification rules to the props of the component
- Validation rules are specified through the PropTypes object
Constraint rules:
- Common types: array, bool, func, number, object, string
- React element type: element
- Required item: isRequired
- Customize specific structures: shape({)
Writing method of props verification in class component
import React from 'react'
import ReactDom from 'react-dom'
import PropTypes from 'prop-types'

class App extends React.Component {
  render() {
    console.log(this.props);
    let arr = this.props.colors;
    let list = arr.map((item, index) => <li key={index}>{index}-{item}</li>)
    return (
        <ul>
          {list}
        </ul>
    )
  }
}

// Add props verification
App.propTypes = {
  colors: PropTypes.array,
  a: PropTypes.number, // value type
  fn: PropTypes.func.isRequired, // The function func is required. Note that this is func
  tag: PropTypes.element, // react element
  filter: PropTypes.shape({ // Custom type
    area: PropTypes.string,
    price: PropTypes.number
  })
}

// The default value when the corresponding prop is not passed
App.defaultProps = {
  gender: 'secrecy',
  age: 18
}
The above code is written to add custom attributes to the class outside the class. How to do these operations inside the class? Class It refers to the attribute of Class itself, that is, Class.propName, rather than the attribute defined on the instance object (this). The static attribute of a Class is written by adding the static keyword before the instance attribute.
class App extends React.Component {
  // Add props verification
  static propTypes = {
    colors: PropTypes.array
  }

// The default value when the corresponding prop is not passed
  static defaultProps = {
    gender: 'secrecy',
    age: 18
  }

  render() {
    console.log(this.props);
    let arr = this.props.colors;
    let list = arr.map((item, index) => <li key={index}>{index}-{item}</li>)
    return (
        <ul>
          {list}
        </ul>
    )
  }
}
Writing method of props check in function component
Since the static keyword cannot be used in a function, the part defining props verification can only be written outside the function component.
function Hello(props) {
  const { name, age, gender } = props;
  return (
    <h2>{name}-{age}-{gender}</h2>
  )
}

// Provide type restrictions
Hello.propTypes = {
  name: PropTypes.string.isRequired,
  age: PropTypes.number.isRequired
}

// The default value when the corresponding prop is not passed
Hello.defaultProps = {
  gender: 'secrecy',
  age: 18
}

const data = {
  name: 'a',
  age: 19
}

ReactDom.render(<Hello {...data} />, document.getElementById('root'));
refs
Obsolete API: Refs of type String
The ref attribute in the API before react is of type string, such as "textInput". You can access the DOM node through this.refs.textInput. It is not officially recommended because the refs of type string exists Some problems , the efficiency is not high.
class App extends React.Component {

  showData = () => {
    let input = this.refs.input1;
    alert(input.value)
  }

  showData2 = (e) => {
    alert(e.target.value);
  }

  render() {
    return (
      <div>
        <input ref="input1" type="text" />
        <button onClick={this.showData}>Tips</button>
        <input onBlur={this.showData2} type="text" />
      </div>
    )
  }
}
Callback refs
class App extends React.Component {

  state = {
    count: 0
  }

  showData = () => {
    let input = this.input1;
    alert(input.value)
  }

  updateCount = () => {
    this.setState({
      count: this.state.count + 1
    })
  }

  render() {
    return (
      <div>
        {/* Note that ref here is the arrow function, and currentNode is the current node,
        react It will be called automatically internally, and then assign the current node to input1 of this */}
        <input ref={currentNode => { this.input1 = currentNode; console.log('--', currentNode) }} type="text" />
        <button onClick={this.showData}>Tips</button>

        <h1>{this.state.count}</h1>
        <button onClick={this.updateCount}>to update</button>
      </div>
    )
  }
}
If the ref callback function is defined as an inline function, it will be executed twice during the update process. The parameter null will be passed in the first time, and then the parameter DOM element will be passed in the second time. This is because a new function instance will be created during each rendering, so React will empty the old ref and set the new one. By defining the ref callback function as the binding of class Function can avoid the above problems, but in most cases it doesn't matter.
As shown in the figure, the callback function of ref will be called twice during each update

The way to change the callback function to class is as follows:
class App extends React.Component {

  showData = () => {
    let input = this.input1;
    alert(input.value)
  }

  setInputRef = (c) => {
    console.log(c)
    this.input1 = c;
  }

  render() {
    return (
      <div>
        <input ref={this.setInputRef} type="text" />
        <button onClick={this.showData}>Tips</button>
      </div>
    )
  }
}
React.createRef
After the call of React.createRef, a container can be returned. The container can store the nodes identified by ref. the container is "dedicated to special personnel"
class App extends React.Component {

  inputRef = React.createRef();
  inputRef2 = React.createRef();

  showData = () => {
    let input = this.inputRef.current;
    console.log(input.value)
  }

  showData2 = () => {
    console.log(this.inputRef2.current.value)
  }

  render() {
    return (
      <div>
        {/* react Internally, the current node is stored in this.inputRef */}
        <input ref={this.inputRef} type="text" />
        <button onClick={this.showData}>Tips</button>
        <input onBlur={this.showData2} ref={this.inputRef2} type="text" />
      </div>
    )
  }
}
Component communication summary
Relationship between components
- Parent child components: props
- Sibling component (non nested component): message subscription publishing, centralized management, status promotion
- Grandparent component (cross level component): message subscription publishing, centralized management, context
- props:
- children props
- render props
- Message subscription publish: pubs sub, event, etc
- Centralized management: redux, dva, etc
- context: producer consumer model
The parent component passes data to the child component
- The parent component provides the state data to be passed
- Add an attribute to the subcomponent tag with the value of data in state
- The child component receives the data transmitted from the parent component through props
In essence, the use of props is the same as that mentioned earlier, but it is applied in a different way
class App extends React.Component {
  state = {
    lastName: 'Lao Wang'
  }

  render() {
    return (
        <div className="parent">
          Parent component
          <Child name={this.state.lastName} />
        </div>
    )
  }
}

function Child(props) {
  return (
      <div className="child">
        <h1>Subcomponents:{props.name}</h1>
      </div>
  )
}

ReactDom.render(<App />, document.getElementById('root'));
The child component passes data to the parent component
Idea: using the callback function, the parent component provides a callback, and the child component calls, taking the data to be transmitted as the parameters of the callback function.
- The parent component provides a callback function (for receiving data)
- Pass the function as the value of the property to the child component
- The subcomponent calls the callback function through props and passes the data of the subcomponent to the callback function as a parameter
class App extends React.Component {
  state = {
    lastName: 'Lao Wang',
    childData: ''
  }

  // 1. The parent component provides a callback function to receive the data of the child component, and the parameters are the data passed by the child component
  getChildMsg = data => {
    console.log(data)
    this.setState({
      childData: data
    })
  }

  render() {
    return (
        <div className="parent">
          <h3>Data received by parent component:{this.state.childData}</h3>
          {/* 2.Use props on the subcomponent to pass the callback function into the subcomponent */}
          <Child getMsg={this.getChildMsg}  />
        </div>
    )
  }
}

class Child extends React.Component {
  state = {
    name:'child'
  }

  handleClick = e => {
    // 3. invoke the callback function passed by the parent component in the child component and pass the data as a parameter.
    this.props.getMsg(this.state.name);
  }

  render() {
    return (
        <div>
          Subcomponents: <button onClick={this.handleClick}>Pass data to parent component</button>
        </div>
    )
  }
}
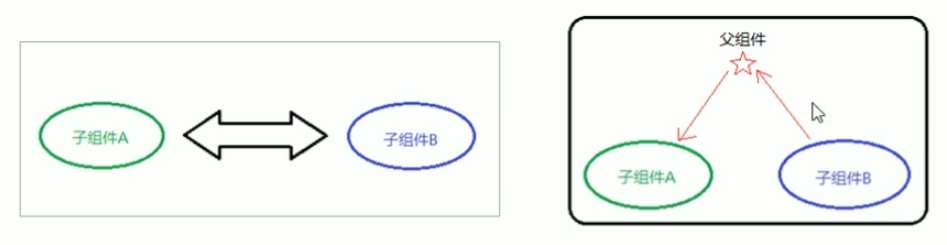
Brother component communication
- Promote the shared state to the nearest public parent component, and the public parent component manages this state
- State of mind: improvement
- Common parent component responsibilities:
- Provide sharing status
- Provides methods to manipulate shared state
- The subcomponents to communicate only need to receive the status or operation status through props
class App extends React.Component {
  state = {
    count: 0
  };

  getChildMsg = data => {
    this.setState({
      count: this.state.count + data
    })
  };

  render() {
    return (
        <div className="parent">
          <ChildA count={this.state.count}/>
          <ChildB getMsg={this.getChildMsg}/>
        </div>
    )
  }
}

class ChildA extends React.Component {

  render() {
    return (
        <div className="childA">
          <h1>Counter:{this.props.count}</h1>
        </div>
    )
  }
}

class ChildB extends React.Component {
  state = {
    num: 1
  };

  inputChange = e => {
    this.setState({
      num: parseInt(e.target.value)
    })
  };

  handleNum = e => {
    let type = e.target.dataset.type;
    let num = this.state.num;
    num = type === 'add' ? num : -num;
    this.props.getMsg(num);
  };

  render() {
    return (
        <div className="childB">
          <input type="number" value={this.state.num} min="1" onChange={this.inputChange}/>
          <button data-type="add" onClick={this.handleNum}>increase</button>
          <button data-type="decrease" onClick={this.handleNum}>reduce</button>
        </div>
    )
  }
}
Context
Context is used to transfer data across components
If two components are distant relatives (for example, nested multiple layers), Context can be used to realize component communication
- Call React. createContext() to create two components: provider (providing data) and Consumer (consuming data).
- Use the Provider component as the parent node to wrap the node to transfer data, and set the value attribute on the Provider component to represent the data to be transferred
- Receiving data using the Consumer component
import React from 'react'
import ReactDom from 'react-dom'

import './index.css'

// Create context to get two components
const {Provider, Consumer} = React.createContext();

// Nested relationship: app -- > node -- > subnode -- > child
class App extends React.Component {
  render() {
    return (
        <Provider value="hello">
          <div className="app">
            <Node/>
          </div>
        </Provider>

    )
  }
}

const Node = props => {
  return (
      <div className="node">
        <SubNode/>
      </div>
  )
}

const SubNode = props => {
  return (
      <div className="subNode">
        <Child/>
      </div>
  )
}

class Child extends React.Component {
  render() {
    return (
        <div className="child">
          <Consumer>
            {
              // Notice that this is a function
              data => <h2>I am a child node:{data}</h2>
            }
          </Consumer>
        </div>
    )
  }
}

ReactDom.render(<App/>, document.getElementById('root'));
Component lifecycle
- The life cycle of a component: the process from the creation of a component to its mounting to its running on the page, and then to its uninstallation when it is not in use
- Each stage of the life cycle is always accompanied by some method calls, which are the hook functions of the life cycle.
- The function of hook function: it provides an opportunity for developers to operate components at different stages.
- Only class components have a lifecycle.
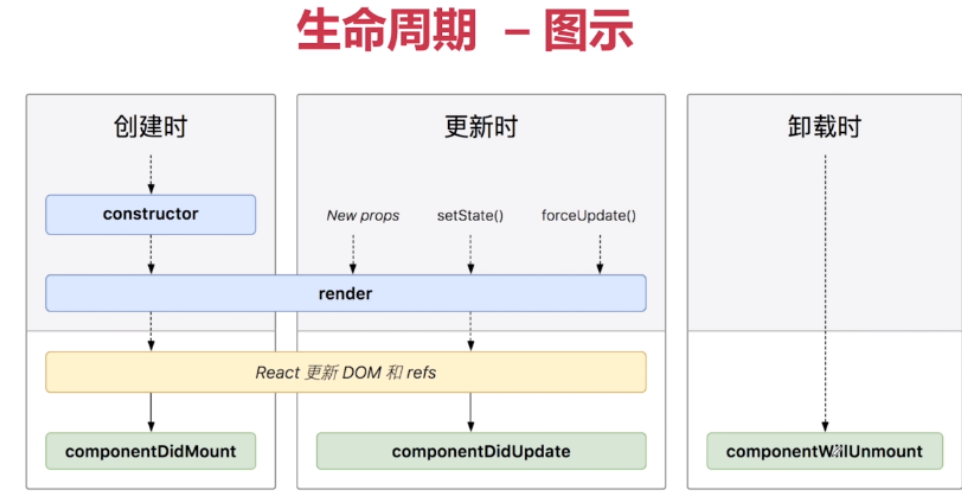
Three stages of the life cycle
- When created
- When updating
- When uninstalling
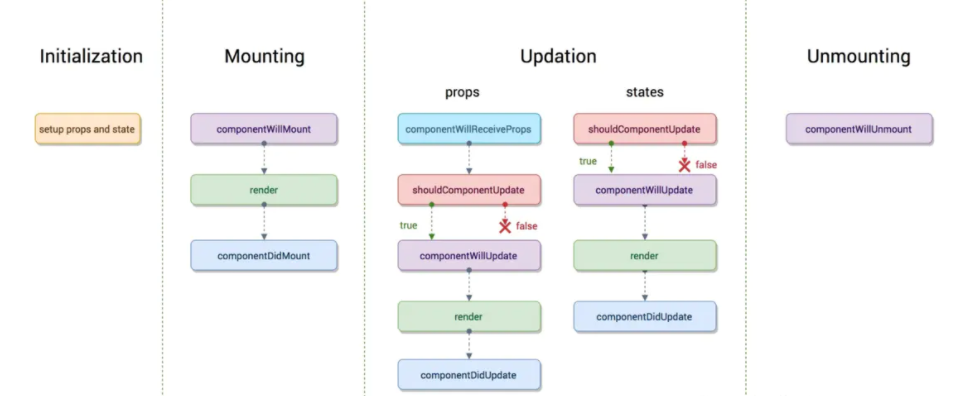
Lifecycle of older versions
Life cycle of new version (complete)
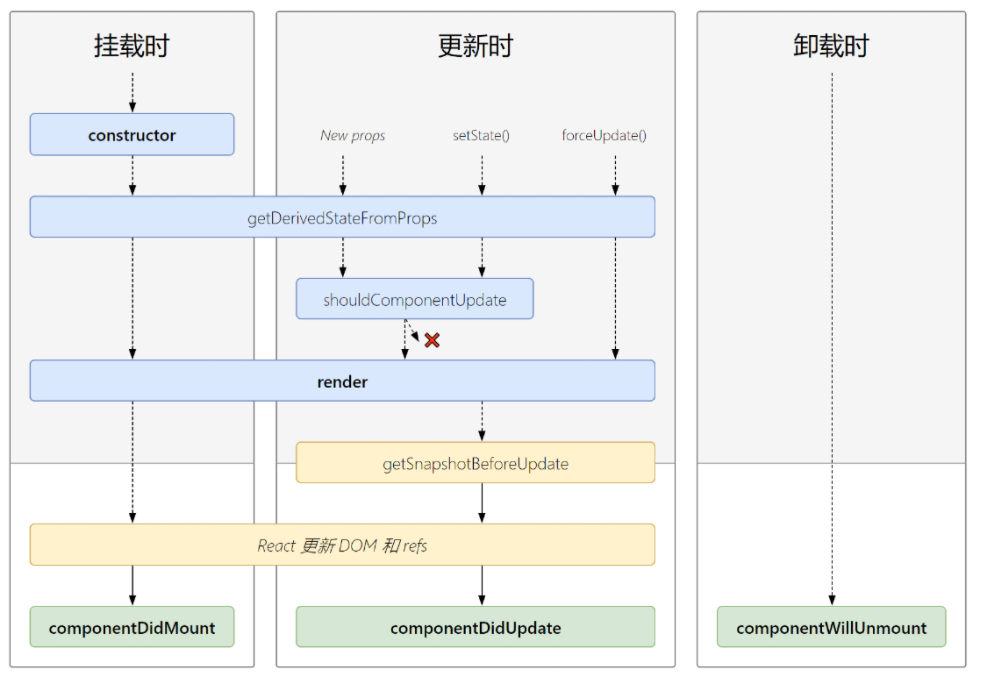
Important hook
- render: call to initialize rendering or update rendering
2. componentDidMount: enable listening and send ajax requests
3. componentWillUnmount: do some finishing work, such as cleaning the timer
Hook to be discarded
- componentWillMount
2. componentWillReceiveProps
3. componentWillUpdate
A warning will appear when using. The next large version needs to be prefixed with UNSAFE before it can be used. It may be completely abandoned in the future and is not recommended.
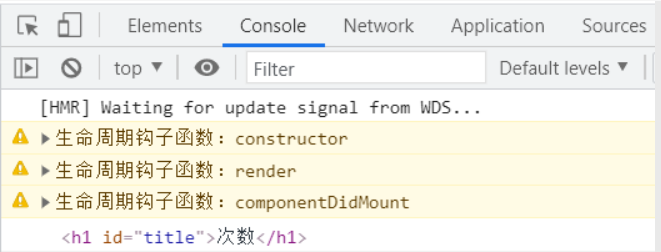
On creation (Mount phase)
When a component is first rendered into the DOM, it is called "mount".
Execution time: when the component is created
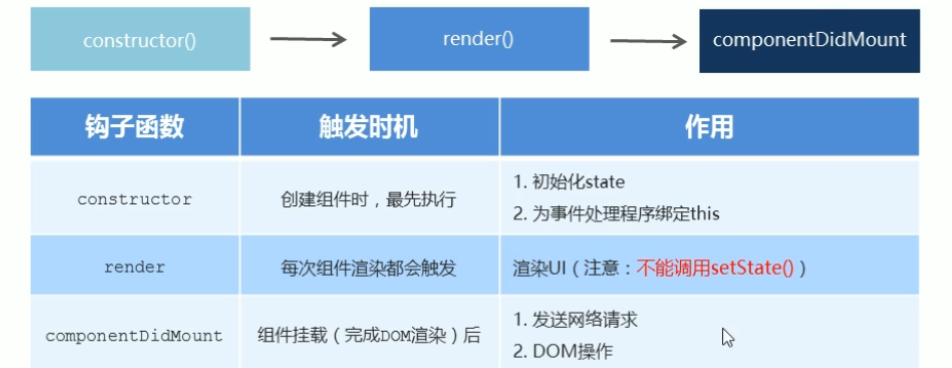
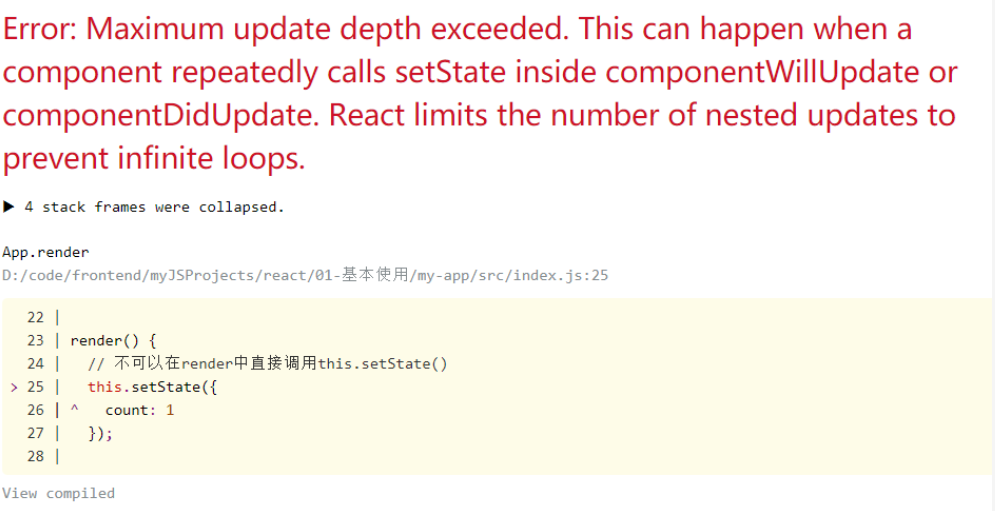
Note that setState() cannot be called directly in the render method, because setState() can update the state. After the state is updated, the render method will be triggered to render the UI. If setState() is called directly in the render method, it is equivalent to calling the render method in a loop, and an error will be reported at the end.
componentDidMount: the componentDidMount() method will run after the component has been rendered into the DOM. Generally, it does some initialization in this hook, such as starting the timer, sending network requests and subscribing to messages
setState() can be called directly in componentDidMount(). It will trigger additional rendering, but this rendering will occur before the browser updates the screen. This ensures that the user will not see the intermediate state even if render() is called twice. Please use this mode with caution because it will cause performance problems. Usually, you should use it in constructor() Initialize state in. If your rendering depends on the size or location of DOM nodes, you can use this method.
import React from 'react'
import ReactDom from 'react-dom'

class App extends React.Component {
  constructor(props) {
    super(props);
    this.state = {
      count: 0
    };

    // console.warn prints a yellow warning message
    console.warn('Lifecycle hook function: constructor')
  }

  componentDidMount() {
    // DOM operations can be performed in componentDidMount
    console.warn('Lifecycle hook function: componentDidMount')
    let title = document.getElementById('title');
    console.log(title);
  }

  render() {
    // this.setState() cannot be called directly in render
    // this.setState({
    //   count: 1
    // });

    console.warn('Lifecycle hook function: render')
    return (
        <div>
          <h1 id="title">frequency</h1>
        </div>
    )
  }
}

ReactDom.render(<App />, document.getElementById('root'));
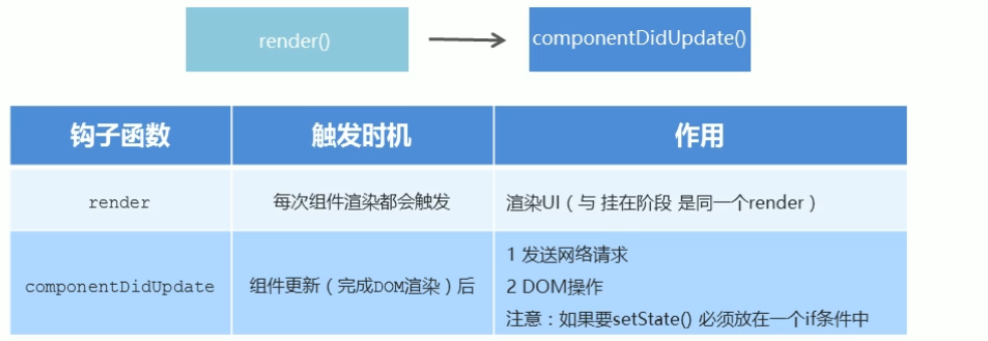
When updating
Two lifecycle functions are called
- render
- componentDidUpdate
Three situations in which render lifecycle function is triggered
- Call the setState() method to update the state
- For subcomponents, when the value of prop changes, the render method of subcomponents will also be triggered
- Call the forceUpdate() method. Even if the state of the component does not change, it will be forced to update. The render method of the child component will also be called
componentDidUpdate
Note: in the componentDidUpdate method, if you want to call setState() to update the state, you must put it in an if condition. Because if you call setState() directly to update the state, render() will be triggered, and componentDidUpdate will be triggered after render execution, resulting in recursive update.
import React from 'react'
import ReactDom from 'react-dom'

class App extends React.Component {
  constructor(props) {
    super(props);
    this.state = {
      count: 0
    };
  }

  handleClick = () => {
    this.setState({
      count: this.state.count + 1
    })
  };

  force = () => {
    this.forceUpdate();
  }

  render() {
    console.log('Parent component: render The lifecycle function is triggered');
    return (
        <div>
          <Counter count={this.state.count}/>
          <button onClick={this.handleClick}>Beat beans</button>
          <button onClick={this.force}>Forced update</button>
        </div>
    )
  }
}

class Counter extends React.Component {
  render() {
    console.log('Subcomponents: render The lifecycle function is triggered');
    return (
        <div>
          <h1 id="title">Number of times Doudou was beaten:{this.props.count}</h1>
        </div>
    );
  }

  // The first parameter prevProps represents the previous props
  componentDidUpdate(prevProps, prevState, snapshot) {
    console.log('Subcomponents: componentDidUpdate The lifecycle function is triggered');
    console.log(prevProps, this.props);

    if (prevProps.count !== this.props.count) {
      this.setState({})
    }
    // You can manipulate DOM
    let title = document.getElementById('title');
    console.log(title.innerHTML);
  }
}

ReactDom.render(<App/>, document.getElementById('root'));
getSnapshotBeforeUpdate
It is seldom used before updating.
getSnapshotBeforeUpdate() is called before the last render output (submitted to the DOM node). It enables the component to capture some information from the DOM before the change occurs (for example, scroll position). Any return value of this lifecycle method will be passed to componentDidUpdate() as a parameter.
import React from 'react';
import ReactDOM from 'react-dom';
import './index.css'

class News extends React.Component {
  state = {
    newsList: ['News 1']
  }

  componentDidMount() {
    // Add a piece of news data every second
    setInterval(() => {
      const newList = this.state.newsList;
      const newsItem = 'Journalism' + (newList.length + 1);
      newList.unshift(newsItem);
      this.setState({
        newList
      });
    }, 1000)
  }

  getSnapshotBeforeUpdate(prevProps, prevState) {
    return this.listDiv.scrollHeight;
  }

  componentDidUpdate(prevProps, prevState, height) {
    console.log(height,this.listDiv.scrollHeight);
    // After sliding the scroll bar, although the number of news is increasing, the page can be located in that place
    this.listDiv.scrollTop += this.listDiv.scrollHeight - height;
  }

  render() {
    return (
        <div className="list" ref={c => this.listDiv = c}>
          {this.state.newsList.map((item,index) => {
            return <div key={index} className="news">{item}</div>
          })}
        </div>
    )
  }
}

ReactDOM.render(<News/>, document.getElementById('root'));
When uninstalling

class App extends React.Component {
  constructor(props) {
    super(props);
    this.state = {
      count: 0
    };
  }

  handleClick = () => {
    this.setState({
      count: this.state.count + 1
    })
  };

  render() {
    console.log('Parent component: render The lifecycle function is triggered');
    return (
        <div>
          {
            this.state.count > 3 ?
                <h1>game over</h1> : <Counter count={this.state.count}/>
          }
          <button onClick={this.handleClick}>Beat beans</button>
        </div>
    )
  }
}

class Counter extends React.Component {
  render() {
    console.log('Subcomponents: render The lifecycle function is triggered');
    return (
        <div>
          <h1 id="title">Number of times Doudou was beaten:{this.props.count}</h1>
        </div>
    );
  }

  componentDidMount() {
    // this points to the current component instance
    this.timerId = setInterval(() => {
      console.log('The timer is executing~');
    }, 500);
  }

  componentWillUnmount() {
    // this points to the current component instance
    // Unload timer
    clearInterval(this.timerId);
    console.log('Subcomponents uninstalled: componentWillUnmount');
  }
}
Component reuse and high-order components
When two components have the same function, high-order component reuse can be used. What can be reused?
- state
- State method (component state logic)
Two ways of reuse
- render props mode
- High order component (HOC)
Note that these two methods are not new APIs, but a mode (writing method) evolved by using the coding techniques of React's own characteristics
- High-order components enhance component functions and realize state logic reuse by packaging components. Packaging (decorator) mode is adopted
- High order component (HOC) is a function that receives the component to be wrapped and returns the enhanced component.
- Create a class component inside the high-level component, provide reusable state logic code in this class component, and pass the reused state to the wrapped component WrappedComponent through prop
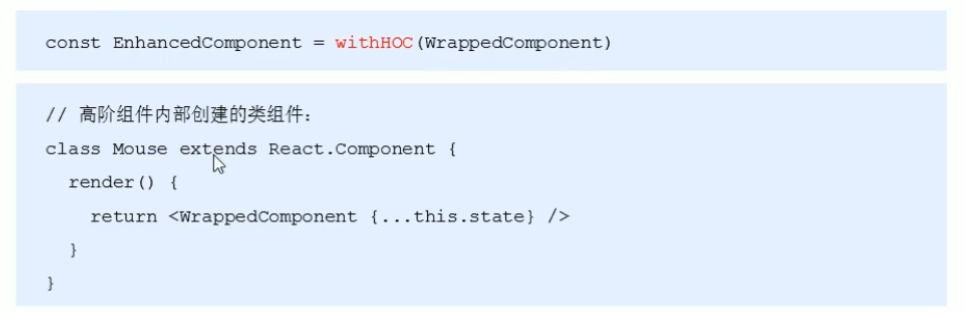
Use steps
- Create a function whose name convention starts with with with
- Specify the function parameters, which should start with an uppercase letter (as the component to render)
- Create a class component inside the function, provide reusable state logic code, and return the class component
- In this kind of component, the parameter component is rendered and the state is passed to the parameter component through prop
- Call the high-level component, pass in the component to be enhanced, get the enhanced component through the return value, and render it to the page
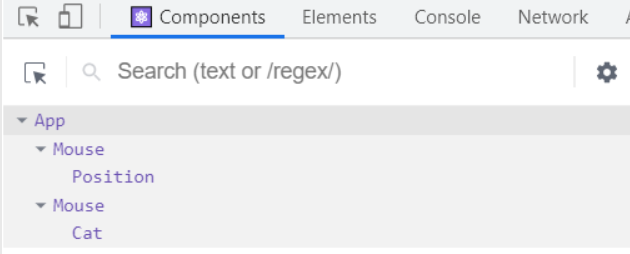
Set displayName
- Problems with using high-order components: the two components obtained have the same name
- Reason: by default, React uses the component name as the displayName
- Solution: set displayName for high-level components to distinguish different components during debugging
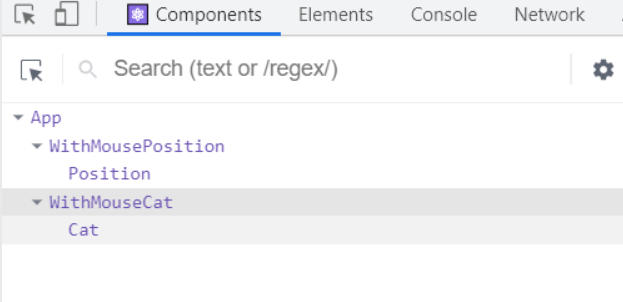
- displayName is used to set debugging information. (React Developer Tools information)
Before setting displayName
After setting displayName
import React from 'react'
import ReactDom from 'react-dom'

import img from './images/cat.png'

// Create high-level components
function withMouse(WrappedComponent) {
  // These components provide reusable state logic
  class Mouse extends React.Component {
    state = {
      x: 0,
      y: 0
    };

    handleMouseMove = e => {
      this.setState({
        x: e.clientX,
        y: e.clientY
      });
    };

    componentDidMount() {
      window.addEventListener('mousemove', this.handleMouseMove);
    }

    componentWillUnmount() {
      window.removeEventListener('mousemove', this.handleMouseMove);
    }

    render() {
      // Props should also be passed here, otherwise it will cause the loss of props
      return <WrappedComponent {...this.state} {...this.props}></WrappedComponent>
    }
  }

  // Set displayName and prefix them with WithMouse to indicate that they are all created by this high-level component
  Mouse.displayName = `WithMouse${getDisplayName(WrappedComponent)}`;

  return Mouse;
}

function getDisplayName(WrappedComponent) {
  return WrappedComponent.displayName || WrappedComponent.name || 'Component';
}

// Test high-order components
// The Position component originally did not have the function of obtaining the mouse Position. You can add this function to it by creating a high-level component
const Position = props => {
  console.log(props);
  return (
      <p>Current mouse position:( x:{props.x},y:{props.y})</p>
  )
};

// Cat following mouse movement
const Cat = props => (
    <img src={img} style={{
      position: 'absolute',
      top: props.y - 64,
      left: props.x - 77.5
    }}/>
);

const MousePosition = withMouse(Position);
const MouseCat = withMouse(Cat);

class App extends React.Component {

  render() {
    return (
        <div>
          <h1>High order component</h1>
          <MousePosition a="1" />
          <MouseCat />
        </div>
    )
  }
}


ReactDom.render(<App/>, document.getElementById('root'));

The front-end learning and communication QQ group has a good atmosphere for learning and discussion in the group. Big guys gather here. We look forward to your joining: 862748629