Today, by writing a simple maze game, we show you how to use the built-in accelerometer of the iPhone.
The effect of the game is shown in the following figure. Users control the orange pacman moving by shaking the screen up and down, pacman will bounce back when it hits the edge of the screen or the wall (blue border box), and red ghost will fail until it succeeds in eating yellow beans. The whole logic is simple, and it is also a small game we played when we were young.

The whole game tutorial is divided into three parts:
- Build the UI, design the labyrinth, and make some walls and three ghosts. At the same time, set up animation to keep three ghosts moving back and forth in a fixed position, which hinders pacman's clearance.
- Introduce the accelerometer to show how to move our pacman;
- The last and most important part is to set up the collision effects between pacman and the surrounding screen, walls and ghosts.
Let's start now.
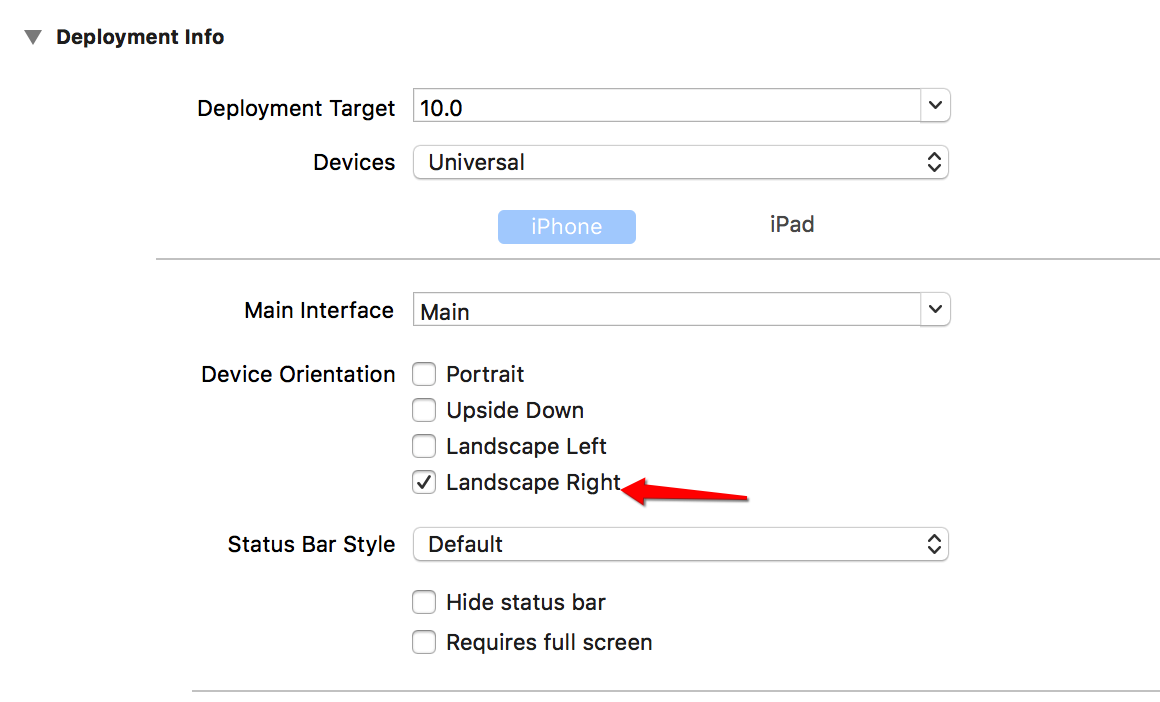
In order to achieve the game effect, when we spin the iPhone, we don't want our app to follow the spin. Therefore, we only let our app support horizontal. Here we choose "Landscape Right." Of course, you can also choose "Landscape Left" according to your personal preferences.
Step 1: Build the UI and animate Ghost
First, build UI.
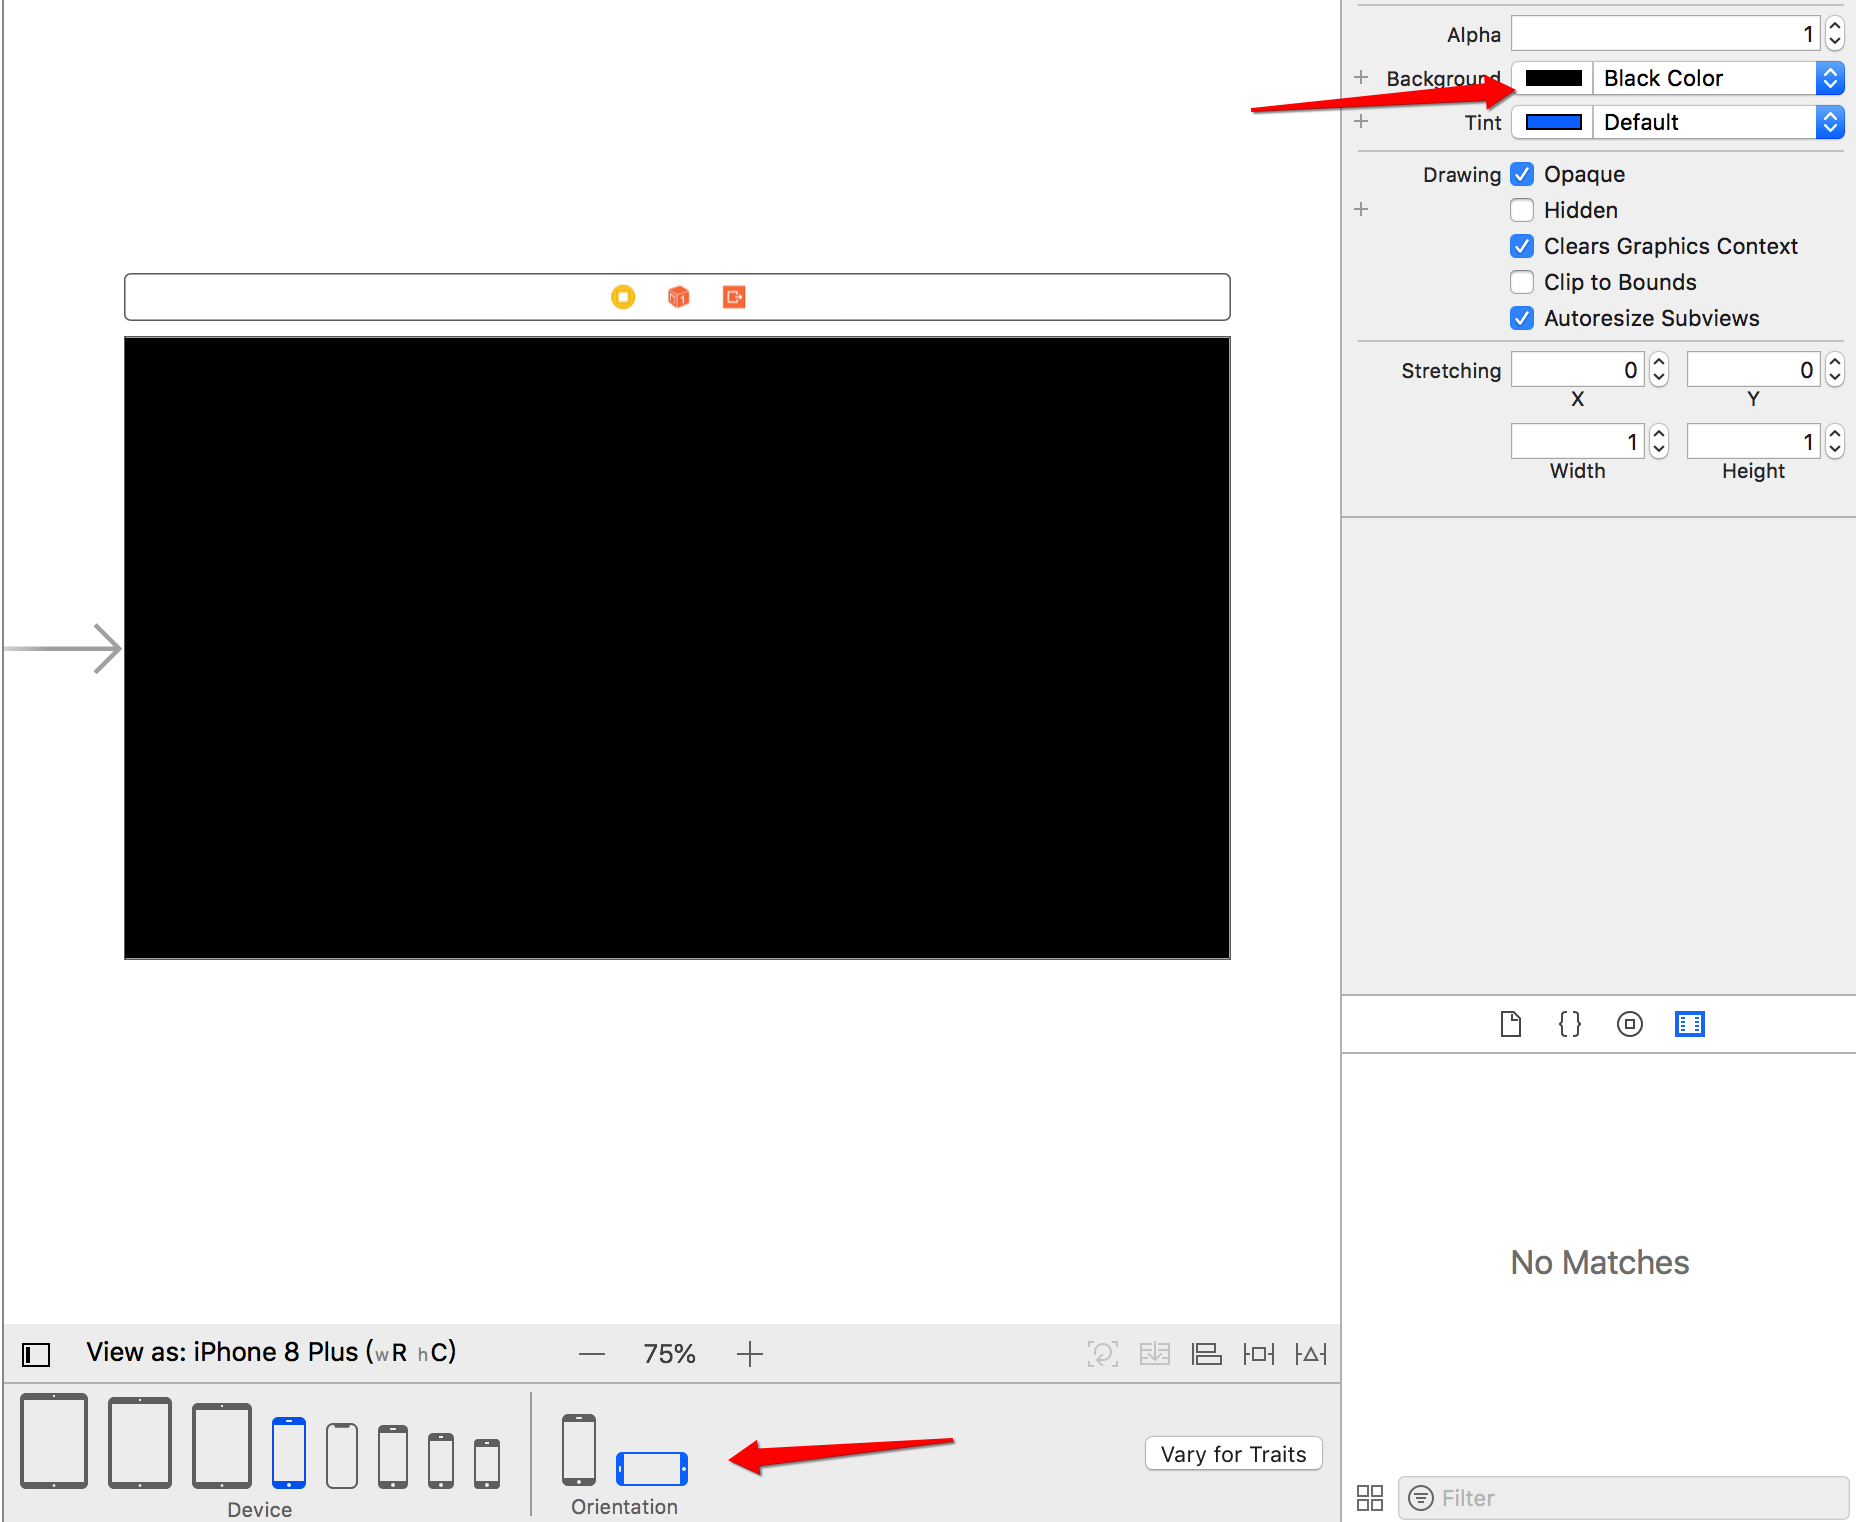
- We can simply build our UI through storyboard. For convenience, we can set our storyboard direction to be horizontal and the background to be black.
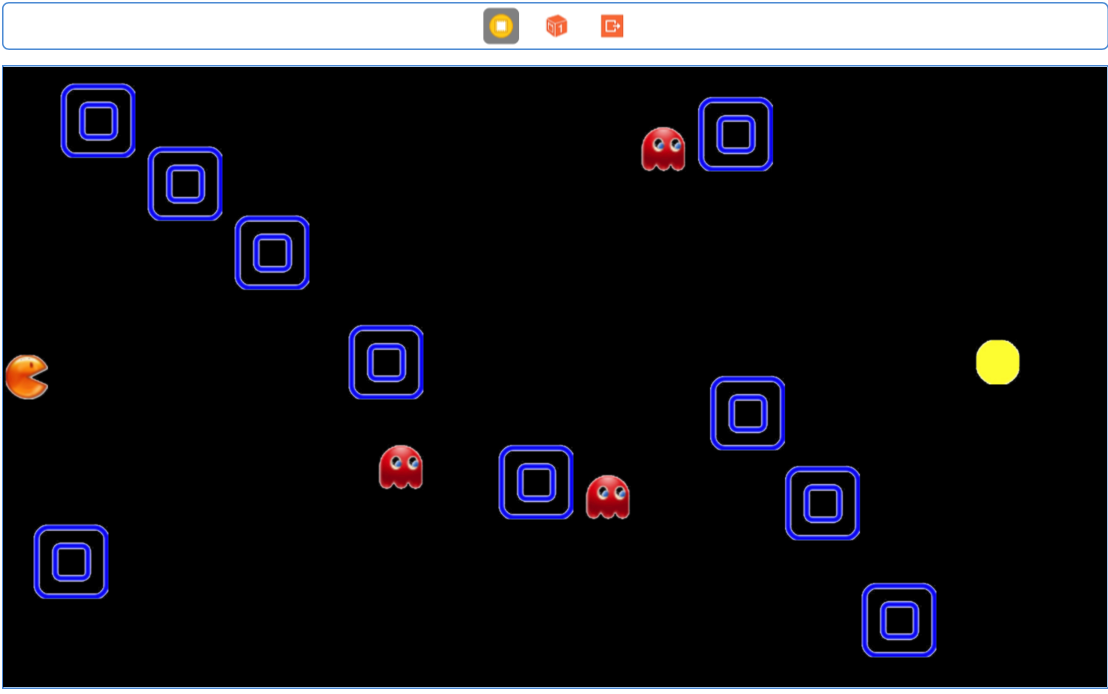
2. Import the required icons into the project. Layout the UI according to your personal preferences. Set the number and location of wall s and ghost s. This also determines the difficulty of setting up the game. My layout is as follows.
Then drag the controls into ViewController.m to create IBOutlet s for us to overstep them. Name them pacman,ghost1,ghost2,ghost3,exit and wall. These are relatively simple, I believe everyone will. But here's one thing I would like to emphasize, wall, because there are many, we will use another way to unify these wall objects and NSArray objects. Relevance. It looks refreshing and convenient for us to operate in a unified way. When connecting, connection chooses Outlet Collection instead of Outlet.

After dragging, the code in ViewController.m is shown in the following figure:
@property (weak, nonatomic) IBOutlet UIImageView *pacman;
@property (weak, nonatomic) IBOutlet UIImageView *ghost1;
@property (weak, nonatomic) IBOutlet UIImageView *ghost2;
@property (weak, nonatomic) IBOutlet UIImageView *ghost3;
@property (strong, nonatomic) IBOutletCollection(UIImageView) NSArray *wall;
@property (weak, nonatomic) IBOutlet UIImageView *exit;
II. Import Framework
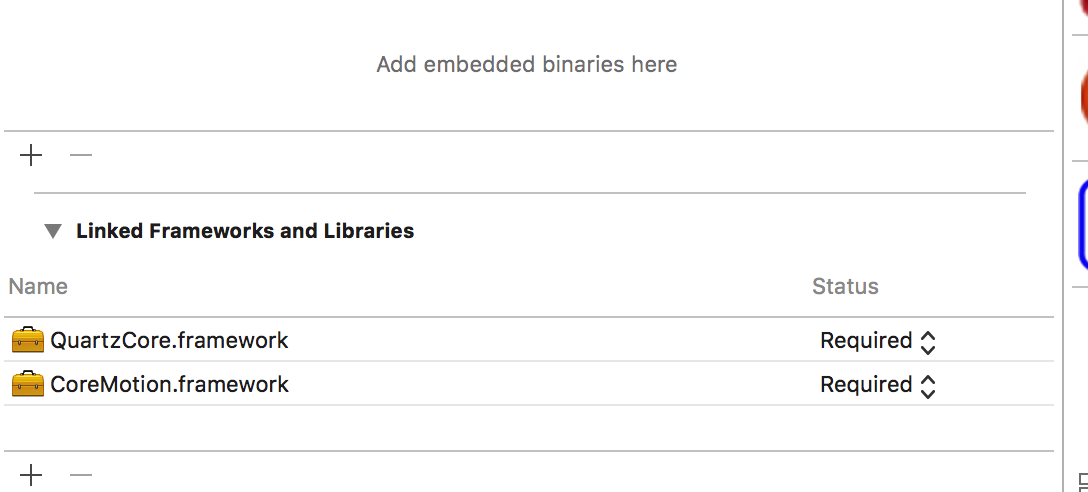
Using accelerometers requires using the CoreMotion framework. By default, our application does not include this framework, so we need to import it manually. Just import it directly into TARGETS - > General - > Linked Frameworks and Libraries. Similarly, we need to import another very important framework: the QuartzCore framework. Because we will use the CABasicAnimation class to create basic animations. (Of course, since xcode later had an import framework in UIKit, we didn't need to import it manually.)
Three: Setting up animation for Ghost
Import header file in ViewController.m
#import <QuartzCore/CAAnimation.h>
Next, add animations to three ghost s.
- (void)ghostAnimation {
    CGPoint origin1 = self.ghost1.center;
    CGPoint target1 = CGPointMake(self.ghost1.center.x, self.ghost1.center.y+124);
    CABasicAnimation *bounce1 = [CABasicAnimation animationWithKeyPath:@"position.y"];
    bounce1.fromValue = @(origin1.y);
    bounce1.toValue = @(target1.y);
    bounce1.duration = 2;    //Cycle time
    bounce1.autoreverses = YES;    //auto reverse
    bounce1.repeatCount = HUGE_VALF;
    bounce1.fillMode = kCAFillModeForwards; //Animation Completion Not Removed
    bounce1.removedOnCompletion = NO;   //Back to the background without being suspended by the system
    [self.ghost1.layer addAnimation:bounce1 forKey:@"position"];

    CGPoint origin2 = self.ghost2.center;
    CGPoint target2 = CGPointMake(self.ghost2.center.x, self.ghost2.center.y+90);
    CABasicAnimation *bounce2 = [CABasicAnimation animationWithKeyPath:@"position.y"];
    bounce2.fromValue = @(origin2.y);
    bounce2.toValue = @(target2.y);
    bounce2.duration = 2.5;
    bounce2.autoreverses = YES;
    bounce2.repeatCount = HUGE_VALF;
    bounce2.fillMode = kCAFillModeForwards;
    bounce2.removedOnCompletion = NO;
    [self.ghost2.layer addAnimation:bounce2 forKey:@"position"];

    CGPoint origin3 = self.ghost3.center;
    CGPoint target3 = CGPointMake(self.ghost3.center.x, self.ghost3.center.y+180);
    CABasicAnimation *bounce3 = [CABasicAnimation animationWithKeyPath:@"position.y"];
    bounce3.fromValue = @(origin3.y);
    bounce3.toValue = @(target3.y);
    bounce3.duration = 3;
    bounce3.autoreverses = YES;
    bounce3.repeatCount = HUGE_VALF;
    bounce3.fillMode = kCAFillModeForwards;
    bounce3.removedOnCompletion = NO;
    [self.ghost3.layer addAnimation:bounce3 forKey:@"position"];
}
Call this method in viewDidLoad. Okay, then we can run our code. If everything is right, you'll see the whole maze interface and three ghost s jumping up and down. Is that interesting?
Okay, let's use the accelerometer to manipulate our pacman.
Step 2: Use Accelerometer to Move pacman
I. Declaring Attributes
The built-in accelerometer of the iPhone provides us iOS developers with a lot of opportunities to create interesting games. We often see app s that tilt the iPhone to control game characters, such as Wild Rover, which is quite complicated. Now we are familiar with how to use the accelerometer provided by the system through this simple maze game. First, we need to declare some attributes. Import the necessary header file before
#import <CoreMotion/CoreMotion.h>
@property (nonatomic,assign) CGPoint currentPoint;  //Current position of pacman
@property (nonatomic,assign) CGPoint previousPoint; //Location of pacman movement
@property (nonatomic,assign) CGFloat pacmenXVelocity;   //x component of velocity (velocity is vector)
@property (nonatomic,assign) CGFloat pacmanYVelocity;   //y component of velocity (velocity is vector)
@property (nonatomic,assign) CGFloat angle; //For the current angle of pac to look more realistic, we set the rotation of pacman
@property (nonatomic,assign) CMAcceleration acceleration;   //Current acceleration measured by accelerometer
@property (nonatomic,strong) CMMotionManager *motionManager;    //It's a queue that helps us receive and process data from accelerometers.
@property (nonatomic,strong) NSOperationQueue *queue;
@property (nonatomic,strong) NSDate *lastUpdateTime;    //Allow us to control the time since the last call of the accelerometer
Additional - Introduction to Accelerometer
Introduction of 1-Accelerometer
-
1. The role of accelerometers
- Used to detect movement of equipment (e.g. shaking)
- It measures acceleration, whether caused by gravity or motion. So in other words, the accelerometer can measure the moving speed and perceive its grip angle. If you want to know more about how the iPhone accelerometer works, you can check it out. This video.
- Used to detect movement of equipment (e.g. shaking)
-
2. Classical application scenarios of accelerometers
- Shake
- Pedometer
-
3. Accelerometer Principle
- Acceleration of testing equipment on x-axis, y-axis and z-axis
- Which direction plays a powerful role and which direction moves?
- According to the value of acceleration, we can judge the force in each direction.
- Which direction plays a powerful role and which direction moves?
- Acceleration of testing equipment on x-axis, y-axis and z-axis
-
4. Before iOS4, accelerometers were used by UIAccelerometer class to collect data. Now they usually use CoreMotion to process acceleration.
-
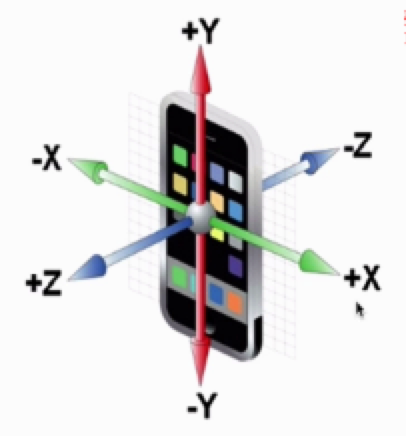
5. It should be noted that the coordinate system of the accelerometer is not the coordinate system of the screen of the iPhone, but the Cartesian coordinate system known to all in school.


2-Accelerometer coordinates
When the home key is down, the Y axis is Cartesian coordinate system. The home is built on the right, and the X-axis is Cartesian coordinate system. When the screen is up, z is the Cartesian coordinate system. Here's the orientation of the iPhone toward the ground, because the accelerator is measured by gravity. (It's hard to specify, you can print rotationRate. x, rotationRate. y, rotationRate. z in the project to experience later.)
The iOS Core Motion framework allows developers to obtain and process motion data from device hardware. Hardware devices here include accelerometers, gyroscopes, magnetometers, pedometers, etc. Interested children's shoes can dig into the mystery of it privately. CMMotion Manager class manages motion data. By using this class, we can obtain the number detected by accelerometers regularly. According to the data, we will use it later.
After understanding the principle of accelerometer, let's continue our maze game project.
2. Use CMMotion Manager to obtain motion data
The higher the sampling frequency, the more accurate the pacman motion will be and of course, the more power-consuming it will be. Let's set a value to sample 60 times per second, so that the pacman motion looks fairly smooth. We define a macro for this purpose.
#define kUpdateInterval (1.0f/60.f)
Let's initialize the accelerometer and set pacman's motion
- (void)pacmanAnimation {
    self.lastUpdateTime = [NSDate date];    //Record the current time
    self.currentPoint = CGPointMake(0, 144);    //Setting pacman initial position
    self.motionManager = [[CMMotionManager alloc] init];    //Create a Motion Manager
    self.queue = [[NSOperationQueue alloc] init];    //Queues generally try to use global variables as much as possible
    self.motionManager.accelerometerUpdateInterval = kUpdateInterval;//Set the sampling interval 60 times per second so that our pacman should move smoothly enough.

    //Method of Starting Sampling
    [self.motionManager startAccelerometerUpdatesToQueue:self.queue withHandler:^(CMAccelerometerData * _Nullable accelerometerData, NSError * _Nullable error) {
        //Record the current acceleration. Interested children's shoes can be printed to see the x,y,z values feel.
        [self setAcceleration:accelerometerData.acceleration];
        //        NSLog(@"x: %f, y: %f, z: %f", self.acceleration.x , self.acceleration.y, self.acceleration.z);
        //Back to the main thread to update the UI
        [self performSelectorOnMainThread:@selector(updateLocation) withObject:nil waitUntilDone:NO];
    }];
}
3. Move to eat beans
At present, we have completed the continuous sampling of Pacman acceleration data. Next, we will use these data to update the new position of pacman. Let's implement the updateLocation method.
- (void)updateLocation {
//Get the time interval between the two samples. The negative sign is added to ensure that the value is positive.
NSTimeInterval secondSinceLastDraw = - ([self.lastUpdateTime timeIntervalSinceNow]);
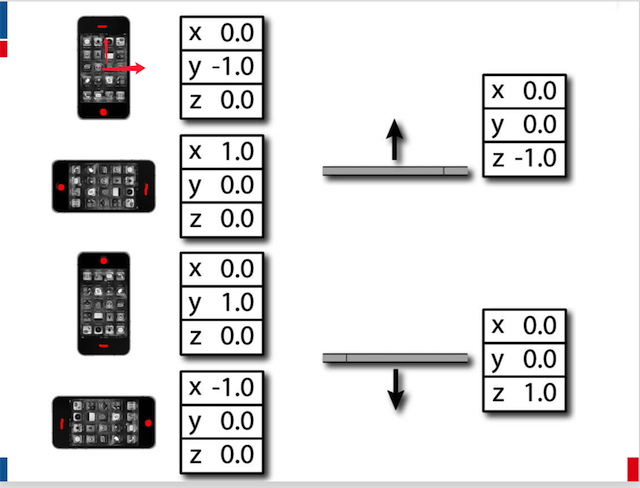
//Get the velocity component of y direction. Because the screen is horizontal, so self. pacmanY Velocity is superimposed by self.acceleration.x. Here, children's shoes should pay attention to. Also because we chose the direction of the screen before: Landscape Right, so we used minus sign to ensure the increment of y direction speed. If children's shoes chose Landscape Left at that time, it would be changed to plus sign. It's important to pay attention to this detail. The specific reason is closely related to the Cartesian coordinate system mentioned above.
self.pacmanYVelocity = self.pacmanYVelocity - (self.acceleration.x*secondSinceLastDraw);
//The calculation principle of the velocity component in the x direction is the same as that in the same way. The purpose of this calculation is to realize the effect of acceleration of gravity and to achieve faster and faster speed, which is more realistic.
self.pacmenXVelocity = self.pacmenXVelocity - (self.acceleration.y*secondSinceLastDraw);
//After getting the current speed of each sampling, we can calculate the distance of pacman moving in X and Y direction in each sampling time interval. 500 is a parameter set by ourselves. Determine the speed of pacman moving, the larger the value, the faster pacman moving. Personally, I feel that setting this value is OK. You can change it according to your preferences.
CGFloat xDelta = secondSinceLastDraw*self.pacmenXVelocity*500;
CGFloat yDelta = secondSinceLastDraw*self.pacmanYVelocity*500;
//You can look at the printed results and analyze them.
// NSLog(@"secondSinceLastDraw:%lf---x:%lf---pacmanYVelocity:%lf---yDelta:%lf",secondSinceLastDraw,self.acceleration.x,self.pacmanYVelocity,yDelta);
//Update the position of pacman after each sampling
self.currentPoint = CGPointMake(self.currentPoint.x+xDelta, self.currentPoint.y+yDelta);
//Mobile pacman
[self movePacman];
//pacman rotates
[self rotateThePacman];
//Record the current time as the last update time
self.lastUpdateTime = [NSDate date];
}The above method of updating pacman's position has been described clearly in the commentary, but it will not be described here again. It is worth noting that since velocity is a vector value, we have to calculate its x and y vectors separately. Of course, if it is 3d, there are z vectors, because we are a small plane game, we do not consider z vectors. In addition, some children's shoes may ask: Sampling interval is set to 60 times per second, and the time interval between two samples should be calculated again? That's because it's only an approximation. For some reasons, we may get data from time to time, so it's better to calculate the time elapsed since the last call, which is more accurate.
Finally, we need to move pacman to the appropriate position.
- (void)movePacman {

    CGRect frame = self.pacman.frame;
    frame.origin.x = self.currentPoint.x;
    frame.origin.y = self.currentPoint.y;
    self.pacman.frame = frame;
    //Keep up-to-date location
    self.previousPoint = self.currentPoint;
}
Here, you can run code to experience pacman moving with the shaking of the screen, is it beginning to feel a little bit? But there is still one thing unsatisfactory, that is, pacman moving itself is static and unrealistic, we hope to see him move in the maze can also maintain rotation.?
Let's implement pacman's rotation.
- (void)rotateThePacman {
    CGFloat newAngle = (self.pacmenXVelocity + self.pacmanYVelocity)*M_PI*4;
    self.angle += newAngle*kUpdateInterval;
    CABasicAnimation *rotate = [CABasicAnimation animationWithKeyPath:@"transform.rotation"];
    rotate.fromValue = @(0);
    rotate.toValue = @(self.angle);
    rotate.duration = kUpdateInterval;
    rotate.repeatCount = 1;
    rotate.removedOnCompletion = NO;
    rotate.fillMode = kCAFillModeForwards;
    [self.pacman.layer addAnimation:rotate forKey:@"10"];

    self.lastAngle = self.angle;
}
Angle rotation is really a bit tricky, it involves some mathematical knowledge. I haven't thought of a good way yet. I can only transit the old value to the new value by self. angle += new Angle * kUpdate Interval to realize the smooth rotation of pacman. If you want to make the opening of Pacman always move forward, it takes a little time to figure out the calculation formula, you can try one. Next.
Now you can run the code and feel it.
Step 3: Setting the Collision Effect
In the above case, pacman can penetrate any obstacles such as walls, ghosts and screens. It's still half-baked. Now let's set up obstacles for pacman to collide with obstacles. These include the following four situations:
-
In collision with the screen boundary, pacman does not leave the screen, but rebounds.
-
When pacman bypasses all obstacles and eats soybeans, the player wins the game.
-
When it collides with ghost, the game fails.
-
When it collides with wall, it also bounces back.
I. Collision with screen boundary
This is easy, just check whether pacman is on the screen.
- (void)collisionWithBoundaries {
    if (self.currentPoint.x<0) {
        _currentPoint.x = 0;
        self.pacmenXVelocity = -(self.pacmenXVelocity/2.0);
    }
    if (self.currentPoint.y<0) {
        _currentPoint.y = 0;
        self.pacmanYVelocity = -(self.pacmanYVelocity/2.0);
    }
    if (self.currentPoint.x>self.view.bounds.size.width-self.pacman.bounds.size.width) {
        _currentPoint.x = self.view.bounds.size.width-self.pacman.bounds.size.width;
        //Reverse the direction of the speed vector while halving the speed to imitate the real world effect
        self.pacmenXVelocity = -(self.pacmenXVelocity/2.0);
    }
    if (self.currentPoint.y>self.view.bounds.size.height-self.pacman.bounds.size.height) {
        _currentPoint.y = self.view.bounds.size.height-self.pacman.bounds.size.height;
        //Reverse the direction of the speed vector while halving the speed to imitate the real world effect
        self.pacmanYVelocity = -(self.pacmanYVelocity/2.0);
    }
}
This method is called at the beginning of the movePacman method.
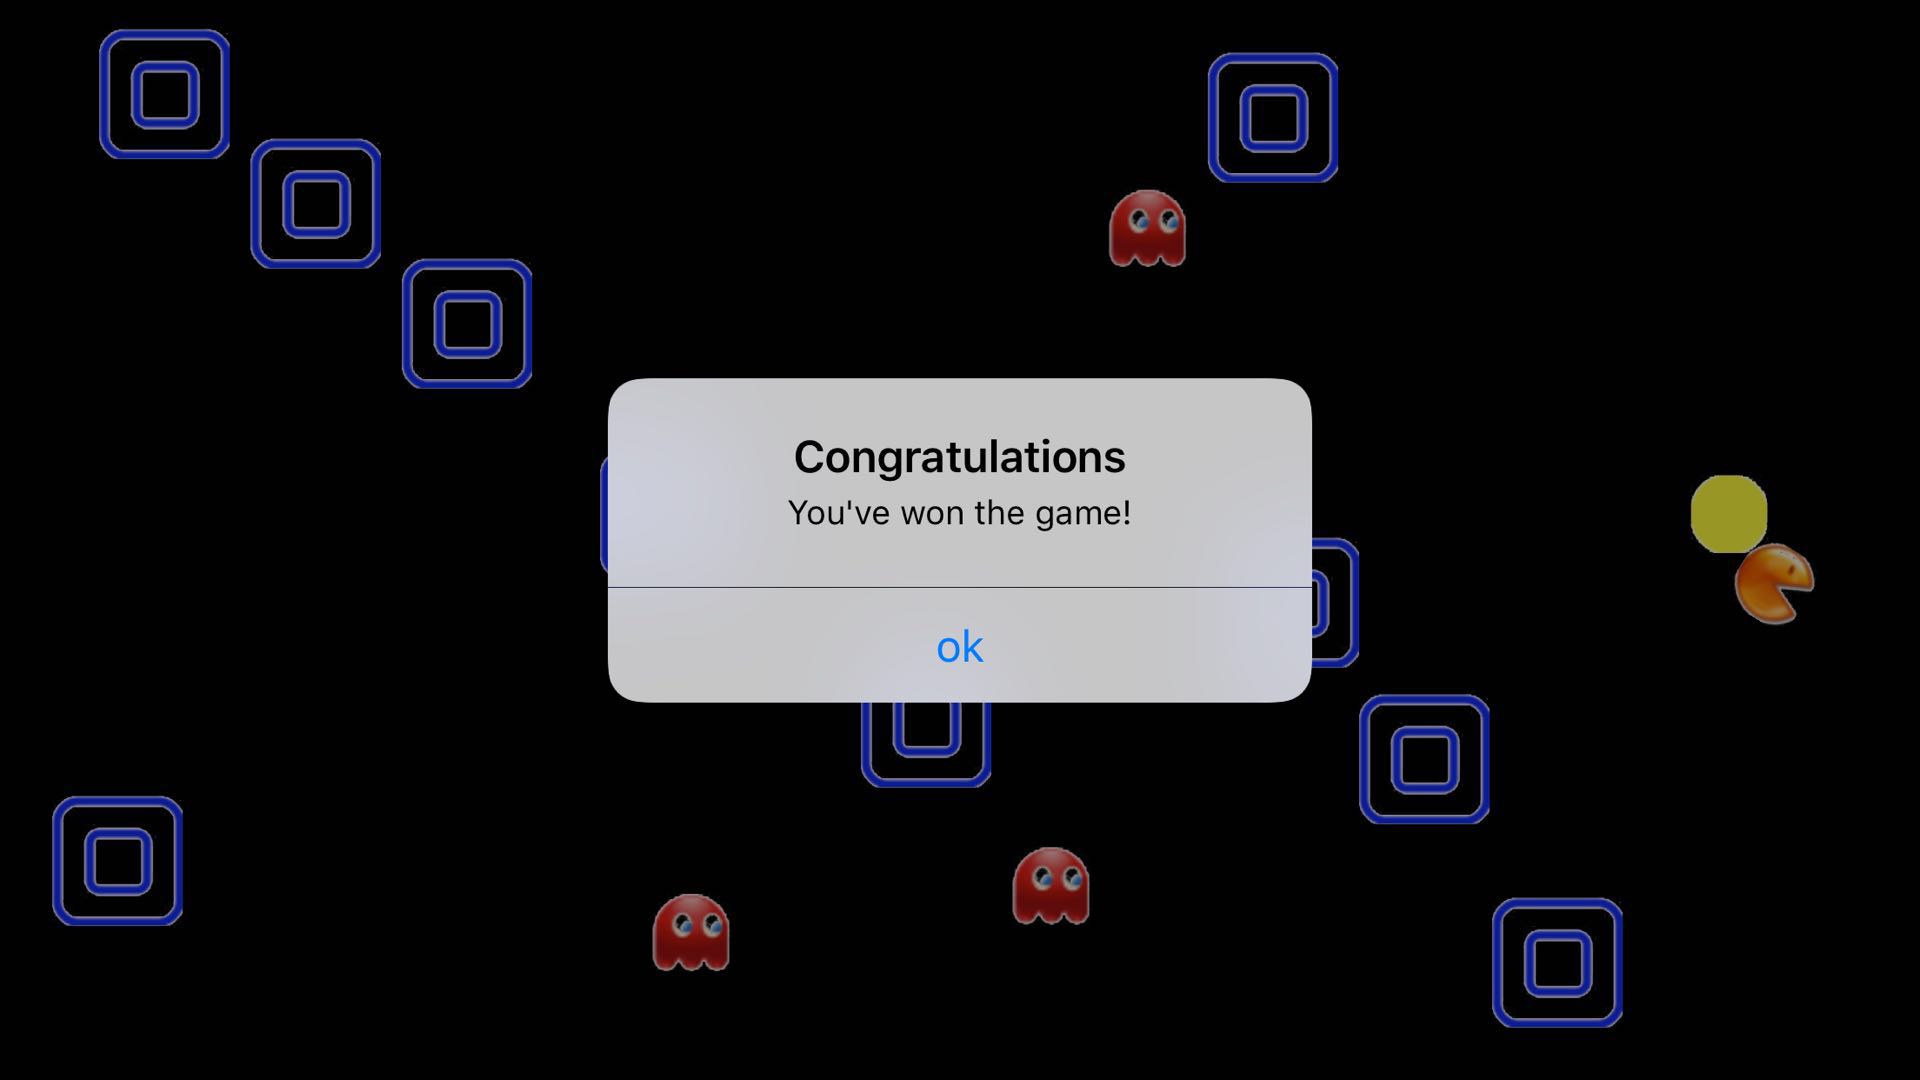
II. Collision with exit
After bumping into soybeans, it prompts congratulations on winning the game and stops Motion Manager's motion sampling method.
- (void)collisionWithExit {
    if (CGRectIntersectsRect(self.pacman.frame, self.exit.frame)) {
        //Stop Accelerometer Sampling
        [self.motionManager stopAccelerometerUpdates];

        UIAlertController *ac = [UIAlertController alertControllerWithTitle:@"Congratulations" message:@"You've won the game!" preferredStyle:UIAlertControllerStyleAlert];
        UIAlertAction *action = [UIAlertAction actionWithTitle:@"ok" style:UIAlertActionStyleDefault handler:nil];
        [ac addAction:action];
        [self presentViewController:ac animated:YES completion:nil];
    }
}
Core Graphics provides CGRectIntersectsRect Help us check whether the frame of one view overlaps the frame of another specified view.
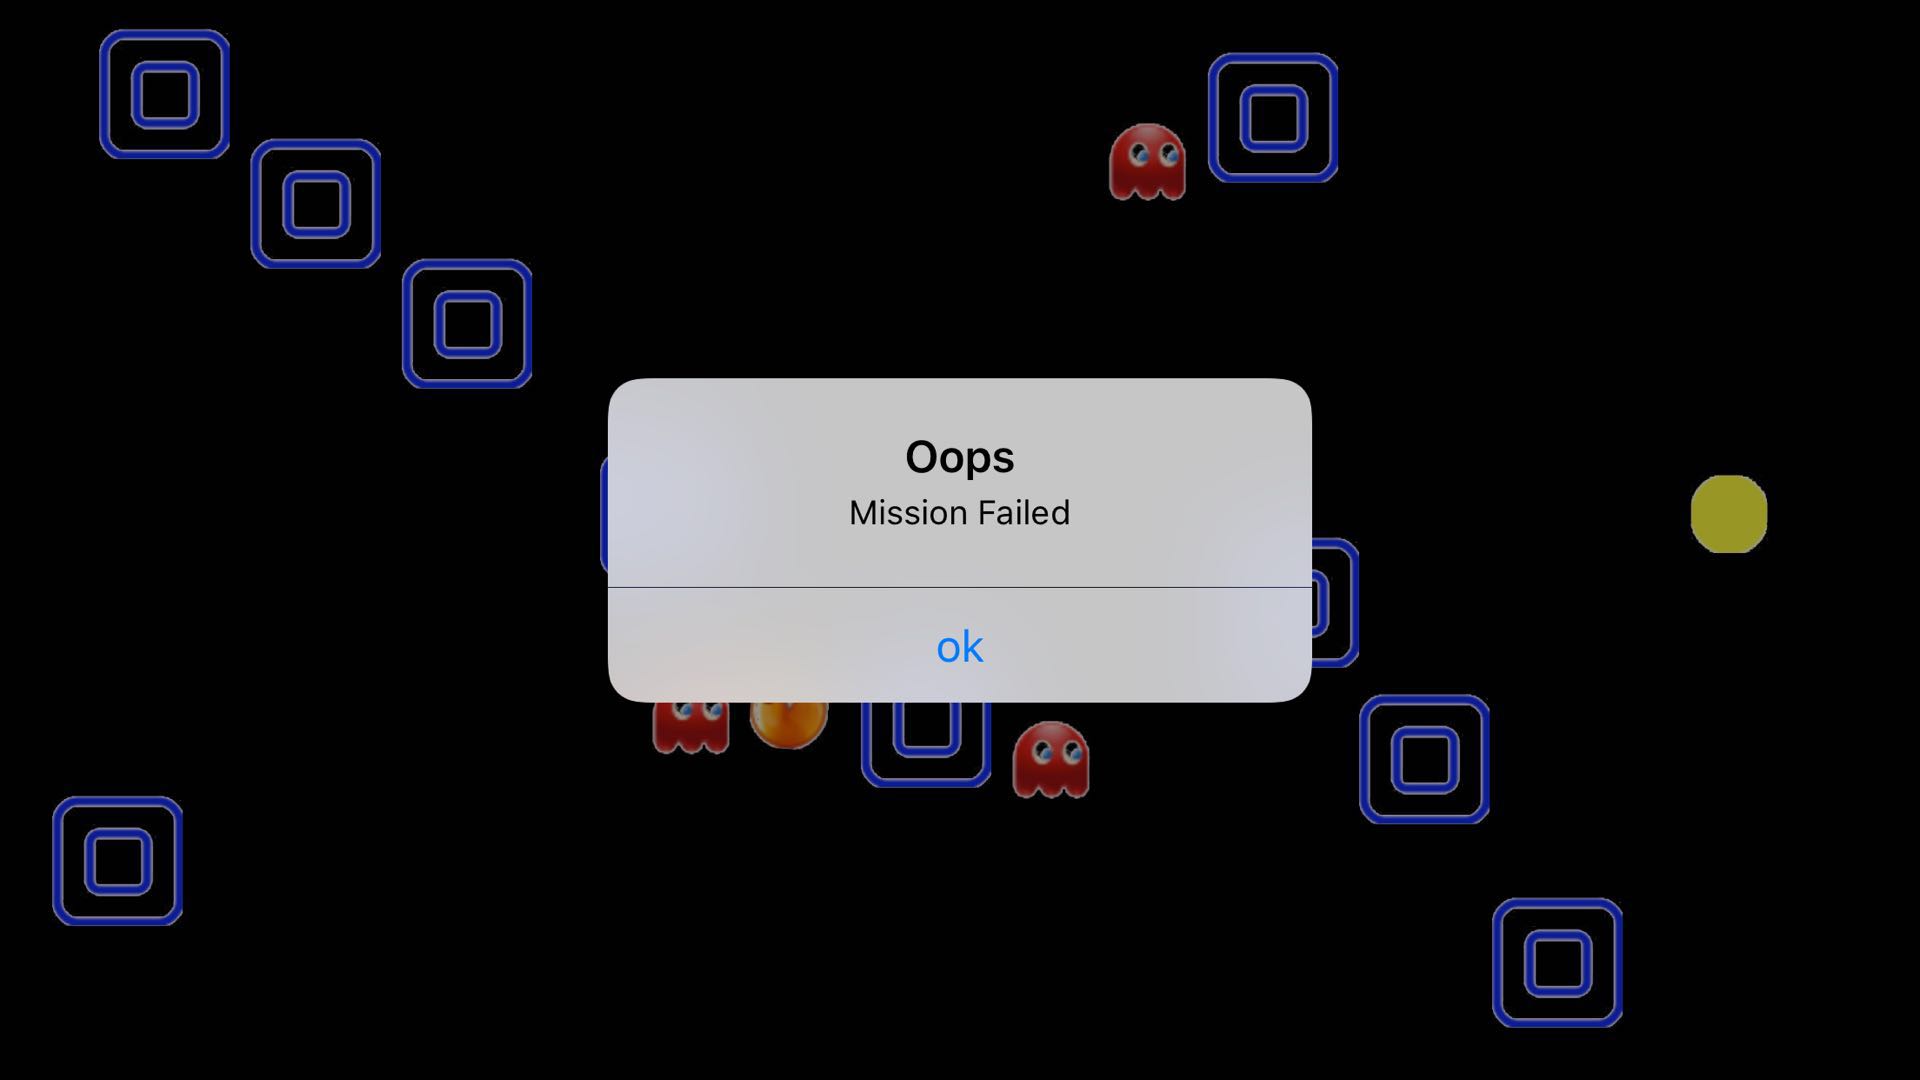
Collision with ghost
After hitting ghost, it prompts the game to fail and returns to the starting point.
- (void)collisionWithGhosts {
    CALayer *ghostLayer1 = self.ghost1.layer.presentationLayer;
    CALayer *ghostLayer2 = self.ghost2.layer.presentationLayer;
    CALayer *ghostLayer3 = self.ghost3.layer.presentationLayer;

    if (CGRectIntersectsRect(self.pacman.frame, ghostLayer1.frame)||CGRectIntersectsRect(self.pacman.frame, ghostLayer2.frame)||CGRectIntersectsRect(self.pacman.frame, ghostLayer3.frame)) {
        UIAlertController *ac = [UIAlertController alertControllerWithTitle:@"Oops" message:@"Mission Failed" preferredStyle:UIAlertControllerStyleAlert];
        UIAlertAction *action = [UIAlertAction actionWithTitle:@"ok" style:UIAlertActionStyleDefault handler:^(UIAlertAction * _Nonnull action) {
            self.currentPoint = CGPointMake(0, 144);
        }];
        [ac addAction:action];
        [self presentViewController:ac animated:YES completion:nil];
    }
}
IV. Collision with walls
This may be a little more complicated than the previous collisions, because the wall here is square, so when it comes back to the left or right side of the wall, the direction of acceleration will have different choices.
- (void)collisionWithWalls {
CGRect frame = self.pacman.frame;
frame.origin.x = self.currentPoint.x;
frame.origin.y = self.currentPoint.y;
for (UIImageView *image in self.wall) {
if (CGRectIntersectsRect(frame, image.frame)) {
CGPoint pacmanCenter = CGPointMake(frame.origin.x+frame.size.width/2.f, frame.origin.y+frame.size.height/2.f);
CGPoint imageCenter = CGPointMake(image.frame.origin.x+frame.size.width/2.f, image.frame.origin.y+frame.size.height/2.f);
CGFloat angleX = pacmanCenter.x - imageCenter.x;
CGFloat angleY = pacmanCenter.y - imageCenter.y;
//Judging the size of x component and Y component, if x > y, it means that the left and right edges of the wall are hit, then the x component of the velocity is reversed and halved; if x < y, it means that the upper and lower edges of the wall are hit, then the Y component of the velocity is reversed and halved.
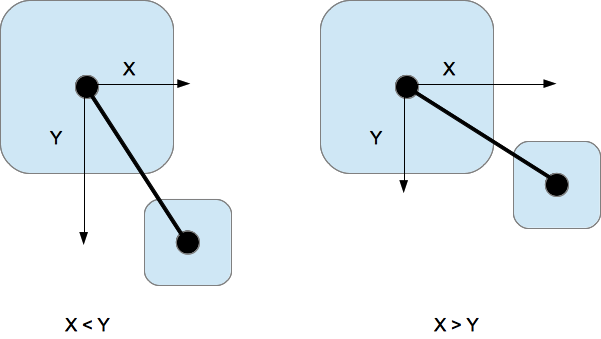
if (fabs(angleX)>fabs(angleY)) {
_currentPoint.x = self.previousPoint.x;
self.pacmenXVelocity = -self.pacmenXVelocity/2.f;
}
else {
_currentPoint.y = self.previousPoint.y;
self.pacmanYVelocity = -self.pacmanYVelocity/2.f;
}
}
}
}
Call these methods in the movePacman method.
- (void)movePacman {
    [self collisionWithBoundaries];
    [self collisionWithExit];
    [self collisionWithGhosts];
    [self collisionWithWalls];
    CGRect frame = self.pacman.frame;
    frame.origin.x = self.currentPoint.x;
    frame.origin.y = self.currentPoint.y;
    self.pacman.frame = frame;
    self.previousPoint = self.currentPoint;
}
At this point, congratulate you on the completion of a simple maze game. Run down to experience the code. Of course, the game is not perfect, there are many errors, in fact, the purpose of this small project is to preliminarily understand the use of iOS system's own speedometer. Let's learn from each other. Welcome you to create a higher-level game on this basis.