Let's start with two sentences.
Today, we enter the third part of BaseActivity, Title. It's a pleasant name. You can see what it means from the name, so you don't need to explain it. (Although you don't want to admit it, it's actually because I'm lazy), so let's start today's content.
Or I want to share my code cloud address with you:
-
[Based on Constraint Layout]
(https://git.oschina.net/bsw_lm/ConstraintLayoutBaseApplication) -
[Not using Constraint Layout]
(https://git.oschina.net/bsw_lm/MyBaseApplication)
text
Some people will have some questions after reading yesterday's part. That is, although we can inherit BaseActivity with Activity and display the corresponding layout file under the title of BaseActivity after yesterday's content, it seems a lot easier, but the title is dead, how to change the text, control the button display, or there are some apps. Home page, do not need to display title, how to operate this part?
The following is precisely to enter this part, not to say anything specific, directly above the method.
Set the title:
    /**
     * Set title
     * @param title Text of the title
     */
    public void setTitle(String title) {
        TextView baseTitle = (TextView) findViewById(R.id.base_title);
        baseTitle.setText(title);
    }
Or bind the control, and then set the title, and the text of the title is passed through the method.
The call is similar to what I said in the previous article. First inherit BaseActivity, then call the setTitle method and write parameters.
The code is as follows:
public class MainActivity extends BaseActivity {

    @Override
    protected void onCreate(Bundle savedInstanceState) {
        super.onCreate(savedInstanceState);
        setBaseContentView(R.layout.activity_main);
        setTitle("new Title");
    }
}
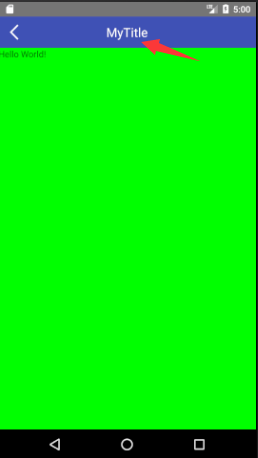
Let's take a look at the effect:
This is the original default title:
After setting the effect:
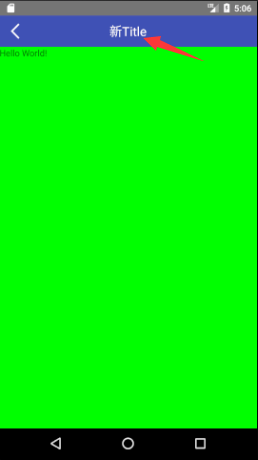
This completes the dynamic setup of Title.
Return key
Now let's look at how the function of return key on the left is accomplished. In fact, this part is simpler than title because it only needs to be processed in BaseActivity.
As you all know, first we implement the View.OnClickListener interface in BaseActivity, do id matching in the rewritten onClick, and find that when the click is returned, call finish(), the code is as follows (the part of the interface must be known, not pasted):
    @Override
    public void onClick(View v) {
        switch (v.getId()) {
            case R.id.base_back:
                finish();
                break;

            default:
                break;
        }
    }
Exit can be achieved by completing the above operations.
Of course, not every time we need him to click on the exit to immediately push it off, such as editing the diary, click on the exit, you need to make a "whether to give up editing" prompt, so you need to add some additional processing.
First, add the following method to BaseActivity.
    public ImageView getBaseBack() {
        return (ImageView) findViewById(R.id.base_back);
    }
Back to the onCreate method of MainActivity, add the following code:
getBaseBack().setOnClickListener(new View.OnClickListener() {
            @Override
            public void onClick(View v) {
                Log.i("log","Can't you get out of here?");
            }
});
When you click the return key again, you won't quit. Instead, you will print "Can't quit" in the logcat panel of as. And what you want to do, just replace Log.i("log", "can't go out"); just write your own code.
Of course, some people may wonder why we need to re-create an OnClickListener here. BaseActivity has been implemented, so we can use getBaseBack().setOnClickListener(this); can't we?
Naturally, I have tried this method. For more information, please refer to Appendix 1.
Of course, there are also some home pages that do not need to return keys, so a separate method was written to hide the return keys.
    /**
     * Hide the return key
     */
    private void hideBack() {
        baseBack.setVisibility(View.GONE);
    }
Function buttons
In addition to the above two, the rest of the title or text I call function keys. For these function keys, we need to deal with more complex, as for why, if simple certainly will not be put in the last say ah.
First point:
Trust me, that's true, even though I'm here. Second Blog At the beginning of the layout, the corresponding pictures were used, but when you use APP, you must find that the text is definitely not only "confirm" two words, pictures can not always be plus sign and more (that is, three points arranged horizontally).
Second point:
Moreover, since it is a key, it must also do click events, and in different pictures, different pages and different states of the current page, the corresponding click events of the keys in each location will not be the same, so the function of the key also needs us to do some processing.
Third points:
Also in the second blog, I have already analyzed several possible situations of these function keys, which show nothing, one function key and two function keys. For each case, we must set who to show and who to hide.
Let me reexamine the order and summarize the three points that need to be dealt with (the order has been adjusted).
- Explicit and implicit
- Switching of Text or Picture Resources
- Click events
After analysis, we will come one by one:
Explicit and implicit
This part is the simplest, that is to set the visibility of all functional controls to go, when you need to call which, you can use java code to set to View.VISIBLE.
Switching of Text or Picture Resources
This part of the content, in fact, is relatively simple, the text does not need to say, refer to the title text settings section, we mainly talk about the picture (of course, the main reason for the picture is still because the front did not say it).
Here we use all the image resources in the res directory. As for the dynamic acquisition part of the network, we can use them later.
It is easy to get id:
R.mipmap.more
It's more pictures in the mipmap directory under the res directory, and of course drawable folders are also useful. (The difference between the two folders, as I said earlier, is not repeated here.)
Setting up images for ImageView, well, it's not complicated:
baseRightIcon1.setImageResource(resId);
baseRightIcon1 is ImageView, resId is the traditional image Id, so this part is also done.
Click events
Here, in fact, only two parts are needed:
1. Setting up click listeners. This part is done in the BaseActivity method.
baseRightIcon1.setOnClickListener(this);
2. Setting up click events, which is done in MainActivity (that is, the activity class to achieve clicks)
    @Override
    public void onClick(View v) {
        super.onClick(v);
        switch (v.getId()) {
            case R.id.base_right_icon1:
                Log.i("Exception", "You ordered me.");
                break;

            default:
                break;
        }
    }
Following are the complete methods:
The setting method in BaseActivity,
/**
     * Set image 1 on the right (rightmost)
     *
     * @param resId     Resource id of picture
     * @param alertText Prompt text
     */
    public void setBaseRightIcon1(int resId, String alertText) {
        baseRightIcon1.setImageResource(resId);
        baseRightIcon1.setVisibility(View.VISIBLE);
        baseRightIcon1.setOnClickListener(this);
        //Information read when voice aids are prompted
        baseRightIcon1.setContentDescription(alertText);
    }
Calls in MainActivity (in OnCreate):
setBaseRightIcon1(R.mipmap.more, "More");
Okay, is that what we have today? Well, if you are more diligent, you can come here, but I am a strangely lazy person. Every time I need to rewrite the OnClick method, and I need to remember the id of these function keys. I don't know others. Anyway, I am afraid of trouble, so I think of a lazy method.
Use of interfaces
See the title, you must know, this part of the content to use is interface, I do not know what state you are, anyway, I learn java time, the most unclear is interface, now can use the interface, and write to the blog, it is still very fruitful.
Actually, I have no choice but to use the interface. It's just that java can't pass the method parameters directly like JavaScript. Otherwise, why bother so much? I won't say much about the definition of the interface. After all, I hate these things which are not useful when I was young, so I go directly to the code.
Do the following in BaseActivity:
First create the following interfaces:
    public interface OnClickRightIcon1CallBack {
        void clickRightIcon1();
    }
There is only one method, because the method in the interface defaults to abstraction, so I lazy did not write.
Then create a private OnClickRightIcon1:
private OnClickRightIcon1CallBack onClickRightIcon1;
Modify the setBaseRightIcon1 method used earlier, add a parameter OnClickRightIcon1 CallBack onClickRightIcon1, and add a line of code to it:
this.onClickRightIcon1 = onClickRightIcon1;
The modified setBaseRightIcon1 grows like this
    /**
     * Set image 1 on the right (rightmost)
     *
     * @param resId             Resource id of picture
     * @param alertText         Prompt text
     * @param onClickRightIcon1 Click Processing Interface
     */
    public void setBaseRightIcon1(int resId, String alertText, OnClickRightIcon1CallBack onClickRightIcon1) {
        this.onClickRightIcon1 = onClickRightIcon1;
        baseRightIcon1.setImageResource(resId);
        baseRightIcon1.setVisibility(View.VISIBLE);
        baseRightIcon1.setOnClickListener(this);
        //Information read when voice aids are prompted
        baseRightIcon1.setContentDescription(alertText);
    }
The last step is to add the corresponding id in OnClick and do click processing.
@Override
    public void onClick(View v) {
        switch (v.getId()) {
            case R.id.base_back:
                finish();
                break;

            case R.id.base_right_icon1:
                onClickRightIcon1.clickRightIcon1();
                break;

            default:
                break;
        }
    }
In this way, the interface can be invoked in the subclass and the operation can be clicked:
    setBaseRightIcon1(R.mipmap.more, "More", new OnClickRightIcon1CallBack() {
            @Override
            public void clickRightIcon1() {
                Log.i("Exception","It all found me.");
            }
    });
See Appendix 2 for the complete code.
appendix
Appendix 1
If we use getBaseBack().setOnClickListener(this) directly as envisioned, then if we override the OnClick method in MainActivity to process the return event, it will be like this:
@Override
    public void onClick(View v) {
        super.onClick(v);
        switch (v.getId()) {
            case R.id.base_back:
                Log.i("log","Can't you get out of here?");
                break;

            default:
                break;
        }
    }
As a result of execution, you can also see the output log of "Can't Back Out", but you can also see that the current Activity is closed.
This is why, carefully, you will find that this code is more than super.onClick(v); that is to say, before executing the rewritten OnClick, you need to execute OnClick in BaseActivity first, so naturally both parts will be executed.
Of course, maybe some people will say that now that we find the problem, let's annotate super.onClick(v); can't we?
This is certainly possible, but there is a premise that there will be no other click event handling in our BaseActivity's OnClick method, or that other click events will not react when you comment out this line of code. Unless you can rewrite everything you use.
Another point is that whenever you need to deal with the return button, you have to think about commenting out this line of code, or wait to talk to the leader.
So it would be easier to simply re-create an OnClickListener.
Appendix 2
BaseActivity
package com.mybaseapplication.base;

import android.app.Activity;
import android.content.Context;
import android.content.res.Resources;
import android.os.Bundle;
import android.support.v7.app.AppCompatActivity;
import android.util.Log;
import android.view.LayoutInflater;
import android.view.View;
import android.view.inputmethod.InputMethodManager;
import android.widget.ImageView;
import android.widget.LinearLayout;
import android.widget.RelativeLayout;
import android.widget.ScrollView;
import android.widget.TextView;

import com.mybaseapplication.R;

import butterknife.ButterKnife;

public class BaseActivity extends AppCompatActivity implements View.OnClickListener {

    public Activity context;
    private ImageView baseBack, baseRightIcon2, baseRightIcon1;
    private TextView baseTitle, baseRightText;
    private OnClickRightIcon1CallBack onClickRightIcon1;
    private OnClickRightIcon2CallBack onClickRightIcon2;
    private OnClickRightTextCallBack onClickRightText;

    @Override
    protected void onCreate(Bundle savedInstanceState) {
        super.onCreate(savedInstanceState);
        setContentView(R.layout.activity_base);
        ButterKnife.inject(this);
        context = this;
        initView();
    }

    /**
     * Hide the return key
     */
    private void hideBack() {
        baseBack.setVisibility(View.GONE);
    }

    /**
     * Get the return key
     */
    public ImageView getBackImage() {
        return baseBack;
    }

    /**
     * Initialization control
     */
    private void initView() {
        baseRightIcon1 = (ImageView) findViewById(R.id.base_right_icon1);
        baseRightIcon2 = (ImageView) findViewById(R.id.base_right_icon2);
        baseBack = (ImageView) findViewById(R.id.base_back);
        baseTitle = (TextView) findViewById(R.id.base_title);
        baseRightText = (TextView) findViewById(R.id.base_right_text);
        baseBack.setOnClickListener(this);
    }

    /**
     * Set title
     *
     * @param title Text of the title
     */
    public void setTitle(String title) {
        baseTitle.setText(title);
    }

    /**
     * Set image 1 on the right (rightmost)
     *
     * @param resId             Resource id of picture
     * @param alertText         Prompt text
     * @param onClickRightIcon1 Click Processing Interface
     */
    public void setBaseRightIcon1(int resId, String alertText, OnClickRightIcon1CallBack onClickRightIcon1) {
        this.onClickRightIcon1 = onClickRightIcon1;
        baseRightIcon1.setImageResource(resId);
        baseRightIcon1.setVisibility(View.VISIBLE);
        baseRightIcon1.setOnClickListener(this);
        //Information read when voice aids are prompted
        baseRightIcon1.setContentDescription(alertText);
    }

    /**
     * Set image 2 on the right (second image on the right)
     *
     * @param resId     Resource id of picture
     * @param alertText Prompt text
     */
    public void setBaseRightIcon2(int resId, String alertText, OnClickRightIcon2CallBack onClickRightIcon2) {
        this.onClickRightIcon2 = onClickRightIcon2;
        baseRightIcon2.setImageResource(resId);
        baseRightIcon2.setVisibility(View.VISIBLE);
        baseRightIcon2.setOnClickListener(this);
        //Information read when voice aids are prompted
        baseRightIcon2.setContentDescription(alertText);
    }

    /**
     * Setting text information on the right
     *
     * @param text Text to be set
     */
    public void setBaseRightText(String text, OnClickRightTextCallBack onClickRightText) {
        this.onClickRightText = onClickRightText;
        baseRightText.setText(text);
        baseRightText.setVisibility(View.VISIBLE);
        baseRightText.setOnClickListener(this);
    }

    /**
     * Reference header layout
     *
     * @param layoutId Layout id
     */
    public void setBaseContentView(int layoutId) {
        //When the height of the sub-layout is less than ScrollView, this method can be used to fill ScrollView to prevent the layout from being displayed.
        ((ScrollView) findViewById(R.id.base_scroll_view)).setFillViewport(true);
        LinearLayout layout = (LinearLayout) findViewById(R.id.base_main_layout);

        //Get the layout and display it on the basis of BaseActivity
        final View view = getLayoutInflater().inflate(layoutId, null);
        //turn off keyboard
        hideKeyBoard();
        //Focus the parent control of EditText to prevent the keyboard from popping up automatically
        view.setFocusable(true);
        view.setFocusableInTouchMode(true);
        LinearLayout.LayoutParams params = new LinearLayout.LayoutParams(
                LinearLayout.LayoutParams.MATCH_PARENT, LinearLayout.LayoutParams.MATCH_PARENT);
        layout.addView(view, params);
    }

    /**
     * Hidden keyboard
     */
    public void hideKeyBoard() {
        View view = ((Activity) context).getWindow().peekDecorView();
        if (view != null) {
            InputMethodManager inputmanger = (InputMethodManager) context.getSystemService(Context.INPUT_METHOD_SERVICE);
            inputmanger.hideSoftInputFromWindow(view.getWindowToken(), 0);
        }
    }

    @Override
    public void onClick(View v) {
        switch (v.getId()) {
            //Return key
            case R.id.base_back:
                finish();
                break;

            //Picture 1
            case R.id.base_right_icon1:
                onClickRightIcon1.clickRightIcon1();
                break;

            //Picture 2
            case R.id.base_right_icon2:
                onClickRightIcon2.clickRightIcon2();
                break;

            //Right side text
            case R.id.base_right_text:
                onClickRightText.clickRightText();
                break;

            default:
                break;
        }
    }

    /**
     * Picture Point Callback Interface
     */
    public interface OnClickRightIcon1CallBack {
        void clickRightIcon1();
    }

    public interface OnClickRightIcon2CallBack {
        void clickRightIcon2();
    }

    public interface OnClickRightTextCallBack {
        void clickRightText();
    }
}
MainActivity
package com.mybaseapplication.ui.activity;

import android.os.Bundle;
import android.util.Log;
import android.view.View;

import com.mybaseapplication.R;
import com.mybaseapplication.base.BaseActivity;

public class MainActivity extends BaseActivity {

    @Override
    protected void onCreate(Bundle savedInstanceState) {
        super.onCreate(savedInstanceState);
        setBaseContentView(R.layout.activity_main);
        //Setting title text
        setTitle("new Title");
        //Setting Back Interception
        getBaseBack().setOnClickListener(new View.OnClickListener() {
            @Override
            public void onClick(View v) {
                Log.i("log","Can't you get out of here?");
            }
        });
        //Setting function keys and clicking method callback monitor
        setBaseRightIcon1(R.mipmap.more, "More", new OnClickRightIcon1CallBack() {
            @Override
            public void clickRightIcon1() {
                Log.i("Exception","It all found me.");
            }
        });
    }
}