Preface
To be a great Android developer, you need a complete Knowledge System Here, let's grow up as we want.
== Complete project unit test learning case
It is well known that a good project needs to be built over time, and some effective testing is a useful tool to speed up the process.This blog post will take you through and step by step into Android unit testing.
What is unit testing?
Unit testing is the process of verifying the correctness of a method in a class. Units are individual particles, and most of them are methods in Android and Java.
Why unit testing?
Unit testing improves development efficiency, and as a project grows over iterations, the time required to compile, run, package, and debug each time increases, so it is possible to perform functional or logical tests on a single method without this step. At the same time, in order to be able to test each subdivision function module, its related code needs to be extracted into corresponding methods to encapsulate, which also improves the code design to some extent.Because it is a test of a single method, bug s can be located more quickly.
The unit test case needs to validate this business logic.During the validation process, developers can gain a deep understanding of the business process, while newcomers come to the project unit test to see which logic runs how many functions and which boundaries they need to be aware of - yes, unit tests do as well as documentation to provide business guidance.
Classification of Android Tests
There are three main aspects of Android testing:
Unit Testing (Junit4, Mockito, PowerMockito, Robolectric)
UI testing (Espresso, UI Automator)
Pressure test (Monkey)
1. Base of Unit Testing Junit4
What is Junit4?
Junit4 is the de facto Java Standard Test library, and it is the largest improvement in the JUnit framework ever. Its main goal is to simplify the writing of test cases using the Annotation feature of Java5.
Start unit testing with Junit4
1.Android Studio has automatically integrated the Junit4 test framework as follows
dependencies {
    ...
    testImplementation 'junit:junit:4.12'
}
2. Important notes related to the use of the Junit4 framework are as follows
[@Test](https://my.oschina.net/azibug) indicates that this is a test method (@Test comment can accept two parameters, one is expected error)
expected, one is timeout time timeout.
The format is @Test(expected = IndexOutOfBoundsException.class),
@Test(timeout = 1000)
[@Before](https://my.oschina.net/u/3870904) Executed before all test methods
 @After executes after all test methods
 @BeforeClass is enforced Before all test methods and @BeforeClass methods of this class
 Row (Modified method must be static)@AfterClass for all test methods in this class and @After
 Execute after method (Modified method must be static)
@Ignore ignores this unit test
In addition, many times, for some reason (for example, the formal code has not yet been implemented), we may want JUnit to ignore certain methods so that it does not run all of them.It's also easy to do this by prefixing @Ignore to the test method that needs to be ignored
3. Main Test Method - Assertion
assertEquals(expected, actual) determines whether two values are equal, and equality passes the test.
assertEquals(expected, actual, tolerance) tolerance deviation
Note: Each of the above methods has an overloaded method that can be added with a String type parameter to indicate that if the validation fails, the string will be used as the result of the failure report.
4. Customize Junit Rule - Implement the TestRule interface and override the apply method
public class JsonChaoRule implements TestRule {

    @Override
    public Statement apply(final Statement base, final Description description) {
        Statement repeatStatement =  new Statement() {
            @Override
            public void evaluate() throws Throwable {
                    //Initialization before testing
                    //Execute test methods
                    base.evaluate();
                    //Release resources after testing, etc.
            }
        };
        return repeatStatement;
    }
}
Then use the @Rule annotation to declare using JsonChaoRule in the desired test class (note that variables annotated by @Rule must be final):
@Rule
public final JsonChaoRule repeatRule = new JsonChaoRule();
5. Get started, use Junit4 for unit testing
1. Write test classes.
2. Right click on the test class and select Go To->Test
 (Or use the shortcut Ctrl+Shift+T, which allows you to
 To switch back and forth between methods and test methods) in Test/java/project
 Automatically generate test templates under test folder/
3. Use assertions (assertEqual, assertEqualArrayEquals, and so on) for unit testing.
4. Right-click on the test class and Run writes the test class.
6. Automate unit testing using the Gradle script that comes with Android Studio
Click app/Tasks/verification/test under Gradle projects in Android Studio to test all test classes (cases) under module at the same time, and generate corresponding index.html test reports under module build/reports/tests/
7. Summary of Junit4:
Advantages: Fast, supports code quality detection tools such as code coverage,
Disadvantages: It is not possible to operate on Android UI alone, some classes, and some differences from native JAVA.
Additional concepts that may be involved:
Piling method: Make the method simple and quick to return a valid result.
Test-driven development: Write tests, implement functionality to make tests pass, and then continue to use this approach for fast, iterative development of functionality.
2. The Foundation of Unit Testing Mockito
What is Mockito?
Mockito is a tasty Java unit test mock framework that simulates a wide variety of objects in place of real objects to respond as expected.
Start unit testing with Mockito
1. Add Mcokito dependencies to build.gradle
testImplementation 'org.mockito:mockito-core:2.7.1'
2. Simulating objects using mock() method
Person mPerson = mock(Person.class);
Energy Supplement Station (-vov-)
Within the JUnit framework, case (that is, each test point, the function annotated with @Test) is also a function. Calling this function directly is not a case, and case is irrelevant. They do not affect each other and can be called directly to reduce duplicate code.Unit tests should not be over-coupled to a condition, so you need to uncouple with a mock and directly mock out the data from the network request to validate the page's response to the data separately.
3. Verify method calls, specify method return values, or perform specific actions
when(iMathUtils.sum(1, 1)).thenReturn(2);
doReturn(3).when(iMathUtils).sum(1,1);
//Setting a stake to a method can be set multiple times, returning only the last set value
doReturn(2).when(iMathUtils).sum(1,1);

//Number of validation method calls
//Method call once
Mockito.when(mockValidator.verifyPassword("xiaochuang_is_handsome")).thenReturn(true);
//Method Call Three Times
Mockito.when(mockValidator.verifyPassword("xiaochuang_is_handsome")
, Mockito.times(3).thenReturn(true);

//The verify method is used to validate the interaction of "mimic objects" or to validate certain behaviors that occur
verify(mPerson, atLeast(2)).getAge();

//A parameter matcher that matches a specific parameter
any()
contains()
argThat()
when(mPerson.eat(any(String.class))).thenReturn("Steamed Rice");

//In addition to mock(), spy() can also simulate objects, spy and mock's
//The only difference is that the default behavior is different: method default calls to spy objects
//True logic, mock object methods default to nothing, or directly
//Return Default
//If you want to preserve the function of the original object, only modify one or more
//Return value of the method, spy method can be used, no parameter constructed class initialization
//Conversion also uses the spy method
Person mPerson = spy(Person.class);

//Check the participating mocks for any unauthenticated interactions
verifyNoMoreInteractions(iMathUtils);
4. Thinking after using Mockito
Simple testing makes the overall code simpler, more readable, and more maintainable.If you can't write a test easily, refactor your code while testing.
Advantages: Rich and powerful way to validate the interaction of "mimic objects" or to validate certain behaviors that occur
 Disadvantages: The Mockito framework does not support mock anonymous classes, final classes, static methods, and private methods.
Although the static method can implement mockito's unit tests using wrapper static classes, it is cumbersome, so PowerMockito comes from it.
3. Save Mockito in the Bad and Hot PowerMockito
What is PowerMockito?
PowerMockito is a more powerful unit testing framework that extends Mockito and supports mock anonymous, final, static, and private methods
Start a trip to PowerMockito
1. Add Mcokito dependencies to build.gradle
testImplementation 'org.powermock:powermock-module-junit4:1.6.5'
testImplementation 'org.powermock:powermock-api-mockito:1.6.5'
2. Simulate objects with PowerMockito
//Use PowerMock with comments written in @PrepareForTest and @RunWith(PowerMockRunner.class) (@PrepareForTest()
// It is the class of the corresponding method, and mockito supports methods that are implemented in the form of PowerMock without these two annotations)
@PrepareForTest(T.class)
@RunWith(PowerMockRunner.class)

//Classes with static methods or fields for mock s
PowerMockito.mockStatic(Banana.class);

//Powermock provides a Whitebox class to easily bypass permission restrictions and get/set private s for injection.
//private methods can also be called.You can also work with the properties/methods of static s by choosing different methods for different parameters based on different requirements.
//Modify the value of a static field in a class
Whitebox.setInternalState(Banana.class, "COLOR", "blue");

//Call the real method in the class
PowerMockito.when(banana.getBananaInfo()).thenCallRealMethod();

//Verify that private methods are called
PowerMockito.verifyPrivate(banana, times(1)).invoke("flavor");

//Ignore calling private methods
PowerMockito.suppress(PowerMockito.method(Banana.class, "flavor"));

//Modify private variables
MemberModifier.field(Banana.class, "fruit").set(banana, "watermelon");

//Objects that come out with PowerMockito mock can call the final method directly
Banana banana = PowerMockito.mock(Banana.class);

//The whenNew method means that when the new object is later, it returns a Mock object instead of letting the real new
//New object.If the construction method has parameters, it can be passed in the withNoArguments method.
PowerMockito.whenNew(Banana.class).withNoArguments().thenReturn(banana);
3. Using PowerMockRule instead of @RunWith(PowerMockRunner.class) requires adding the following additional dependencies:
testImplementation "org.powermock:powermock-module-junit4-rule:1.7.4"
testImplementation "org.powermock:powermock-classloading-xstream:1.7.4"
Examples of use are as follows:
@Rule
public PowerMockRule mPowerMockRule = new PowerMockRule();
4. Use Parameterized for parameterized testing:
Provide a series of data to constructor parameters by annotating @Parameterized.parameters Or to public global variable annotated by @Parameterized.parameter
RunWith(Parameterized.class)
public class ParameterizedTest {

    private int num;
    private boolean truth;

    public ParameterizedTest(int num, boolean truth) {
        this.num = num;
        this.truth = truth;
    }

    //The method annotated by this annotation injects the corresponding elements in the returned list data into the test class
    //In the constructor ParameterizedTest(int num, boolean truth)
    @Parameterized.Parameters
    public static Collection providerTruth() {
        return Arrays.asList(new Object[][]{
                {0, true},
                {1, false},
                {2, true},
                {3, false},
                {4, true},
                {5, false}
        });
    }

//    //You can also inject public variables using annotations without using constructor injection
//    @Parameterized.Parameter
//    public int num;
//    //value = 1 Specifies the second Boolean value in parentheses
//    @Parameterized.Parameter(value = 1)
//    public boolean truth;

    @Test
    public void printTest() {
        Assert.assertEquals(truth, print(num));
        System.out.println(num);
    }

    private boolean print(int num) {
        return num % 2 == 0;
    }

}
4. Robolectric capable of executing Android code in Java unit tests
What is Robolectric?
Robolectric solves the pain point of Android unit testing in Java unit testing by using a set of Android code that runs on the JVM.
Enter Roboletric's territory
1. Add Robolectric dependencies to build.gradle
    //Robolectric Core
    testImplementation "org.robolectric:robolectric:3.8"
    //support-v4 support
    testImplementation 'org.robolectric:shadows-support-v4:3.4-rc2'
    //Support for Multidex functionality
    testImplementation "org.robolectric:shadows-multidex:3.+"
2. Common Robolectric usages
Configure above the specified test class first
@RunWith(RobolectricTestRunner.class)
//Robolectric currently supports up to 23 versions of sdk.
@Config(constants = BuildConfig.class, sdk = 23)
Here are some common uses
//When the Robolectric.setupActivity() method returns,
//Activity's onCreate(), onStart(), onResume() are called by default
mTestActivity = Robolectric.setupActivity(TestActivity.class);

//Get the shadow class corresponding to the TestActivity so that you can get its corresponding action or behavior
ShadowActivity shadowActivity = Shadows.shadowOf(mTestActivity);
Intent intent = shadowActivity.getNextStartedActivity();

//Use the ShadowToast class to get the appropriate action or behavior for displaying toast
Toast latestToast = ShadowToast.getLatestToast();
Assert.assertNull(latestToast);
//Get text in Toast directly from the ShadowToast simple factory class
Assert.assertEquals("hahaha", ShadowToast.getTextOfLatestToast());

//Use the ShadowAlertDialog class to get the corresponding when displaying AlertDialog
//Actions or Behaviors (only supported under app package for the time being, not v7.)
latestAlertDialog = ShadowAlertDialog.getLatestAlertDialog();
AlertDialog latestAlertDialog = ShadowAlertDialog.getLatestAlertDialog();
Assert.assertNull(latestAlertDialog);

//Available using RuntimeEnvironment.application
//Application, easy for us to use.For example, access resource files.
Application application = RuntimeEnvironment.application;
String appName = application.getString(R.string.app_name);
Assert.assertEquals("WanAndroid", appName);

//application can also be obtained directly from ShadowApplication
ShadowApplication application = ShadowApplication.getInstance();
Assert.assertNotNull(application.hasReceiverForIntent(intent));
Custom Shadow Class
@Implements(Person.class)
public class ShadowPerson {

    @Implementation
    public String getName() {
        return "AndroidUT";
    }

}

@RunWith(RobolectricTestRunner.class)
@Config(constants = BuildConfig.class,
        sdk = 23,
        shadows = {ShadowPerson.class})

    Person person = new Person();
    //What's actually called is the ShadowPerson method, which outputs JsonChao
    Log.d("test", person.getName());

    ShadowPerson shadowPerson = Shadow.extract(person);
    //Test Passed
    Assert.assertEquals("JsonChao", shadowPerson.getName());

}
Be careful: Asynchronous testing has some problems (such as changing some coding habits, such as callback functions can't be written as anonymous internal class objects, need to define a global variable and break its encapsulation, that is, provide a get method for UT calls), solution uses Mockito to combine testing to turn asynchronous to synchronous.
3. Advantages and disadvantages of Robolectric
Advantages: Most Android platforms rely on bottom class references and simulations.
Disadvantages: Asynchronous testing is problematic and requires a combination of frameworks to accomplish more.
5. jacoco generated by unit test coverage report
What is Jacoco
Jacoco's full name is Java Code Coverage, which generates a unit test code coverage report for java.
Join Jacoco to your unit test family
Add a jacoco.gradle custom script under the application Module, app.gradle apply from It, synchronize, you can see that the Report directory is generated under the app's Task, the Report directory The JacocoTestReport task is generated below.
apply plugin: 'jacoco'

jacoco {
    toolVersion = "0.7.7.201606060606" //Specify the version of jacoco
    reportsDir = file("$buildDir/JacocoReport") //Specify the folder where jacoco generates reports
}

//Depends on the testDebugUnitTest task
task jacocoTestReport(type: JacocoReport, dependsOn: 'testDebugUnitTest') {
    group = "reporting" //Specify the grouping of task
    reports {
        xml.enabled = true //Open xml Report
        html.enabled = true //Open html report
    }

    def debugTree = fileTree(dir: "${buildDir}/intermediates/classes/debug",
            includes: ["**/*Presenter.*"],
            excludes: ["*.*"])//Specify class folders, rules that contain classes, and rules that exclude classes.
            //Here we generate test reports for all Presenter classes
    def mainSrc = "${project.projectDir}/src/main/java" //Specify Source Directory

    sourceDirectories = files([mainSrc])
    classDirectories = files([debugTree])
    executionData = files("${buildDir}/jacoco/testDebugUnitTest.exec")//Specify the path to report data
}
Under App/Task/verifications under Gradle.projects, where the testDebugUnitTest build task generates unit test results reports in xml and html formats, corresponding to the test-results and reports folders, respectively; the jacoTestReport task generates unit test coverage reports, which are stored in the Jaco and JacocoReport s folders.
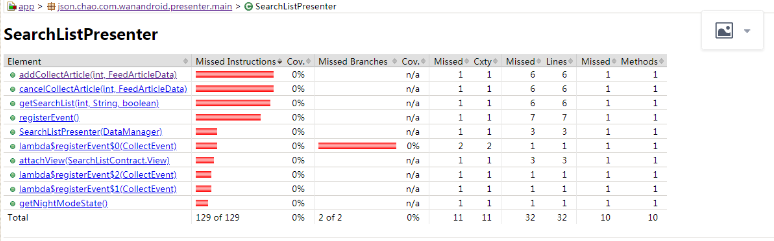
The index.html under the generated JacocoReport folder is the corresponding unit test coverage report. When you open it with a browser, you can see that the coverage is identified by different colors, with green indicating that the code is covered by the unit test, yellow indicating that it is partially covered, and red indicating that it is not covered at all.
6. Process of unit testing
To verify the correctness of a program, all possible conditions (extreme programming) must be given, and their behavior or results verified before it is considered a 100% coverage condition.In a real project, validating the general and boundary conditions is OK.
In a real project, unit test objects are one-to-one with pages, and cross-page is not recommended. Such unit test coupling is too large to maintain. Once you've finished writing, look at the coverage, find out the function branch conditions that are not covered in the unit test, and so on, then continue to supplement the unit test case list and add cases to the unit test project code. The unit test for the project ends until all important branches of logic and boundary conditions are covered on the planning page.
Suggestion (-ovo-)~
You can use it on a small scale from your company's projects to develop your own unit testing style, and then you can follow it to a wider scale.
Reference link:
1,Always | Everything about Android testing is here
2,Unit and UI testing in Android Studio
appreciate
If this library is of great help to you, you are willing to support the further development of this project and the ongoing maintenance of this project.You can scan the QR code below and let me have a cup of coffee or beer.Thank you very much for your donation.Thank you!
<div align="center"> <img src="https://user-gold-cdn.xitu.io/2020/1/7/16f7dc32595031fa?w=1080&h=1457&f=jpeg&s=93345" width=20%><img src="https://user-gold-cdn.xitu.io/2020/1/7/16f7dc3259518ecd?w=990&h=1540&f=jpeg&s=110691" width=20%> </div>
Contanct Me
# WeChat:
Welcome to my WeChat: bcce5360
# WeChat Group:
If you can't sweep code to join the WeChat group, please invite your friends who want to join the WeChat group, and add me to WeChat to pull you into the group.
<div align="center"> <img src="https://user-gold-cdn.xitu.io/2020/1/7/16f7dc352011e1fe?w=1013&h=1920&f=jpeg&s=86819" width=35%> </div>
The QQ group:
2,000 people QQ group, Awesome-Android learning and communication group, QQ group number: 959936182, welcome to join ~
About me
-
Email: chao.qu521@gmail.com
-
Blog: https://jsonchao.github.io/
-
Nuggets: https://juejin.im/user/5a3ba9375188252bca050ade