7, Web component injection
1. Web native component injection (Servlet, Filter, Listener)
-
Method 1: use @ ServletComponentScan + web3.0 annotation
-
Add the ServletComponentScan("") annotation on the main startup class of MainApplicationContext
@ServletComponentScan("day01.view") @SpringBootApplication public class MainApplicationContext { public static void main(String[] args) { SpringApplication.run(ViewApplication.class, args); } } -
Add web3.0 annotations to Servlet, Filter and Listener respectively
@WebServlet("/my")
public class MyServlet extends HttpServlet {
}
@WebFilter("/css/*") public class MyFilter implements Filter { }@WebListener public class MyListener implements ServletContextListener { }
-
-
Method 2: use RegistrationBean
-
Write your own web components
//Servlet public class MyServlet extends HttpServlet { } //Filter public class MyFilter implements Filter { } //Listener public class MyListener implements ServletContextListener { } -
Write a configuration class to register these beans
@Configuration(proxyBeanMethods = true)//FilterRegistrationBean depends on Servlet correlation
public class WebConfig {
    //Register Servlet
    @Bean
    public ServletRegistrationBean servletRegistration(){
        MyServlet servlet = new MyServlet();
        return new ServletRegistrationBean(servlet,"/my");
    }
	//Register Filter
    @Bean
    public FilterRegistrationBean filterRegistrationBean(){
        MyFilter filter = new MyFilter();
        return new FilterRegistrationBean(filter,servletRegistration());
    }
	//Register Listener
    @Bean
    public ServletListenerRegistrationBean servletListenerRegistrationBean(){
        MyListener listener = new MyListener();
        return new ServletListenerRegistrationBean(listener);
    }
}
-
2. Dispatcher servlet principle
-
To answer this question, we must first find out how the dispatcher servlet is injected
- The DispatcherServlet property is automatically configured in the container and bound to webmvcproperties (the configuration item is spring.mvc)
- Configure the DispatcherServlet into the through servletregistrationbean < DispatcherServlet >
- The default mapping is / path
-
The mapping path of the dispatcher servlet mentioned above is /, which is related to the priority processing path of Tomcat. See the figure below
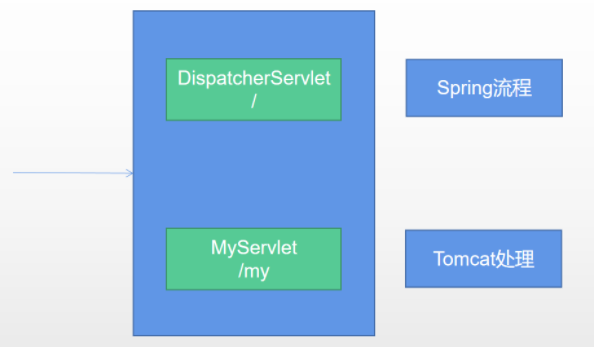
-
Tomcat path priority processing is based on the principle of precise optimization (that is, when multiple servlets can handle unified layer paths, the precise path takes priority)
-
This explains why native web APIs are not intercepted by Spring's interceptors
3. Embedded Servlet container
-
WebServer supported by default
- Tomcat Jetty Undertow Netty
- The servlet webserver ApplicationContext container starts looking for the servlet webserverfactory and guides the creation of the server
-
How to switch servers
<dependency>
    <groupId>org.springframework.boot</groupId>
    <artifactId>spring-boot-starter-web</artifactId>
    <exclusions>
        <exclusion>
            <groupId>org.springframework.boot</groupId>
            <artifactId>spring-boot-starter-tomcat</artifactId>
        </exclusion>
    </exclusions>
</dependency>
<!--Above configuration: SpringBoot default Web Container is Tomcat,Will now Tomcat remove-->
<!--Then you can import the server you want to configure. See the details Spring Official documents-->
<dependency>
    <groupId>org.springframework.boot</groupId>
    <artifactId>spring-boot-starter-undertow</artifactId>
</dependency>
4. Principle of embedded Servlet container
- When the SpringBoot application starts and finds that it is a web application, the web scenario package - Import Tomcat
- The web application will create a web version of the IOC container servletwebserver ApplicationContext
- When the servlet webserver ApplicationContext starts, look for the servlet webserverfactory (the servlet's web server factory)
- By default, there are multiple WebServer factories (tomcatservlet webserverfactory, jettyservletwebserverfactory, etc.) in the bottom layer of SpringBoot
- The bottom layer has an automatic configuration class ServletWebServerFactoryAutoConfiguration
- ServletWebServerFactoryAutoConfiguration imported servletwebserverfactoryconfiguration (configuration class)
- ServletWebServerFactoryConfiguration configuration class. According to the dynamic judgment, if the package of the web server is imported into the system (tomcat package is imported from the default web starter), there will be the factory class of the web container in the container
- Tomcat servlet webserverfactory creates and starts the Tomcat server. The constructor of Tomcat webserver has the initialization method initialize() this.tomcat.start()
- The embedded server is the code call to start the server manually (the tomcat core jar package exists)
5. Spring boot customization principle
-
Customized configuration mode
-
Modify the core configuration file (application.properties/application.yaml)
-
Write a custom configuration class, xxconfiguration + @ bean replacement, and add the default component in the container and view parser
-
For web applications, write a configuration class. Within the time limit, WebMvcfigurer can customize web functions and combine @ Bean to extend components in the container
@Configuration//Annotation this is a control class public class WebConfig implements WebMvcConfigurer { } -
@EnableWebMvc + WebMvcConfigurer and @ Bean can fully take over spring MVC, reconfigure all rules, and realize customization and extension functions
-
Principle of this method
-
Webmvcoautoconfiguration is the default spring MVC auto configuration function class (static resources, welcome page)
-
Once @ EnableWebMvc is used, DelegatingWebMvcConfiguration.class will be imported
@Import(DelegatingWebMvcConfiguration.class) public @interface EnableWebMvc { } -
DelegatingWebMvcConfiguration function: it can only guarantee the use of the most basic functions of spring MVC
- Bring the WebMvcConfigurer in the system. The customization of all functions takes effect when these webmvcconfigurers are combined
- Some very low-level components are automatically configured. RequestMappingHandlerMapping and the components that these components depend on are obtained from the container
-
To make the configuration in webmvcconfiguration effective, you must @ ConditionalOnMissingBean(WebMvcConfigurationSupport.class)
-
@EnableWebMvc caused webmvcaiutoconfiguration not to take effect
-
-
-
-
How to conduct principle analysis
- Importing scenario starter - > xxxautoconfiguration - > importing Xxx components - > binding xxxproperties - > binding configuration file items