Summary:
It is not difficult to build an MQTT server on linux CentOS. It mainly uses mosquitto, a message broker service software. It adopts publish / subscribe mode transmission mechanism, which is lightweight, simple, open and easy to implement. It is widely used in the Internet of things.
MQTT is a client server based message publish / subscribe transmission protocol. It is widely used in IoT. It has several main characteristics:
 1. Use Publishing/The subscription transmission mode realizes one to many publishing and receiving, and reduces the coupling between applications
 2. It can shield the transmission of load content.
 3. Support the subscription and publishing of different accounts, realize the separation of read and write permissions, and ensure the security of data publishing
 4. adopt TCP/IP Provide network connection, facilitate implementation, and support security policy control
 5. The length of the protocol header is short, the network transmission overhead is small, and the traffic is saved
 6. Three message quality modes are supported:
 7. Send the message once at most, regardless of whether the message is accepted successfully
 8. At least once, ensure that the message will arrive and the order will be repeated
 9. Only once, ensure that the message arrives only once
 10. adopt last will and testament And other features notify the client of abnormal interruption
My linux version is CentOS Linux release 7.9.2009 (Core)
1, Install software
1.1 enter the following command
yum install gcc-c++
yum install cmake
yum install openssl-devel
1.2. Create a new file
Create a new software folder, Download mosquitto, the next no higher no lower version, and unzip:
mkdir software
cd software
wget http://mosquitto.org/files/source/mosquitto-1.4.10.tar.gz
tar -xzvf mosquitto-1.4.10.tar.gz
However, mosquitto cannot be compiled and installed here
The following three extensible software are not installed and will not affect the use of mosquitto:
1.4. Install c-areas (library supporting asynchronous DNS lookup)
wget http://c-ares.haxx.se/download/c-ares-1.10.0.tar.gz
tar xvf c-ares-1.10.0.tar.gz
cd c-ares-1.10.0
./configure
make
sudo make install
1.5. Install lib uuid (support to generate unique uuid for each connected client)
yum install libuuid-devel
1.6. Install lib websocket s (support applications requiring WebSockets)
wget https://github.com/warmcat/libwebsockets/archive/v1.3-chrome37-firefox30.tar.gz
tar zxvf v1.3-chrome37-firefox30.tar.gz
cd libwebsockets-1.3-chrome37-firefox30
mkdir build
cd build
cmake .. -DLIB_SUFFIX=64
make install
But I'm doing cmake... - Dlib_ An error is reported when suffix = 64:
CMake Error: The source directory "*" does not appear to contain CMakeLists.txt.
If you want to solve this problem, read this article: Solve CMake Error: The source directory "*" does not appear to contain CMakeLists.txt
It doesn't matter if you don't deal with the above problem. It's no big deal, but there's no corresponding function.
1.7. Modify the configuration of mosquitto
Let's modify the configuration of mosquitto:
cd mosquitto-1.4.10
vim config.mk
With inside_ SRV: = yes and WITH_UUID:=yes, all are annotated with # numbers
1.8 installation of mosquitto
Next, compile and install mosquitto:
make
sudo make install
Note: if libmosquitto.so.1 cannot be found during subsequent use, enter the following command under software to modify the location of libmosquitto.so:
sudo ln -s /usr/local/lib/libmosquitto.so.1 /usr/lib/libmosquitto.so.1
sudo ldconfig
2, Security configuration
2.1. Create user
sudo groupadd mosquitto
sudo useradd -g mosquitto mosquitto
2.2 program configuration
create profile
mv /etc/mosquitto/mosquitto.conf.example /etc/mosquitto/mosquitto.conf
2.3. Modify the default configuration
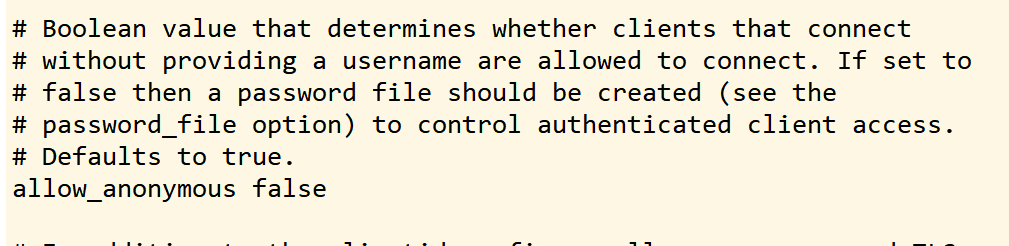
1. Turn off anonymous user login
Open the mosquitto.conf file (/ etc/mosquitto/mosquitto.conf) and find allow_anonymous node. This node is used to determine whether to enable anonymous user login. Remove the previous #, and change it to false.

2. Set user password file path
Find password_file node, which tells the server where the users you want to configure will be stored. Open this configuration and specify the pwfile.example file path (note the absolute path), around line 669.
password_file /etc/mosquitto/pwfile or / pwfile.example

3. Configure topic and user
acl_file /etc/mosquitto/aclfile.example

4. Add user information
Enter the user name at the end of the terminal, and then the password and confirmation password will pop up automatically. (note that you do not need to add - c when creating a user for the second time. If you add - c, the user created for the first time will be overwritten.)
mosquitto_passwd -c /etc/mosquitto/pwfile admin203
Then go to / etc/mosquitto/mosquitto.conf and add the following two user names and passwords.

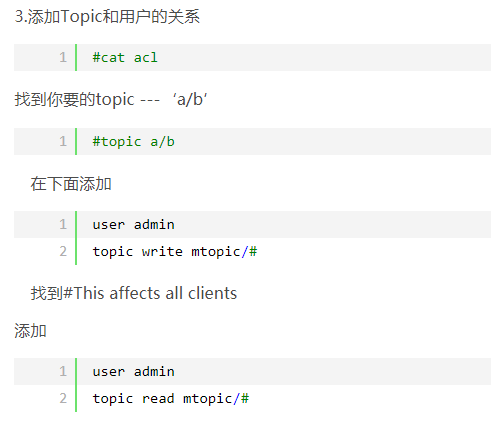
5. Add the relationship between Topic and user
vim /etc/mosquitto/aclfile.example
1. If you want to configure multiple users, you can configure topic and user acl_file /etc/mosquitto/aclfile
Save and exit. Return to the command line to rebuild the mqtt account cpsmqtt, which is used to read and write separated mosquitto_passwd -c /etc/mosquitto/pwfile cpsmqtt
Enter the password Cps123
2. Rebuild the mqtt account cpsread for read-write separation. Note that you do not need to add - c when creating a user for the second time. If you add - c, the user created for the first time will be overwritten.
mosquitto_passwd /etc/mosquitto/pwfile cpsread
Enter the password Cpsread123
vim /etc/mosquitto/aclfile.example
Shield useless, add
user cpsmqtt
topic write cps/#
user cpsread
topic read cps/#
Continue restarting mosquitto -c /etc/mosquitto/mosquitto.conf -d
If it doesn't work, you can set it directly
# This affects access control for clients with no username.
#user admin203
#topic read mtopic/#
#topic write mtopic/#
# This only affects clients with username "roger".
#user admin203
#topic write mtopic/#
#topic read mtopic/#
# This affects all clients.
#pattern write $SYS/broker/connection/%c/state
user admin203
topic read mtopic/#
topic write mtopic/#
It must be set here, or * * connection rejected: not authorized. * * exceptions will be thrown all the time.
6. Set user name and password
Turn off anonymous user login
Configure account password
7. User authentication test
mosquitto -c /etc/mosquitto/mosquitto.conf
1638589039: mosquitto version 1.4.10 (build date 2021-12-04 09:32:52+0800) starting
1638589039: Config loaded from /etc/mosquitto/mosquitto.conf.
1638589039: Opening ipv4 listen socket on port 1883.
1638589039: Opening ipv6 listen socket on port 1883
 Launcher: the default port is 1883
mosquitto -c /etc/mosquitto/mosquitto.conf -d
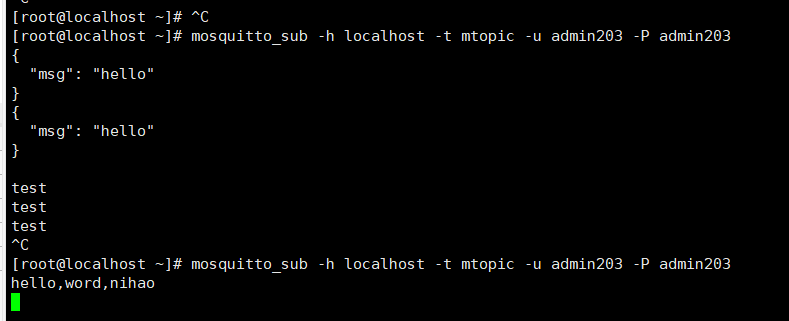
Open another (publish) window and enter:
producer:
mosquitto_pub -h localhost -t mtopic -u admin203 -P admin203 -m "hello,word,nihao" -p 1883
 perhaps
mosquitto_pub -h localhost -t mtopic -u admin203 -P admin203 -m "test"
In addition, open a server window and enter in a (subscription) window:
consumer:
mosquitto_sub -h localhost -t mtopic -u admin203 -P admin203
test
hello,word,nihao
3, Error resolution
3.1,libmosquitto.so.1 No such file or directory
./mosquitto_sub: error while loading shared libraries: libmosquitto.so.1: cannot open shared object file: No such file or directory
terms of settlement:
After compiling mosquitto, enter the Lib directory, copy the compiled libmosquitto.so.1 to the directory / usr/local/lib, and execute the following commands:
cp libmosquitto.so.1 /usr/local/lib
Then execute:
Execute command:
sudo ln -s /usr/local/lib/libmosquitto.so.1 /usr/lib/libmosquitto.so.1
Final execution
ldconfig
that will do
4, MQTTX client sending and receiving messages
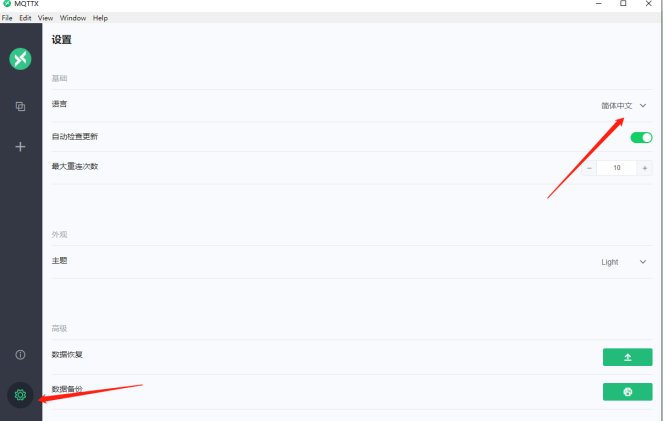
1. Download the client software installation package and click the installation package to install it directly MQTTX
2. The interface starts in English and can display Chinese
3. Create a connection, which can be created in both places
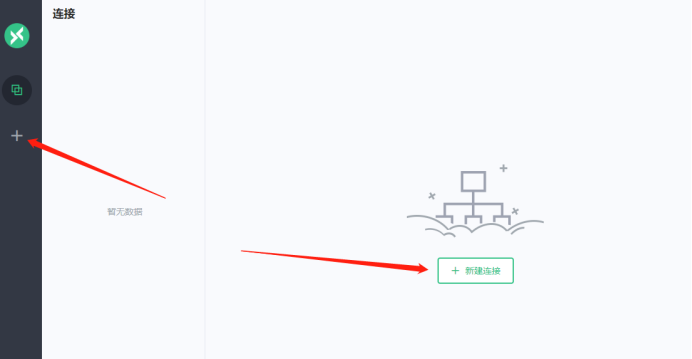
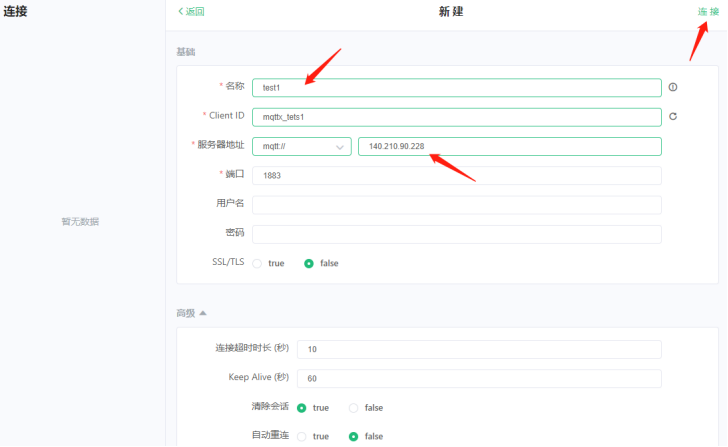
4. Mainly fill in the name, Client ID and server address, and connect
5. In the same step, create a test2 connection

6. Add a subscription in test1
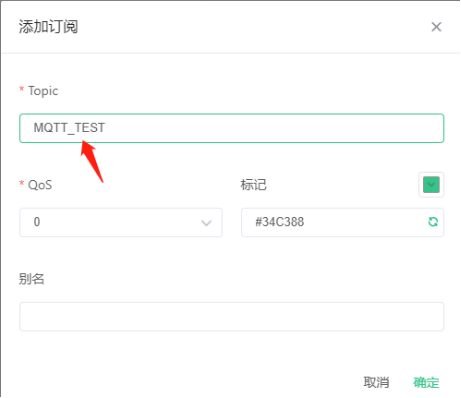
7. Enter the name of test1 subscription Topic in test2. Enter the content to send. Test1 can receive. Be sure to pay attention to the location where the Topic is written.
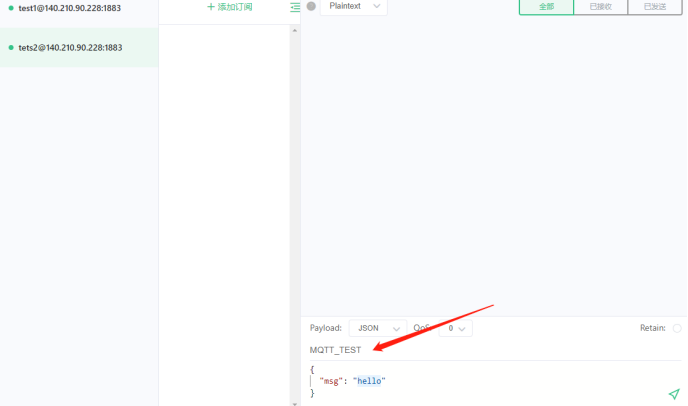
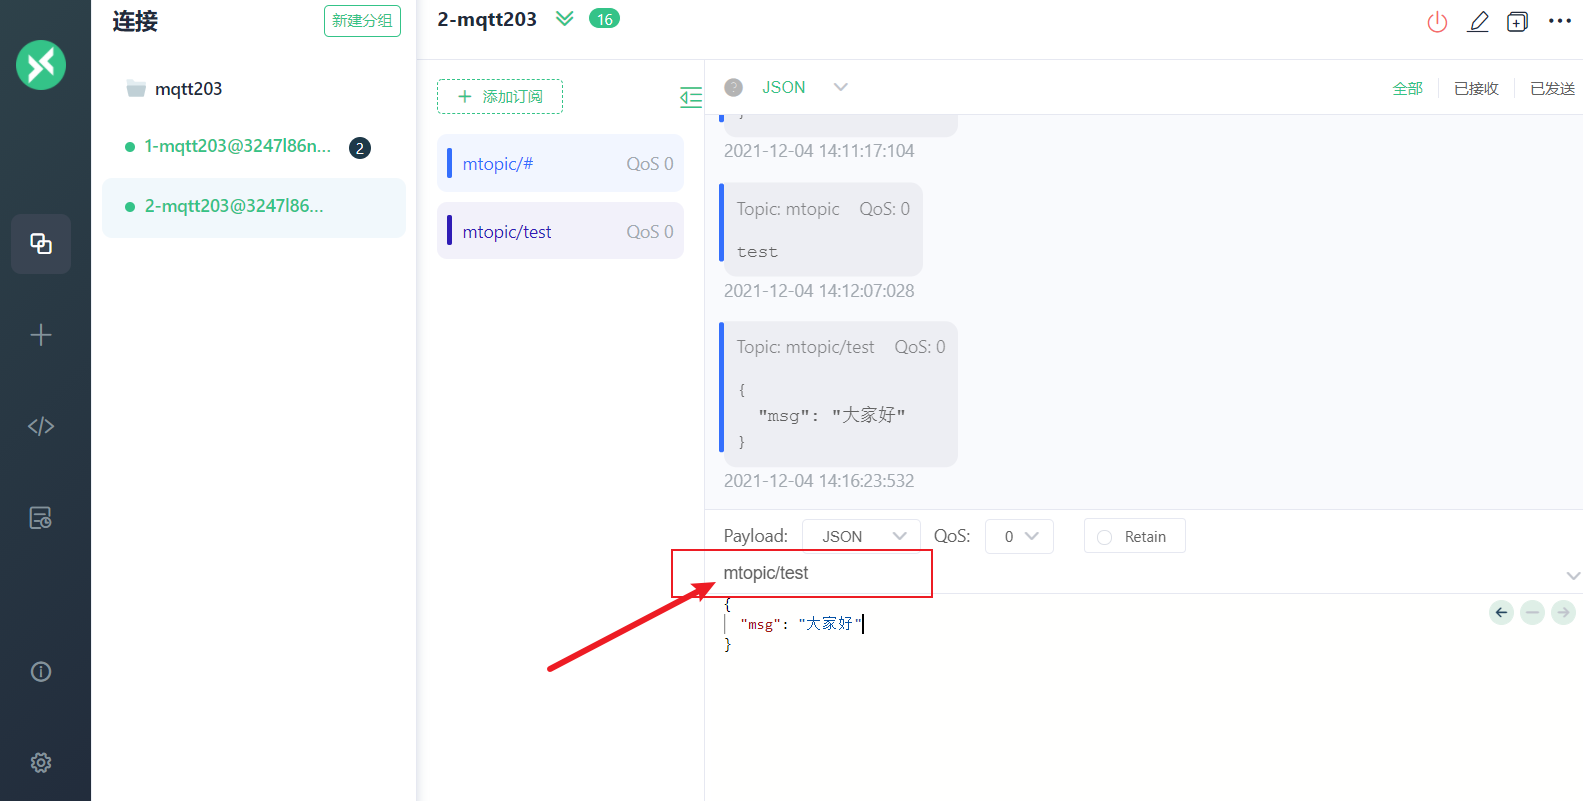
release

receive
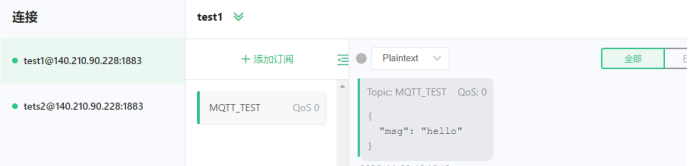
Conversely, test1 can also publish messages to test2.
Here, the MQTT is all finished and you can have fun, isn't it SoEasy~