catalogue
1, MySQL master-slave replication
1. Principle of master-slave replication
1. Replication types supported by MySQL
2. Working principle of MySQL master-slave replication
3.MySOL master-slave replication delay
1. The concept of MySQL read-write separation
2. The principle of MySQL read-write separation
three MySQL read / write separation
1. Internal implementation based on program code
2. Implementation based on intermediate agent layer
4. The role of reading and writing classification
5. When should I separate reading from writing
6. Build Amoeba to realize read-write separation
7. Verify polling read / write separation
1, MySQL master-slave replication
1. Principle of master-slave replication
1. Replication types supported by MySQL
- Statement based replication
- Row based replication
- Mixed type replication
2. Working principle of MySQL master-slave replication
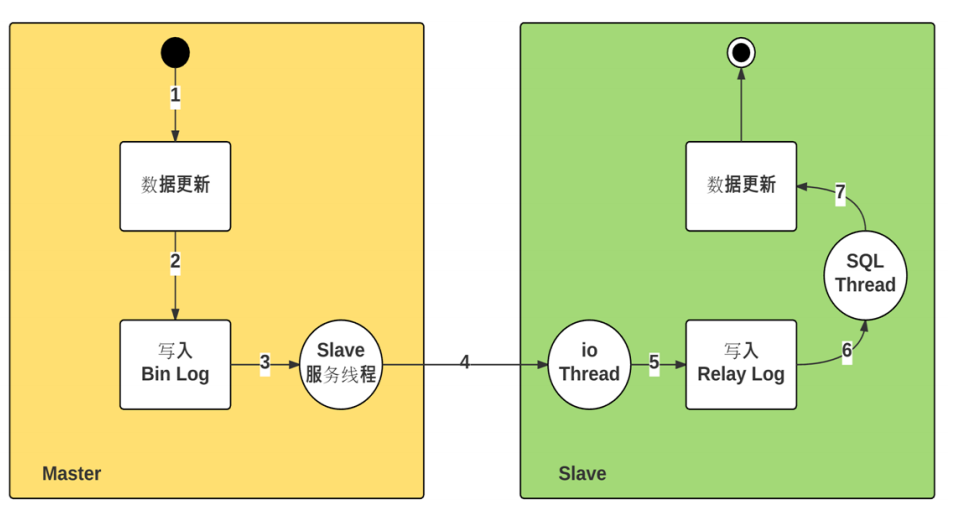
- The master database of the master server records operations to the Binary log through the dump thread
- Start the I/O thread from the server and send a synchronization log request to the master server
- The master server sends the binary log content to the slave server
- Synchronize binary logging operations from the server to the relay log (stored in the cache of the slave server)
- The sql thread in the slave server writes the operation recorded in the relay log to the slave server database after it is executed from the server
Primary node dump Thread
Slave node I/O Thread SQL Thread
3.MySOL master-slave replication delay
- The master server is highly concurrent, forming a large number of transactions
- Network delay
- The master-slave hardware device causes cpu master frequency, memory io and hard disk io
- It is not synchronous replication, but asynchronous replication
- Optimize Mysql parameters from the library. For example, increase innodb_buffer_pool_size, let more operations be completed in Mysgl memory and reduce disk operations. Use high-performance hosts from the library. Including strong cpu and increased memory. Avoid using virtual virtual hosts and use physical hosts, which improves i/o. The slave library uses SSD disk network optimization to avoid synchronization across machine rooms
4. Role of replication
-
data distribution
-
Load balanced read operation
-
backups
-
High availability and failover
-
MySQL upgrade test
2. Specific operation
Main server: 192.168.68.200
Slave server 1:192.168.68.30
Slave server 2: 192.168.69.105
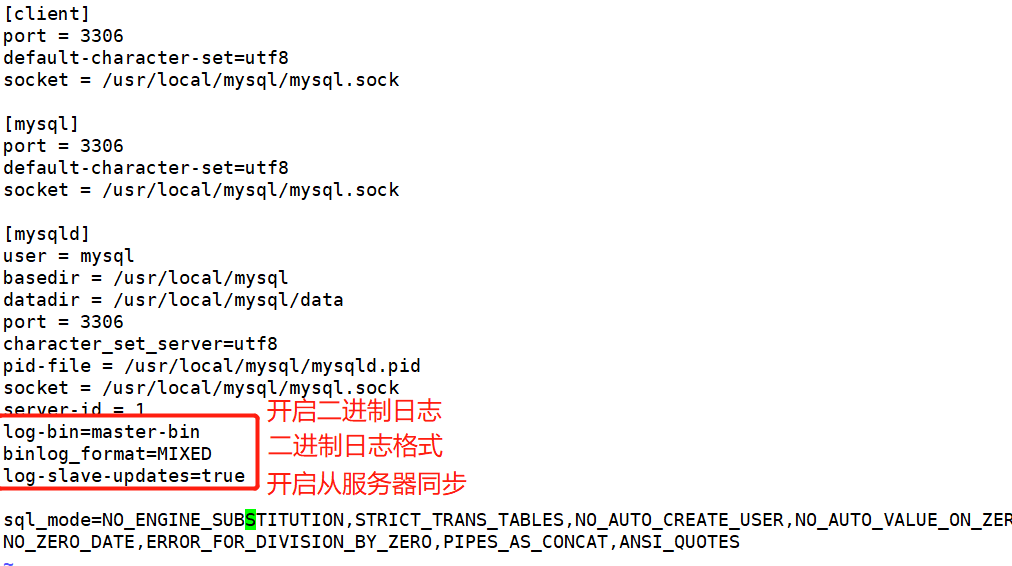
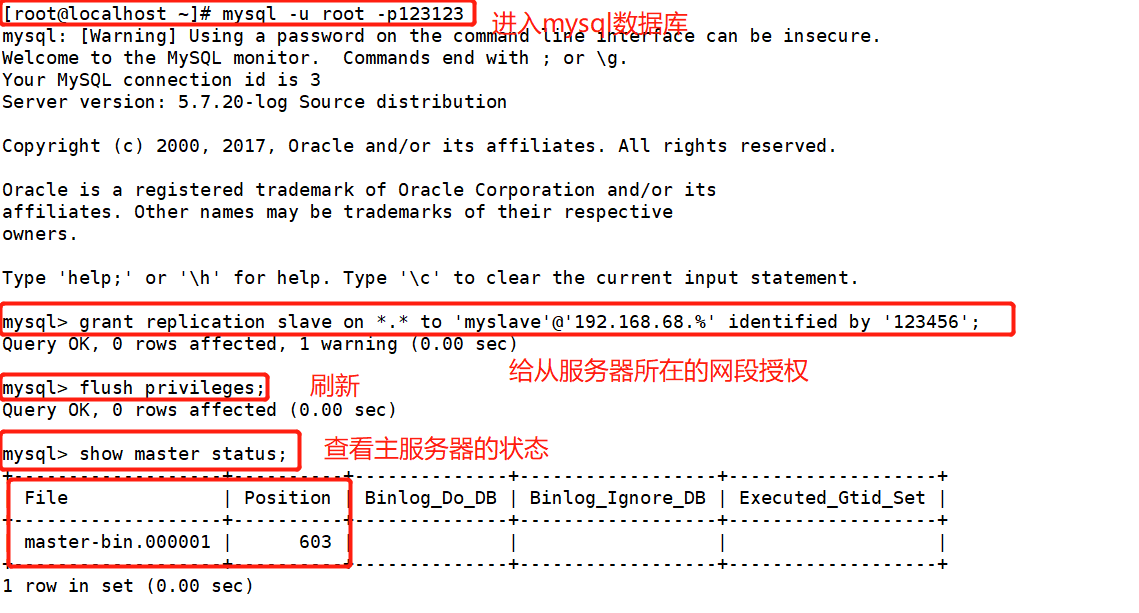
1. Main server 192.168.68.200
[root@localhost ~]# systemctl stop firewalld.service
[root@localhost ~]# setenforce 0
[root@localhost ~]# yum install -y ntp  ##Install master server time synchronization
[root@localhost ~]# vim /etc/ntp.conf
server 127.127.68.0
fudge  127.127.68.0 stratum 8
[root@localhost ~]# systemctl start ntpd
[root@localhost ~]# vim /etc/my.cnf
server-id = 1
log-bin=master-bin
binlog_format=MIXED
log-slave-updates=true
[root@localhost ~]# systemctl restart mysqld.service
[root@localhost ~]# mysql -u root -p123123  ##Enter database
mysql> grant replication slave on *.* to 'myslave'@'192.168.68.%' identified by '123456';
mysql> flush privileges;
mysql> show master status;
+-------------------+----------+--------------+------------------+-------------------+
| File              | Position | Binlog_Do_DB | Binlog_Ignore_DB | Executed_Gtid_Set |
+-------------------+----------+--------------+------------------+-------------------+
| master-bin.000001 |      603 |              |                  |                   |
+-------------------+----------+--------------+------------------+-------------------+


[root@localhost ~]# vim /etc/ntp.conf
127.127.68.0 on your own network segment


[root@localhost ~]# vim /etc/my.cnf

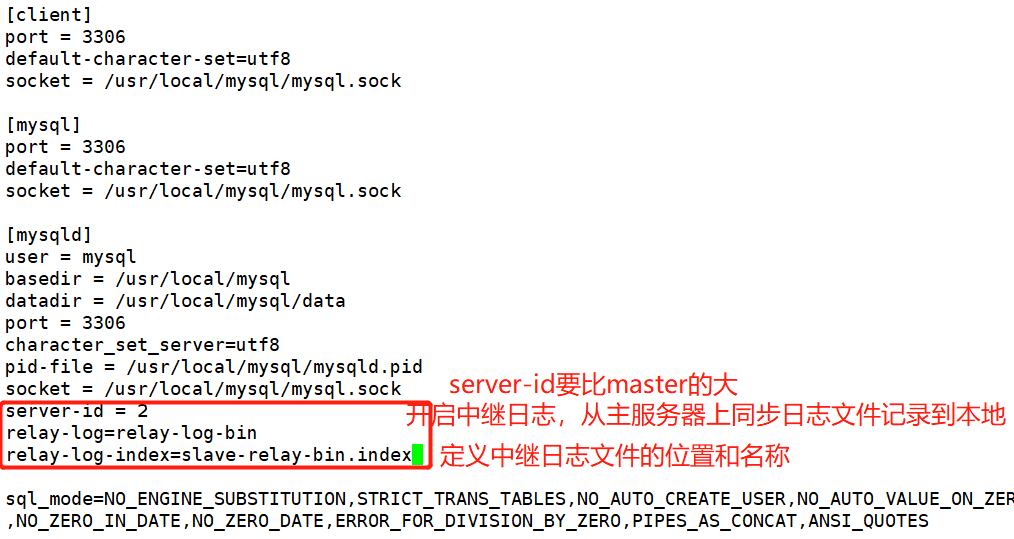
2. From server 192.168.68.30
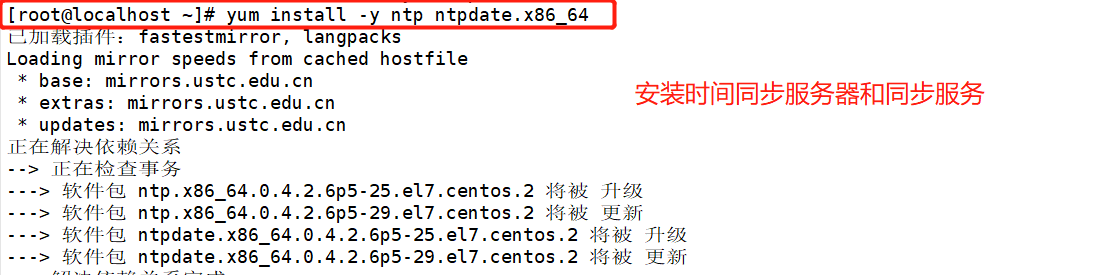
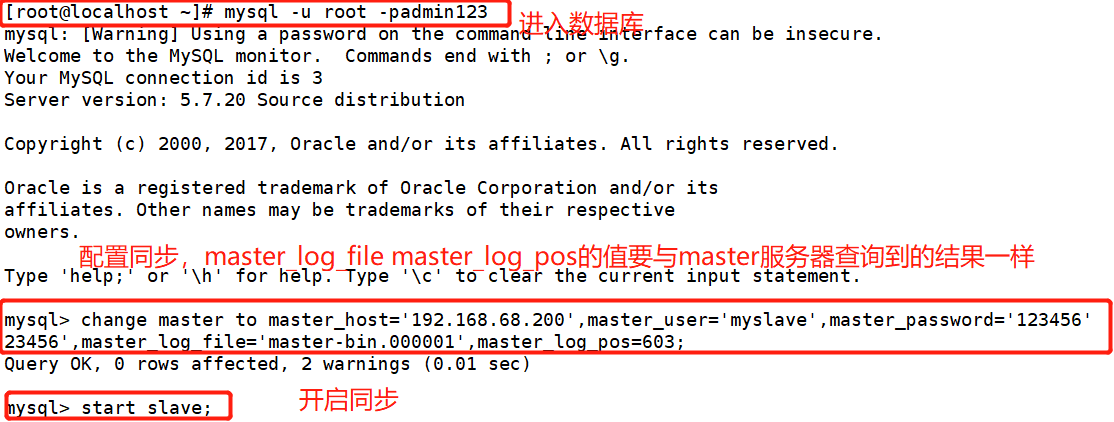
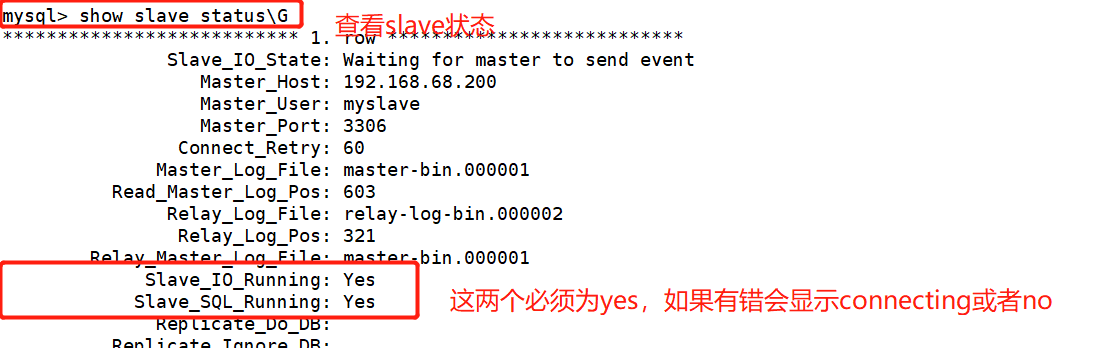
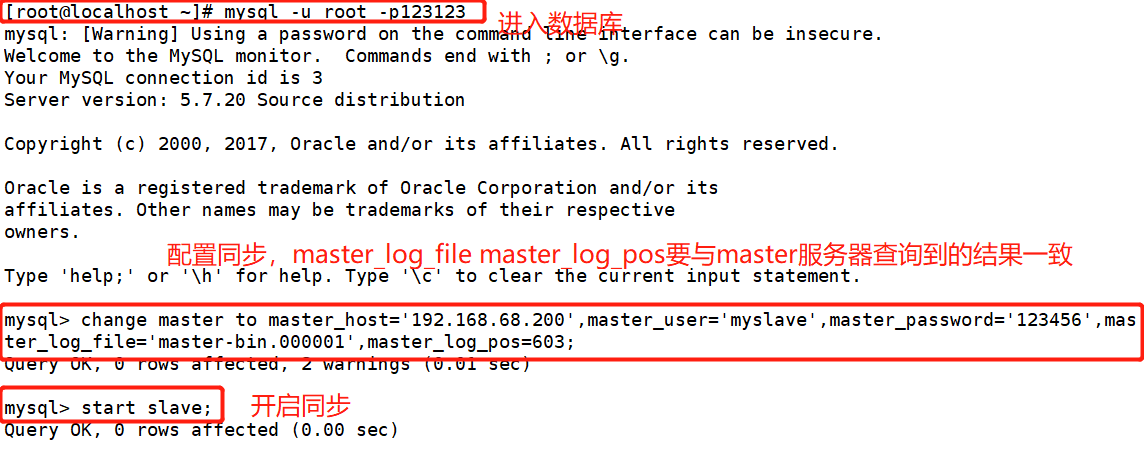
[root@localhost ~]# systemctl stop firewalld.service
[root@localhost ~]# setenforce 0
[root@localhost ~]# yum install -y ntp ntpdate.x86_64
[root@localhost ~]# service ntpd start
[root@localhost ~]# /usr/sbin/ntpdate 192.168.68.200
##Create scheduled task
[root@localhost ~]# crontab -e
*/30 * * * * /bin/sbin/ntpdate 192.168.68.200
[root@localhost ~]# vim /etc/my.cnf
server-id = 2
relay-log=relay-log-bin
relay-log-index=slave-relay-bin.index
[root@localhost ~]# systemctl restart mysqld.service
[root@localhost ~]# mysql -u root -padmin123
mysql> change master to master_host='192.168.68.200',master_user='myslave',master_password='123456'23456',master_log_file='master-bin.000001',master_log_pos=603;
mysql> start slave;
mysql> show slave status\G


[root@localhost ~]# crontab -e
To write the absolute path of the command, use the which + command to know the absolute path of the command

[root@localhost ~]# vim /etc/my.cnf
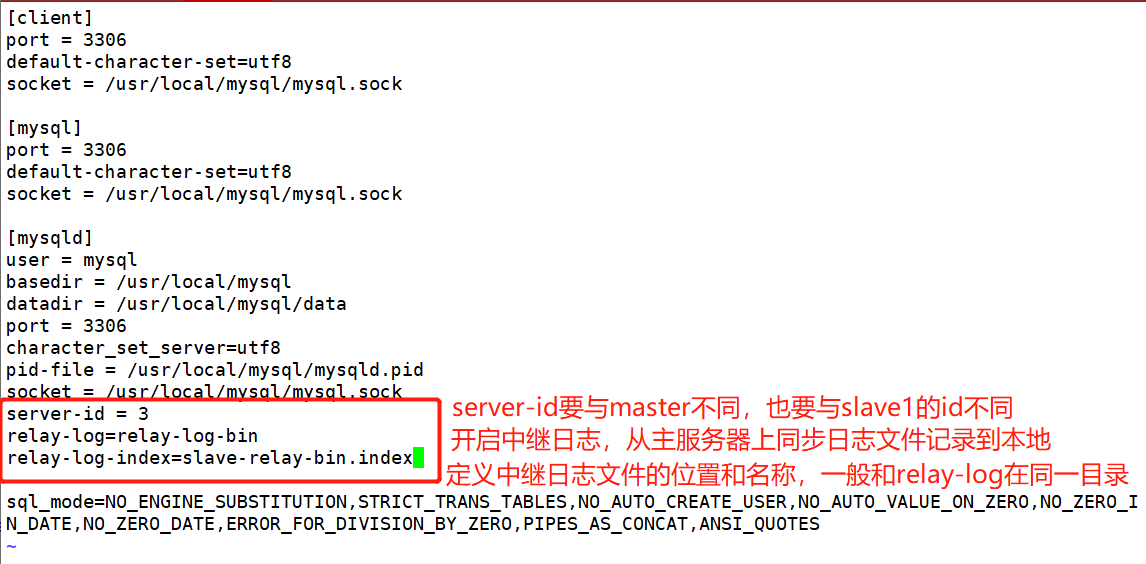
3. From server 192.168.68.105
[root@localhost ~]# systemctl stop firewalld.service
[root@localhost ~]# setenforce 0
[root@localhost ~]# yum install -y ntp ntpdate.x86_64
[root@localhost ~]# service ntpd start
[root@localhost ~]# /usr/sbin/ntpdate 192.168.68.200
##Create scheduled task
[root@localhost ~]# crontab -e
*/30 * * * * /bin/sbin/ntpdate 192.168.68.200
[root@localhost ~]# vim /etc/my.cnf
server-id = 3
relay-log=relay-log-bin
relay-log-index=slave-relay-bin.index
[root@localhost ~]# systemctl restart mysqld.service
[root@localhost ~]# mysql -u root -pa123123
mysql> change master to master_host='192.168.68.200',master_user='myslave',master_password='123456'23456',master_log_file='master-bin.000001',master_log_pos=603;
mysql> start slave;
mysql> show slave status\G
[root@localhost ~]# crontab -e
To write the absolute path of the command, use the which + command to know the absolute path of the command
[root@localhost ~]# vim /etc/my.cnf
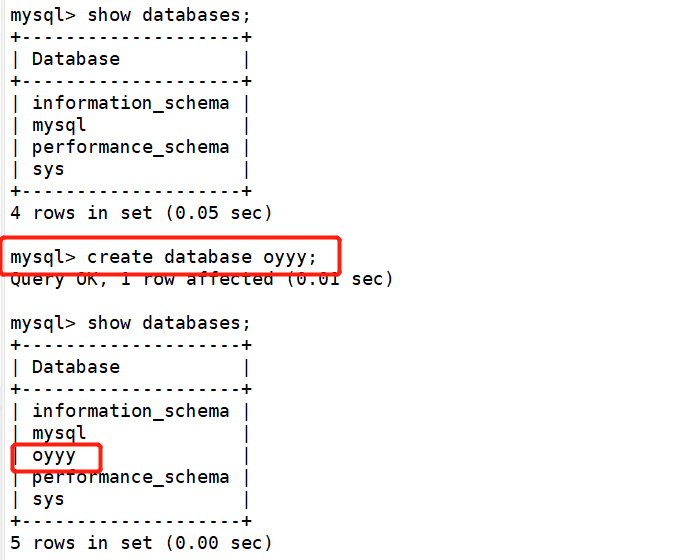
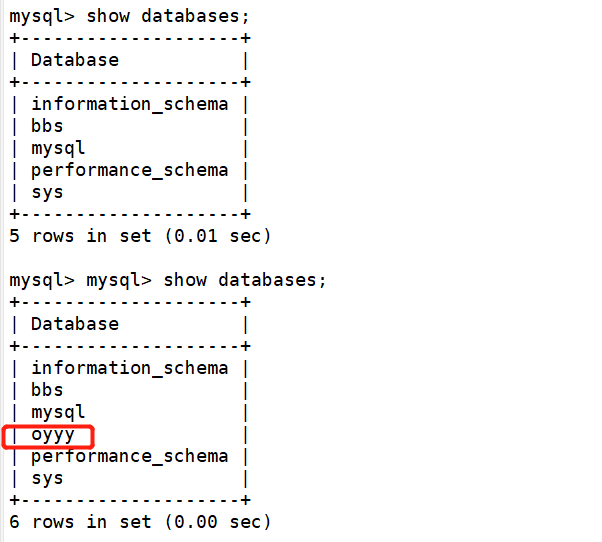
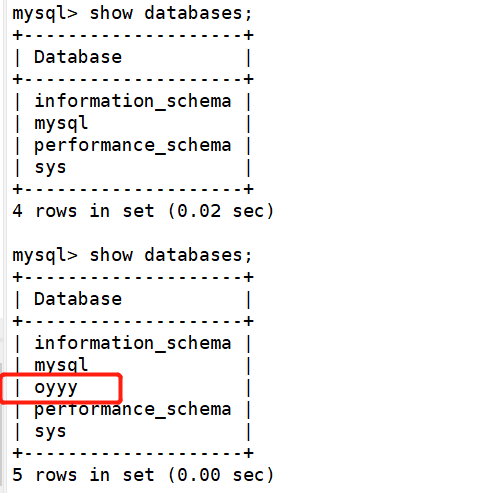
4. Test
Main server 192.168.68.200
From server 192.168.68.30
From server 192.168.68.105
2, Read write separation
1. The concept of MySQL read-write separation
The basic principle of read-write separation is to let the main database handle transactional add, change and DELETE operations (INSERT, UPDATE and DELETE), while the SELECT query operation is processed from the database.
Database replication is used to synchronize changes caused by transactional operations to slave databases in the cluster.
2. The principle of MySQL read-write separation
Read write separation is to write only on the master server and read only on the slave server. The basic principle is to let the master database handle transactional queries and the slave database handle select queries. Database replication is used to synchronize changes caused by transactional queries on the master database to the slave database in the cluster.
three MySQL read / write separation
1. Internal implementation based on program code
Good performance
It needs developers to implement it, and the operation and maintenance personnel have no way to start
2. Implementation based on intermediate agent layer
It is generally located between the client and the server. After receiving the client request, the proxy server forwards it to the back-end database through judgment. There are the following representative programs.
(1)MySQL-Proxy
(2)Atlas
(3)Amoeba
4. The role of reading and writing classification
Because the "write" (writing 10000 pieces of data may take 3 minutes) operation of the database is time-consuming.
However, the "read" of the database (it may take only 5 seconds to read 10000 pieces of data).
Therefore, the separation of reading and writing solves the problem that the writing of the database affects the efficiency of query.
5. When should I separate reading from writing
The database does not have to be read-write separated. If the program uses more databases, less updates and more queries, it will be considered.
The use of database master-slave synchronization and read-write separation can share the pressure of the database and improve the performance.
6. Build Amoeba to realize read-write separation
Main server: 192.168.68.200
Slave server 1:192.168.68.30
Slave server 2: 192.168.69.105
amoeba:192.168.68.40
Client: 192.168.68.10
1.amoeba:192.168.68.40
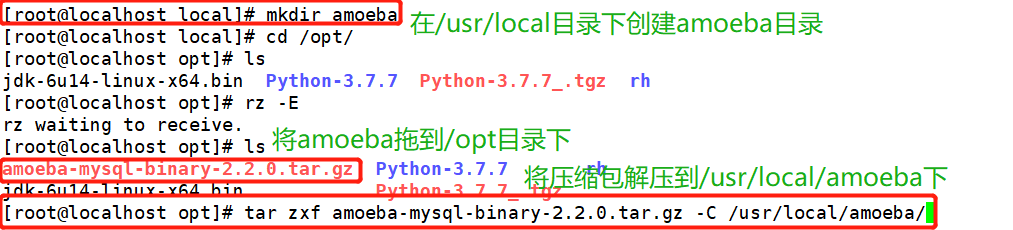
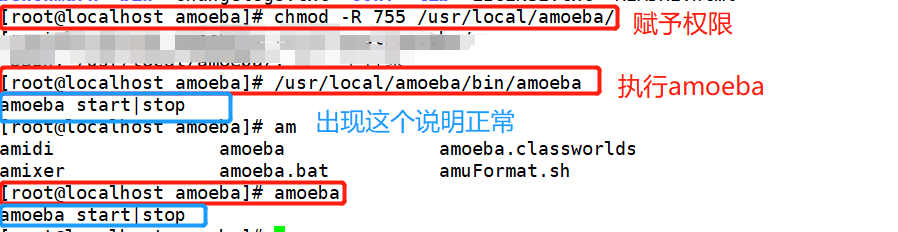
[root@localhost opt]# rz -E
rz waiting to receive.
[root@localhost opt]# ls
jdk-6u14-linux-x64.bin  Python-3.7.7  Python-3.7.7_.tgz  rh
[root@localhost opt]# cp jdk-6u14-linux-x64.bin /usr/local/
[root@localhost opt]# cd /usr/local/
[root@localhost local]# chmod +x jdk-6u14-linux-x64.bin
[root@localhost local]# ./jdk-6u14-linux-x64.bin
[root@localhost local]# mv jdk1.6.0_14/ jdk1.6
[root@localhost local]# vim /etc/profile
export JAVA_HOME=/usr/local/jdk1.6
export CLASSPATH=$CLASSPATH:$JAVA_HOME/lib:$JAVA_HOME/jre/lib
export PATH=$JAVA_HOME/lib:$JAVA_HOME/jre/bin/:$PATH:$HOME/bin
export AMOEBA_HOME=/usr/local/amoeba
export PATH=$PATH:$AMOEBA_HOME/bin
[root@localhost local]# source /etc/profile
[root@localhost local]# java -version
[root@localhost local]# mkdir amoeba
[root@localhost local]# cd /opt/
[root@localhost opt]# ls
amoeba-mysql-binary-2.2.0.tar.gz  Python-3.7.7       rh
jdk-6u14-linux-x64.bin            Python-3.7.7_.tgz
[root@localhost opt]# tar zxf amoeba-mysql-binary-2.2.0.tar.gz -C /usr/local/amoeba/
[root@localhost amoeba]# chmod -R 755 /usr/local/amoeba/
[root@localhost amoeba]# /usr/local/amoeba/bin/amoeba
amoeba start|stop
[root@localhost amoeba]# amoeba
amoeba start|stop
Install the java environment and drag jdk-6u14-linux-x64.bin to the / opt directory


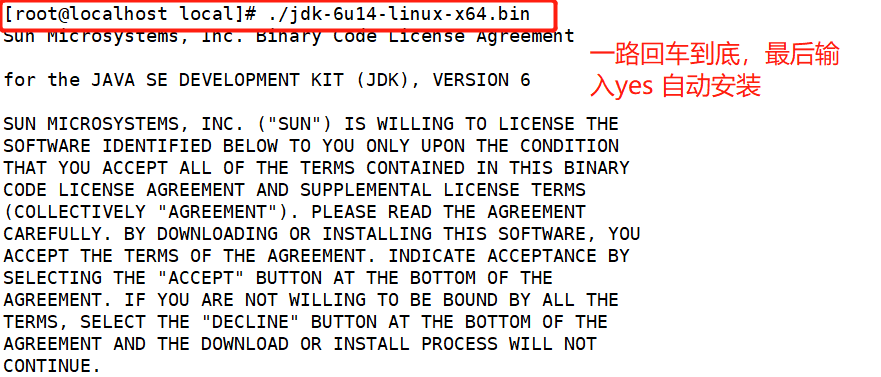
The last appearance of done indicates that the installation is complete
jdk1.6.0_14 / move to / usr/local / and change the name to jdk1.6

[ root@localhost local]# vim /etc/profile Add the following configuration at the end

Unzip amoeba
Grant permissions and run
Enable amoeba access on Master, slave1 and slave2 servers
2.master:192.168.68.200

3.amoeba:192.168.68.40
Amoeba server setup amoeba service
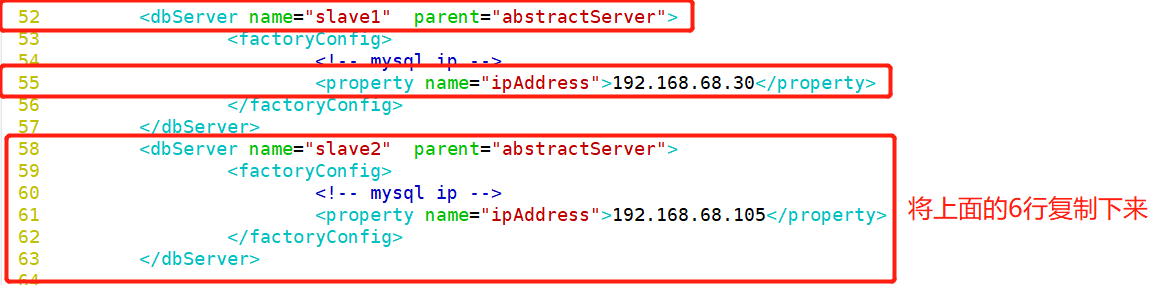
[root@localhost ~]# cd /usr/local/amoeba/conf/
[root@localhost conf]# cp amoeba.xml amoeba.xml.bak
[root@localhost conf]# vim amoeba.xml
30 <property name="user">amoeba</property>  ##Set login user name
32 <property name="password">123456</property>   ##Set password
115<property name="defaultPool">master</property>   ##Set the default pool to master
 Delete the comment on line 117
118<property name="writePool">master</property>  ##Set write pool
119<property name="readPool">slaves</property>  ##Set read pool
[root@localhost conf]# cp dbServers.xml dbServers.xml.bak
[root@localhost conf]# vim dbServers.xm
23  <!--    <property name="schema">test</property>  --> ##Comment out line 23
26  <property name="user">test</property>   ##Set login user
29  <property name="password">123123</property> ##Delete lines 28 and 30 and set the password
45         <dbServer name="master"  parent="abstractServer">
46                 <factoryConfig>
47                         <!-- mysql ip -->
48                         <property name="ipAddress">192.168.68.200</property>
49                 </factoryConfig>
50         </dbServer>
51
52         <dbServer name="slave1"  parent="abstractServer">
53                 <factoryConfig>
54                         <!-- mysql ip -->
55                         <property name="ipAddress">192.168.68.30</property>
56                 </factoryConfig>
57         </dbServer>
58         <dbServer name="slave2"  parent="abstractServer">
59                 <factoryConfig>
60                         <!-- mysql ip -->
61                         <property name="ipAddress">192.168.68.105</property>
62                 </factoryConfig>
63         </dbServer>
65         <dbServer name="slaves" virtual="true">
66                 <poolConfig class="com.meidusa.amoeba.server.MultipleServerPool">
67                         <!-- Load balancing strategy: 1=ROUNDROBIN , 2=WEIGHTBASED , 3=HA-->
68                         <property name="loadbalance">1</property>
69
70                         <!-- Separated by commas,such as: server1,server2,server1 -->
71                         <property name="poolNames">slave1,slave2</property>
[root@localhost conf]# amoeba start &
[root@localhost conf]# netstat -natp |grep java

[ root@localhost conf]# vim amoeba.xml Global configuration


[root@localhost conf]# vim dbServers.xm


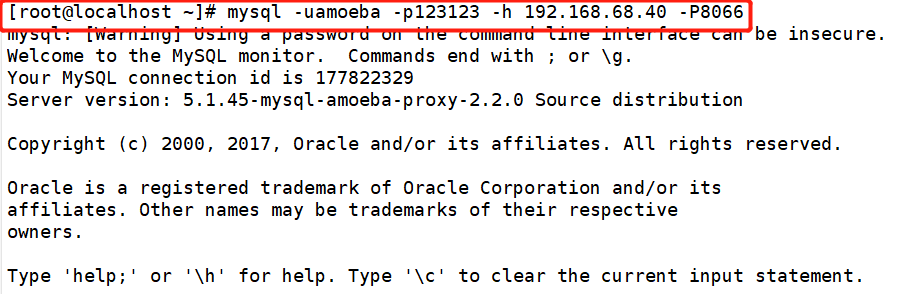
4. Client 192.168.68.10
[root@localhost ~]# systemctl stop firewalld.service
[root@localhost ~]# setenforce 0
[root@localhost ~]# yum install -y mariadb mariadb-server
[root@localhost ~]# mysql -uamoeba -p123123 -h 192.168.68.40 -P8066


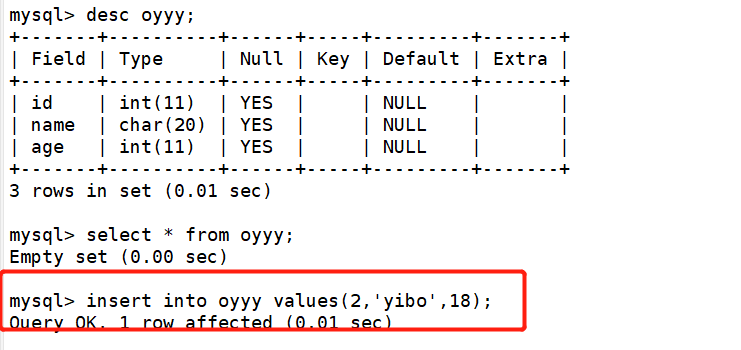
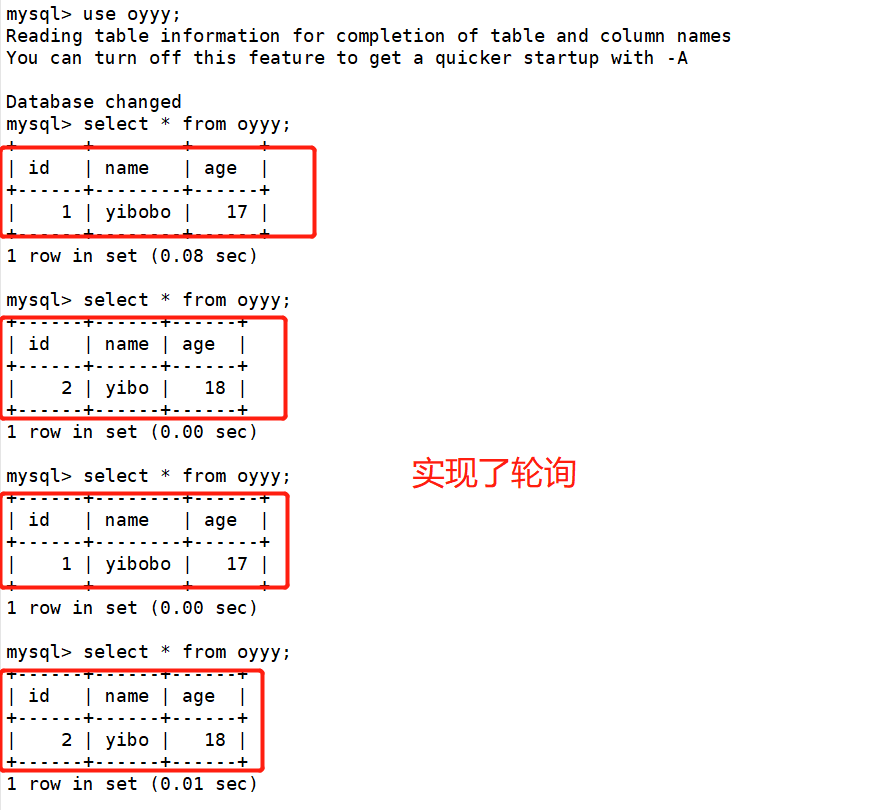
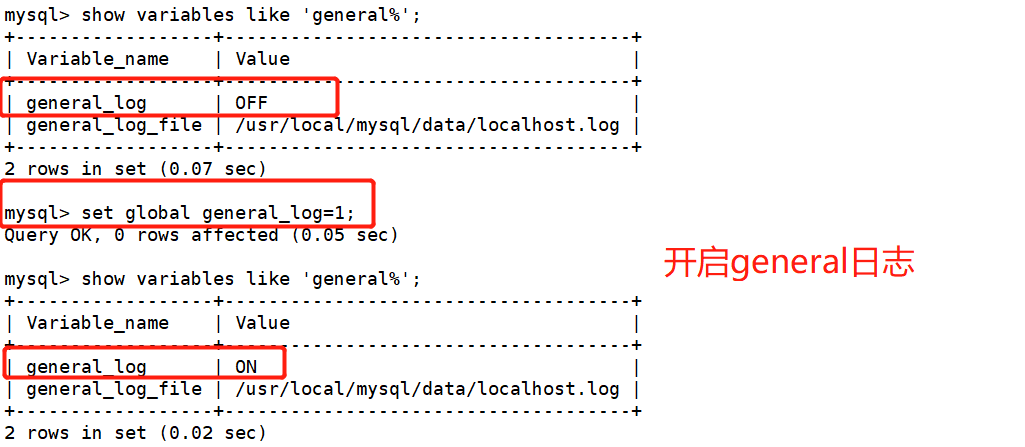
7. Verify polling read / write separation
1. Polling
Turn off master-slave replication on both slave servers

On slave1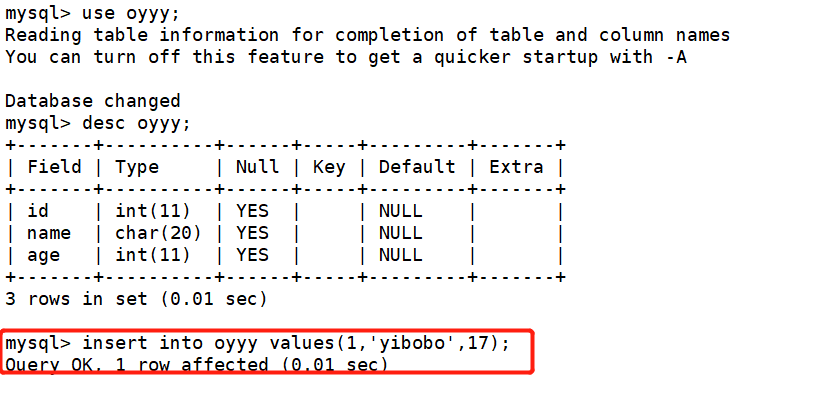
On slave2
On the client
2. Read write separation
On master, slave1, slave2 and Amoeba servers
On the master-slave server
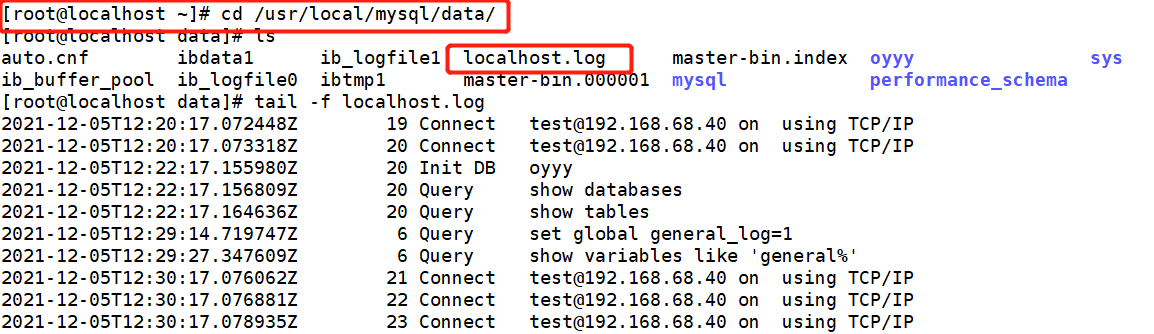
On slave1 slave server
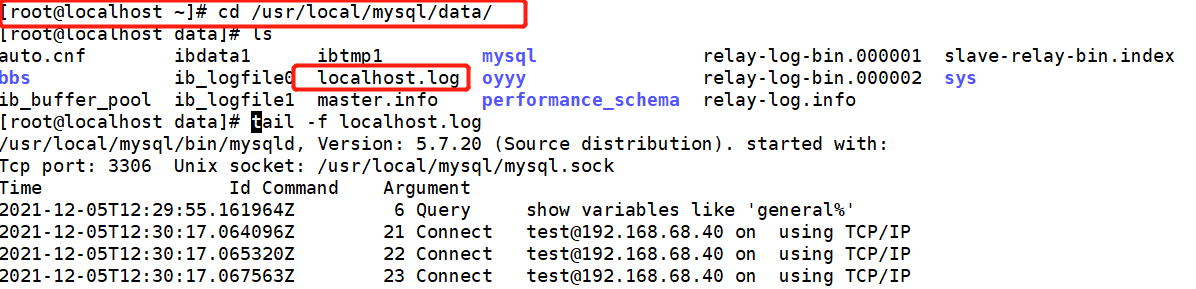
On the client

On the master-slave server
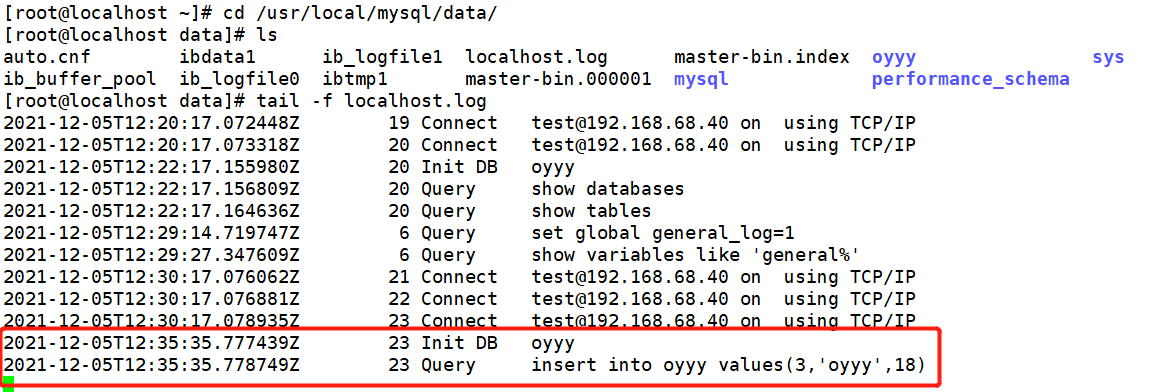 On slave1 slave server

At this time, the read-write separation has been completed