summary
The usage and practice of permission system based on Spring Security and JWT have been discussed in the previous design of permission system based on Spring Security and JWT. This paper further practices the multi system single sign on (SSO) and JWT permission control functions based on Spring Security Oauth3. After all, this requirement is quite common.
The code is open source and is placed at the end of the text. You need to take it yourself
Theoretical knowledge
Before that, you need to learn and understand some pre knowledge, including:
Spring Security: authentication and authority module of Web System Based on spring implementation
OAuth3: an open network standard for authorization
Single sign on (SSO): in multiple application systems, users only need to log in once to access all mutually trusted application systems
JWT: a JSON based open standard (RFC 7519) for transmitting information between network applications. It is used as a JSON object for secure information transmission between different systems. The main use scenarios are generally used to transmit authenticated user identity information between identity providers and service providers
Goals to achieve
Objective 1: design and implement a third-party authorization center service (Server) to complete user login, authentication and authority processing
Objective 2: you can mount any number of Client applications under the authorization center
Objective 3: when the user accesses the Security page of the client application, he will be redirected to the authorization center for authentication. After authentication, he can access the services of the client application, and multiple client applications only need to log in once (called "single sign on SSO")
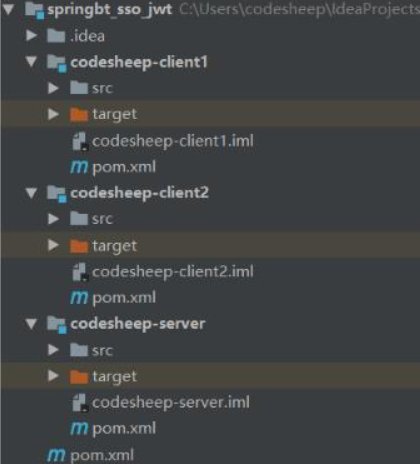
Based on this goal driven, this paper designs three independent services, namely:
An authorization service center (codesheet server)
Client application 1 (codedeep-client1)
Client application 2 (codedeep-client2)
Multi module project construction
The three applications are organized through a multi module Maven project. The project parent pom needs to add the following dependencies:
<dependencies>

    <dependency>
        <groupId>org.springframework.boot</groupId>
        <artifactId>spring-boot-dependencies</artifactId>
        <version>2.0.8.RELEASE</version>
        <type>pom</type>
        <scope>import</scope>
    </dependency>

    <dependency>
        <groupId>io.spring.platform</groupId>
        <artifactId>platform-bom</artifactId>
        <version>Cairo-RELEASE</version>
        <type>pom</type>
        <scope>import</scope>
    </dependency>

    <dependency>
        <groupId>org.springframework.cloud</groupId>
        <artifactId>spring-cloud-dependencies</artifactId>
        <version>Finchley.SR2</version>
        <type>pom</type>
        <scope>import</scope>
    </dependency>

</dependencies>
The project structure is as follows:
Construction of authorized certification center
The authorized certification center is essentially a Spring Boot application, so several major steps need to be completed:
Add dependency in pom
<dependencies>
    <dependency>
        <groupId>org.springframework.cloud</groupId>
        <artifactId>spring-cloud-starter-oauth3</artifactId>
    </dependency>
</dependen

project yml Profile:
server:
port: 8085
servlet:
context-path: /uac
That is, start the authorization center service on the local port 8085
Create an impersonated user with the specified permissions
@Component
public class SheepUserDetailsService implements UserDetailsService {

@Autowired
private PasswordEncoder passwordEncoder;

@Override
public UserDetails loadUserByUsername(String s) throws UsernameNotFoundException {

    if( !"codesheep".equals(s) )
        throw new UsernameNotFoundException("user" + s + "non-existent" );

    return new User( s, passwordEncoder.encode("123456"), AuthorityUtils.commaSeparatedStringToAuthorityList("ROLE_NORMAL,ROLE_MEDIUM"));
}
}
Here, an analog user with the user name codedeep and password 123456 is created, and given normal and medium permissions
Authentication server configuration AuthorizationServerConfig
The two most important things to do here: one is to define the passes of two client applications (sheep1 and sheep2); the other is to configure the specific implementation method of token as JWT Token.
Spring Security security configurationspringsecurityconfig
@Configuration
public class SpringSecurityConfig extends WebSecurityConfigurerAdapter {

@Override
@Bean
public AuthenticationManager authenticationManager() throws Exception {
    return super.authenticationManager();
}

@Autowired
private UserDetailsService userDetailsService;

@Bean
public PasswordEncoder passwordEncoder() {
    return new BCryptPasswordEncoder();
}

@Bean
public DaoAuthenticationProvider authenticationProvider() {
    DaoAuthenticationProvider authenticationProvider = new DaoAuthenticationProvider();
    authenticationProvider.setUserDetailsService(userDetailsService);
    authenticationProvider.setPasswordEncoder(passwordEncoder());
    authenticationProvider.setHideUserNotFoundExceptions(false);
    return authenticationProvider;
}

@Override
protected void configure(HttpSecurity http) throws Exception {

    http
            .requestMatchers().antMatchers("/oauth/**","/login/**","/logout/**")
            .and()
            .authorizeRequests()
            .antMatchers("/oauth/**").authenticated()
            .and()
            .formLogin().permitAll();
}

@Override
protected void configure(AuthenticationManagerBuilder auth) throws Exception {
    auth.authenticationProvider(authenticationProvider());
}
}
Client application creation and configuration
This article creates two client applications: codedeep-client1 and codedeep-client2. Because they are similar, only one of them is taken as an example
SSO client application configuration class ClientWebsecurityConfigurer
@Configuration@EnableWebSecurity
br/>@EnableWebSecurity
br/>@EnableOAuth3Sso
@Override
public void configure(HttpSecurity http) throws Exception {
    http.antMatcher("/**").authorizeRequests()
            .anyRequest().authenticated();
}
}
All the complicated things have been handed over to the annotation!
application.yml configuration
auth-server: http://localhost:8085/uac
server:
port: 8086

security:
oauth3:
client:
client-id: sheep1
client-secret: 123456
user-authorization-uri: ${auth-server}/oauth/authorize
access-token-uri: ${auth-server}/oauth/token
resource:
jwt:
key-uri: ${auth-server}/oauth/token_key
Several configurations here are very important. They all need to communicate with the authorization center built earlier
Create test controller TestController
@RestController
public class TestController {

@GetMapping("/normal")
@PreAuthorize("hasAuthority('ROLE_NORMAL')")
public String normal( ) {
    return "normal permission test success !!!";
}

@GetMapping("/medium")
@PreAuthorize("hasAuthority('ROLE_MEDIUM')")
public String medium() {
    return "medium permission test success !!!";
}

@GetMapping("/admin")
@PreAuthorize("hasAuthority('ROLE_ADMIN')")
public String admin() {
    return "admin permission test success !!!";
}
}
The test controller contains three interfaces, which require three permissions (ROLE_NORMAL, ROLE_MEDIUM and ROLE_ADMIN). The test will be conducted one by one to see the effect after the meeting
experimental verification
Start the authorized authentication center codedeep server (starting at the local port 8085)
Start the client application codedeep-client1 (started on the local port 8086)
Start the client application codedeep-client2 (started on the local port 8087)
First, use the browser to access the test interface of codedeep-client1: localhost:8086/normal. Since there is no user login authentication at this time, it will automatically jump to the login authentication page of the authorization center: http://localhost:8085/uac/login :
    This validates single sign on SSO The function of!