1, Installation package download
Link: https://pan.baidu.com/s/1G6V9u5PDyxlixZ2PwGWdJA
Extraction code: q8mb
Note: the above installation package is a zip package, which contains all the packages for installing CDH6.1. After downloading, unzip it
2, Upload the installation package to the master node
Note: the installation directory here should be based on this article, so that the following instructions can be pasted and copied directly without modification
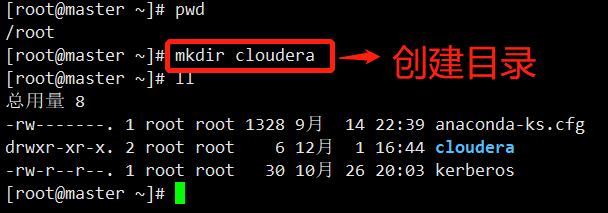
1. Create a new cloudera directory under the root directory and put the downloaded installation package in it
Instruction:
#Create the cloudera directory under the root directory
cd /root
mkdir cloudera
Screenshot:
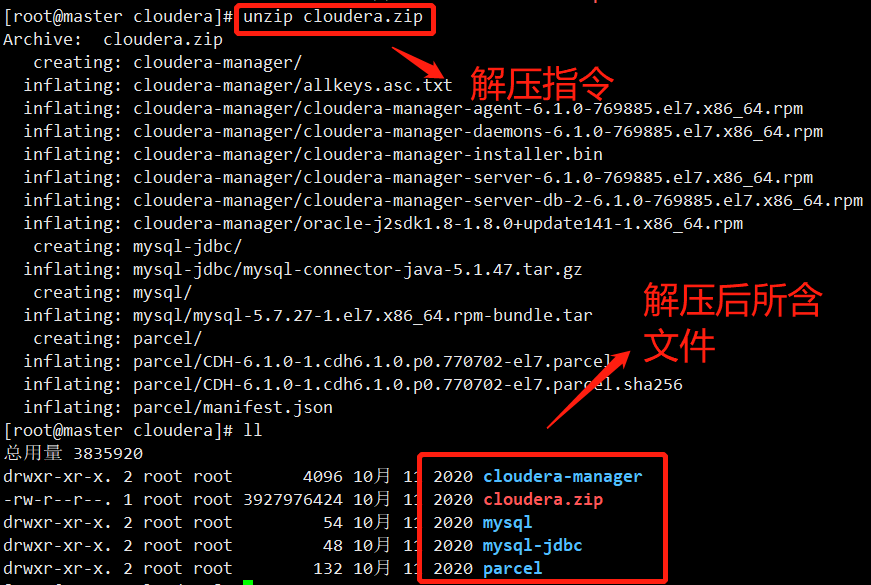
2. Upload the installation package to the cloudera directory and unzip it
Screenshot after uploading the installation package:

Instruction:
#Decompression instruction
unzip cloudera.zip

#Here's a bug. The file name is wrong. I'm too lazy to update the contents of the compressed package. All builders work hard to see this
cd /root/cloudera/cloudera-manager
mv allkeys.asc.txt allkeys.asc
Screenshot after decompression:
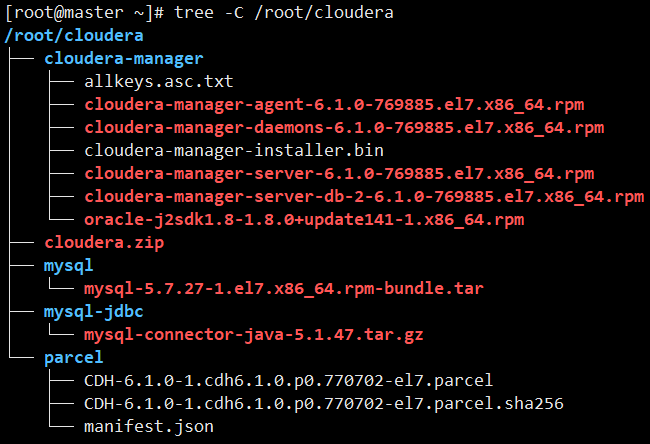
3. View all installation package directory information
Instruction:
#If there is no tree instruction, download the installation instruction first
yum install tree
#View the directory tree of cloudera directory under the root directory
tree -C /root/cloudera
Screenshot: (this figure can clearly see the installation package information we need to install CDH)
3, Preliminary server environment preparation
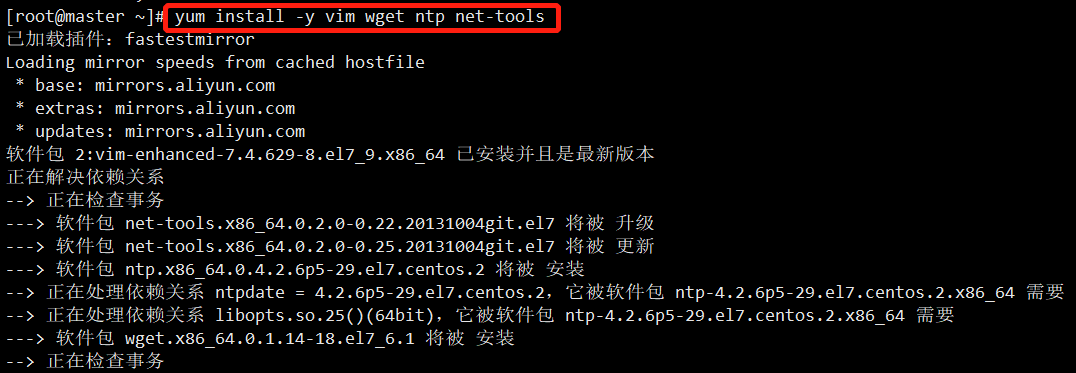
1. Install common tools (required for each node)
Instruction:
yum install -y vim wget ntp net-tools
Screenshot:
2. Set host name (required for each node)
Instruction:
#Here is an example. Set the name according to the actual situation. Here, change the server name to master
hostnamectl set-hostname master

#Set the name of the second node server to slave-1
hostnamectl set-hostname slave-1

#Set the name of the third node server to slave-2
hostnamectl set-hostname slave-2
Screenshot: (because I set the server name before, the screenshot name here has been changed to master)

3. Modify the hosts file (required for each node)
Instruction:
#Edit hosts file
vim /etc/hosts
#Add the following content at the end of the hosts file
192.168.127.117 master
192.168.127.118 slave-1
192.168.127.119 slave-2
Screenshot:

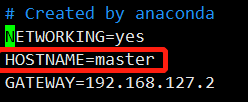
4. Modify the / etc/sysconfig/network file of each host (each node needs to execute)
Instruction:
#Open file
vim /etc/sysconfig/network
#Write to the corresponding server
HOSTNAME=master

Note: other node servers write their server names respectively
Screenshot:
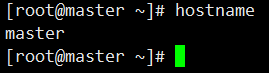
5. Check whether the host name is effective (it needs to be executed for each node)
Instruction:
hostname
Screenshot:
6. Turn off the firewall (each node needs to execute)
Instruction:
#Just paste, copy and execute all directly
systemctl stop firewalld \
&& systemctl disable firewalld \
&& systemctl status firewalld
Screenshot:

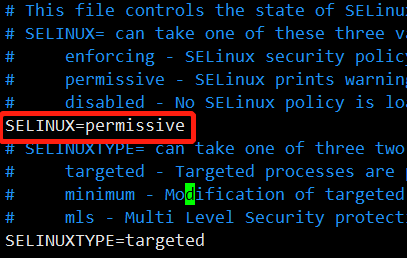
7. Turn off Selinux (each node needs to execute)
Instruction:
#Edit selinux file
vim /etc/sysconfig/selinux
#Modify the following content to replace enforceing with permission
SELINUX=permissive

###Note: you need to restart the server here, otherwise it will not take effect, which will lead to an error of 403 when building the local yum source later
Screenshot:
8. Configure SSH password free login (required for each node)
Refer to the following articles:
https://blog.csdn.net/Alan3344/article/details/84131661
9. Set up NTP service
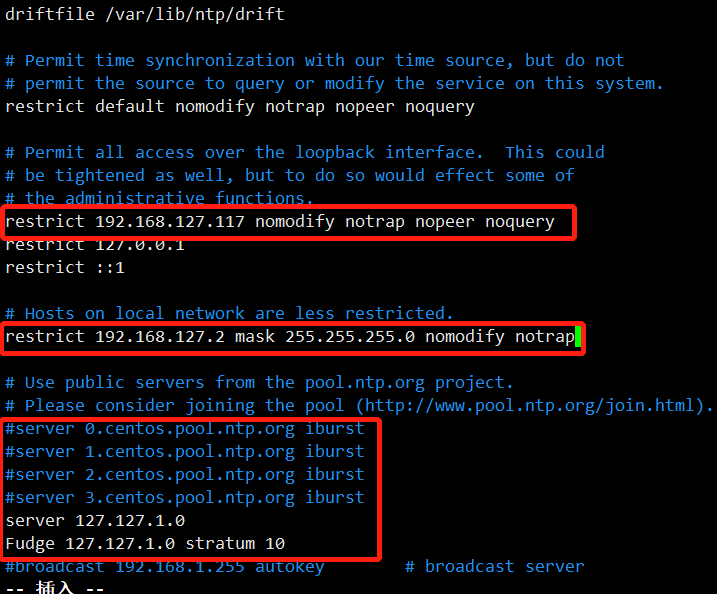
9.1. On the master node
Instruction:
#Edit the ntp.conf file
vim /etc/ntp.conf

#Note out the following
server 0.centos.pool.ntp.org iburst
server 1.centos.pool.ntp.org iburst
server 2.centos.pool.ntp.org iburst
server 3.centos.pool.ntp.org iburst

#Add the following
server 127.127.1.0
Fudge 127.127.1.0 stratum 10

#Modify the following information
restrict ${Current node ip} nomodify notrap nopeer noquery
restrict ${Gateway of the network segment where the cluster is located} mask ${Subnet mask} nomodify notrap
Screenshot:
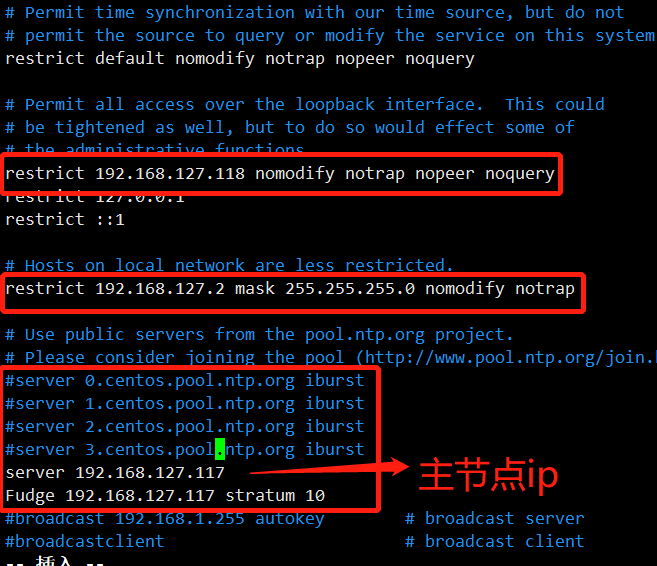
9.2. On other nodes (all other nodes need to be executed)
Instruction:
#Edit the ntp.conf file
vim /etc/ntp.conf

#Note out the following
server 0.centos.pool.ntp.org iburst
server 1.centos.pool.ntp.org iburst
server 2.centos.pool.ntp.org iburst
server 3.centos.pool.ntp.org iburst

#Add the following
server ${Master node ip}
Fudge ${Master node ip} stratum 10

#Modify the following information
restrict ${Current node ip} nomodify notrap nopeer noquery
restrict ${Gateway of the network segment where the cluster is located} mask ${Subnet mask} nomodify notrap
Screenshot:
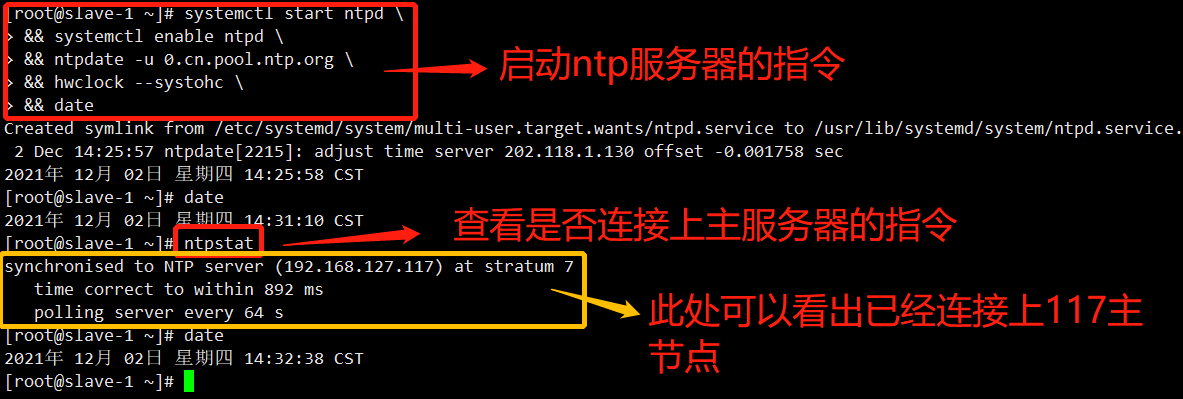
9.3. Start the time synchronization server (to be executed by each node)
Instruction:
#Directly paste all, copy and run
systemctl start ntpd \
&& systemctl enable ntpd \
&& ntpdate -u 0.cn.pool.ntp.org \
&& hwclock --systohc \
&& date


#Check whether the time server on the master node is linked
ntpstat
Screenshot:
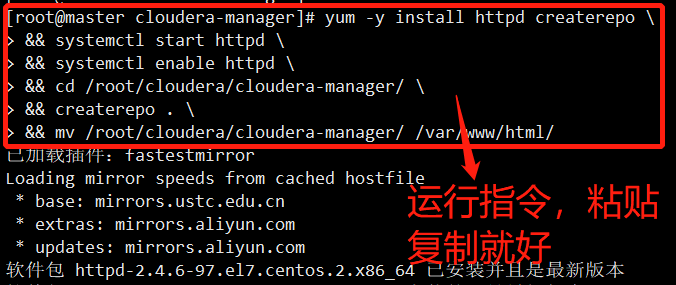
10. Install the local yum source on the primary node (only the primary node, that is, the node where CM is installed)
Instruction:
#It was emphasized earlier that the downloaded installation package should be placed under / root/cloudera. Here, the following instructions can be pasted, copied and run. Otherwise, the path information needs to be changed

yum -y install httpd createrepo \
&& systemctl start httpd \
&& systemctl enable httpd \
&& cd /root/cloudera/cloudera-manager/ \
&& createrepo . \
&& mv /root/cloudera/cloudera-manager/ /var/www/html/
Screenshot:
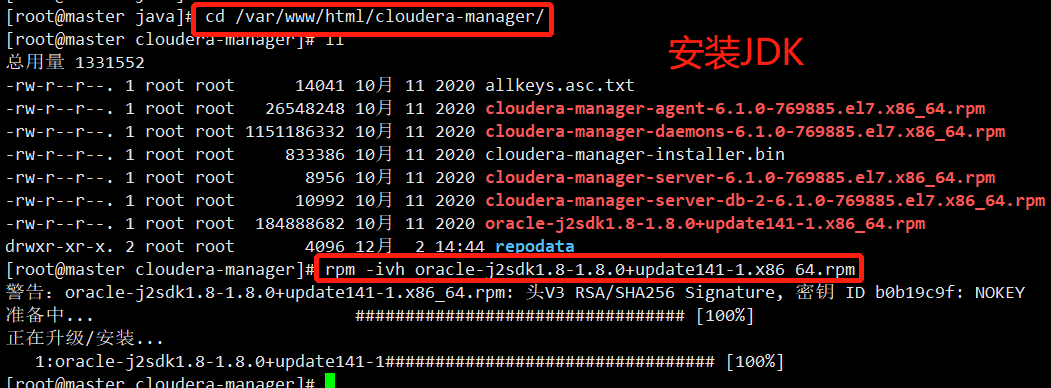
11. Install JDK (only the primary node, that is, the node where CM is installed)
Instruction:
#Enter the installation path (if the installation package path shown above is installed, paste it directly)
cd /var/www/html/cloudera-manager/
rpm -ivh oracle-j2sdk1.8-1.8.0+update141-1.x86_64.rpm
Screenshot:
12. Install Mysql (only the primary node, that is, the node where CM is installed)
12.1. Uninstall mariadb
Instruction:
#Just paste and copy all of the following instructions
#Uninstall the built-in mariadb
yum -y remove mariadb-libs
Screenshot:

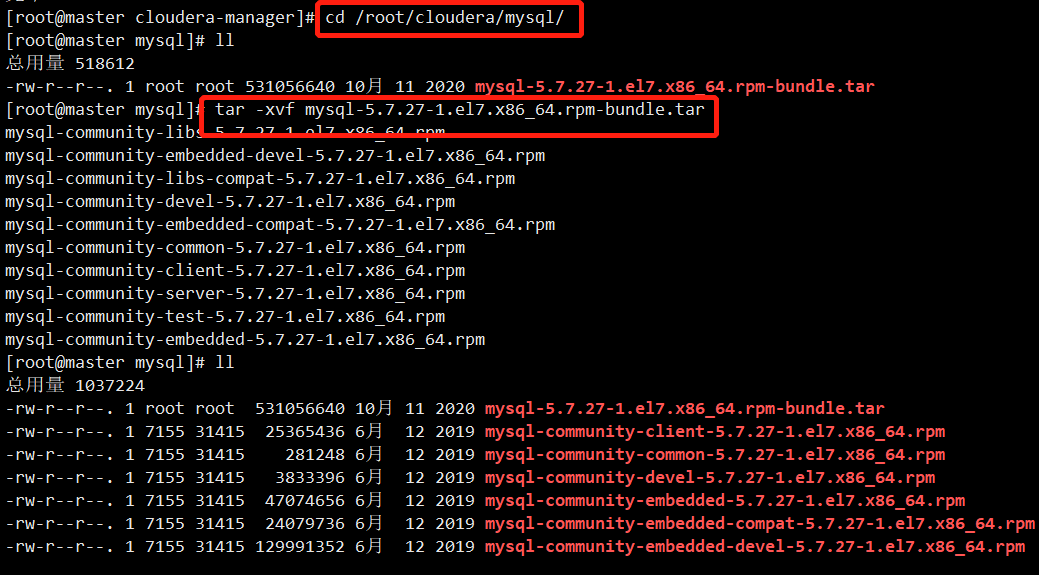
12.2. Unzip and download the MySQL installation package
Instruction:
#Unzip the downloaded MySQL package
cd /root/cloudera/mysql/
tar -xvf mysql-5.7.27-1.el7.x86_64.rpm-bundle.tar
Screenshot:
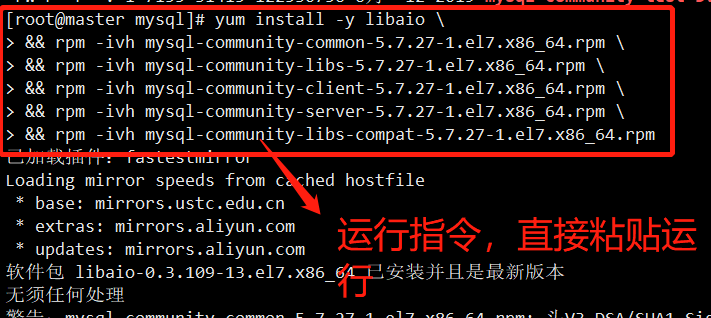
12.3. Installing MySQL
Instruction:
#Directly paste all copy run
yum install -y libaio \
&& rpm -ivh mysql-community-common-5.7.27-1.el7.x86_64.rpm \
&& rpm -ivh mysql-community-libs-5.7.27-1.el7.x86_64.rpm \
&& rpm -ivh mysql-community-client-5.7.27-1.el7.x86_64.rpm \
&& rpm -ivh mysql-community-server-5.7.27-1.el7.x86_64.rpm \
&& rpm -ivh mysql-community-libs-compat-5.7.27-1.el7.x86_64.rpm
Screenshot:
12.4. Configure my.cnf
Instruction:
#Paste, copy and run
echo character-set-server=utf8 >> /etc/my.cnf
Screenshot:

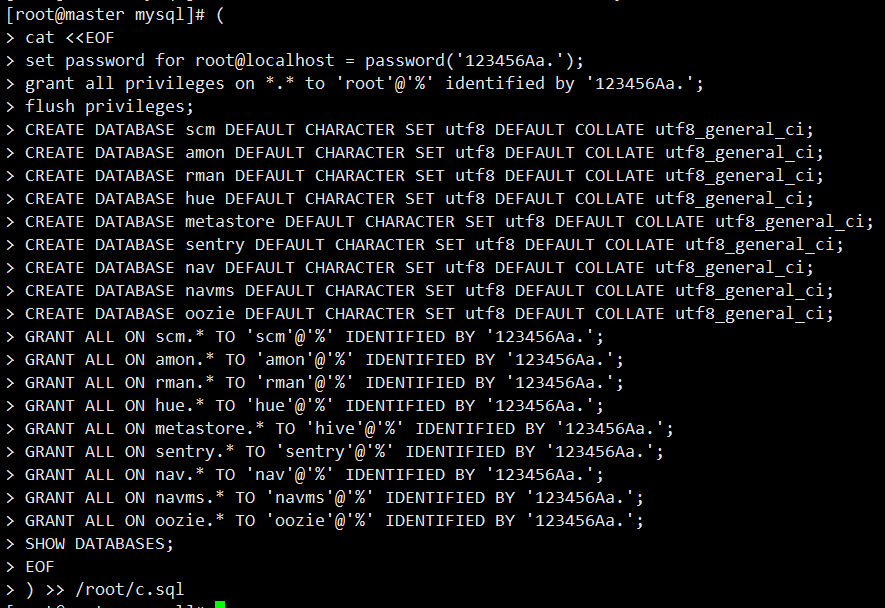
12.5. Database creation and authorization
Instruction:
#This is just an SQL script file for creating a database. It involves the password of the database. You can modify it according to the individual. After modification, paste, copy and run it all

(
cat <<EOF
set password for root@localhost = password('123456Aa.');
grant all privileges on *.* to 'root'@'%' identified by '123456Aa.';
flush privileges;
CREATE DATABASE scm DEFAULT CHARACTER SET utf8 DEFAULT COLLATE utf8_general_ci;
CREATE DATABASE amon DEFAULT CHARACTER SET utf8 DEFAULT COLLATE utf8_general_ci;
CREATE DATABASE rman DEFAULT CHARACTER SET utf8 DEFAULT COLLATE utf8_general_ci;
CREATE DATABASE hue DEFAULT CHARACTER SET utf8 DEFAULT COLLATE utf8_general_ci;
CREATE DATABASE metastore DEFAULT CHARACTER SET utf8 DEFAULT COLLATE utf8_general_ci;
CREATE DATABASE sentry DEFAULT CHARACTER SET utf8 DEFAULT COLLATE utf8_general_ci;
CREATE DATABASE nav DEFAULT CHARACTER SET utf8 DEFAULT COLLATE utf8_general_ci;
CREATE DATABASE navms DEFAULT CHARACTER SET utf8 DEFAULT COLLATE utf8_general_ci;
CREATE DATABASE oozie DEFAULT CHARACTER SET utf8 DEFAULT COLLATE utf8_general_ci;
GRANT ALL ON scm.* TO 'scm'@'%' IDENTIFIED BY '123456Aa.';
GRANT ALL ON amon.* TO 'amon'@'%' IDENTIFIED BY '123456Aa.';
GRANT ALL ON rman.* TO 'rman'@'%' IDENTIFIED BY '123456Aa.';
GRANT ALL ON hue.* TO 'hue'@'%' IDENTIFIED BY '123456Aa.';
GRANT ALL ON metastore.* TO 'hive'@'%' IDENTIFIED BY '123456Aa.';
GRANT ALL ON sentry.* TO 'sentry'@'%' IDENTIFIED BY '123456Aa.';
GRANT ALL ON nav.* TO 'nav'@'%' IDENTIFIED BY '123456Aa.';
GRANT ALL ON navms.* TO 'navms'@'%' IDENTIFIED BY '123456Aa.';
GRANT ALL ON oozie.* TO 'oozie'@'%' IDENTIFIED BY '123456Aa.';
SHOW DATABASES;
EOF
) >> /root/c.sql
Screenshot:
12.6. Start MySQL service
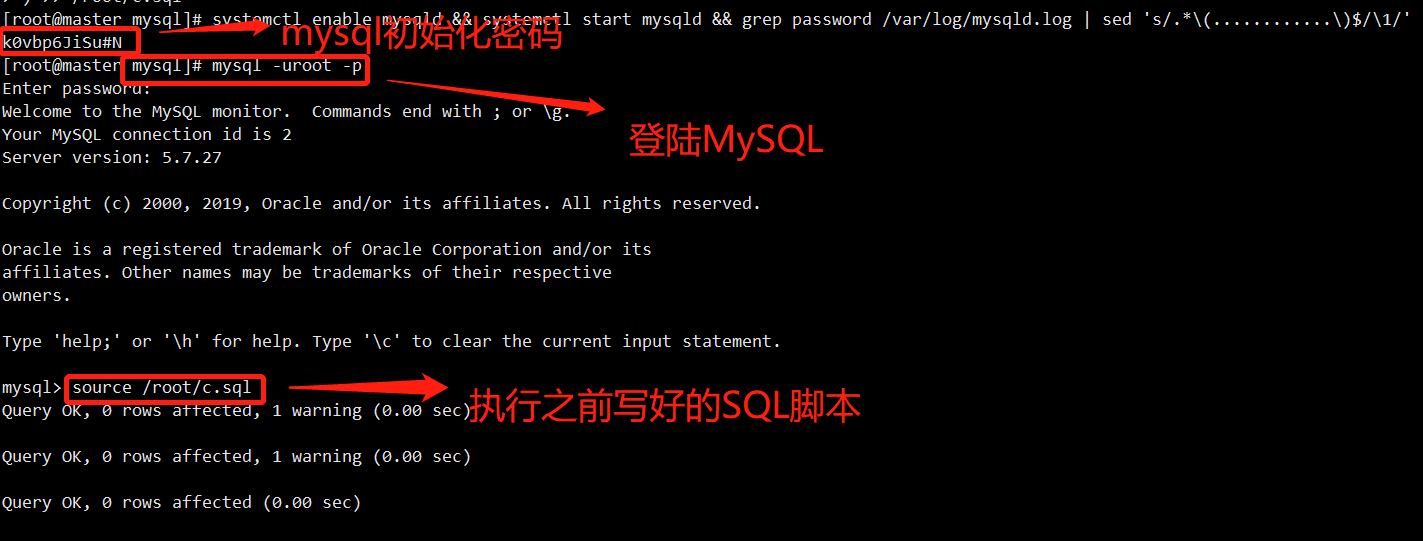
Instruction:
#Just paste, copy and run directly
systemctl enable mysqld && systemctl start mysqld && grep password /var/log/mysqld.log | sed 's/.*\(............\)$/\1/'
Screenshot:

12.7 log in to MySQL and run the SQL script written before
Instruction:
#Log in to MySQL
mysql -uroot -p

#Just enter the initialization password printed above

#Run the SQL file (note whether your SQL is placed in this directory. It is recommended to focus on documents and don't bother to modify so much)
source /root/c.sql
Screenshot:
12.8. Configure MySQL JDBC Driver
Instruction:
#Direct paste copy execution
mkdir -p /usr/share/java/ \
&& cd /root/cloudera/mysql-jdbc/;tar -zxvf mysql-connector-java-5.1.47.tar.gz \
&& cp /root/cloudera/mysql-jdbc/mysql-connector-java-5.1.47/mysql-connector-java-5.1.47-bin.jar /usr/share/java/mysql-connector-java.jar
Screenshot:

4, CM build
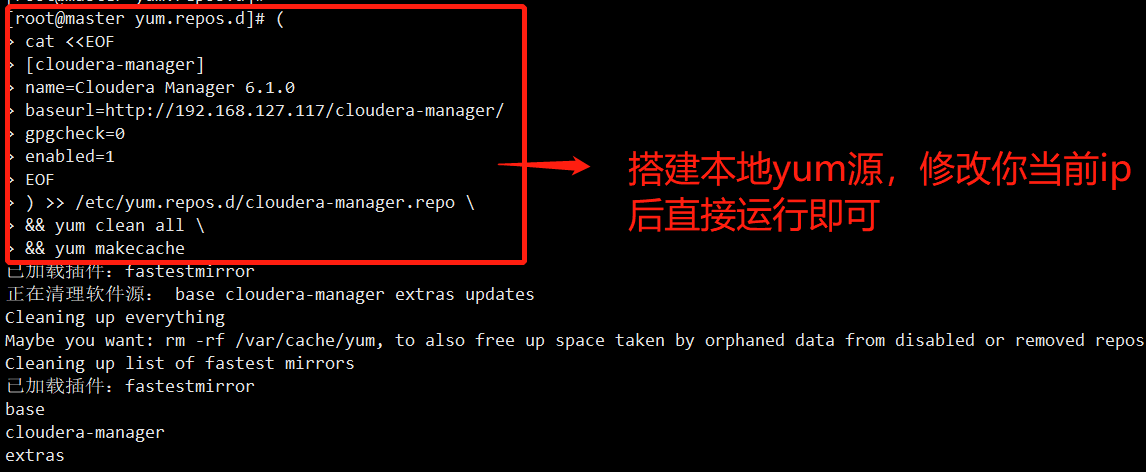
1. Configure the local yum source on the master node
Instruction:
#Configure the local yum source. Remember to modify the ip address. After modification, paste and copy directly
(
cat <<EOF
[cloudera-manager]
name=Cloudera Manager 6.1.0
baseurl=http://${current node IP} / cloudera Manager/
gpgcheck=0
enabled=1
EOF
) >> /etc/yum.repos.d/cloudera-manager.repo \
&& yum clean all \
&& yum makecache
Screenshot:
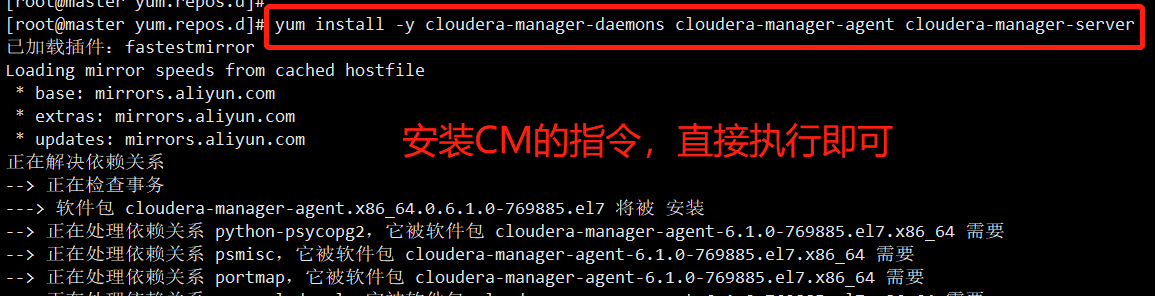
2. Installation Cloudera Manager
Instruction:
yum install -y cloudera-manager-daemons cloudera-manager-agent cloudera-manager-server
Screenshot:
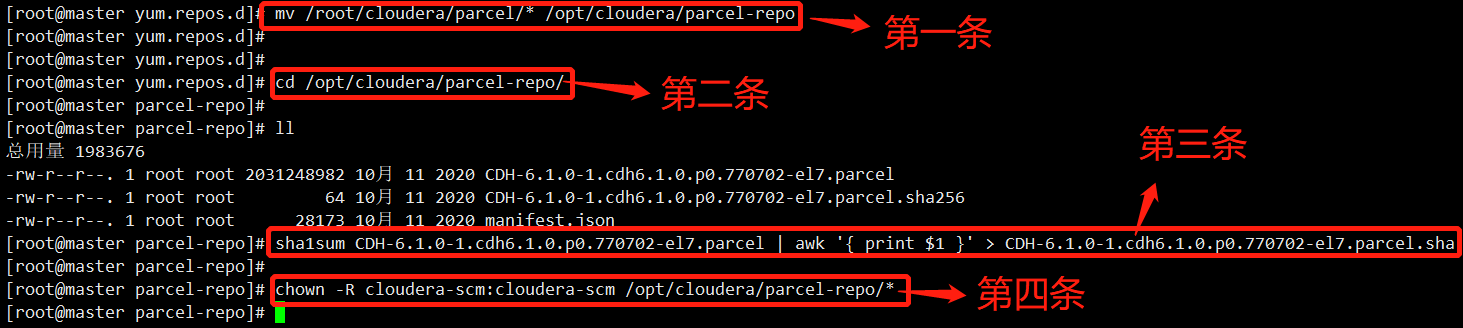
3. Configure the local Parcel repository
Instruction:
#The following instructions are pasted and executed in turn. The first instruction
mv /root/cloudera/parcel/* /opt/cloudera/parcel-repo
#Second instruction
cd /opt/cloudera/parcel-repo/
#Third directive
sha1sum CDH-6.1.0-1.cdh6.1.0.p0.770702-el7.parcel | awk '{ print $1 }' > CDH-6.1.0-1.cdh6.1.0.p0.770702-el7.parcel.sha
#Article 4 directive
chown -R cloudera-scm:cloudera-scm /opt/cloudera/parcel-repo/*
Screenshot:
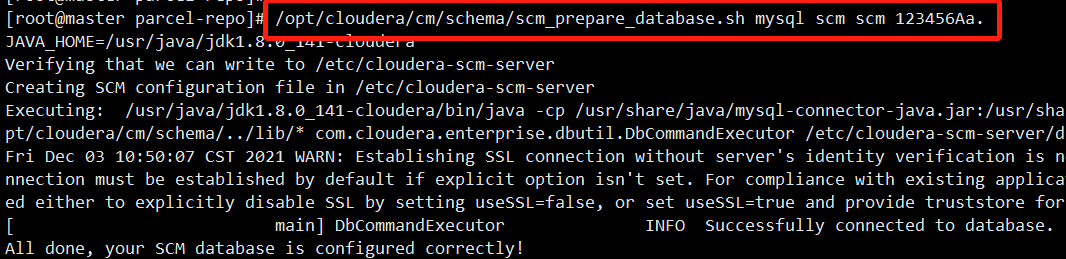
4. Initialize scm Library
Instruction:
#Note: modify the password of the scm library corresponding to the mysql you configured. If you follow the settings in this article, paste and copy directly
/opt/cloudera/cm/schema/scm_prepare_database.sh mysql scm scm 123456Aa.
Screenshot:
5. Start CM
Instruction:
#Direct paste copy execution
systemctl start cloudera-scm-server \
&& sleep 2 \
&& tail -f /var/log/cloudera-scm-server/cloudera-scm-server.log | grep "INFO WebServerImpl:com.cloudera.server.cmf.WebServerImpl: Started Jetty server"
Screenshot:

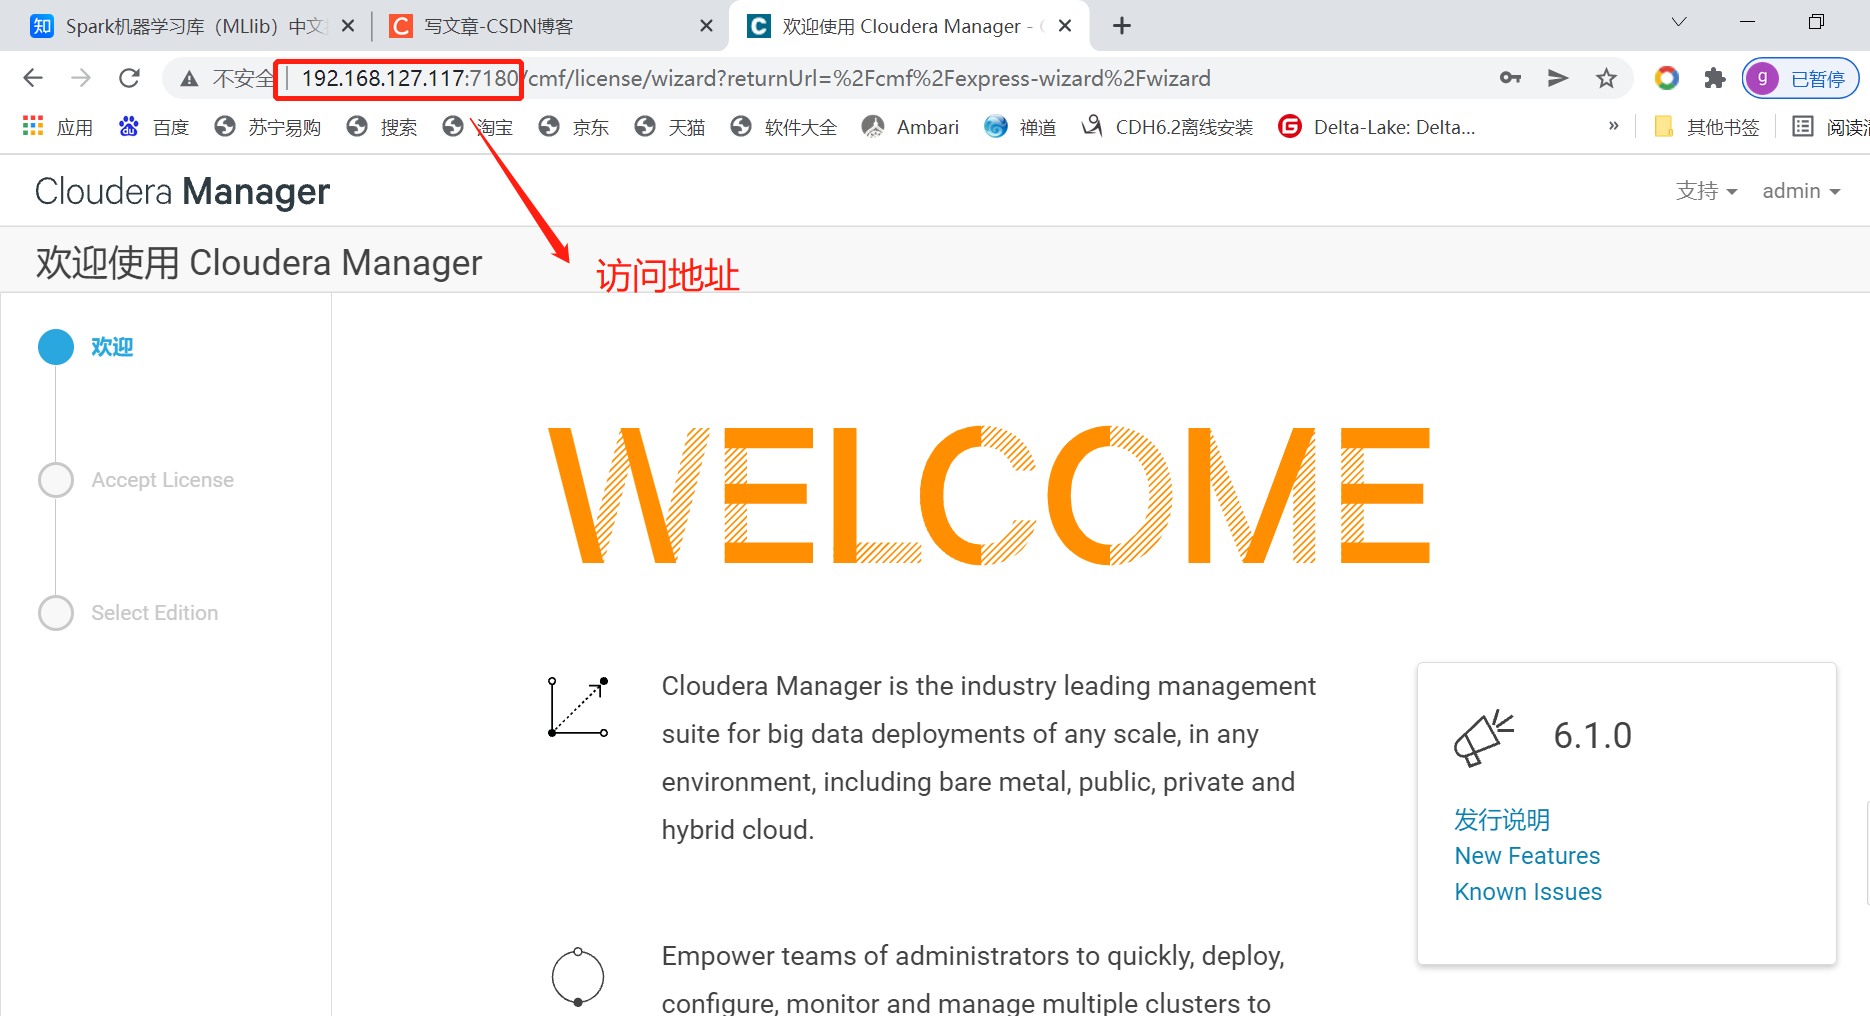
6. Login CM interface
Instruction:
http://${IP} of the node where CM resides: 7180
 account number/password: admin/admin
Screenshot:
5, Initialize CM and component installation
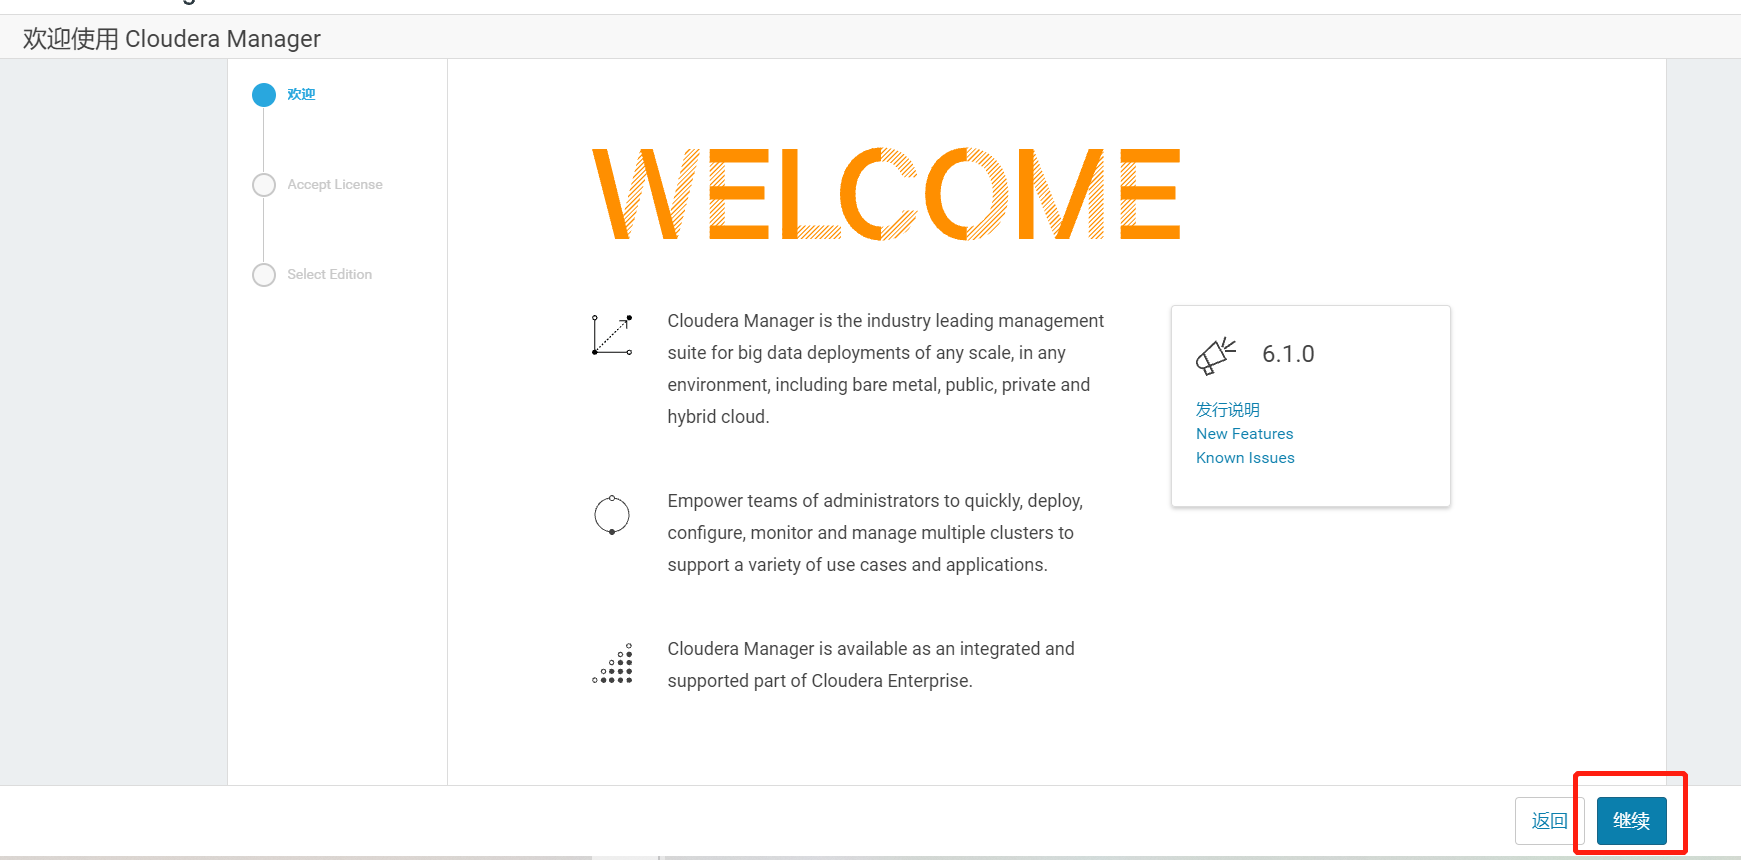
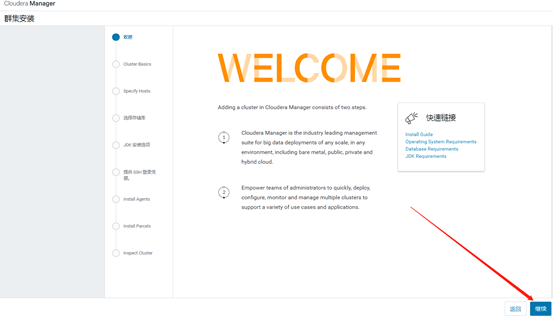
1. Welcome interface, next step
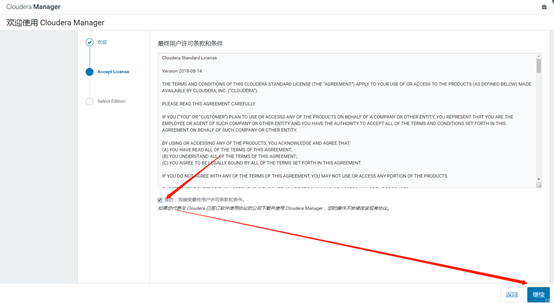
2. User permission, consent, next step
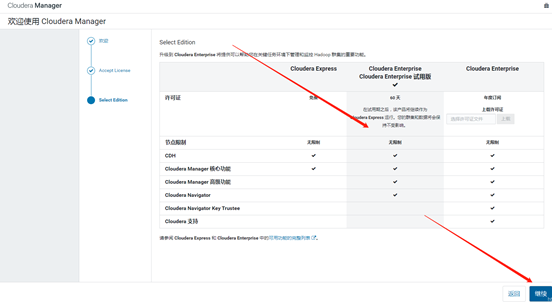
3. Select a trial version that expires in 60 days
4. Welcome interface, next step
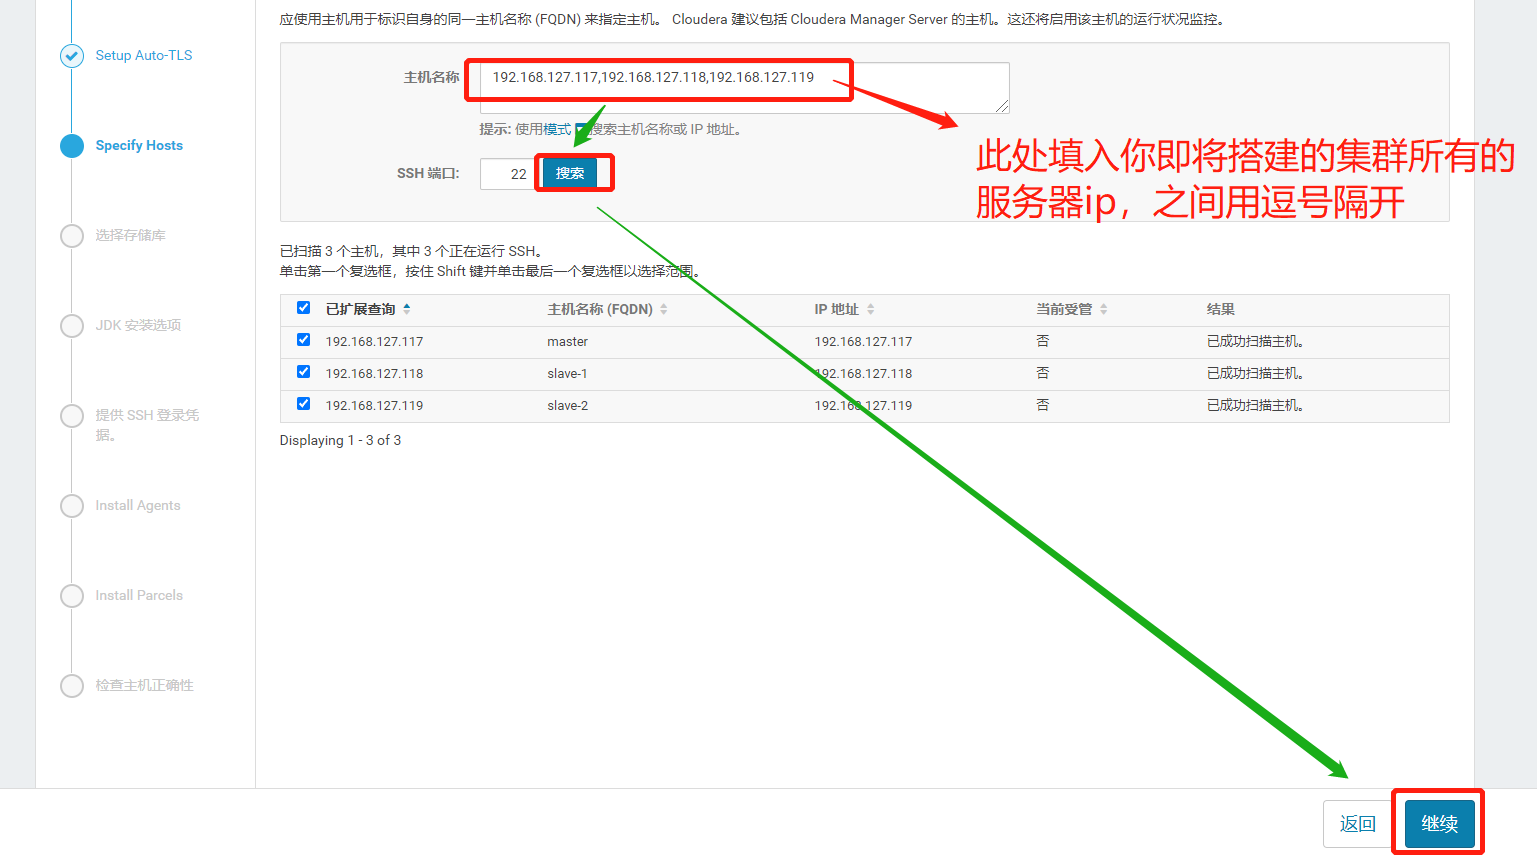
5. Select the host in the network and click next
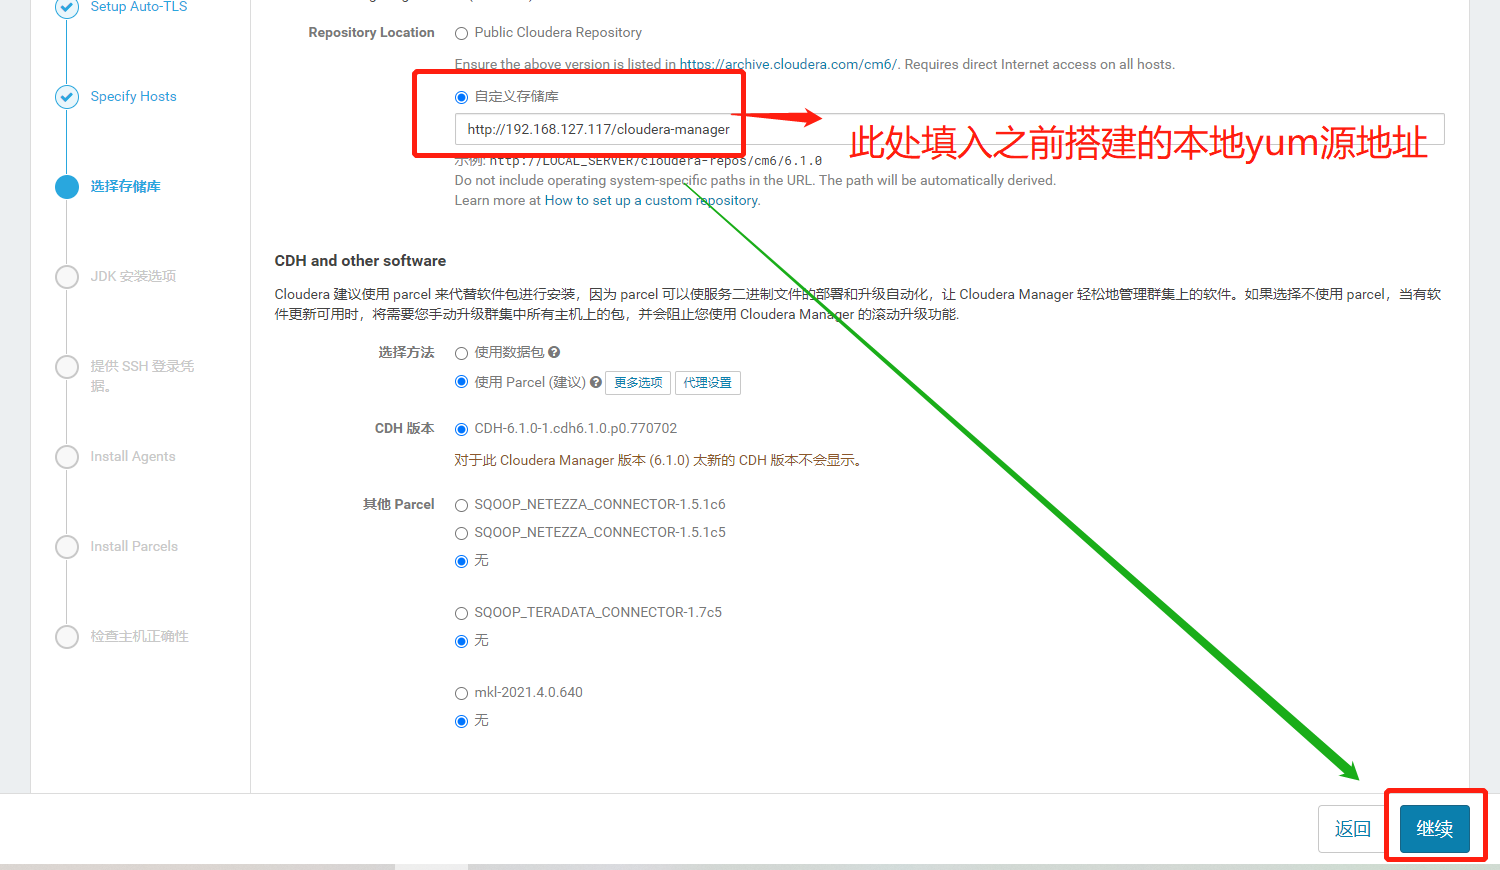
6. Input local yum Source address, next
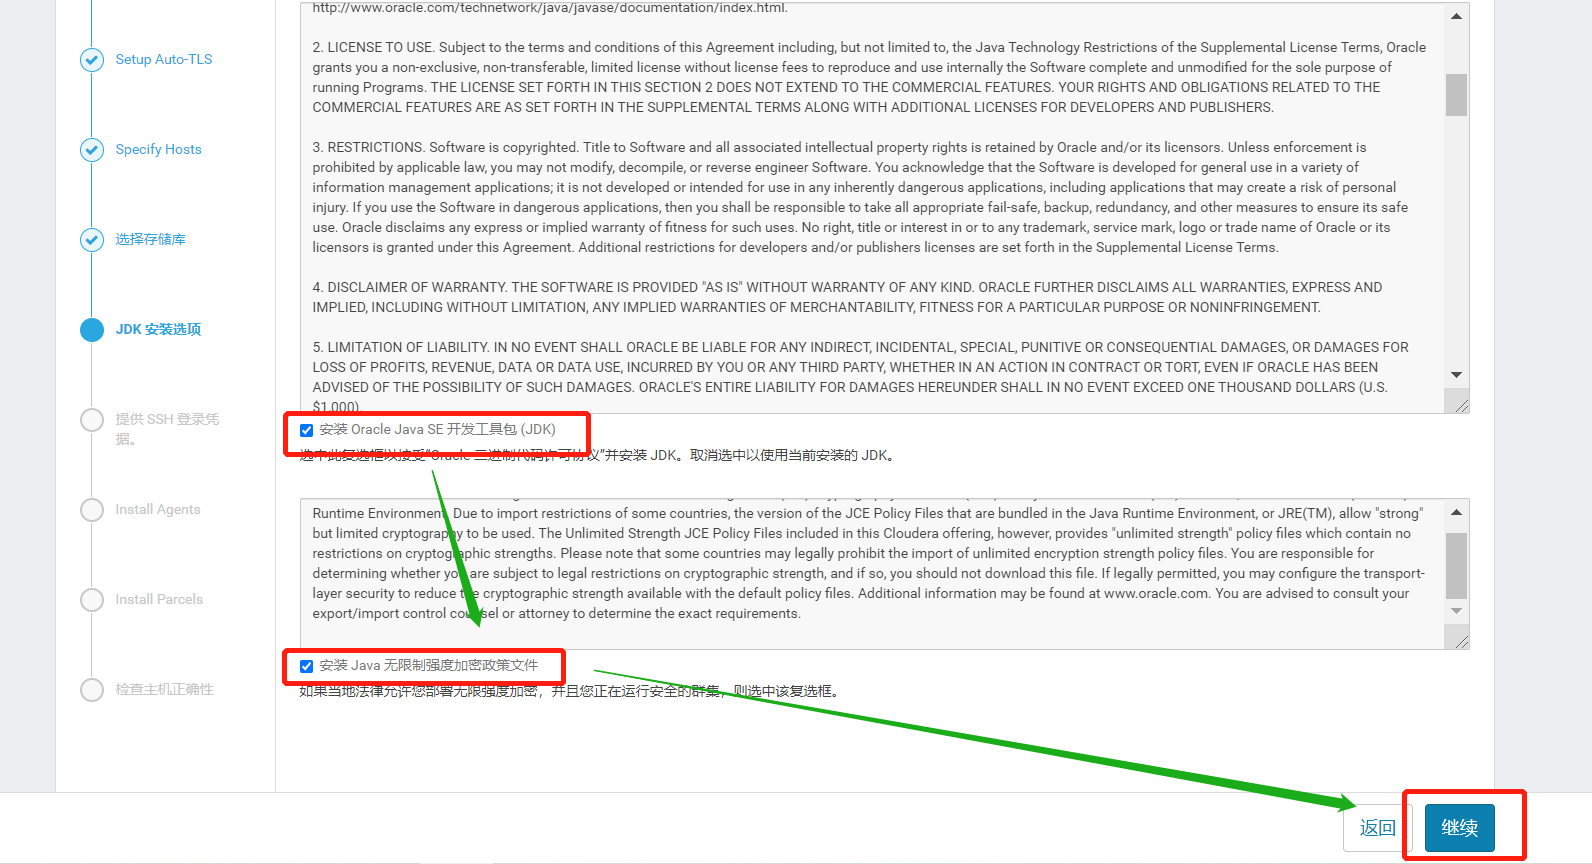
7. Agree jdk Use license, next step
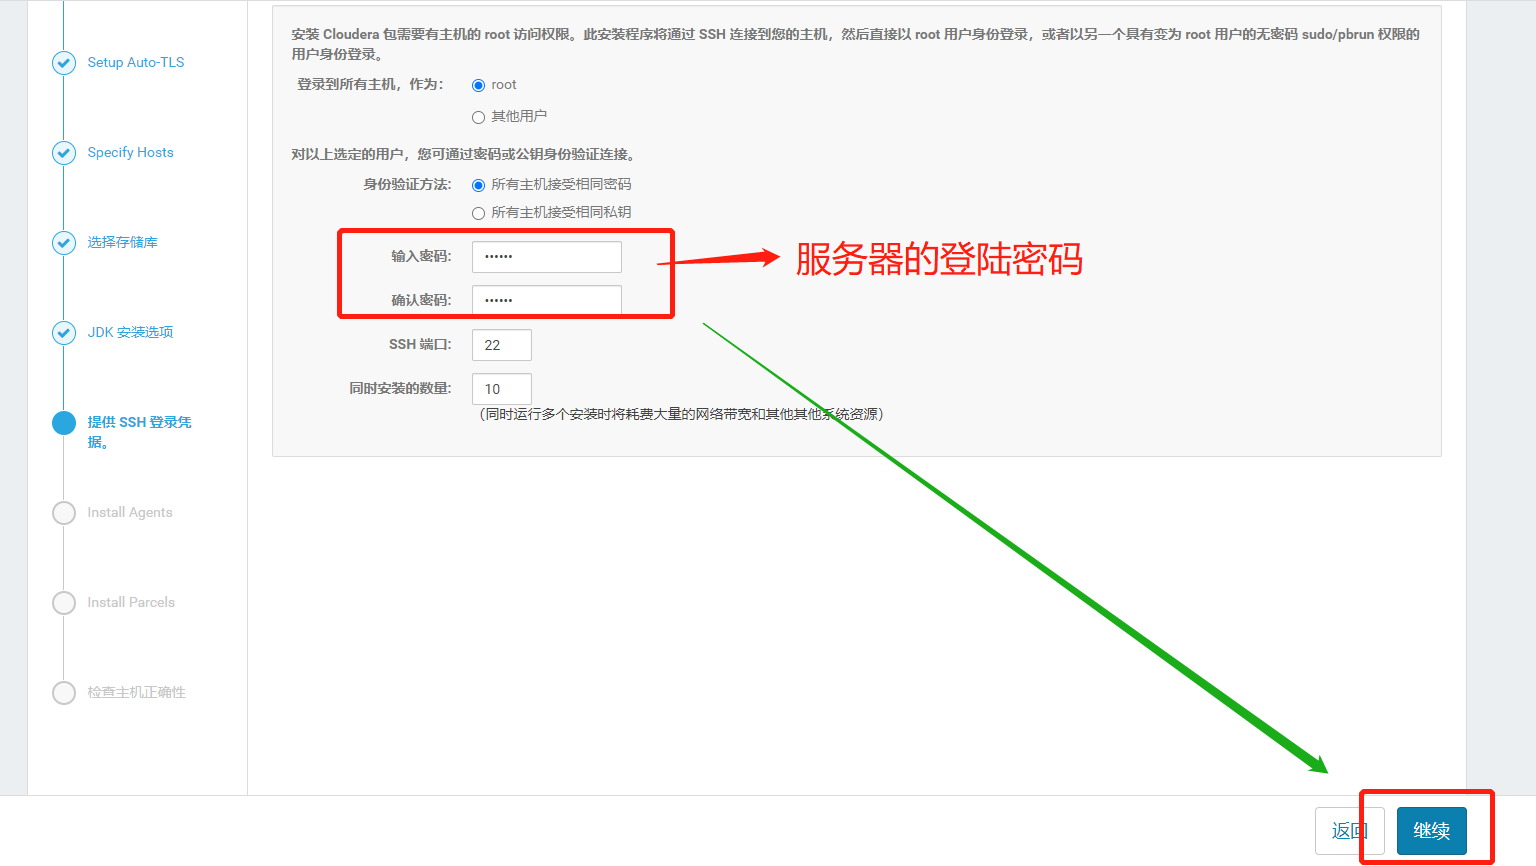
8. Enter another host password, next
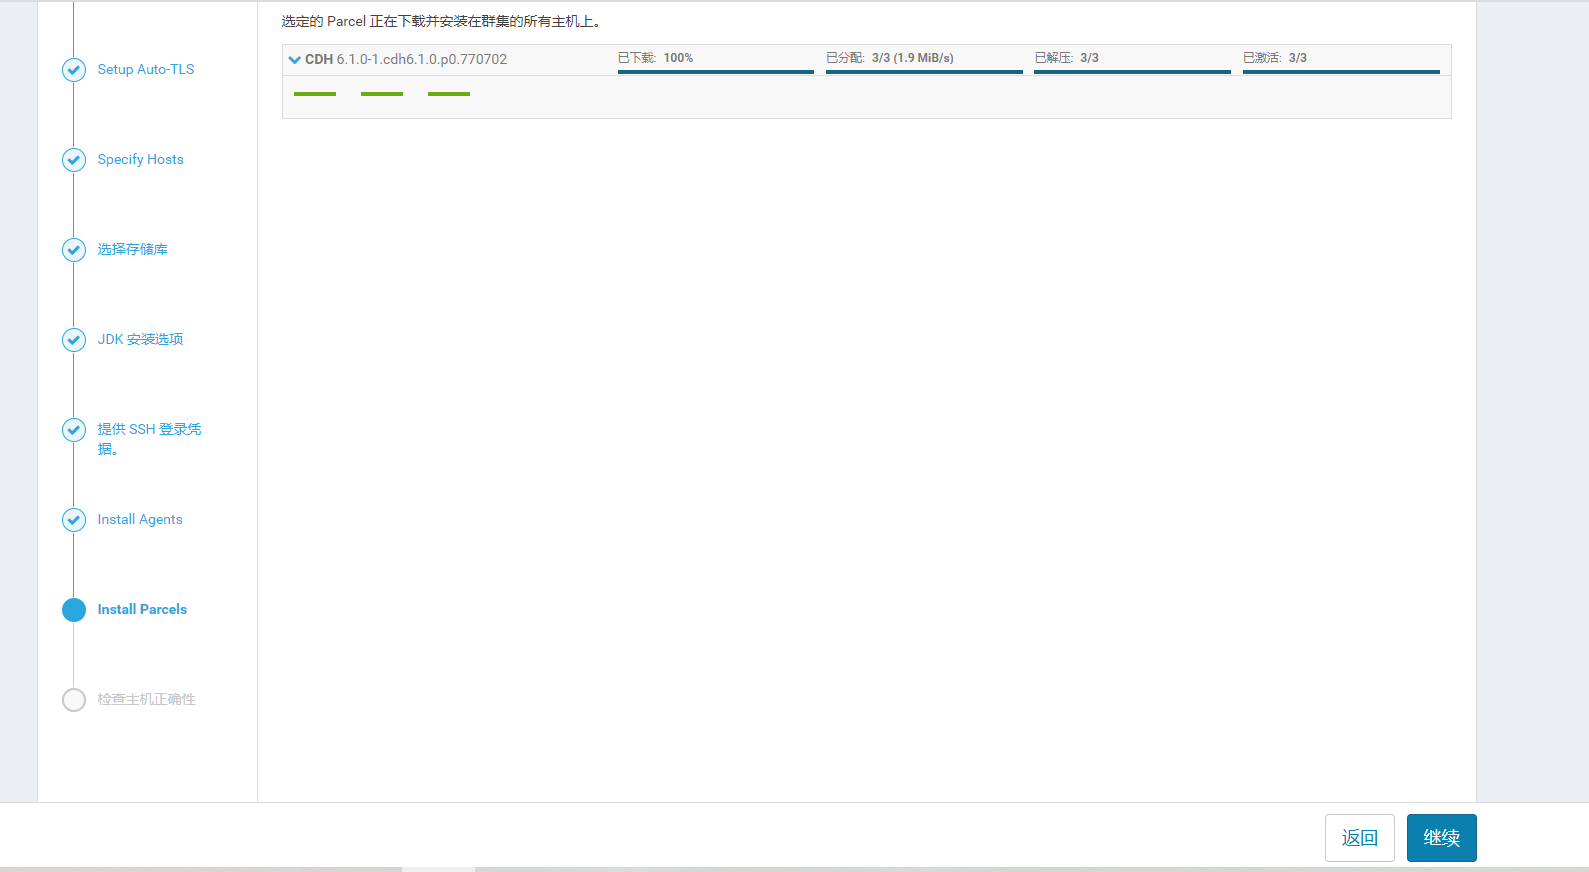
9. Installation of each host agent and parcels, installation completed, next step
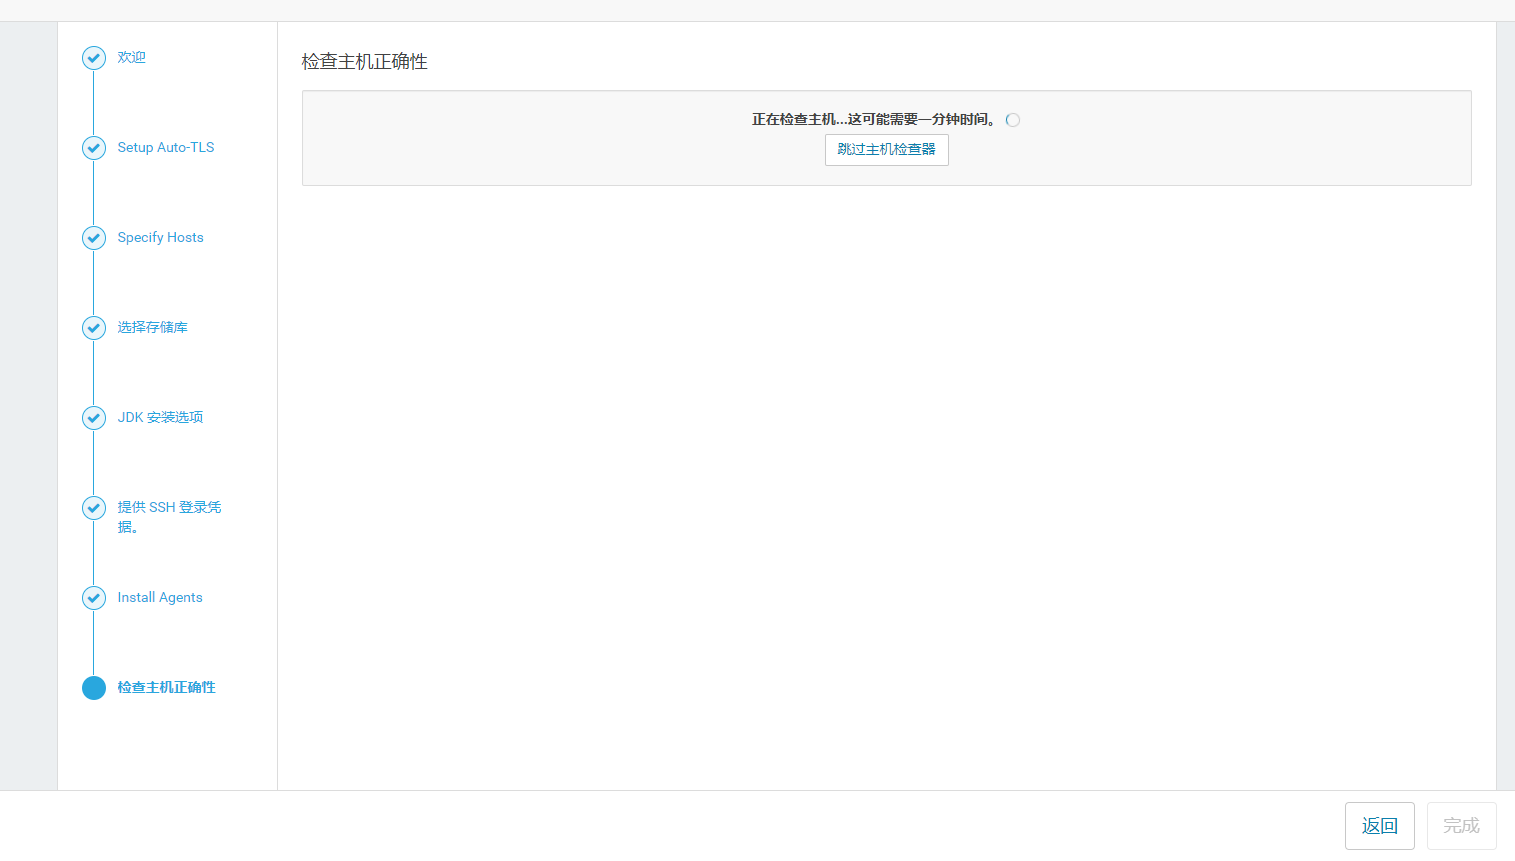
10. Host health check, next step
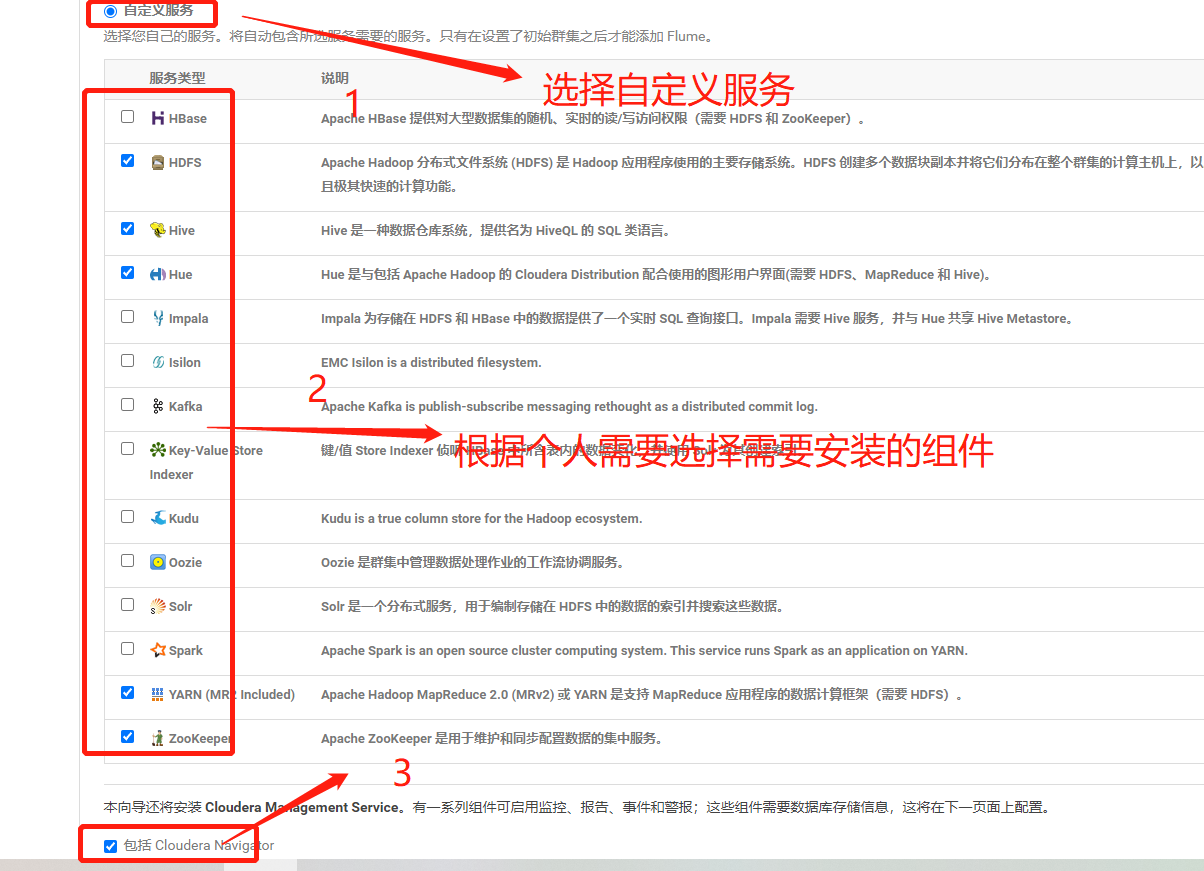
11. Select installed services
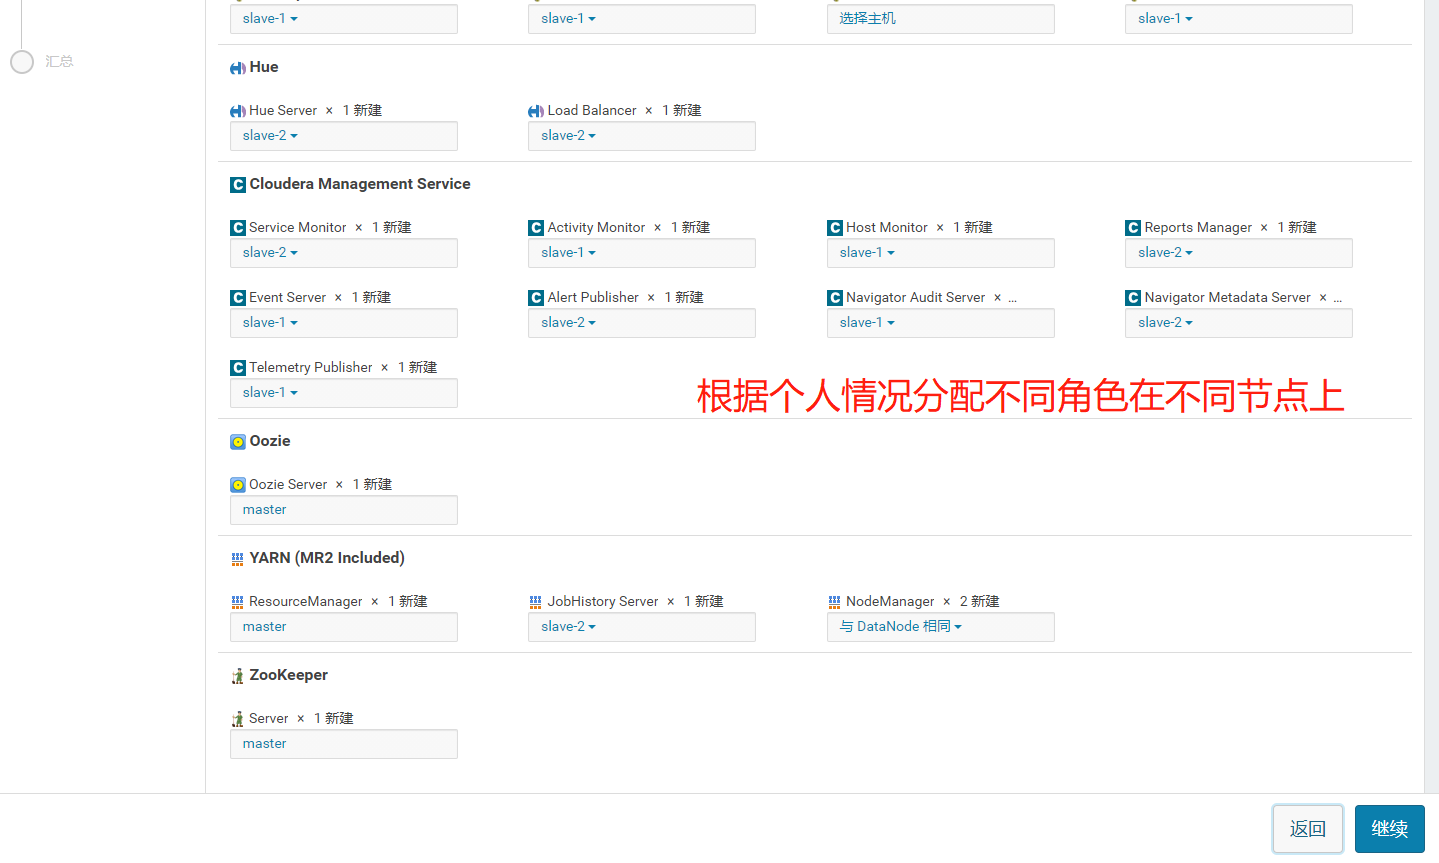
12. Self assign roles to hosts
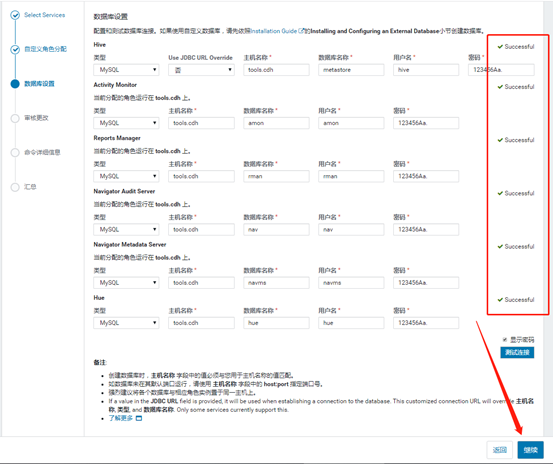
13, Test database link
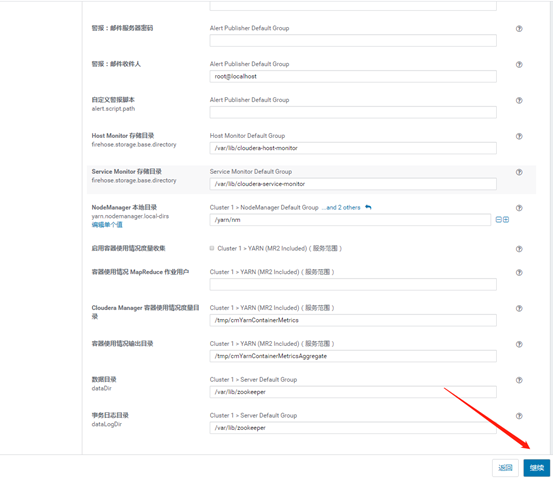
14. Configure the installation location of the instance, and install the data directory under a large partition as far as possible
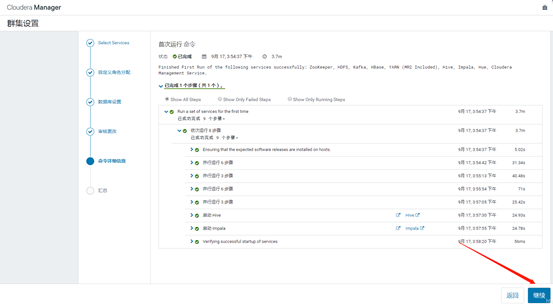
15. Installation services, next step
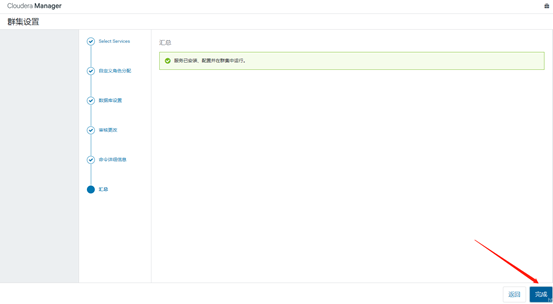
16. Installation complete