This series of articles is to explain Python OpenCV image processing knowledge. In the early stage, it mainly explains the introduction of image and the basic usage of OpenCV. In the middle stage, it explains various algorithms of image processing, including image sharpening operator, image enhancement technology and image segmentation. In the later stage, it studies the application of image recognition, image classification and target detection combined with in-depth learning.
The previous article introduced Python calling OpenCV to realize image scaling, image rotation, image flipping and image translation. This article will explain the operation of image thresholding, including binary thresholding, anti binary thresholding, truncation thresholding, anti thresholding to 0 and thresholding to 0. The full text is basic knowledge. I hope it will be helpful to you. I hope the article is helpful to you. If there are deficiencies, please forgive me~
- 1, Thresholding
- 2, Binary thresholding
- 3, Anti binary thresholding
- 4, Truncation thresholding
- 5, De thresholding to 0
- 6, Thresholding to 0
All source code of this series in github:
- https://github.com/eastmountyxz/ ImageProcessing-Python
1, Thresholding
Image Binarization or thresholding aims to extract the target object in the image and distinguish the background and noise. Usually, a threshold T is set, and the pixels of the image are divided into two categories through t: pixel groups greater than T and pixel groups less than t.
In the image after gray conversion, each pixel has only one gray value, and its size represents the degree of light and shade. Binarization can divide the pixels in the image into two types of colors. The commonly used binarization algorithm is shown in Formula 1:
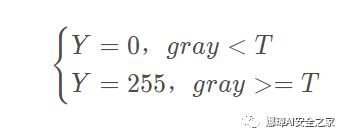
When Gray is less than the threshold T, its pixel is set to 0, indicating black; When Gray is greater than or equal to the threshold T, its Y value is 255, indicating white.
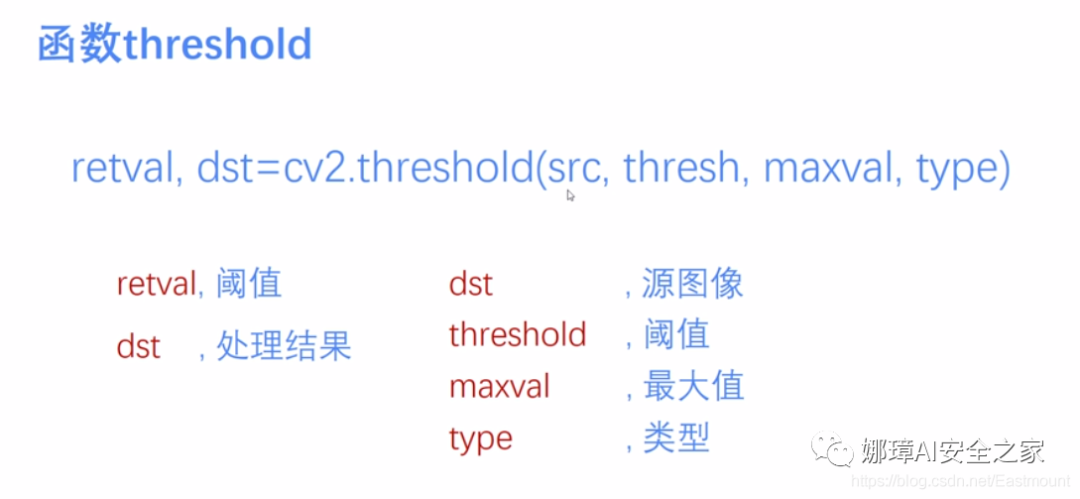
The threshold function threshold() is provided in Python OpenCV to realize binarization. Its formula and parameters are shown in the following figure:
- retval, dst = cv2.threshold( src, thresh, maxval, type)
The specific meanings of parameters are as follows:
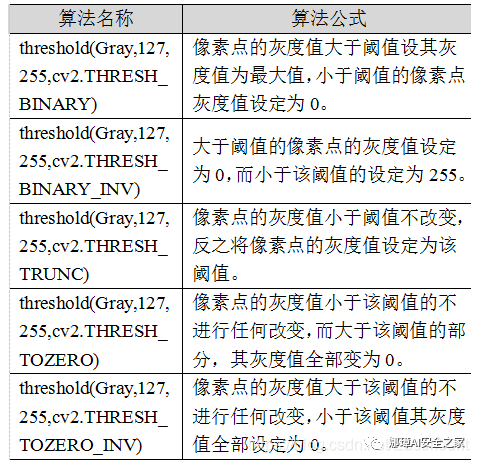
The commonly used methods are shown in the following table, in which the parameter Gray in the function represents the Gray image, the parameter 127 represents the threshold for classifying the pixel value, the parameter 255 represents the new pixel value that should be given when the pixel value is higher than the threshold, and the last parameter corresponds to different threshold processing methods.
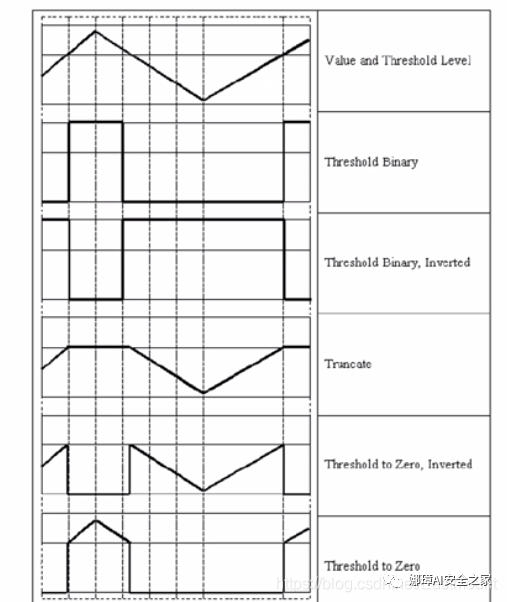
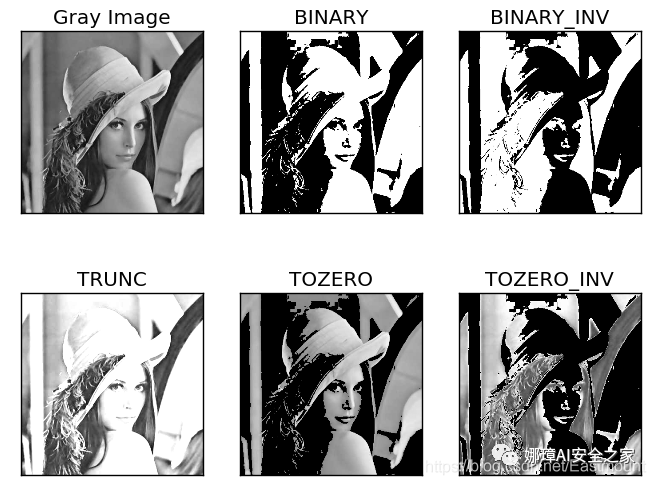
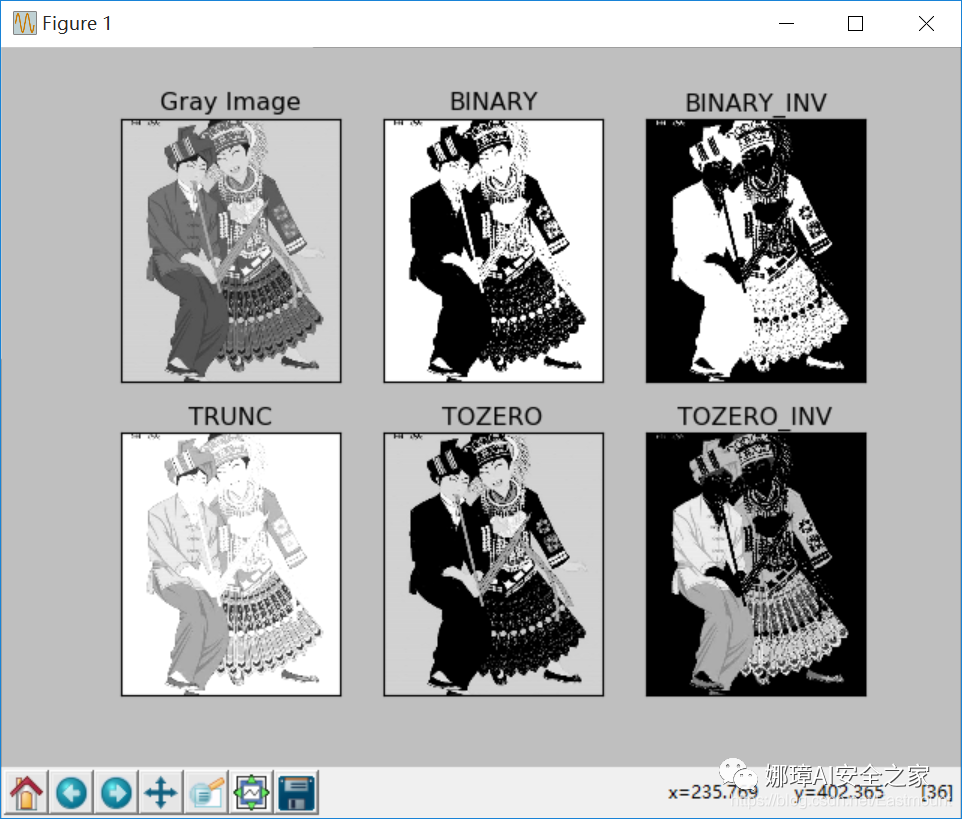
The corresponding five figures provided by OpenCV are as follows. The first one is the original figure, followed by binary thresholding, anti binary thresholding, truncation thresholding, anti thresholding to 0 and thresholding to 0.
BINARY processing is widely used in all walks of life, such as cell map segmentation in biology, license plate recognition in transportation and so on. In the field of cultural application, the required national cultural relics images are converted into black-and-white two-color images through BINARY processing, so as to provide better support for the following image recognition. The following figure shows the results of various binarization processing algorithms, of which "BINARY" is the most common black-and-white two-color processing.
2, Binary thresholding
This method first selects a specific threshold value, such as 127. The new threshold generation rule is as follows:

- (1) The gray value of pixels greater than or equal to 127 is set to the maximum value (for example, the maximum 8-bit gray value is 255)
- (2) The gray value of pixels with gray value less than 127 is set to 0
For example, 163 - > 255, 86 - > 0102 - > 0201 - > 255. The keyword is cv2.THRESH_BINARY, the complete code is as follows:
#encoding:utf-8
import cv2
import numpy as np

#Read picture
src = cv2.imread('test.jpg')

#Gray image processing
GrayImage = cv2.cvtColor(src,cv2.COLOR_BGR2GRAY)

#Binary thresholding
r, b = cv2.threshold(GrayImage, 127, 255, cv2.THRESH_BINARY)
print(r)

#Display image
cv2.imshow("src", src)
cv2.imshow("result", b)

#Wait for display
cv2.waitKey(0)
cv2.destroyAllWindows()
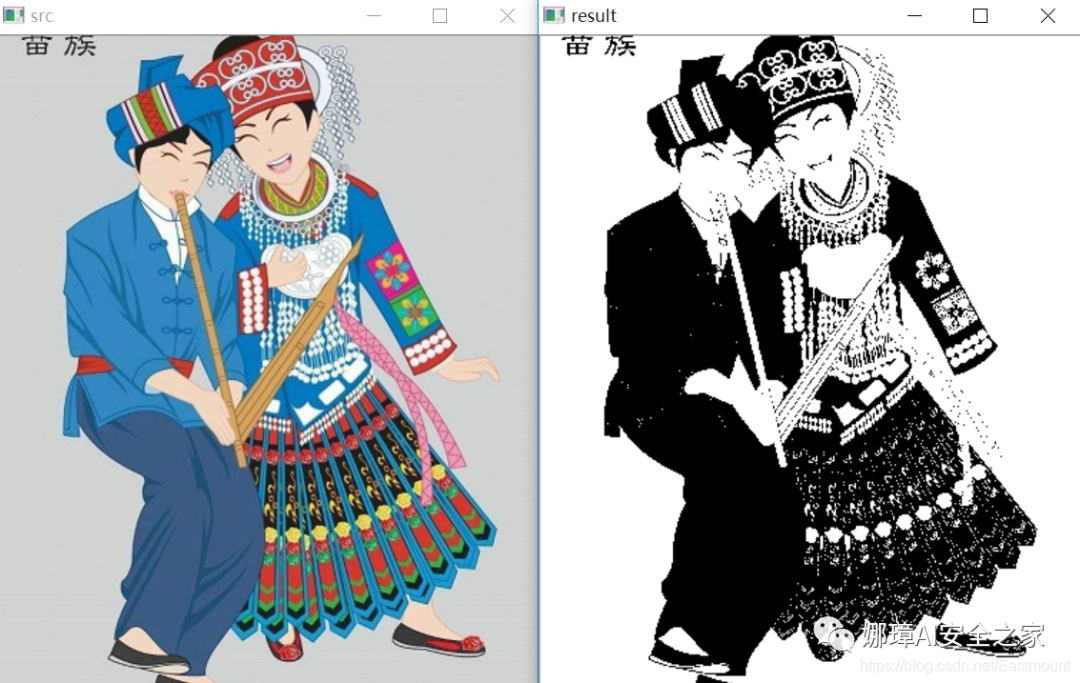
The output is two return values, r is 127 and b is the processing result (greater than 127 is set to 255 and less than 0). As shown in the figure below:
3, Anti binary thresholding
This method is similar to the binary thresholding method. First, select a specific gray value as the threshold, such as 127. The new threshold generation rule is as follows:

- (1) The gray value of pixels greater than 127 is set to 0 (take an 8-bit gray image as an example)
- (2) The grayscale value less than this threshold is set to 255
For example, 163 - > 0, 86 - > 255102 - > 255201 - > 0. The keyword is cv2.THRESH_BINARY_INV, complete code as follows:
#encoding:utf-8
import cv2
import numpy as np

#Read picture
src = cv2.imread('test.jpg')

#Gray image processing
GrayImage = cv2.cvtColor(src,cv2.COLOR_BGR2GRAY)

#Anti binary thresholding
r, b = cv2.threshold(GrayImage, 127, 255, cv2.THRESH_BINARY_INV)
print(r)

#Display image
cv2.imshow("src", src)
cv2.imshow("result", b)

#Wait for display
cv2.waitKey(0)
cv2.destroyAllWindows()
The output results are shown in the figure below:
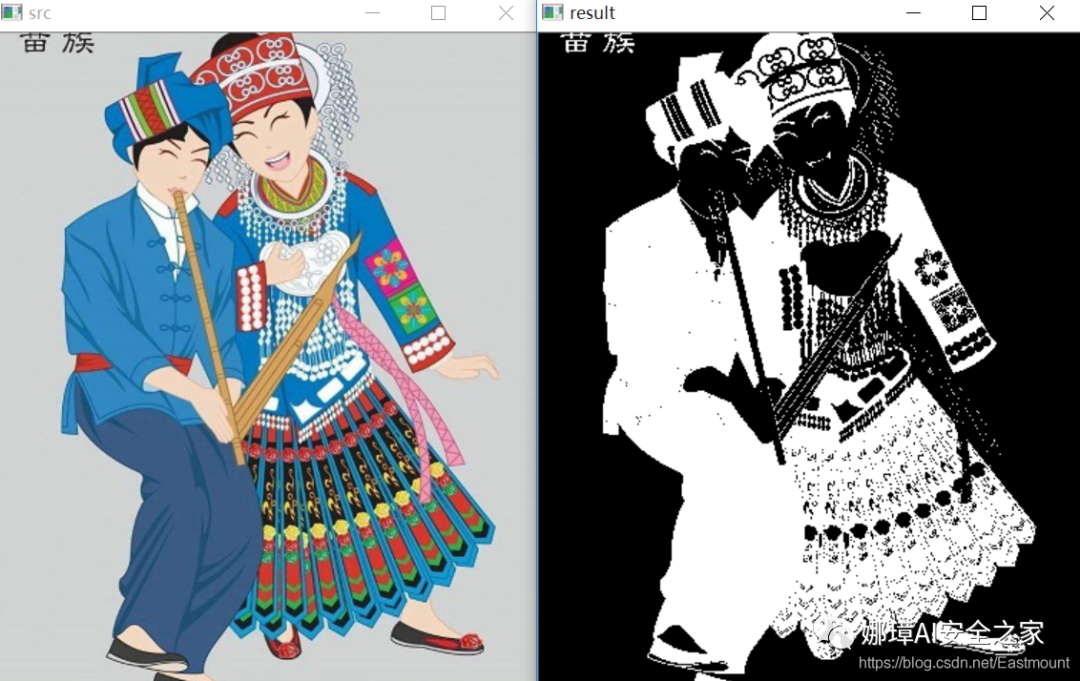
The result obtained by this method is just opposite to the binary thresholding method. The bright color elements are treated as black and the dark color is white.
4, Truncation thresholding
The method needs to select a threshold, the pixels in the image greater than the threshold are set as the threshold, and those less than the threshold remain unchanged, such as 127. The new threshold generation rule is as follows:

- (1) The gray value of pixels greater than or equal to 127 is set to the threshold 127
- (2) The gray value less than the threshold does not change
For example, 163 - > 127, 86 - > 86102 - > 102201 - > 127. The keyword is cv2.THRESH_TRUNC, the complete code is as follows:
#encoding:utf-8
import cv2
import numpy as np

#Read picture
src = cv2.imread('test.jpg')

#Gray image processing
GrayImage = cv2.cvtColor(src,cv2.COLOR_BGR2GRAY)

#Truncation thresholding
r, b = cv2.threshold(GrayImage, 127, 255, cv2.THRESH_TRUNC)
print(r)

#Display image
cv2.imshow("src", src)
cv2.imshow("result", b)

#Wait for display
cv2.waitKey(0)
cv2.destroyAllWindows()
The output results are shown in the following figure:
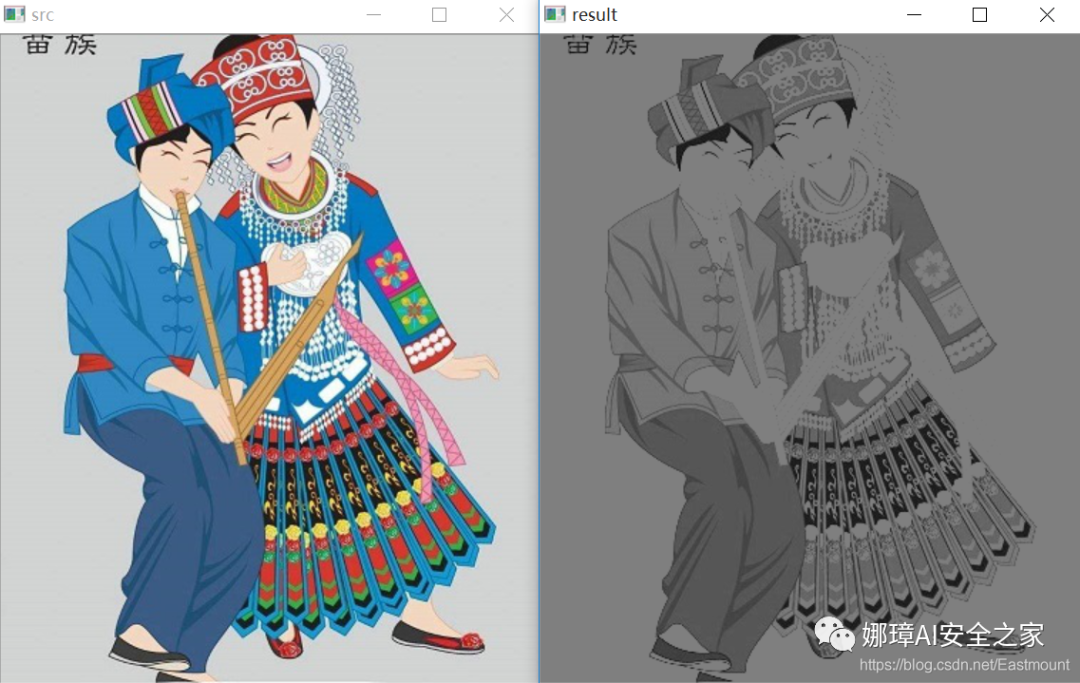
This processing method is equivalent to processing the pixel value of relatively bright (greater than 127, biased towards white) in the image as a threshold.
5, De thresholding to 0
This method first selects a threshold, such as 127, and then processes the gray value of the image as follows:

- (1) Pixels greater than or equal to the threshold 127 become 0
- (2) Pixel values less than this threshold remain unchanged
For example, 163 - > 0, 86 - > 86102 - > 102201 - > 0. The keyword is cv2.THRESH_TOZERO_INV, complete code as follows:
#encoding:utf-8
import cv2
import numpy as np

#Read picture
src = cv2.imread('test.jpg')

#Gray image processing
GrayImage = cv2.cvtColor(src,cv2.COLOR_BGR2GRAY)

#De thresholding to 0 processing
r, b = cv2.threshold(GrayImage, 127, 255, cv2.THRESH_TOZERO_INV)
print(r)

#Display image
cv2.imshow("src", src)
cv2.imshow("result", b)

#Wait for display
cv2.waitKey(0)
cv2.destroyAllWindows()
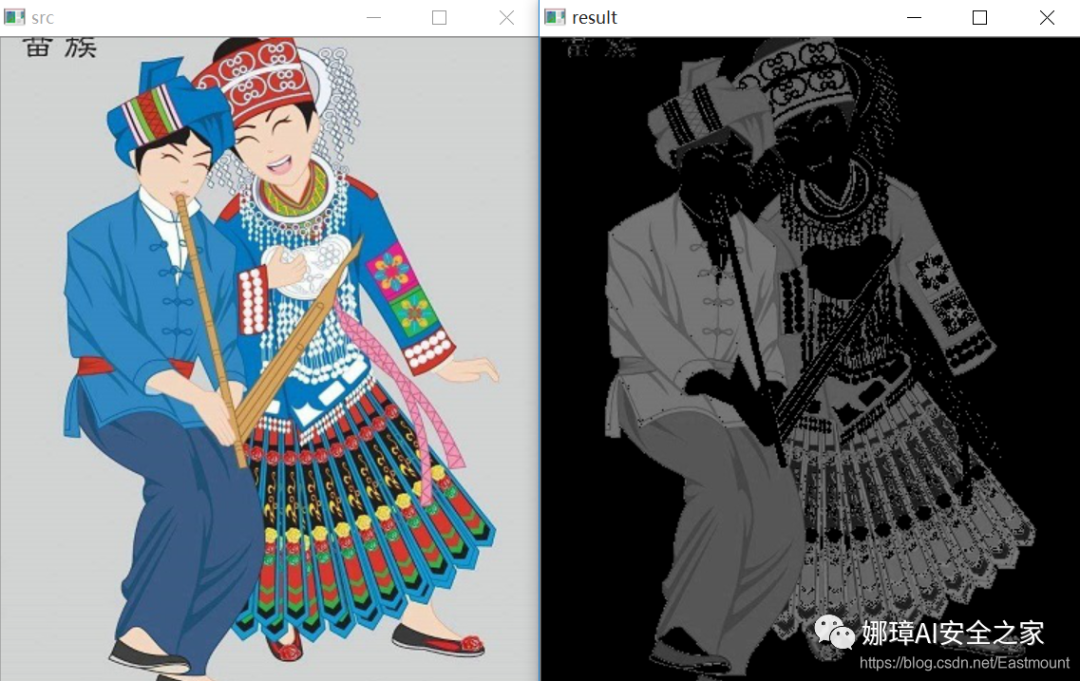
The output results are shown in the figure below:
6, Thresholding to 0
This method first selects a threshold, such as 127, and then processes the gray value of the image as follows:

- (1) For pixels greater than or equal to the threshold 127, the value remains unchanged
- (2) Pixel values less than this threshold are set to 0
For example, 163 - > 163, 86 - > 0102 - > 0201 - > 201. The keyword is cv2.THRESH_TOZERO, the complete code is as follows:
#encoding:utf-8
import cv2
import numpy as np

#Read picture
src = cv2.imread('test.jpg')

#Gray image processing
GrayImage = cv2.cvtColor(src,cv2.COLOR_BGR2GRAY)

#Thresholding to 0 processing
r, b = cv2.threshold(GrayImage, 127, 255, cv2.THRESH_TOZERO)
print(r)

#Display image
cv2.imshow("src", src)
cv2.imshow("result", b)

#Wait for display
cv2.waitKey(0)
cv2.destroyAllWindows()
The output results are shown in the figure below:
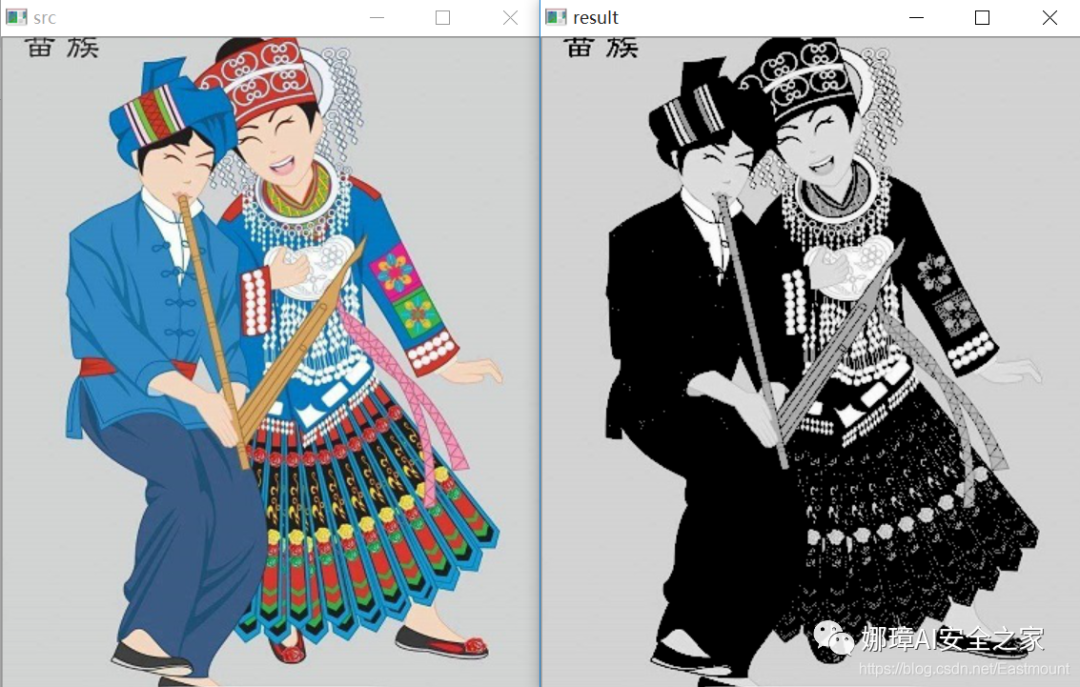
In this algorithm, the brighter part remains unchanged and the darker part is treated as 0.
7, Summary
The comparison code of the complete five algorithms is as follows:
#encoding:utf-8
import cv2
import numpy as np
import matplotlib.pyplot as plt

#Read image
img=cv2.imread('test.jpg')
lenna_img = cv2.cvtColor(img,cv2.COLOR_BGR2RGB)
GrayImage=cv2.cvtColor(img,cv2.COLOR_BGR2GRAY)

#Threshold processing
ret,thresh1=cv2.threshold(GrayImage,127,255,cv2.THRESH_BINARY)
ret,thresh2=cv2.threshold(GrayImage,127,255,cv2.THRESH_BINARY_INV)
ret,thresh3=cv2.threshold(GrayImage,127,255,cv2.THRESH_TRUNC)
ret,thresh4=cv2.threshold(GrayImage,127,255,cv2.THRESH_TOZERO)
ret,thresh5=cv2.threshold(GrayImage,127,255,cv2.THRESH_TOZERO_INV)

#Display results
titles = ['Gray Image','BINARY','BINARY_INV','TRUNC','TOZERO','TOZERO_INV']
images = [GrayImage, thresh1, thresh2, thresh3, thresh4, thresh5]
for i in range(6):
   plt.subplot(2,3,i+1),plt.imshow(images[i],'gray')
   plt.title(titles[i])
   plt.xticks([]),plt.yticks([])
plt.show()
The output results are shown in the figure below:
This part refers to the author's paper "Research on image sharpening and edge extraction technology based on Miao costumes", which was casually written at that time. Ha ha, looking back on the speech of writing this article in 2018, it's quite good!
Source code download address, remember to help star and pay attention!
- https://github.com/eastmountyxz/ ImageProcessing-Python
References, I would like to thank these leaders for their encouragement!
- [1] Gonzalez. Digital image processing (3rd Edition) [M]. Electronic Industry Press, 2013
- [2] Luo Zijiang. Image processing in Python [M]. Science Press, 2020
- [3] https://blog.csdn.net/Eastmount