Pre knowledge
We will use Nacos as the registration center, Gateway as the Gateway, and the micro service permission solution provided by SA token. This solution is based on the previous solution
Application Architecture
The idea is similar to the previous scheme. The authentication service is responsible for login processing, the gateway is responsible for login authentication and permission authentication, and other API services are responsible for processing their own business logic. In order to share SA token sessions among multiple services, all services need to integrate SA token and Redis.
- Micro SA token common: common toolkit, user class UserDTO and common return result class CommonResult shared by other services are extracted here.
- Micro SA token gateway: gateway service, responsible for request forwarding, login authentication and authority authentication.
- Micro SA token auth: authentication service, which contains only one login interface and calls the API implementation of SA token.
- Micro SA token API: a protected API service. Users can access the service after authentication through the gateway.
Scheme implementation
Next, implement this solution, and build gateway service, authentication service and API service in turn.
micro-sa-token-gateway
Let's first build the gateway service, which will be responsible for the login authentication and permission authentication of the whole microservice.
- In addition to the general Gateway dependency, we also need to add the following dependencies in pom.xml, including the Reactor responsive dependency of SA token, the dependency of integrating Redis to realize distributed Session and our micro SA token common dependency;
<dependencies>
   <!-- Sa-Token Authority authentication( Reactor Responsive integration) -->
   <dependency>
       <groupId>cn.dev33</groupId>
       <artifactId>sa-token-reactor-spring-boot-starter</artifactId>
       <version>1.24.0</version>
   </dependency>
   <!-- Sa-Token integration Redis (use jackson Serialization mode) -->
   <dependency>
       <groupId>cn.dev33</groupId>
       <artifactId>sa-token-dao-redis-jackson</artifactId>
       <version>1.24.0</version>
   </dependency>
   <!-- provide Redis Connection pool -->
   <dependency>
       <groupId>org.apache.commons</groupId>
       <artifactId>commons-pool2</artifactId>
   </dependency>
   <!-- micro-sa-token Generic dependency -->
   <dependency>
       <groupId>com.macro.cloud</groupId>
       <artifactId>micro-sa-token-common</artifactId>
       <version>1.0.0</version>
   </dependency>
</dependencies>- Next, modify the configuration file application.yml and add Redis configuration and SA token configuration. If you have seen the previous tutorial on the use of SA token, you will basically know the role of these configurations;
spring:
  redis:
    database: 0
    port: 6379
    host: localhost
    password:

# SA token configuration
sa-token:
  # token name (also cookie name)
  token-name: Authorization
  # token validity, in seconds, - 1 means never expires
  timeout: 2592000
  # Temporary validity period of token (token expires if there is no operation within the specified time), unit: seconds
  activity-timeout: -1
  # Whether to allow concurrent login of the same account (if false, the new login will crowd out the old login)
  is-concurrent: true
  # Whether to share a token when multiple people log in to the same account (if false, create a new token each time they log in)
  is-share: false
  # token style
  token-style: uuid
  # Output operation log
  is-log: false
  # Whether to read token from cookie
  is-read-cookie: false
  # Whether to read token from head
is-read-head: true- Add the configuration class SaTokenConfig of SA token, inject a filter for login authentication and authority authentication, add routing rules in setAuth method, and add callback processing of authentication failure in setError method;
@Configuration
public class SaTokenConfig {
    /**
     * Register SA token global filter
     */
    @Bean
    public SaReactorFilter getSaReactorFilter() {
        return new SaReactorFilter()
                // Intercept address
                .addInclude("/**")
                // Open address
                .addExclude("/favicon.ico")
                // Authentication method: enter each access
                .setAuth(r -> {
                    // Login authentication: authentication is required except for login interfaces
                    SaRouter.match("/**", "/auth/user/login", StpUtil::checkLogin);
                    // Authority authentication: different interfaces have different access rights
                    SaRouter.match("/api/test/hello", () -> StpUtil.checkPermission("api:test:hello"));
                    SaRouter.match("/api/user/info", () -> StpUtil.checkPermission("api:user:info"));
                })
                // setAuth method exception handling
                .setError(e -> {
                    // Set the error return format to JSON
                    ServerWebExchange exchange = SaReactorSyncHolder.getContent();
                    exchange.getResponse().getHeaders().set("Content-Type", "application/json; charset=utf-8");
                    return SaResult.error(e.getMessage());
                });
    }
}- Expand the StpInterface interface provided by SA token to obtain the user's permission. After the user logs in, we will save the user information into the Session, and the permission information will also be in it. Therefore, the permission code can only be obtained from the Session.
/**
 * Custom permission verification interface extension
 */
@Component
public class StpInterfaceImpl implements StpInterface {

    @Override
    public List<String> getPermissionList(Object loginId, String loginType) {
        // Returns the list of permission codes owned by this loginId
        UserDTO userDTO = (UserDTO) StpUtil.getSession().get("userInfo");
        return userDTO.getPermissionList();
    }

    @Override
    public List<String> getRoleList(Object loginId, String loginType) {
        // Returns the list of role codes owned by this loginId
        return null;
    }

}
micro-sa-token-auth
Next, let's build the authentication service. It's very simple as long as we integrate SA token and implement the login interface.
- Firstly, add relevant dependencies in pom.xml, including SA token's SpringBoot dependency, Redis's integration to realize distributed Session dependency and our micro SA token common dependency;
<dependencies>
    <!-- Sa-Token Authority authentication -->
    <dependency>
        <groupId>cn.dev33</groupId>
        <artifactId>sa-token-spring-boot-starter</artifactId>
        <version>1.24.0</version>
    </dependency>
    <!-- Sa-Token integration Redis (use jackson Serialization mode) -->
    <dependency>
        <groupId>cn.dev33</groupId>
        <artifactId>sa-token-dao-redis-jackson</artifactId>
        <version>1.24.0</version>
    </dependency>
    <!-- provide Redis Connection pool -->
    <dependency>
        <groupId>org.apache.commons</groupId>
        <artifactId>commons-pool2</artifactId>
    </dependency>
    <!-- micro-sa-token Generic dependency -->
    <dependency>
        <groupId>com.macro.cloud</groupId>
        <artifactId>micro-sa-token-common</artifactId>
        <version>1.0.0</version>
    </dependency>
</dependencies>- Next, modify the configuration file application.yml and copy the previous gateway configuration;
spring:
  redis:
    database: 0
    port: 6379
    host: localhost
    password:

# SA token configuration
sa-token:
  # token name (also cookie name)
  token-name: Authorization
  # token validity, in seconds, - 1 means never expires
  timeout: 2592000
  # Temporary validity period of token (token expires if there is no operation within the specified time), unit: seconds
  activity-timeout: -1
  # Whether to allow concurrent login of the same account (if false, the new login will crowd out the old login)
  is-concurrent: true
  # Whether to share a token when multiple people log in to the same account (if false, create a new token each time they log in)
  is-share: false
  # token style
  token-style: uuid
  # Output operation log
  is-log: false
  # Whether to read token from cookie
  is-read-cookie: false
  # Whether to read token from head
is-read-head: true- Define the login interface in the UserController, and return a Token after successful login. The specific implementation is in the UserServiceImpl class;
/**
 * Customize the Oauth2 get token interface
 * Created by macro on 2020/7/17.
 */
@RestController
@RequestMapping("/user")
public class UserController {
    @Autowired
    private UserServiceImpl userService;

    @RequestMapping(value = "/login", method = RequestMethod.POST)
    public CommonResult login(@RequestParam String username, @RequestParam String password) {
        SaTokenInfo saTokenInfo = userService.login(username, password);
        if (saTokenInfo == null) {
            return CommonResult.validateFailed("Wrong user name or password");
        }
        Map<String, String> tokenMap = new HashMap<>();
        tokenMap.put("token", saTokenInfo.getTokenValue());
        tokenMap.put("tokenHead", saTokenInfo.getTokenName());
        return CommonResult.success(tokenMap);
    }
}- Add the specific login logic in UserServiceImpl. First verify the password. After the password verification is successful, notify the SA token login user ID, and then store the user information directly in the Session;
/**
 * User management business class
 * Created by macro on 2020/6/19.
 */
@Service
public class UserServiceImpl{

    private List<UserDTO> userList;

    public SaTokenInfo login(String username, String password) {
        SaTokenInfo saTokenInfo = null;
        UserDTO userDTO = loadUserByUsername(username);
        if (userDTO == null) {
            return null;
        }
        if (!SaSecureUtil.md5(password).equals(userDTO.getPassword())) {
            return null;
        }
        // After the password verification is successful, log in with one line of code
        StpUtil.login(userDTO.getId());
        // Store user information in Session
        StpUtil.getSession().set("userInfo",userDTO);
        // Get the Token information of the currently logged in user
        saTokenInfo = StpUtil.getTokenInfo();
        return saTokenInfo;
    }
}- Here is a point to remind. The Session of SA token is not the HttpSession we usually understand, but its own Session like mechanism.
micro-sa-token-api
Next, let's build a protected API service to realize the interface to obtain login user information and the test interface that needs special permission to access.
- First, add related dependencies in pom.xml, which is the same as micro SA token auth above;
<dependencies>
    <!-- Sa-Token Authority authentication -->
    <dependency>
        <groupId>cn.dev33</groupId>
        <artifactId>sa-token-spring-boot-starter</artifactId>
        <version>1.24.0</version>
    </dependency>
    <!-- Sa-Token integration Redis (use jackson Serialization mode) -->
    <dependency>
        <groupId>cn.dev33</groupId>
        <artifactId>sa-token-dao-redis-jackson</artifactId>
        <version>1.24.0</version>
    </dependency>
    <!-- provide Redis Connection pool -->
    <dependency>
        <groupId>org.apache.commons</groupId>
        <artifactId>commons-pool2</artifactId>
    </dependency>
    <!-- micro-sa-token Generic dependency -->
    <dependency>
        <groupId>com.macro.cloud</groupId>
        <artifactId>micro-sa-token-common</artifactId>
        <version>1.0.0</version>
    </dependency>
</dependencies>- Next, modify the configuration file application.yml and copy the previous gateway configuration;
spring:
  redis:
    database: 0
    port: 6379
    host: localhost
    password:

# SA token configuration
sa-token:
  # token name (also cookie name)
  token-name: Authorization
  # token validity, in seconds, - 1 means never expires
  timeout: 2592000
  # Temporary validity period of token (token expires if there is no operation within the specified time), unit: seconds
  activity-timeout: -1
  # Whether to allow concurrent login of the same account (if false, the new login will crowd out the old login)
  is-concurrent: true
  # Whether to share a token when multiple people log in to the same account (if false, create a new token each time they log in)
  is-share: false
  # token style
  token-style: uuid
  # Output operation log
  is-log: false
  # Whether to read token from cookie
  is-read-cookie: false
  # Whether to read token from head
is-read-head: true- Add an interface to obtain user information. Since Redis is used to realize distributed Session, it can be obtained directly from Session. Is it very simple!
/**
 * Get login user information interface
 * Created by macro on 2020/6/19.
 */
@RestController
@RequestMapping("/user")
public class UserController{

    @GetMapping("/info")
    public CommonResult<UserDTO> userInfo() {
        UserDTO userDTO = (UserDTO) StpUtil.getSession().get("userInfo");
        return CommonResult.success(userDTO);
    }

}- Add a test interface that requires api:test:hello permission. The preset admin user has this permission, but the macro user does not.
/**
 * Test interface
 * Created by macro on 2020/6/19.
 */
@RestController
@RequestMapping("/test")
public class TestController {

    @GetMapping("/hello")
    public CommonResult hello() {
        return CommonResult.success("Hello World.");
    }

}
Function demonstration
After the three services are built, we use Postman to demonstrate the authentication and authorization function of microservices.
- First start the Nacos and Redis services, and then start the micro SA token gateway, micro SA token auth and micro SA token API services. The starting sequence does not matter;
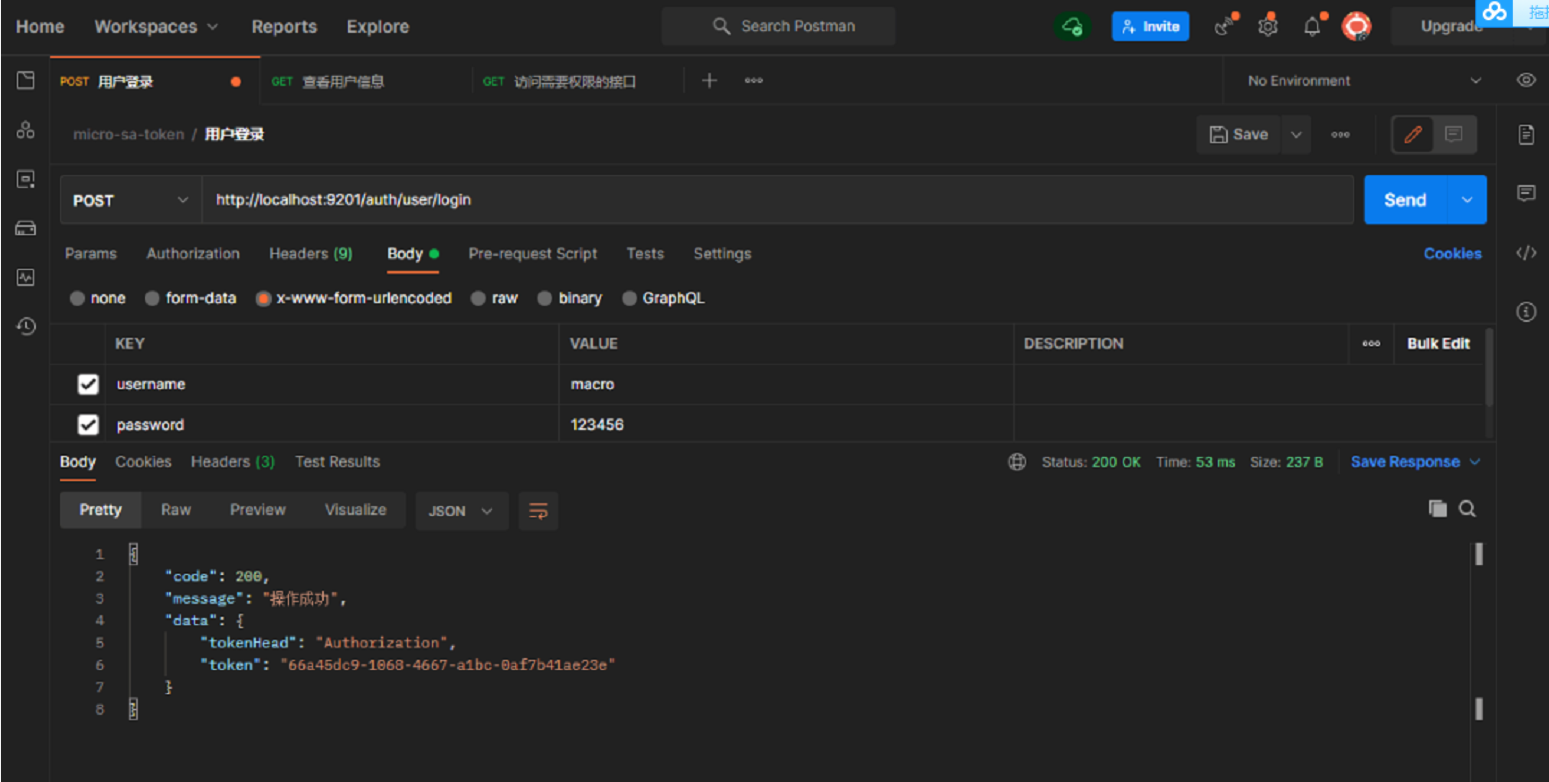
- Get the Token directly through the gateway access login interface. Access address: http://localhost:9201/auth/user/login
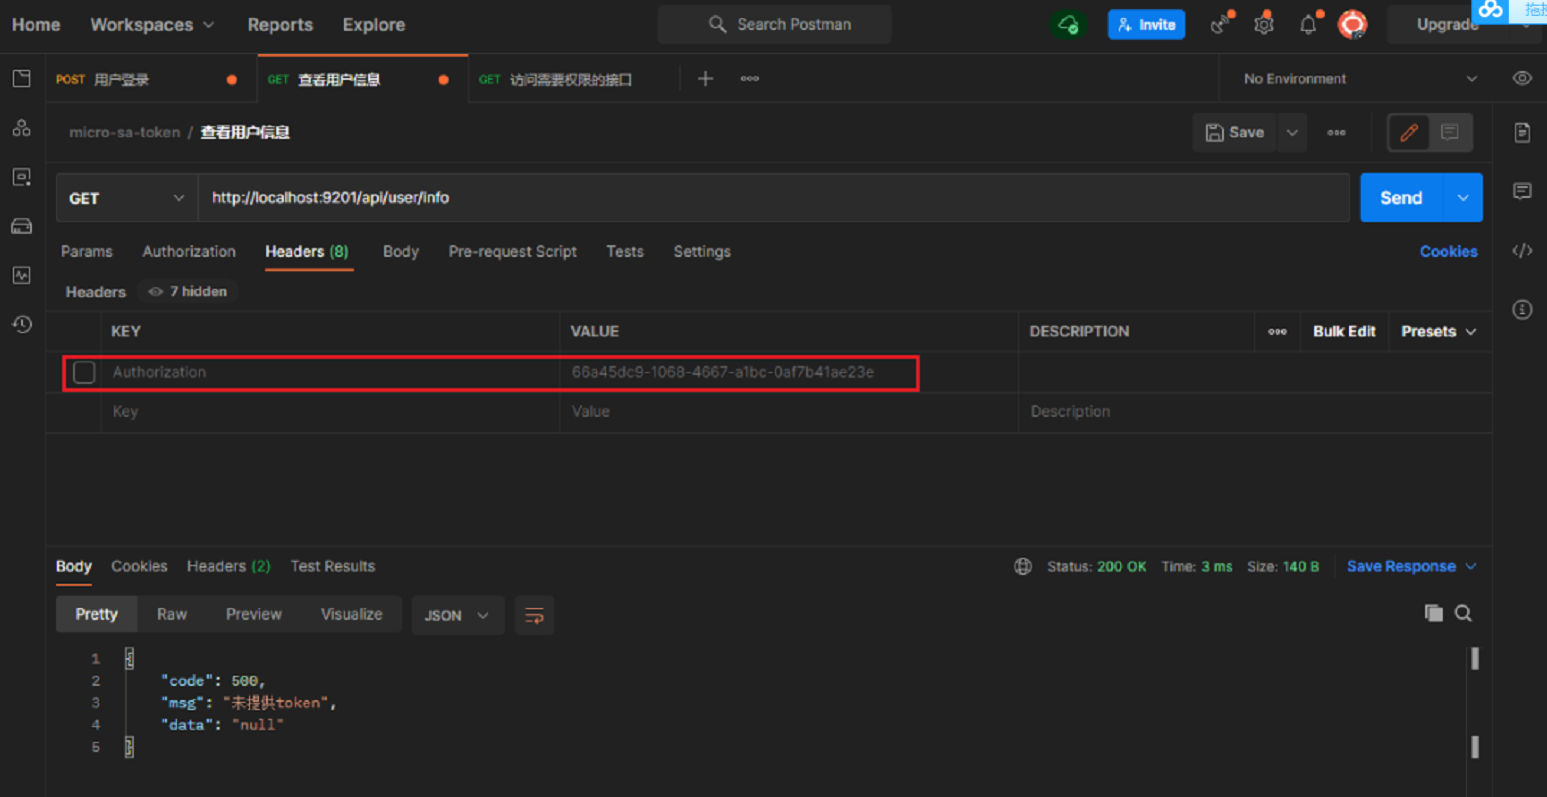
- The API service is accessed through the gateway without calling the interface to obtain user information with Token. It cannot be accessed normally. Access address: http://localhost:9201/api/user/info
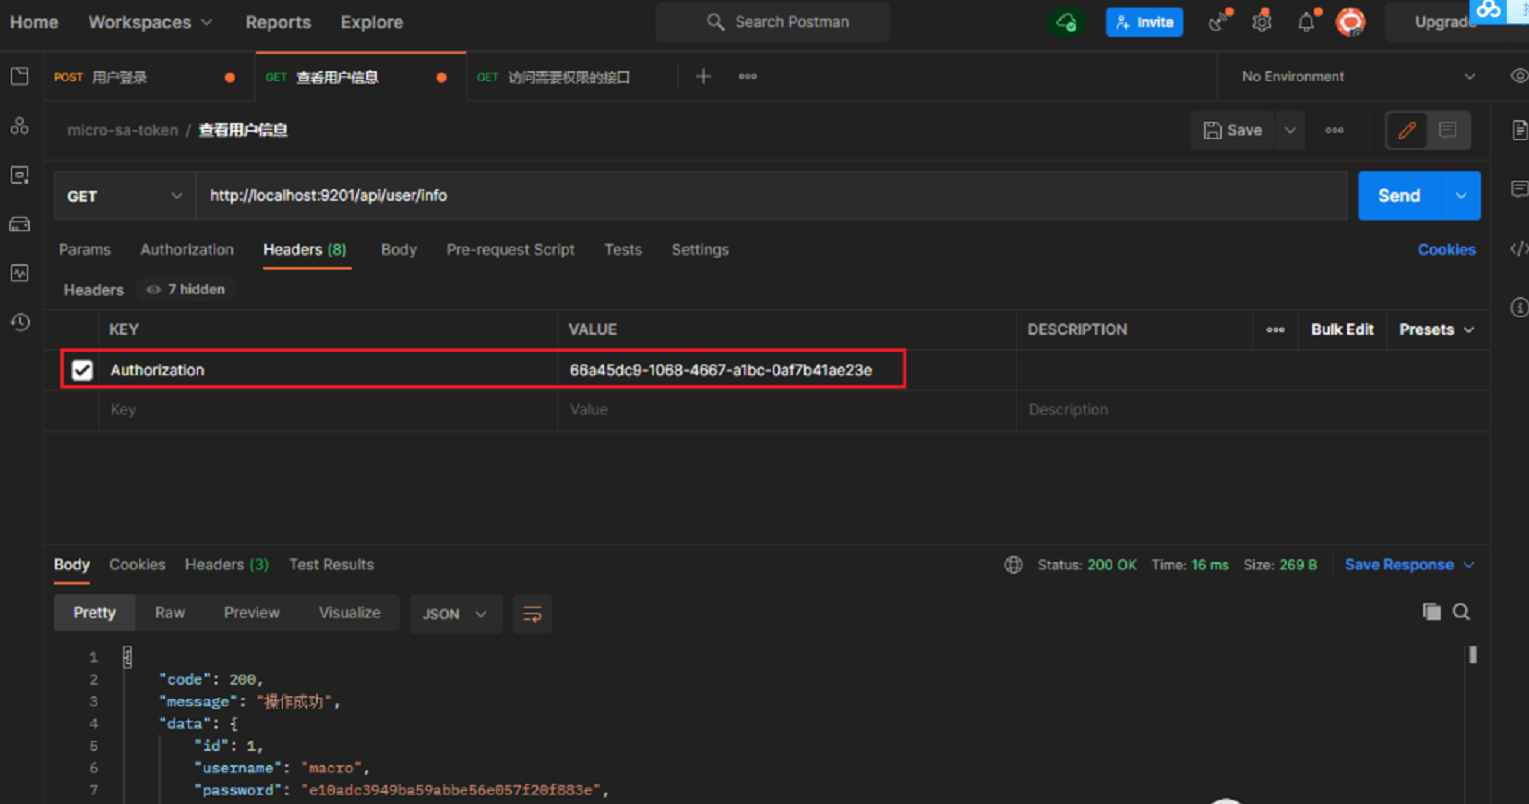
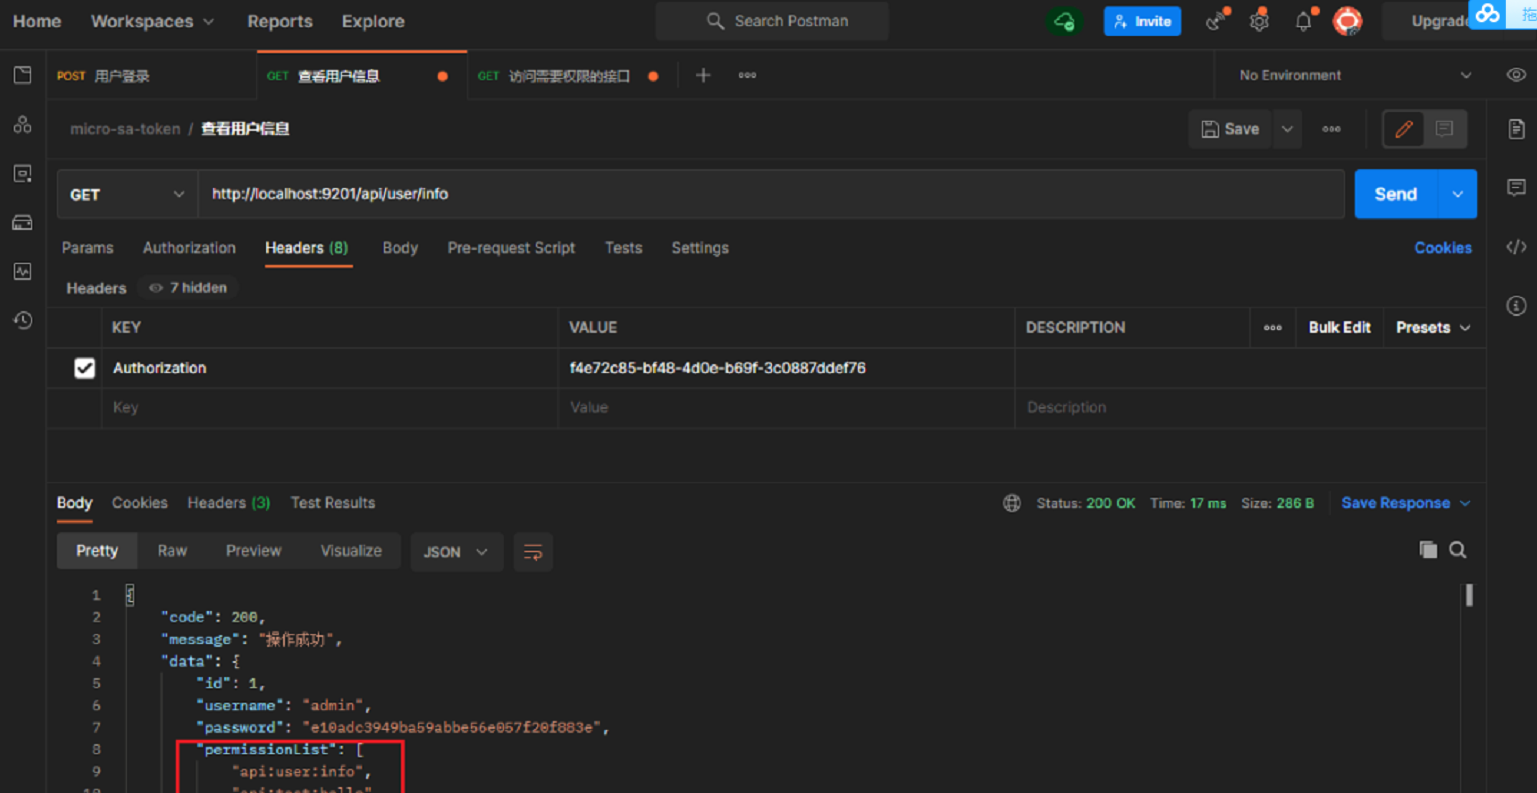
- The API service is accessed through the gateway, and the interface for obtaining user information with Token call can be accessed normally;
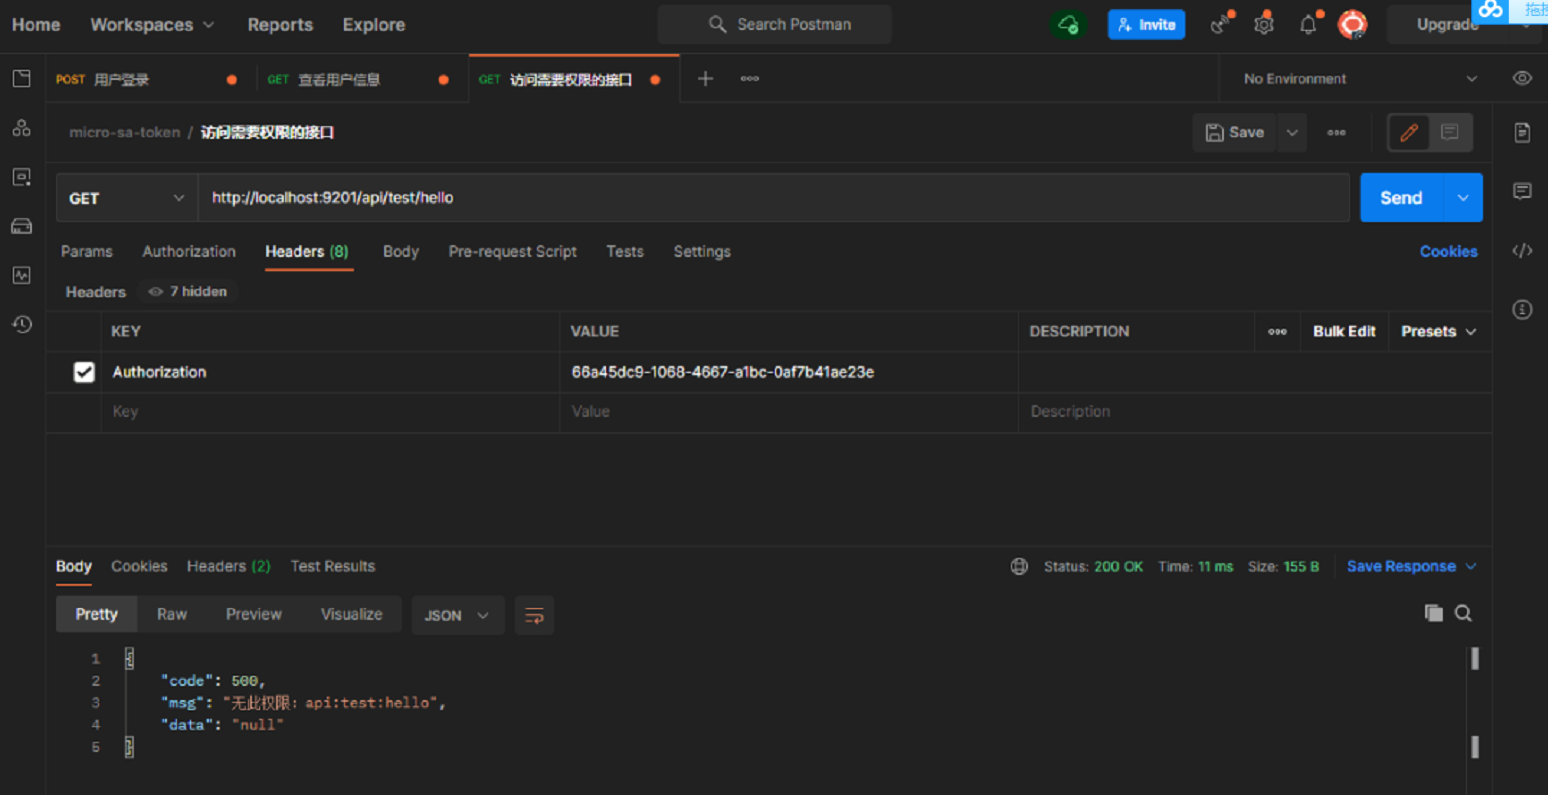
- Access the API service through the gateway and use the macro user to access the test interface requiring api:test:hello permission. It cannot be accessed normally. Access address: http://localhost:9201/api/test/hello
- Log in and switch to admin user, who has api:test:hello permission;
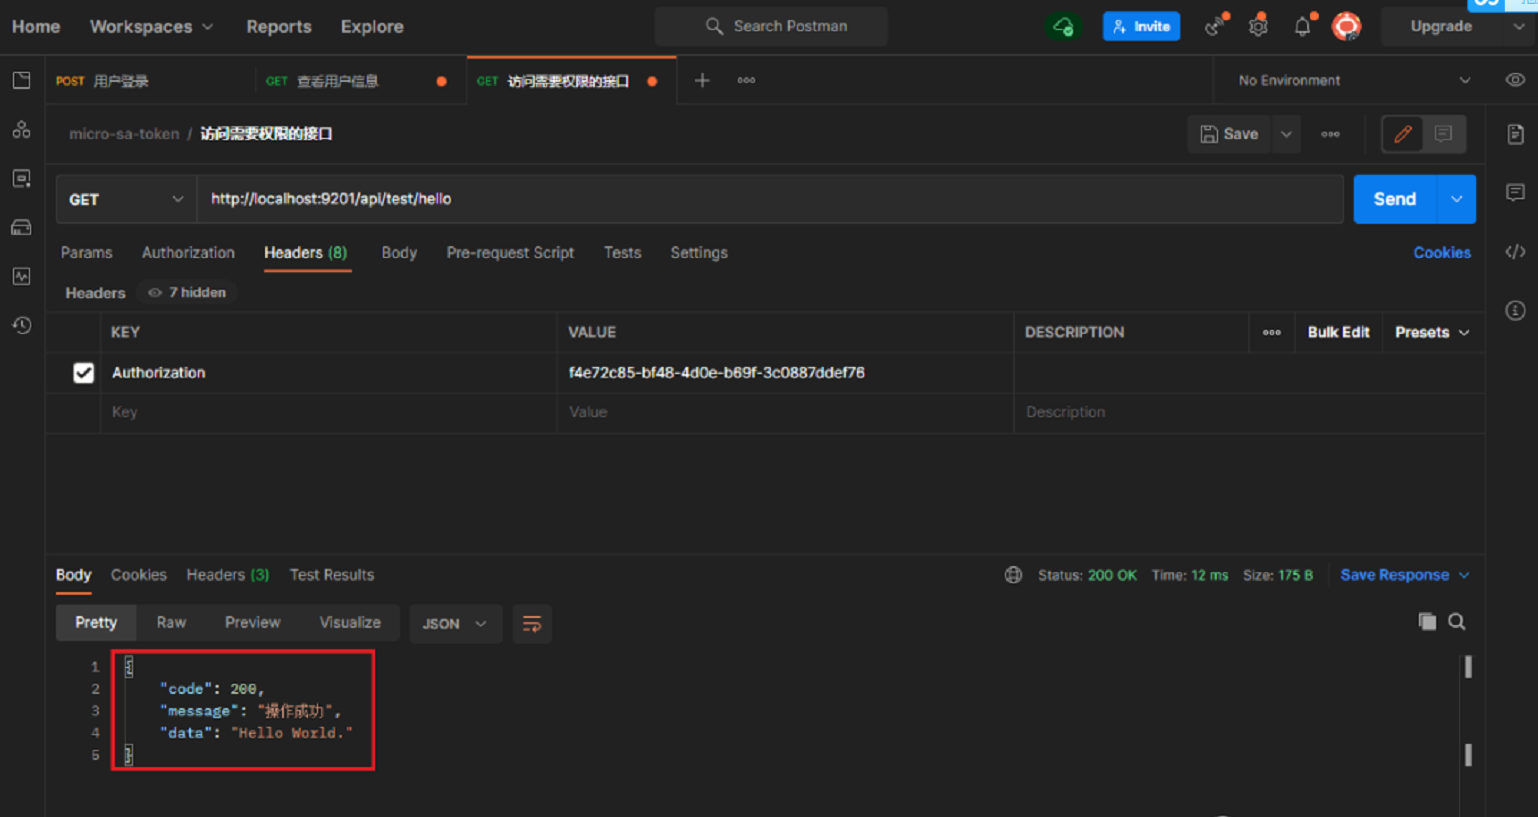
- The API service is accessed through the gateway, and the test interface is accessed by the admin user, which can be accessed normally.
summary
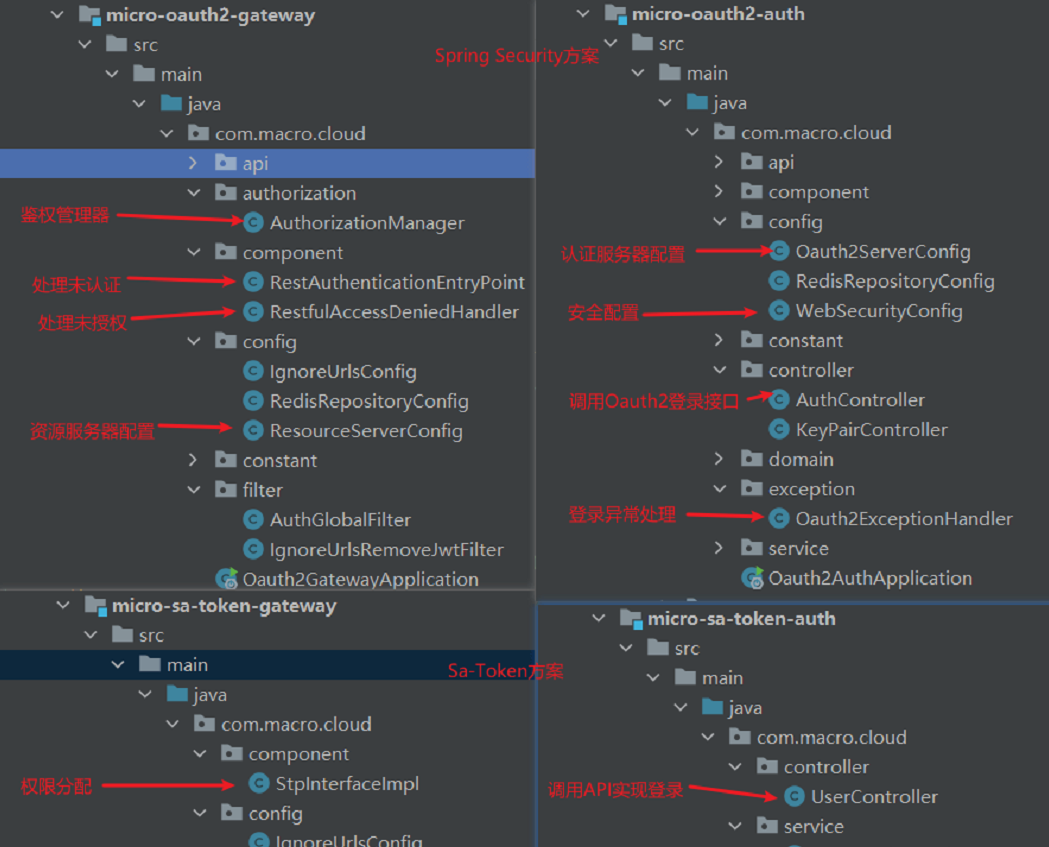
Compared with the previous microservice permission solution using Spring Security, the SA token solution is simpler and more elegant. To use Security, we need to define the authentication manager, deal with unauthenticated and unauthorized situations respectively, and define the authentication and resource server configuration ourselves. It is very cumbersome to use. With Sa-Token, the authentication and authorization can be implemented by configuring filters on the gateway, and then the login and permission distribution can be achieved by calling API. Refer to the following figure for specific differences.
Project source code address
https://github.com/macrozheng/springcloud-learning/tree/master/micro-sa-token
Also want to know more buddy, scan the bottom two dimensional code, pay attention to the official account "w programming diary" to get more free information.