Before browsing the article
In this issue, I share three tips for looking at the source code, which are also summarized from other big guys.
- Reusable code Such a code is a key function of software. A great God's writing has many essences worth learning.
- Time crossing code If a piece of code is still in use for 10 or even 15 years. It shows that its design idea must be great.
- Easy to debug code The code of a program is easy to debug successfully, which shows that the author's project structure ability is very strong and worth learning.
preface
Today, let's make a new thing called the full stack hot overload production environment scaffold based on Vue technology stack. To be honest, I've thought about the name for a long time. Finally, this name is used as the title of the article. Let me split and explain: the whole stack means to support the front and back ends; I believe you are familiar with the term "hot overload", that is, each time the page is changed, it does not need to be refreshed manually, but can be refreshed automatically; Production environment here, you can understand it as online environment and user environment.
origin
Why do you think of developing such a project? We may usually use VueCLI or Vite more to develop Vue projects, but if we just develop a simple web page, it will be a bit of a fuss.
At this time, we may use the production environment version of Vue. However, in this case, we can't use the hot overload function like VueCLI and Vite, so we need to constantly refresh the web page. If you add or delete elements to the html file in the editor, or modify a style of an element in the css file, and then want to see the effect in the browser, the usual steps are: switch the window to the browser, and then press F5 on the keyboard to refresh the page. This action may be repeated many times when making a page. Our development efficiency is greatly reduced.
Therefore, it is necessary for us to develop a production environment scaffold that can be thermally overloaded. If the analog data interface service is added, it will be more perfect. We developed a full stack hot overload production environment scaffold based on Vue technology stack.
actual combat
1, Initialize project
First, we create an empty folder called gulp Vue cli, which is the project root folder. I believe the smart little partner can see that our protagonist today is gulp. After building the project root folder, we will use the command to quickly generate the package.json file.
npm init -y
2, Create front-end and back-end projects
Next, we will create a front-end project folder in the created project root folder, which can be called src. In addition, the back-end project folder is called server.
Next, we will create a front-end project under the src folder. The following is the directory details:
css ---Storage style directory
js ---Directory where logical files are stored
imgs ---Directory for storing pictures
index.html ---Project main page
index.html
<!DOCTYPE html>
<html lang="en">
  <head>
    <meta charset="UTF-8" />
    <meta http-equiv="X-UA-Compatible" content="IE=edge" />
    <meta name="viewport" content="width=device-width, initial-scale=1.0" />
    <title>Simple Vue</title>
    <link rel="icon" href="/imgs/favicon.ico" />
    <link rel="stylesheet" href="/css/index.css" />
  </head>
  <body>
    <div id="app">
      <img src="/imgs/logo.png" alt="" />
      <p class="mes">{{ message }}</p>
      <p class="author">{{txt}}</p>
      <p class="status">{{status}}</p>
      <button @click="sendData">send</button>
      <p>{{resTxt}}</p>
    </div>
  </body>
  <script src="/js/vue.js"></script>
  <script type="module">
    import {addTxt} from './js/utils.js';
    const app = new Vue({
      el: "#app",
      data: {
        message: "Hello Simple Vue!",
        resTxt:"",
        status:"",
        txt:addTxt()
      },
      methods: {
        sendData() {
          fetch("http://localhost:3000/send/", {
            method: "POST",
            headers: {
              "Content-Type": "application/x-www-form-urlencoded",
            },
            body: `username=maomincoding&url=https://www.maomin.club`,
          })
            .then((response) => response.json())
            .then((response) => {
              this.resTxt = response;
            })
            .catch((err) => {
              console.error(err);
            });
        },
      },
      mounted() {
        fetch("http://localhost:3000/mes/", {
          method: "GET",
          headers: {
            "Content-Type": "application/x-www-form-urlencoded",
          },
        })
          .then((response) => response.json())
          .then((response) => {
            this.status = response;
          })
          .catch((err) => {
            console.error(err);
          });
      },
    });
  </script>
</html>
This page is very simple. It mainly uses Vue.js to render text and render text after calling the interface. To call the interface method, we use the fetch method here. For details, you can check the MDN website:
https://developer.mozilla.org/zh-CN/docs/Web/API/Fetch_API
After establishing the front-end project, we will start to establish the back-end project. We use the Node.js technology stack here. There is only one main file app.js under the server folder.
app.js
const express = require('express');
const bodyParser = require('body-parser')
const app = express();

app.use(express.static("./src"));

app.use(bodyParser.urlencoded({ extended: true }));
app.use(bodyParser.json());


// Cross domain
app.all('*', function (req, res, next) {
    res.header("Access-Control-Allow-Origin", "*");
    res.header("Access-Control-Allow-Headers", "X-Requested-With");
    res.header("Access-Control-Allow-Methods", "PUT,POST,GET,DELETE,OPTIONS");
    res.header("X-Powered-By", ' 3.2.1');
    res.header("Content-Type", "application/json;charset=utf-8");
    next();
});

//Custom interface
app.get("/mes", function (request, response) {
    response.send({
        status:"success",
        mes:"Render page succeeded!"
    });
})

app.post("/send",function(request,response){
    response.send(request.body); // echo the result back
})

app.listen(3000, function () {
    console.log("The server is running");
});
Here, we also briefly introduce the knowledge points involved. Express believes that the partners who contact the Node must know. Express is a flexible Node.js that keeps the smallest scale. It is a Web application development framework that provides a set of powerful functions for Web and mobile applications. Here, we mainly use it to create several API interfaces for foreground calls. Body parser parses the incoming request body in the middleware before the handler, and can obtain the data from the foreground in request.body.
Before that, you need to install the following two dependencies:
npm install express
npm install body-parser -D
3, Develop front and rear end thermal overload function
We have established the front-end and back-end projects. Next, we will focus on how to develop the hot overload function.
I will first create a gulpfile.js file in the root directory of the project. Then, I will list what we need to know.
- gulp
- browser-sync
- gulp-nodemon
gulp
Gulp is a front-end automatic construction tool based on Node.js. It can automatically complete the testing, checking, merging, compression confusion, formatting, browser automatic refresh, deployment file generation and other operations of JavaScript/sass/html/image/css files. At the same time, it can monitor files. If files are changed, it can automatically process and generate new files. Therefore, gulp solves the problems of development efficiency (automatically updating the page after modifying the code), resource integration (compression and combination of code), code quality (automatic test of code inspection), code conversion (ES6 -- > Es5), etc
Here, we need to know how gulp creates tasks.
const gulp =  require('gulp');
// Create task
// First parameter: task name
// The second parameter: callback function, which will be executed when we execute the task
gulp.task('test', function(){
    console.log('test');
})
//Execution task: gulp task name
gulp test
browser-sync
Here, we can focus on it. It is the protagonist we are looking for today.
Before looking for it, I also found other plug-ins that can automatically refresh the browser, such as LiveReload. It can also automatically refresh the page and preview the html effect in real time. But why didn't I use LiveReload? The most painful point is that you need to install the LiveReload plug-in on your browser. In addition, you have to install a LiveReload software locally. If you are using the VScode editor, you need to install the LiveReload plug-in in the plug-in center. By default, the browser and editor will not automatically activate LiveReload for you. You need to configure some things manually. So if it's so troublesome, just see if there are other solutions.
Finally, I found it - Browser Sync. The following is the official explanation of it:
Browsersync enables the browser to respond to your file changes (html, js, css, sass, less, etc.) in real time and quickly, and automatically refresh the page. More importantly, browsersync can be debugged on PC, tablet, mobile phone and other devices at the same time. You can imagine: "suppose you have a PC, ipad, iphone, android and other devices on your desk and open the page you need to debug. After you use browsersync, any time your code is saved, the above devices will display your changes at the same time". Whether you are a front-end or back-end engineer, using it will improve your work efficiency by 30%.
Of course, before learning it, you should note that Browser Sync is based on Node.js and is a Node module. If you want to use it quickly, you may need to install Node.js first.
Then you can install it globally.
npm install -g browser-sync
You can also install it under a local project.
npm install --save-dev browser-sync
If you want to learn more about it, you can search the following website on your browser:
http://www.browsersync.cn/docs/
Browser Sync can be used alone or integrated into building tools such as gulp and grunt. In the Node.js project, it can also be combined with gulp nodemon to realize the automatic refresh of the whole stack.
gulp-nodemon
Nodemon is a very practical tool to monitor any changes in your Node.js source code and automatically restart your server. Gulp nodemon is almost identical to ordinary gulp nodemon, but it is designed to perform gulp tasks.
After introducing the knowledge points we need to know, we will go deep into gulpfile.js file to see how to realize front and rear end hot overloading.
const gulp = require('gulp');
const browserSync = require('browser-sync').create();
const nodemon = require('gulp-nodemon');

gulp.task('server', function() {
    nodemon({
        script: 'server/app.js',
        ignore: ["gulpfile.js", "node_modules/"],
        env: {
            'NODE_ENV': 'development'
        }
    }).on('start', function() {
        browserSync.init({
            proxy: 'http://localhost:3000',
            files: ["src/**"],
            port:8080
        }, function() {
            console.log("browser refreshed.");
        });
    });
});
Before that, you need to install the following three dependencies:
npm install gulp -D
npm install browser-sync -D
npm install gulp-nodemon -D
After installing the dependency, let's interpret the above code.
require('browser-sync').create(); This line of code means to create an instance of Browser Sync and allows you to create multiple servers or agents.
The gulp.task() code snippet is used to create tasks.
// Create task
// First parameter: task name
// The second parameter: callback function, which will be executed when we execute the task
gulp.task('test', function(){
    console.log('test');
})
nodemon is a configuration object.
- script: points to the server file address.
- Ignore: ignore some file changes that have no impact on the program operation. nodemon only monitors js files. You can use the ext item to extend other file types.
- env: running environment development is the development environment and production is the production environment.
Here, we trigger the start of Browser Sync through the start event of gulp nodemon.
In the init method of browserSync.init(), we need to pass in a configuration object for the first parameter and define a callback method for the second parameter.
- Proxy: the interface address of the proxy server.
- files: the file directory to listen to.
- Port: port number.
It should be noted here that if the js file of the server is modified, the application will be restarted through nodemon first. At this time, the browser will not refresh. If the modified file is saved again, Browser Sync will show the modified effect.
Browsing effect
So far, our project has been completed. Before browsing! We need such an operation. Open the package.json file. Define a startup command to facilitate each startup.
  "scripts": {
    "dev": "gulp server"
  },
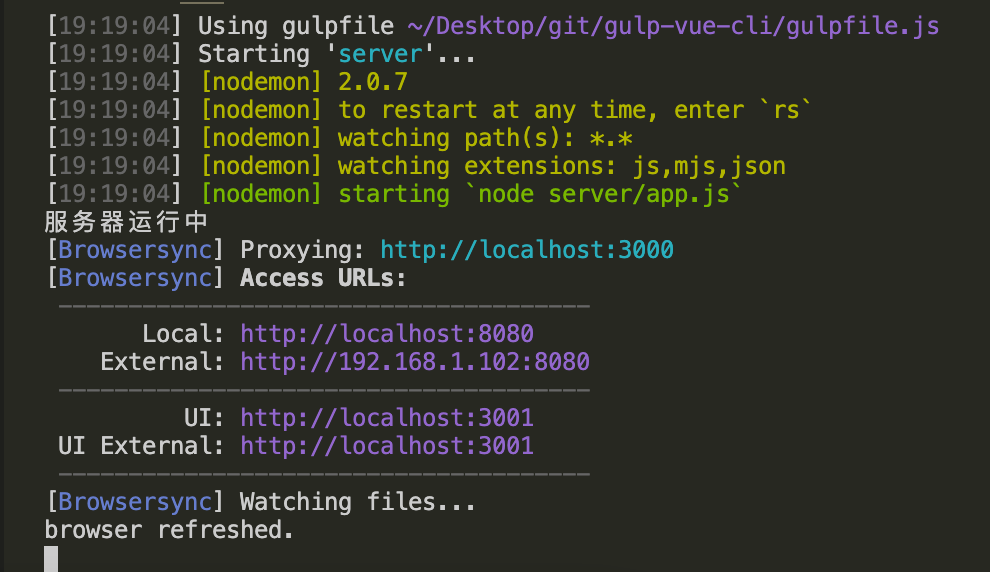
After that, we can start the project like this.
npm run dev

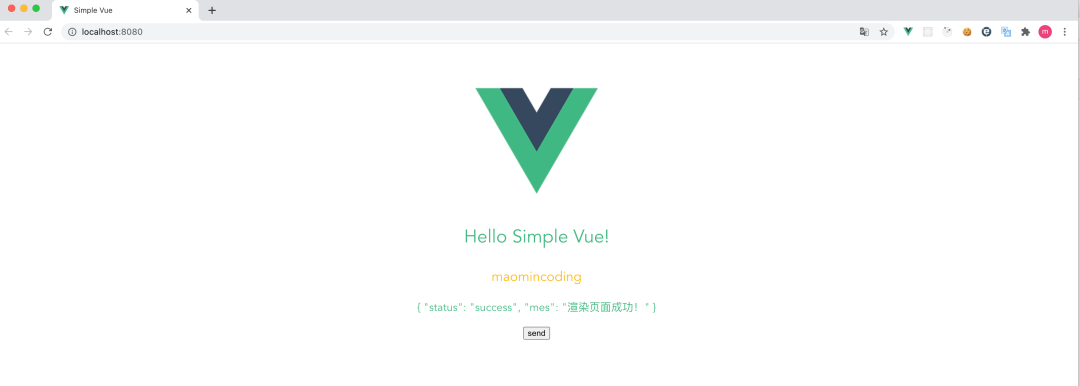
On the browser.

Open successfully. Now let's change the code to see if it can be hot overloaded.

The test is successful, so we can safely develop our own code, and the efficiency will naturally be improved. Before that, I kept F5. Do you think this action is very non creative for programmers? Now you can reduce the burden of the left hand and F5 keys.
epilogue
Thank you for reading. I hope I didn't waste your time.
Source address:
https://gitee.com/maomincoding/gulp-vue-cli