This article is an English translation. Interested students can click "read the original" at the end of the article to view the original English version.
When the Node.js Server project becomes larger and larger, it is difficult to organize and standardize the data and database, so a good development and project setting from the beginning is very important to the success of your development project. In this article, we will show you how to set up most Nest.js projects. We will work on a simple Node.js API, use PostgreSQL database as data storage, and set up some tools around it to make development easier.

To build the API in node. JS, we will use Nest.js. It is a very flexible framework based on Express.js, which allows you to make Node.js services in a short time, because it integrates many good functions (such as complete typing support, dependency injection, module management and more).
Projects and tools
In order to get started faster, Nest.js comes with a good CLI tool that can create project templates for us. We started to build our project with the following lines of code:
npm i -g @nestjs/cli
nest new project-name
More Nest.js and its CLI
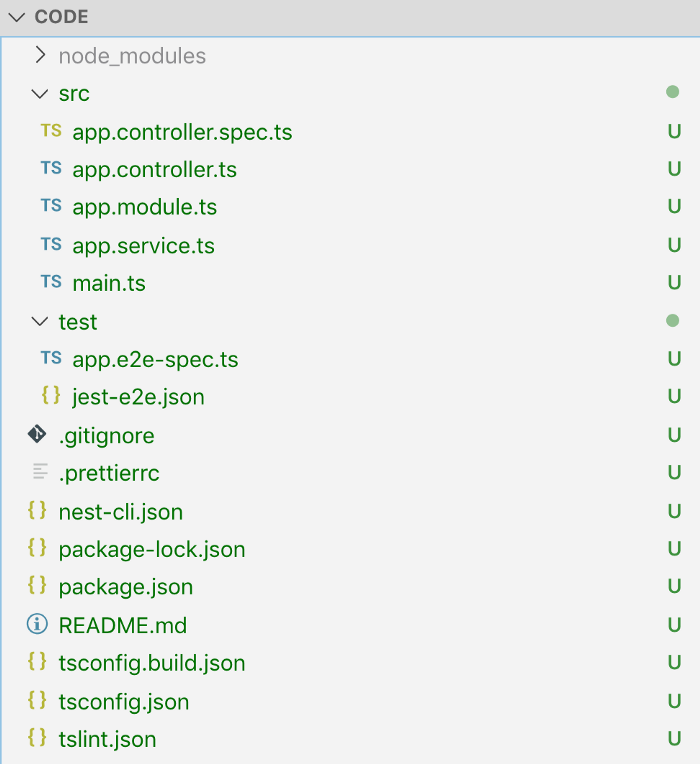
Let's test to see if everything is OK so far:
npm run start:dev
Add data persistence layer
We will use TypeORM to manage our database schema. The advantage of TypeORM is that it allows you to describe the data entity model through code, and then apply and synchronize these models to the database with table structure. (this applies not only to PostgreSQL databases, but also to other databases. You can find which databases are supported in the TypeORM document.)
Use docker automation to set up local PostgreSQL database instances.
To achieve data persistence locally, we now need a database server and a database to connect to. One way is to set up a PostgreSQL database server on the local machine, but this is not very good. Because the project will be too coupled with our local database server. This means that if you work with a team on a project, as long as you switch machines, you need to set up a database server on each machine, or write an installation guide in some way (things become more difficult when your team's development classmates have different operating systems). So how do we overcome this? Automate this step! We use the pre built PostgreSQL docker image and run the database server as a docker process. We can write a complete setup with a few lines of shell code to make our server instance run and prepare an empty database for connection. Because it is reusable, and the setup code can be managed in source control together with the rest of the project code, it makes the "getting started" of other developers in the team very simple. Here is what this script looks like:
#!/bin/bash
set -e

SERVER="my_database_server";
PW="mysecretpassword";
DB="my_database";

echo "echo stop & remove old docker [$SERVER] and starting new fresh instance of [$SERVER]"
(docker kill $SERVER || :) && \
  (docker rm $SERVER || :) && \
  docker run --name $SERVER -e POSTGRES_PASSWORD=$PW \
  -e PGPASSWORD=$PW \
  -p 5432:5432 \
  -d postgres

# wait for pg to start
echo "sleep wait for pg-server [$SERVER] to start";
SLEEP 3;

# create the db
echo "CREATE DATABASE $DB ENCODING 'UTF-8';" | docker exec -i $SERVER psql -U postgres
echo "\l" | docker exec -i $SERVER psql -U postgres
Let's add this command to our package.json run script so that we can easily execute it.
"start:dev:db": "./src/scripts/start-db.sh"
Now we have a command that can be run. It will set up the database server and a common database. To make the process more robust, we will use the same name for the docker container ($SERVER var in the script) and add an additional check: if a container with the same name is running, it will be ended and deleted to ensure a clean state.
Nest.js connection database
Like everything else, there is already an NPM module to help you hook the Nest.js project to your database. Let's add TypeORM support to our project using the pre built nest JS to TypeORM module. You can add the required modules like this:
npm install --save @nestjs/typeorm typeorm pg
configuration management
We can configure which database server TypeORM connects to in Nest.js by using TypeOrmModule. It has a forRoot method that we can pass in the configuration. We know that the configuration will be different in local development and production environments. Therefore, this process must be generic to some extent so that it can provide different configurations in different operating environments. We can write the following configuration services. The function of this configuration class is to run before our API Server main.ts is started. It can read the configuration from the environment variable and then provide the value read-only at run time. To make dev and prod flexible, we will use the dotenv module.
npm install --save dotenv
With this module, we can have a ". env" file in the root directory of the locally developed project to prepare the configuration values. In production, we can read the values from the environment variables on the production server. This is a very flexible approach that also allows you to easily share your configuration with other developers on your team using a single file. Note: I strongly recommend git to ignore this file, because you may put the account and password of the production environment into this file, so you should not submit the configuration file to the project to cause accidental disclosure. This is what your. env file looks like:
POSTGRES_HOST=127.0.0.1
POSTGRES_PORT=5432
POSTGRES_USER=postgres
POSTGRES_PASSWORD=mysecretpassword
POSTGRES_DATABASE=my_database
PORT=3000
MODE=DEV
RUN_MIGRATIONS=true
Therefore, our ConfigService will run as a singleton service, load the configuration values at startup and provide them to other modules. We will include a fault-tolerant pattern in the service. This means that if you get a value that does not exist, it will throw a full meaning error. This makes your setup more robust because you will detect configuration errors at build / start time rather than during the runtime lifecycle. This will enable you to detect this early when deploying / starting the server, rather than when consumers use your api. This is what your ConfigService looks like and how we add it to the Nest.js Application module:
// app.module.ts

import { Module } from'@nestjs/common';
import { TypeOrmModule } from'@nestjs/typeorm';
import { AppController } from'./app.controller';
import { AppService } from'./app.service';
import { configService } from'./config/config.service';

@Module({
  imports: [
    TypeOrmModule.forRoot(configService.getTypeOrmConfig())
  ],
  controllers: [AppController],
  providers: [AppService],
})
exportclass AppModule { }
// src/config/config.service.ts

import { TypeOrmModuleOptions } from'@nestjs/typeorm';

require('dotenv').config();

class ConfigService {

  constructor(private env: { [k: string]: string | undefined }) { }

  private getValue(key: string, throwOnMissing = true): string {
    const value = this.env[key];
    if (!value && throwOnMissing) {
      thrownewError(`config error - missing env.${key}`);
    }

    return value;
  }

  publicensureValues(keys: string[]) {
    keys.forEach(k =>this.getValue(k, true));
    returnthis;
  }

  publicgetPort() {
    returnthis.getValue('PORT', true);
  }

  publicisProduction() {
    const mode = this.getValue('MODE', false);
    return mode != 'DEV';
  }

  public getTypeOrmConfig(): TypeOrmModuleOptions {
    return {
      type: 'postgres',

      host: this.getValue('POSTGRES_HOST'),
      port: parseInt(this.getValue('POSTGRES_PORT')),
      username: this.getValue('POSTGRES_USER'),
      password: this.getValue('POSTGRES_PASSWORD'),
      database: this.getValue('POSTGRES_DATABASE'),

      entities: ['**/*.entity{.ts,.js}'],

      migrationsTableName: 'migration',

      migrations: ['src/migration/*.ts'],

      cli: {
        migrationsDir: 'src/migration',
      },

      ssl: this.isProduction(),
    };
  }

}

const configService = new ConfigService(process.env)
  .ensureValues([
    'POSTGRES_HOST',
    'POSTGRES_PORT',
    'POSTGRES_USER',
    'POSTGRES_PASSWORD',
    'POSTGRES_DATABASE'
  ]);

export { configService };
Development restart
npm i --save-dev nodemon ts-node
Then add a nodemon.json file with debugging and TS node support in root
{
  "watch": ["src"],
  "ext": "ts",
  "ignore": ["src/**/*.spec.ts"],
  "exec": "node --inspect=127.0\. 0.1:9223 -r ts-node/register -- src/main.ts",
  "env": {}
}
Finally, we change the start:dev script in package.json to:
"start:dev": "nodemon --config nodemon.json",
In this way, we can start our API server through npm run start:dev. when starting, it should obtain the values of the corresponding environment of. env from ConfigService, and then connect typeORM to our database, and it is not bound to my machine.
Define and load data model entities
TypeORM supports automatic loading of data model entities. You can simply put them all in one folder and load them in your configuration using a pattern -- we put our in model/.entity.ts. (see ConfigService in TypeOrmModuleOptions of entity)
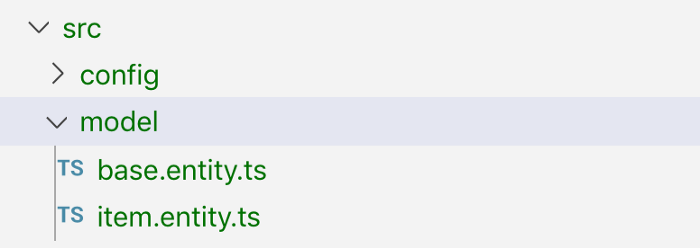
Another feature of TypeORM is that these entity models support inheritance. For example, if you want each entity to have some data fields. For example, the automatically generated uuid id field, the createDateTime field, and the lastChangedDateTime field. Note: these base classes should be abstract. Therefore, defining data model entities in TypeORM will be as follows:
// base.entity.ts

import { PrimaryGeneratedColumn, Column, UpdateDateColumn, CreateDateColumn } from'typeorm';

exportabstractclass BaseEntity {
    @PrimaryGeneratedColumn('uuid')
    id: string;

    @Column({ type: 'boolean', default: true })
    isActive: boolean;

    @Column({ type: 'boolean', default: false })
    isArchived: boolean;

    @CreateDateColumn({ type: 'timestamptz', default: () =>'CURRENT_TIMESTAMP' })
    createDateTime: Date;

    @Column({ type: 'varchar', length: 300 })
    createdBy: string;

    @UpdateDateColumn({ type: 'timestamptz', default: () =>'CURRENT_TIMESTAMP' })
    lastChangedDateTime: Date;

    @Column({ type: 'varchar', length: 300 })
    lastChangedBy: string;

    @Column({ type: 'varchar', length: 300, nullable: true })
    internalComment: string | null;
}
// item.entity.ts

import { Entity, Column } from'typeorm';
import { BaseEntity } from'./base.entity';

@Entity({ name: 'item' })
exportclass Item extends BaseEntity {

  @Column({ type: 'varchar', length: 300 })
  name: string;

  @Column({ type: 'varchar', length: 300 })
  description: string;
}
Find more supported data annotations in the typeORM document. Let's start our API and see if it works.
npm run start:dev:db
npm run start:dev
In fact, our database does not immediately reflect our data model. typeORM can synchronize your data model to the tables in the database. Automatic synchronization of data models is good, but it is also dangerous. Why? In early development, you may not have sorted out all data entities. Therefore, if you change the entity class in the code, typeORM will automatically synchronize the fields for you. However, once there is actual data in your database and you intend to modify the field type or other operations later, typeORM will change the database by deleting and re creating the database table, which means that you are likely to lose the data in the table. Of course, you should avoid this unexpected situation in a production environment. That's why I prefer to deal with database migration directly in code from the beginning. This will also help you and your team better track and understand changes in data structures and force you to think more actively about what can help you avoid destructive changes and data loss in your production environment. Fortunately, TypeORM provides a solution and CLI commands that handle the task of generating SQL commands for you. Then you can easily verify and test these without using any dark magic in the background. The following are best practices for setting up typeORM CLI.
1.typeORM CLI settings
We have added all necessary configurations in ConfigService, but typeORM CLI and ormconfig.json are effective at the same time, so we want to distinguish them from the CLI in the formal environment. Add a script to write the configuration JSON file and add it to our. gitignore -list:
import fs = require('fs');
fs.writeFileSync('ormconfig.json', JSON.stringify(configService.getTypeOrmConfig(), null, 2)
);
Add an npm script task to run it and the typeorm:migration:generate and typeorm:migration:run commands. Like this, ormconfig will be generated before running the typeORM CLI command.
"pretypeorm": "(rm ormconfig.json || :) && ts-node -r tsconfig-paths/register src/scripts/write-type-orm-config.ts",
"typeorm": "ts-node -r tsconfig-paths/register ./node_modules/typeorm/cli.js",
"typeorm:migration:generate": "npm run typeorm -- migration:generate -n",
"typeorm:migration:run": "npm run typeorm -- migration:run"
2. Create migration
Now we can run this command to create an initialization migration:
npm run typeorm:migration:generate -- my_init
This will connect typeORM to your database and generate a database migration script my_init.ts (in typescript) and place it in the migration folder of your project. Note: you should submit these migration scripts to your source control and treat these files as read-only. If you want to change something, the idea is to use the CLI command to add another migration at the top.
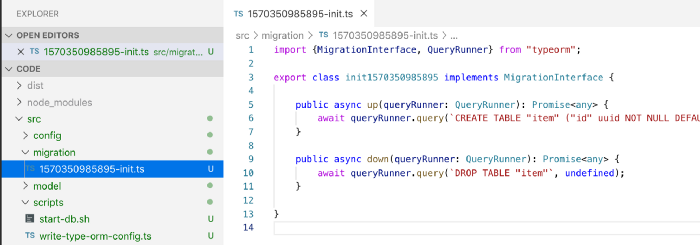
3. Run migration
npm run typeorm:migration:run
Now we have all the tools needed to create and run the migration without running the API server project. It provides us with great flexibility during development, and we can re run, re create and add them at any time. However, in a production or staging environment, you often actually want to automatically run the migration script after deployment / before starting the API server. To do this, you just need to add a start.sh script. You can also add an environment variable run_ Migrations = < 0|1 > to control whether migration should run automatically.
#!/bin/bash
 set up -e
 set up -x
 If [ "$RUN_MIGRATIONS" ]; then
  Echo "running migration";
  npm run typeorm:migration:run
fi
 Echo "start server";
npm run start:prod
Debugging and database tools
We synchronize database fields through the API - but does our database actually reflect our data model? You can check this by running some CLI script queries on the DB or using the UI database management tool for quick debugging. When using a PostgreSQL database, I use pgAdmin. This is a very powerful tool with a beautiful user interface. However, I recommend that you use the following workflow:
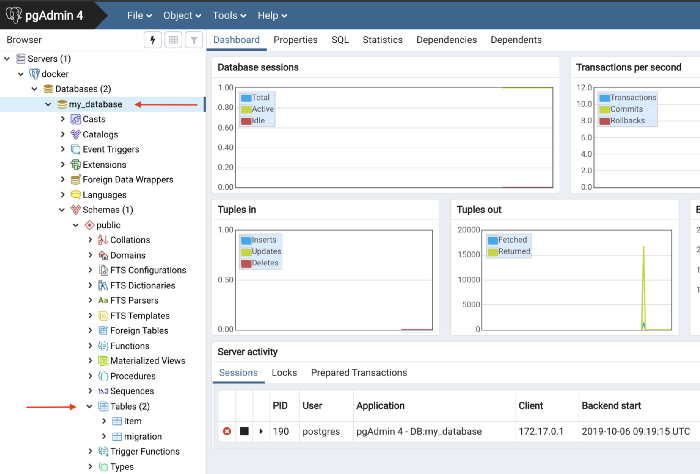
We can now see the tables created in the database. 1. Project table defined in the project. 2. A migration table in which typeORM tracks which migration has been performed on the database. (Note: you should also treat this table as read-only, otherwise typeORM CLI will be confused)
Add some business logic
Now let's add some business logic. For demonstration, I'll add a simple endpoint that will return the data in the table. We use Nest.js CLI to add a project controller and a project service.
nest -- generate controller item
nest -- generate service item
This will generate some templates for us, and then we add:
// item.service.ts

import { Injectable } from'@nestjs/common';
import { InjectRepository } from'@nestjs/typeorm';
import { Item } from'../model/item.entity';
import { Repository } from'typeorm';

@Injectable()
exportclass ItemService {
  constructor(@InjectRepository(Item) private readonly repo: Repository<Item>) { }

  publicasyncgetAll() {
    returnawaitthis.repo.find();
  }
}
// item.controller.ts

import { Controller, Get } from'@nestjs/common';
import { ItemService } from'./item.service';

@Controller('item')
exportclass ItemController {
  constructor(private serv: ItemService) { }

  @Get()
  publicasyncgetAll() {
    returnawaitthis.serv.getAll();
  }
}
Then connect them together through ItemModule and import them in AppModule.
// item.module.ts

import { Module } from'@nestjs/common';
import { TypeOrmModule } from'@nestjs/typeorm';
import { ItemService } from'./item.service';
import { ItemController } from'./item.controller';
import { Item } from'../model/item.entity';

@Module({
  imports: [TypeOrmModule.forFeature([Item])],
  providers: [ItemService],
  controllers: [ItemController],
  exports: []
})
exportclass ItemModule { }
After starting the API, curl try:
curl localhost:3000/item | jq
[] # << indicating no items in the DB - cool :)
Don't expose your entities - add DTO s and responses
Don't expose your actual data model on persistence to consumers through your API. When you wrap each data entity with a data transfer object, you must serialize and deserialize it.
There should be a difference between the internal data model (API to database) and the external model (API consumer to API). In the long run, this will help you decouple and make maintenance easier.
- Separation of application domain driven design principles.
- Performance, making it easier to optimize queries.
- Version control.
- Testability wait Therefore, we will add an ItemDTO response class, which will be populated by item entities in the database. This is what a simple service and response DTO looks like: Note: you must install @ nestjs/swagger, class validator and class transformer for this.
// item.dto.ts

import { ApiModelProperty } from'@nestjs/swagger';
import { IsString, IsUUID, } from'class-validator';
import { Item } from'../model/item.entity';
import { User } from'../user.decorator';

exportclass ItemDTO implements Readonly<ItemDTO> {
  @ApiModelProperty({ required: true })
  @IsUUID()
  id: string;

  @ApiModelProperty({ required: true })
  @IsString()
  name: string;

  @ApiModelProperty({ required: true })
  @IsString()
  description: string;

  publicstaticfrom(dto: Partial<ItemDTO>) {
    const it = new ItemDTO();
    it.id = dto.id;
    it.name = dto.name;
    it.description = dto.description;
    return it;
  }

  publicstaticfromEntity(entity: Item) {
    returnthis.from({
      id: entity.id,
      name: entity.name,
      description: entity.description
    });
  }

  publictoEntity(user: User = null) {
    const it = new Item();
    it.id = this.id;
    it.name = this.name;
    it.description = this.description;
    it.createDateTime = newDate();
    it.createdBy = user ? user.id : null;
    it.lastChangedBy = user ? user.id : null;
    return it;
  }
}
Now we can simply use DTO like this:
// item.controller.ts

  @Get()
  publicasync getAll(): Promise<ItemDTO[]> {
    returnawaitthis.serv.getAll()
  }

  @Post()
  publicasync post(@User() user: User, @Body() dto: ItemDTO): Promise<ItemDTO> {
    returnthis.serv.create(dto, user);
  }
// item.service.ts

  publicasync getAll(): Promise<ItemDTO[]> {
    returnawaitthis.repo.find()
      .then(items => items.map(e => ItemDTO.fromEntity(e)));
  }

  publicasync create(dto: ItemDTO, user: User): Promise<ItemDTO> {
    returnthis.repo.save(dto.toEntity(user))
      .then(e => ItemDTO.fromEntity(e));
  }
Set OpenAPI (Swagger) DTO methods also enable you to generate API documents (openAPI aka swagger docs) from them. You only need to install:
npm install --save @nestjs/swagger swagger-ui-express
And add these lines to main.ts
// main.ts

asyncfunction bootstrap() {
  const app = await NestFactory.create(AppModule);

  if (!configService.isProduction()) {

    constdocument = SwaggerModule.createDocument(app, new DocumentBuilder()
      .setTitle('Item API')
      .setDescription('My Item API')
      .build());

    SwaggerModule.setup('docs', app, document);

  }

  await app.listen(3000);
}
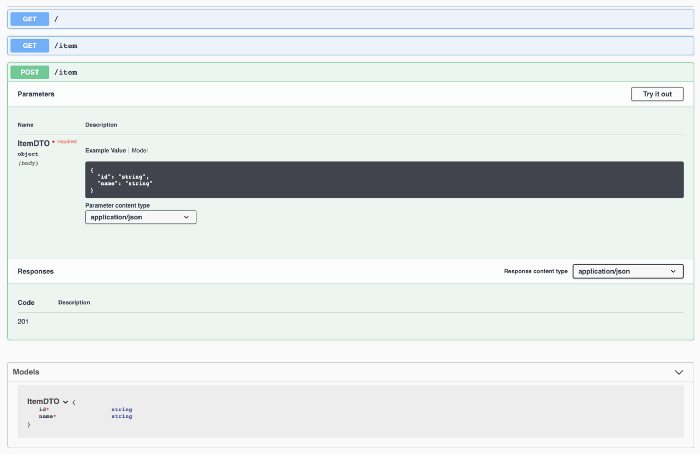
View here More about Swagger.
Click "read original" to view the original English version. (ladder is required)
About this article
Author: Tencent IMWeb front end team @zzbo
https://mp.weixin.qq.com/s/IanpQznpAqL6_tYCl2e7IA