Introduction:
1) What is Keras?
Keras is an advanced neural network API written in Python, which can run with TensorFlow, CNTK, or Theano as the back end. The development of keras focuses on supporting fast experiments, and the ability to convert your ideas into experimental results with minimal delay is the key to good research. In particular, in tensorflow version 2.0, the keras framework will be further integrated, and the official also recommends that you use keras to build the model, so it is necessary for us to understand and master the basic structure and use methods of keras, so as to improve our work and experimental efficiency!
(2) Advantages of Keras
In the official documentation of Keras, the development team lists four advantages of Keras:
user-friendliness
Keras is an API designed for humans, not machines. It puts the user experience at the top and center. Keras follows best practices to reduce cognitive difficulties: it provides a consistent and simple API, minimizes the number of user actions required for common use cases, and provides clear and actionable feedback when users make mistakes.
modularization
A model is understood as a sequence or diagram of independent and fully configurable modules. These modules can be assembled together with as few restrictions as possible. In particular, neural network layer, loss function, optimizer, initialization method, activation function and regularization method are all modules that can be combined to build a new model.
Easy scalability
New modules are easy to add (as new classes and functions), and existing modules already provide sufficient examples. Keras is more suitable for advanced research because it can easily create new modules that can improve expressiveness.
Python based implementation
Keras does not have a separate configuration file in a specific format. The model is defined in Python code, which is compact, easy to debug, and easy to extend.
(3) Keras usage example
Let's define a network with a hidden layer:
from tensorflow import keras
from keras.utils import plot_model
import numpy as np

x_train = np.random.rand(10000, 2)
y_train = 3 * x_train[:, 0] + 2 * x_train[:, 1] + 1
print(y_train.shape)

model = keras.models.Sequential()
# Use the add method to add hidden layers
model.add(keras.layers.Dense(512, activation= 'sigmoid', input_dim= 2, use_bias= True))

model.add(keras.layers.Dense(1, activation= 'sigmoid', use_bias= True))
# Compilation model
model.compile(loss = keras.losses.mean_squared_error,
              optimizer= keras.optimizers.Adam(0.01),
              metrics= ['accuracy'])
# Training model
model.fit(x_train, y_train, batch_size= 10)
# Output:
10/1000 [..............................] - ETA: 26s - loss: 17.7002 - acc: 0.0000e+00
690/1000 [===================>..........] - ETA: 0s - loss: 12.8620 - acc: 0.0000e+00
1000/1000 [==============================] - 0s 336us/step - loss: 11.8523 - acc: 0.0000e+00
It can be seen that using Keras to build models is faster and more efficient than TensorFlow basic API
Installation:
(1) Install TensorFlow
Keras needs TensorFlow as the backend, so we should first confirm whether TensorFlow is installed, open Anaconda Prompt, and enter:
>>>pip install tensorflow
(2) Installing using pip
Open Anaconda Prompt and enter:
>>>pip install keras
Wait for download and installation
(3) Installing using git
Open Anaconda Prompt and enter:
>>>git clone https://github.com/keras-team/keras.git
The premise of using this method is that you have installed git tool
(4) Installation h5py
The purpose of this component is to allow us to save the Keras model, open Anaconda Prompt, and enter:
>>>pip install h5py
(5) Installing graphviz and pydot
The purpose of these two components is to visualize the network structure of Keras. We will use them later. Open Anaconda Prompt and enter:
>>>pip install graphviz
>>>pip install pydot
General process of using keras:
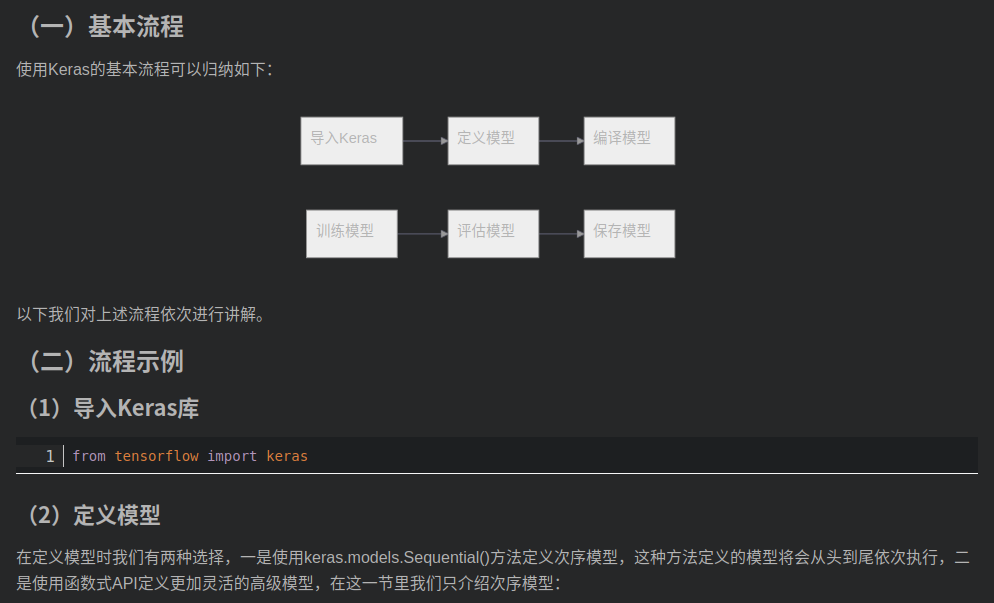
# Instantiate an order model
model = keras.models.Sequential()
# Use the model.add method to add hidden layers
model.add(···)
model.add(···)
How to define a hidden layer will be discussed in the next section
(3) Compilation model
After we define the model, we need to compile it using the compile method:
model.compile(loss = keras.losses.mean_squared_error,
              optimizer= keras.optimizers.Adam(0.01),
              metrics= ['accuracy'])
In the compilation operation, we need to define the optimization method used by the model, loss function, evaluation index of the model, etc
(4) Training model
We use the model.fit() method to train the model and import the characteristics and labels of the training data:
model.fit(x_train, y_train, batch_size= 10, epochs = 5)
Here, you can specify parameters such as the number of batches and the number of generations of training
(5) Evaluation model
Use the model.evaluate() method to evaluate the model, as follows:
model.evaluate(x=None, y=None, batch_size=None, verbose=1, sample_weight=None, steps=None)
You can also specify parameters such as the number of batches
(6) Save model
After the model training, we use the model.save() method to save the model
model.save(/model.h5)
The final model is saved as a file in h5 format
Introduction to Dense method:
(1) keras.layers.Dense method
Before defining the model, it is necessary for us to understand the Dense method in detail, because it is the basic method for Keras to define the network layer. Its code is as follows:
keras.layers.Dense(units,
                  activation=None,
                  use_bias=True,
                  kernel_initializer='glorot_uniform',
                  bias_initializer='zeros',
                  kernel_regularizer=None,
                  bias_regularizer=None,
                  activity_regularizer=None,
                  kernel_constraint=None,
                  bias_constraint=None)
The parameters are described as follows:
 units:
    There are several neurons in this layer

    activation:
    Activation function used by this layer

    use_bias:
    Add offset item

    kernel_initializer:
    Weight initialization method

    bias_initializer:
    Offset value initialization method

    kernel_regularizer:
    Weight normalization function

    bias_regularizer:
    Normalization method of offset value

    activity_regularizer:
    Normalization method of output

    kernel_constraint:
    Weight change limit function

    bias_constraint:
    Offset value change limit function
(2) Use example
The following is an example of the use of the density method:
keras.layers.Dense(512, activation= 'sigmoid', input_dim= 2, use_bias= True)
A neural layer with 512 nodes and sigmoid activation function is defined here. Note that when defining the first layer, the shape of data input, i.e. input, needs to be formulated_ Dim, so that the data can be fed into the network normally!
The Sequential method defines the model:
(2) Model implementation
(1) Import class library
from tensorflow import keras
(2) Model definition
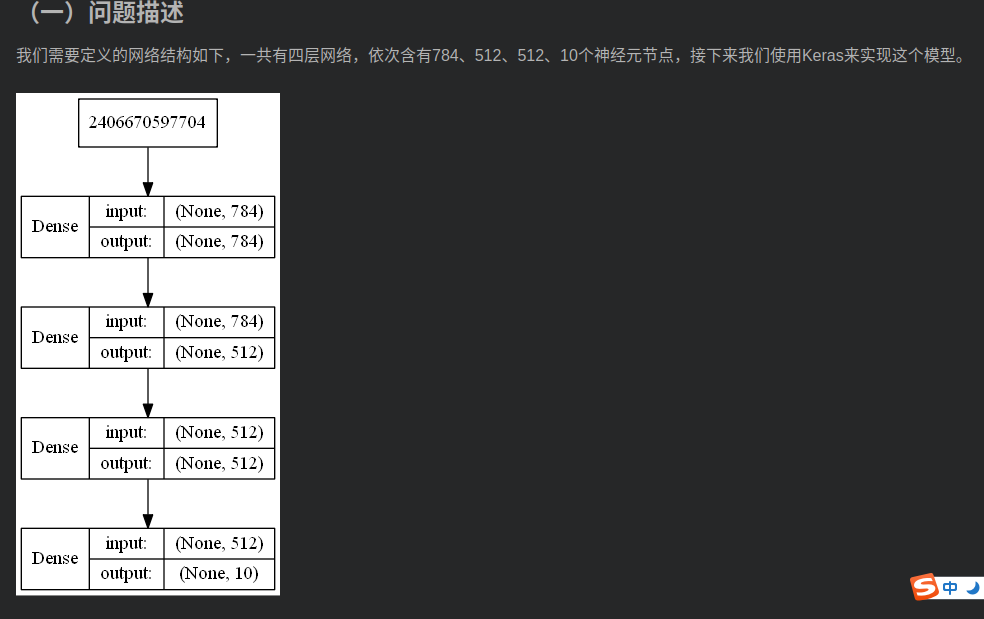
Careful friends may have found that this is a model used to identify MNIST data sets
model = keras.models.Sequential()
model.add(keras.layers.Dense(784, input_dim=784, kernel_initializer='normal', activation= 'tanh'))
model.add(keras.layers.Dense(512, kernel_initializer='normal', activation= 'tanh'))
model.add(keras.layers.Dense(512, kernel_initializer='normal', activation= 'tanh'))
model.add(keras.layers.Dense(10, kernel_initializer='normal', activation= 'softmax'))
(3) Model compilation
Using cross entropy as loss function and Adam optimization algorithm:
model.compile(loss='categorical_crossentropy', optimizer='adam', metrics=['accuracy'])
(4) Model training
model.fit(x_train, y_train, epochs=10, batch_size=200, verbose=1)
(5) Model saving
model.save('/model.h5')(6) Complete code
Enter data to start training. Note that the code here does not have the operation of entering data! Only design ideas are provided.
from tensorflow import keras

# Define model
model = keras.Sequential()
model.add(keras.layers.Dense(784, input_dim=784, kernel_initializer='normal', activation= 'tanh'))
model.add(keras.layers.Dense(512, kernel_initializer='normal', activation= 'tanh'))
model.add(keras.layers.Dense(512, kernel_initializer='normal', activation= 'tanh'))
model.add(keras.layers.Dense(10, kernel_initializer='normal', activation= 'softmax'))

# Compilation model
model.compile(loss='categorical_crossentropy', optimizer='adam', metrics=['accuracy'])

# Fitting model
model.fit(x_train, y_train, epochs=10, batch_size=200, verbose=1)