Recently, 8266 has been used in the school single chip microcomputer course design experiment. The requirement is to use 51 single chip microcomputer to interact with mobile phone. In the past, I used a 32 single-chip microcomputer to connect to the cloud through 8266. At the beginning, I also wanted to upload data to the mobile app through the cloud. However, later, I found that the requirements of this problem are not so high. It seems complex to use 8266 as a single-chip microcomputer to go to the cloud. I wonder if there is a simpler method to find it on the Internet, 8266 can communicate with mobile phone by opening LAN
esp8266
The AT instruction of 8266 is used this time
To do a good job, we must first sharpen the device. First, we must test whether the esp8266 we have is normal. This time, I use CH340 module and punctual atomic serial port assistant to test.
Hardware connection: VCC meet 3V3 (esp8266 standard voltage, unless there is a step-down chip on the 8266 module, it can be connected to 5V)
GND meet GND
RX meet TX
TX meet RX
Episode: according to my original experience, I can test the AT command with the computer serial port assistant by wiring according to the above, but this time it really failed. After repeated tests, I went to burn the esp8266AT command firmware and found that it could not be burned. I thought this 8266 was broken, But later, my roommate told me that the 8266 should connect the enable terminal EN to a high level. Indeed, it can be used in the future. (the new version used before does not need to be connected to this line, and the old version 8266 needs to be connected)
The following is the AT command of the serial port assistant
AT
AT+CWMODE=2
AT+RST
AT+CWSAP="esp8266","12345678",6,4
AT+CIPMUX=1
AT+CIPSERVER=1,8080
AT+CIFSR
AT+CIPSEND=0,10
ceshi
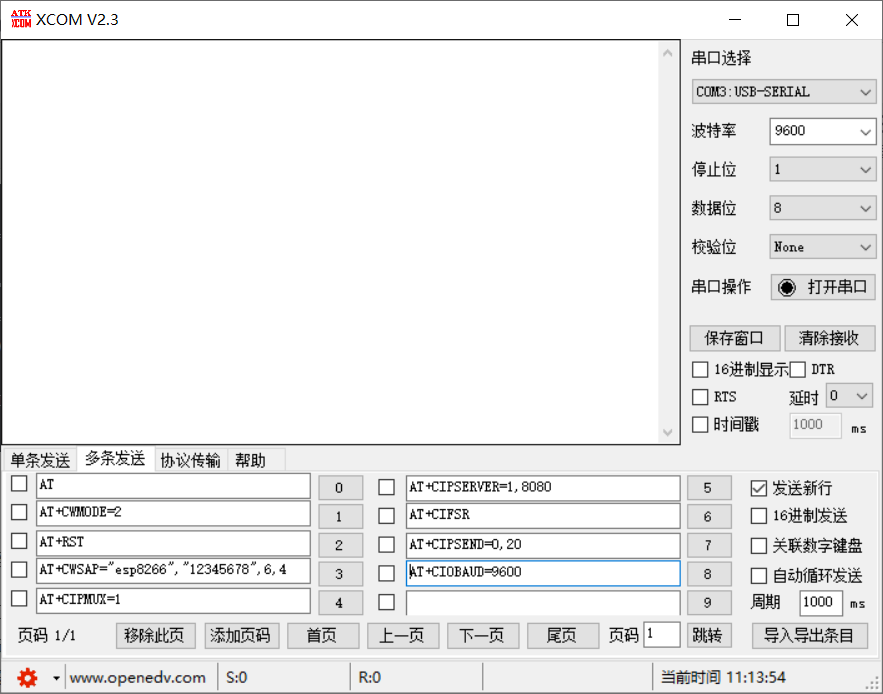
Input to the serial port assistant like this to start the test
First, open the serial port assistant, select 9600 baud rate, and send AT to see if there is a reply. If there is a reply, send the above instructions in turn to test. If there is no reply, select other baud rates. There is a baud rate so that this module has no problem so far. If there is no reply, you may need to burn the firmware again.
AT+CWSAP="esp8266","12345678",6,4 After sending this command, esp8266 will turn on a hotspot,
Connect with the mobile phone, and then send the command successively until AT+CIFSR. After sending this command, 8266 will reply to an IP address. This IP address should be recorded because it is required for subsequent mobile phone connection to 8266.
After the command is sent, connect the 8266 enabled hotspot with your mobile phone,

Open the tcp network debugging assistant on the mobile phone, which I downloaded casually on Baidu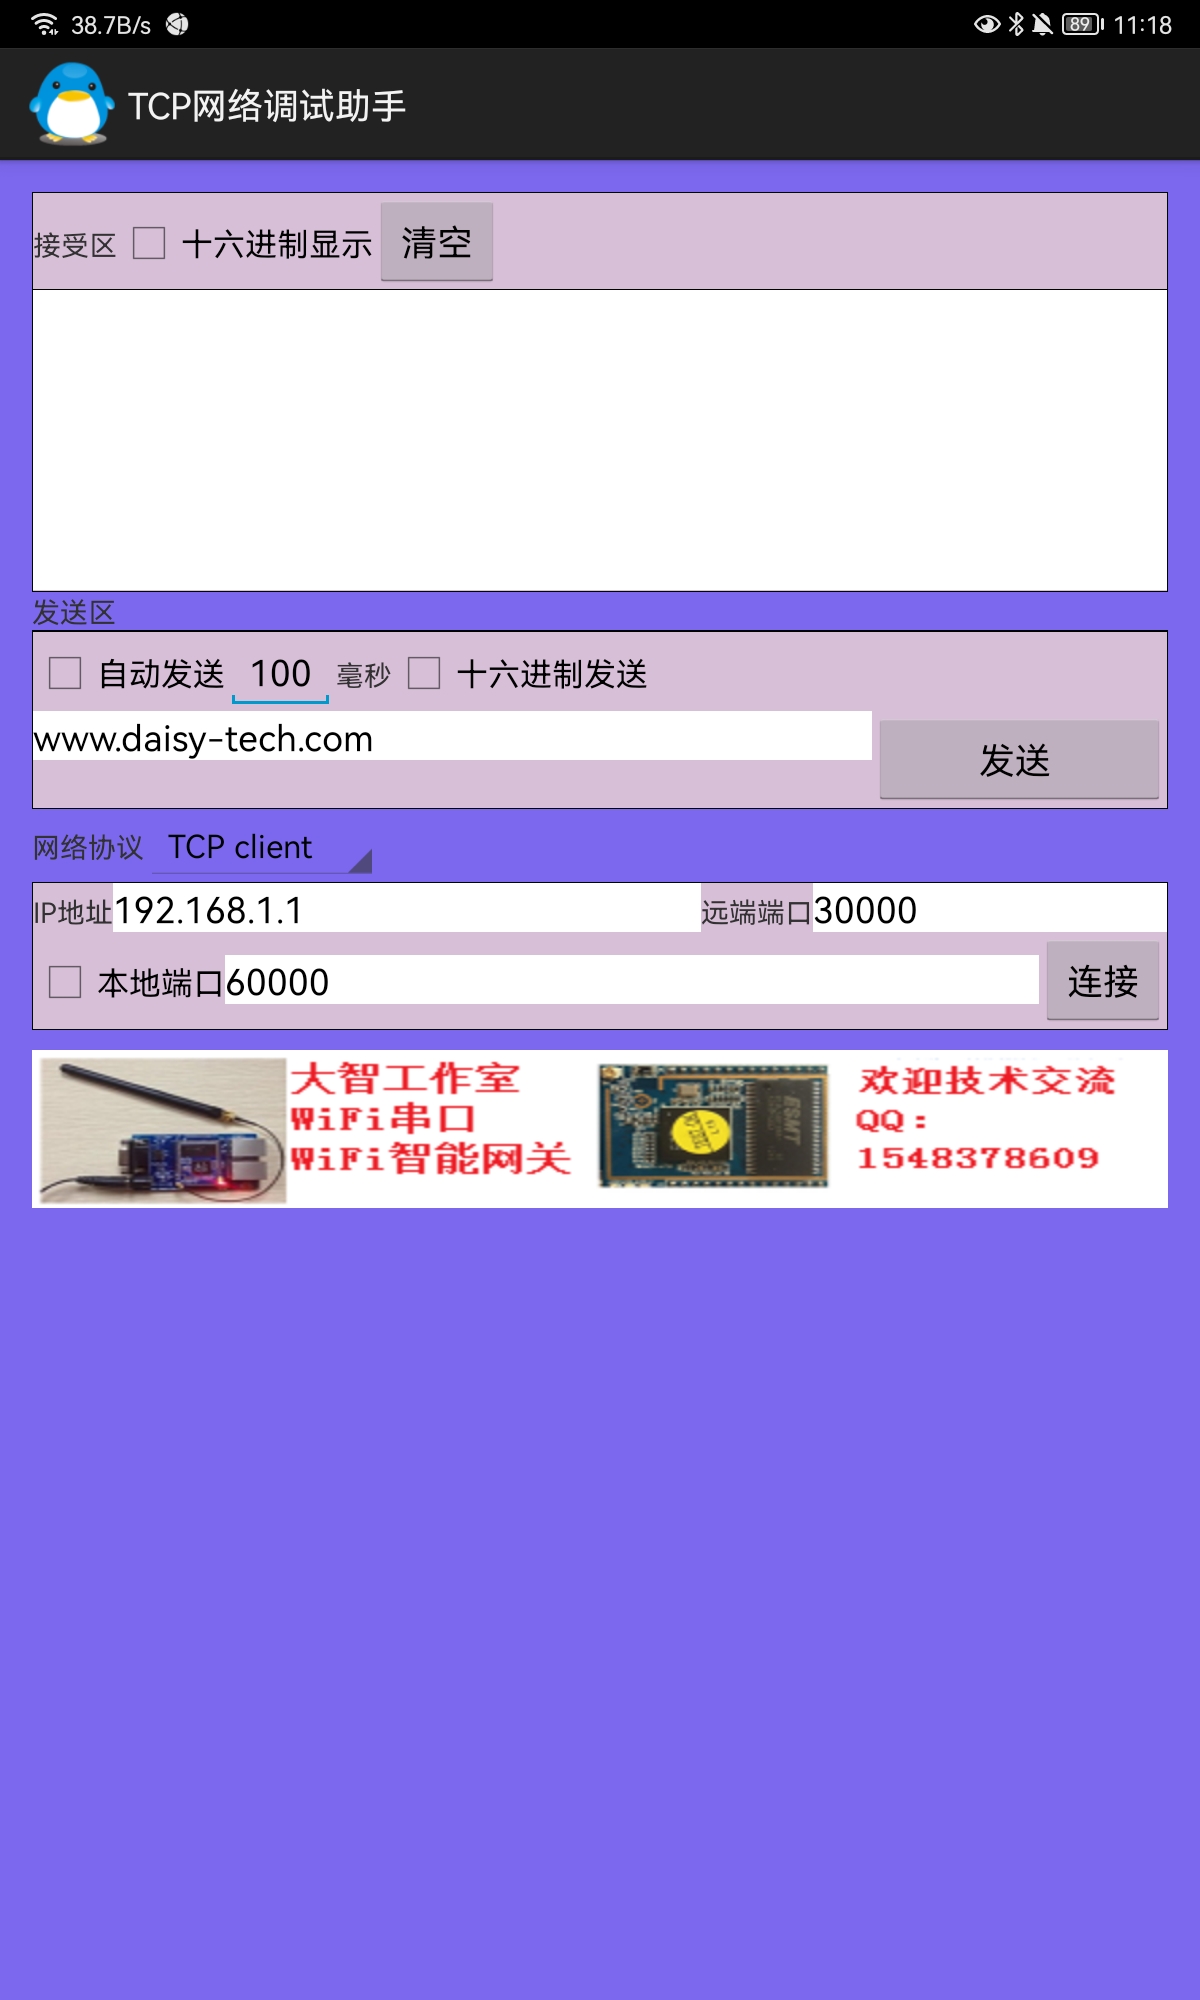
Set the IP address. The common IP address of 8266 is 192.168.4.1, but it is better to query it with the command AT+CIFSR. The port number I set is 8080 as follows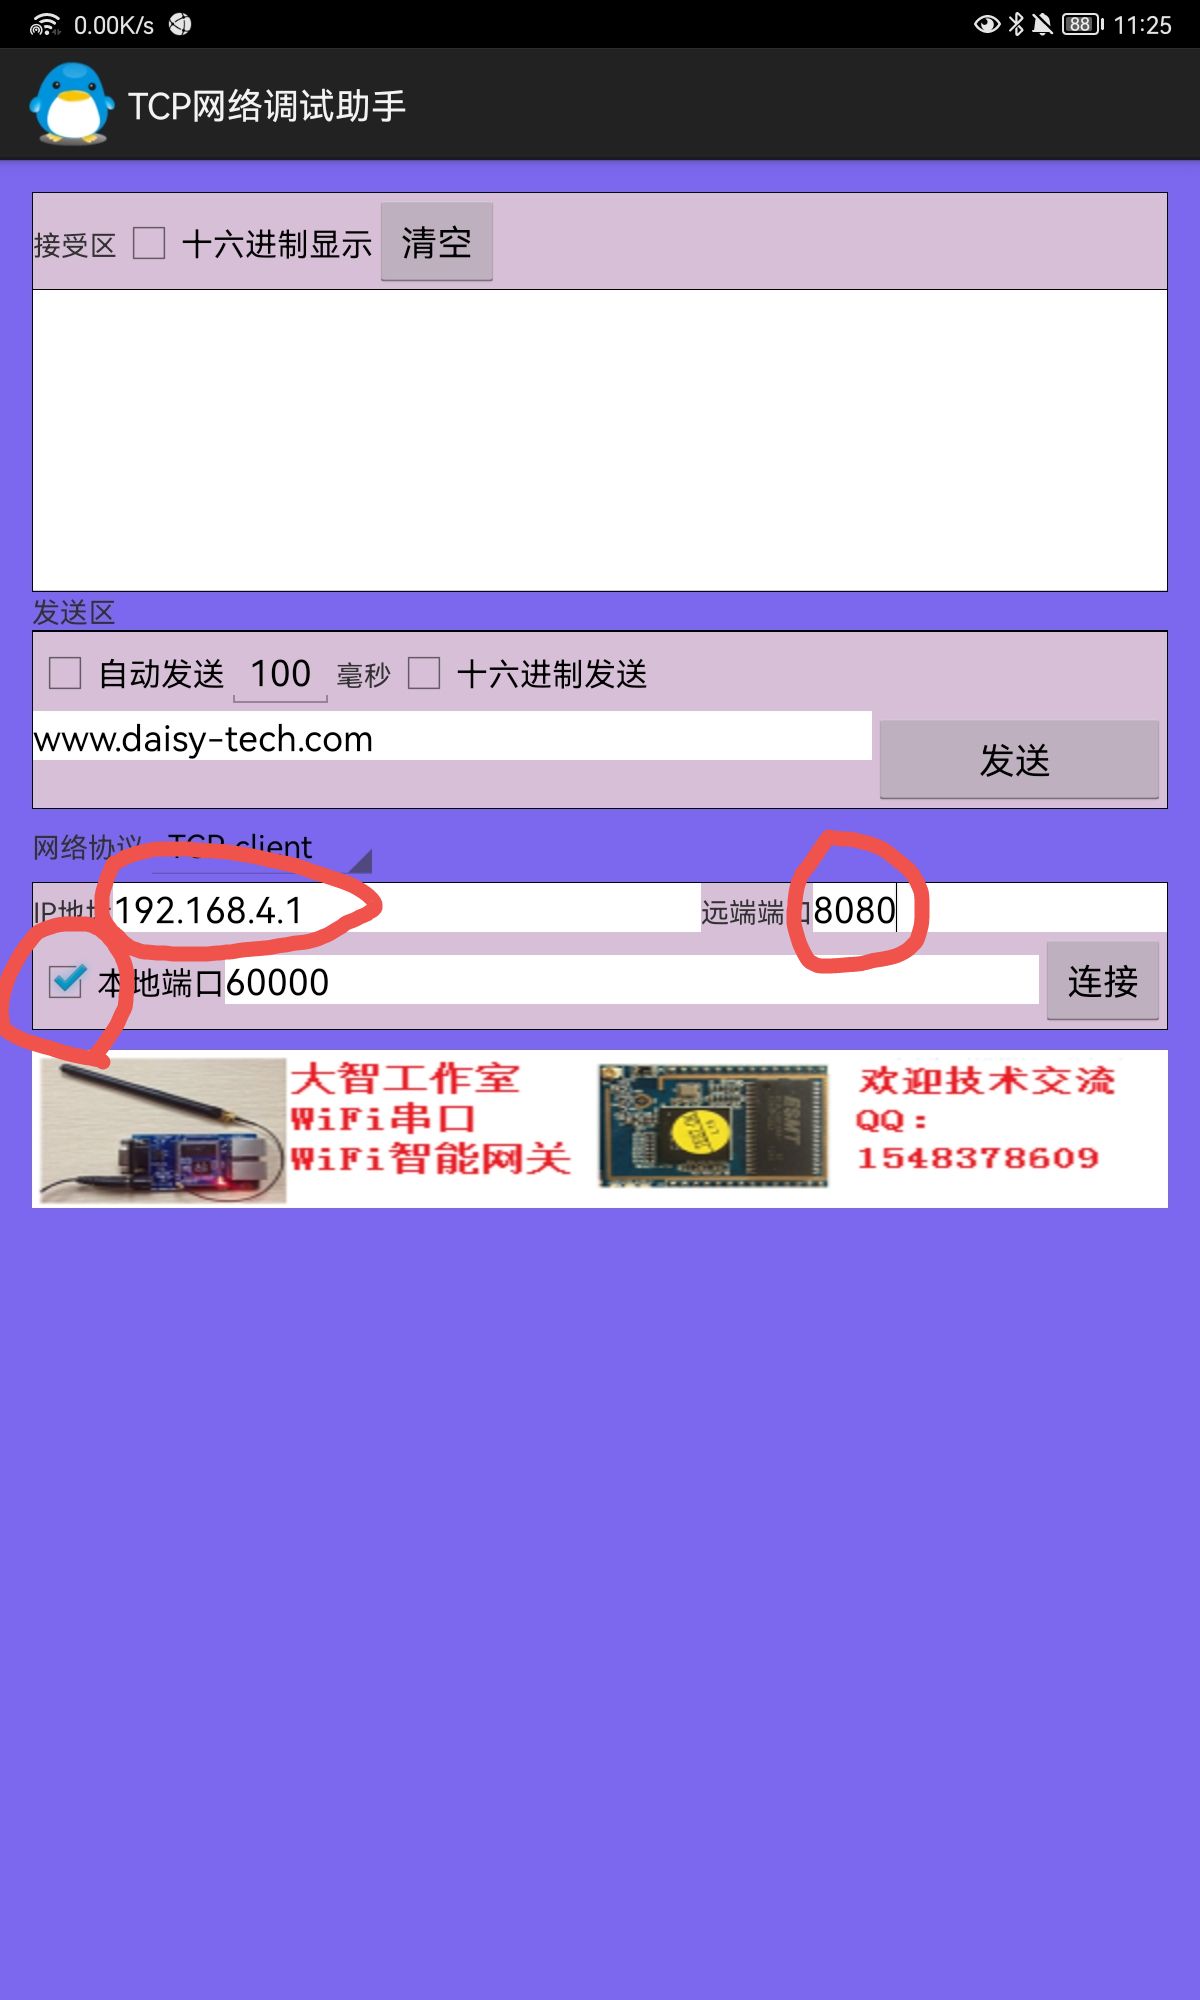
Click Connect, and the mobile APP can receive the information sent by the 8266 terminal.
There is a point to note when sending messages Command at + cipend = 0,10 You can't just send it once. You can send information only by sending an instruction followed by sending a message, such as "hello". In this instruction, 10 means that the length of data can be changed from large to small. How big can it be changed? No attempt has been made. Test it with interested friends.
After the test, you can start the part of 51 single chip microcomputer.
51 single chip microcomputer
Also connect the pin before starting the code:
esp8266TX meet 51 single chip microcomputer P3 ^ 0 (single chip microcomputer RX pin)
esp8266RX meet 51 single chip microcomputer P3 ^ 1 (single chip microcomputer TX pin)
esp8266VCC meet 51 single chip microcomputer 3V3
esp8266GND meet 51 single chip microcomputer GND
51 MCU code part is also relatively simple, just the serial port. Initialize the 51 MCU serial port. The baud rate I set is 9600, which corresponds to the serial port baud rate of esp8266
void uart_init(void)
{
	SCON=0X50;			//Set to working mode 1
	TMOD=0X21;			//Set counter working mode 2
	TH1 = 0xfd;		//Baud rate 9600
	TL1 = 0xfd;
	TR1=1;					//Open counter
	ES=1;						//Open receive interrupt
	EA=1;						//Open total interrupt
	TI = 0;
  	RI = 0;

}
Connect to 8266. Here is the connection code given by your roommate. The test is relatively stable. Generally speaking, it is to delay after sending instructions, and then delay after instructions.
void connect_8266(void)	//Connection 8266 function
{
	char *a="AT+RST\r\n";
	char *b="AT+CWMODE=2\r\n";
	char *c="AT+CWSAP=\"190421219\",\"00000000\",11,3\r\n";
    char *d="AT+CIPMUX=1\r\n";
    char *e="AT+CIPSERVER=1,8080\r\n";
	char *f="AT+CIFSR\r\n";
	ES = 0;
	while(*a!='\0')
    {
        SBUF=*a;      //Write characters to send
        while(!TI);    //Wait for sending to complete
        TI=0;          //send out
        a++;
    }
	Delay_Ms(100); //A delay function is added here, delaying about 5ms to give ESP8266 reaction time
	while(*b!='\0')
    {
        SBUF=*b;      //Write characters to send
        while(!TI);    //Wait for sending to complete
        TI=0;          //send out
        b++;
    }
	Delay_Ms(100); //A delay function is added here, delaying about 5ms to give ESP8266 reaction time
	while(*c!='\0')
    {
        SBUF=*c;      //Write characters to send
        while(!TI);    //Wait for sending to complete
        TI=0;          //send out
        c++;
    }
	Delay_Ms(100); //A delay function is added here, delaying about 5ms to give ESP8266 reaction time
    while(*a!='\0')
    {
        SBUF=*a;      //Write characters to send
        while(!TI);    //Wait for sending to complete
        TI=0;          //send out
        a++;
    }
   	Delay_Ms(100); //A delay function is added here, delaying about 5ms to give ESP8266 reaction time
    while(*d!='\0')
    {
        SBUF=*d;

        while(!TI);    //Wait for sending to complete
        TI=0;
        d++;
    }
	Delay_Ms(100); //A delay function is added here, delaying about 5ms to give ESP8266 reaction time
	while(*e!='\0')
    {
        SBUF=*e;

        while(!TI);    //Wait for sending to complete
        TI=0;
        e++;
    }
	Delay_Ms(100); //A delay function is added here, delaying about 5ms to give ESP8266 reaction time
	 while(*f!='\0')
    {
        SBUF=*f;

        while(!TI);    //Wait for sending to complete
        TI=0;
        f++;
    }
	Delay_Ms(100); //A delay function is added here, delaying about 5ms to give ESP8266 reaction time
   	ES = 1;

}
51 single chip microcomputer sends data
send_string("AT+CIPSEND=0,10\r\n");
Delay_Ms(10);
sprintf(a_8266,"wine:%s      ","hello");
send_string(a_8266);
After the corresponding settings of tcp network assistant are completed, click the connection to receive the data sent by 51 single chip microcomputer.