preface
For Android development, after working for a few years, we have to advance or change careers directly. If you are still working on Android and want to improve your understanding of the Framework, it is an essential process. Let's start today's topic.
As we know, for any programming language, the entry is generally the main function.
Where is the Android app portal? How did his main function start?
Students who may be familiar with Android know that the entry of an application is in the ActivityThread. There is a problem. When and who called the main function in the ActivityThread?
The above answers will be found in this article. If you are familiar with this process, you can review it in.
Android Architecture
The Android platform is based on the Linux kernel. Android Runtime (ART/Dalvik) relies on the Linux kernel to perform low-level functions, such as threading and low-level memory management.
Above the Android Runtime is the Java API Framework layer we often contact, as shown in the following figure is the system architecture diagram of Android
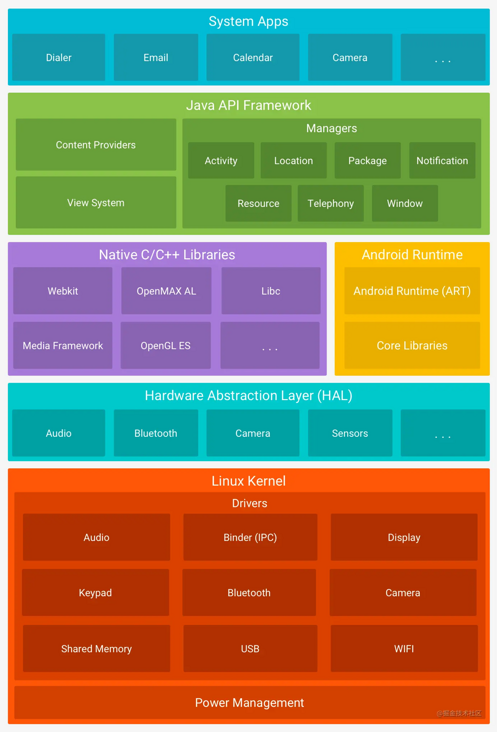
Today's topic is not the explanation of each part of this frame composition, but the startup process analysis of the Framework layer closer to the application layer.
Android Framework overview
If we put aside the Android architecture diagram here, what does the narrow Framewrok mainly include?
According to my understanding, it can be divided into three parts: server, client, and driver that depends on the underlying capabilities of Linux.
Server
They are mainly ActivityManagerService (AMS), WindowManagerService (WMS) and PackageM anerService (PMS)
- AMS is mainly used to manage the activities of all applications
- WMS manages various windows, hiding, displaying, etc
- PMS is used to manage and track all application APK, installation, resolution, control permissions, etc
There are also two classes KeyInputQueue and InputDispatchThread for handling touch messages, one for reading messages and the other for distributing messages
client
It mainly includes ActivityThread, Activity, DecodeView and parent class View, PhoneWindow, ViewRootImpl and internal class W
- ActivityThread is mainly used to communicate with AMS clients. Activity is a familiar class for us to write applications
Drivers that rely on the underlying capabilities of Linux
Mainly surface flinger (SF) and Binder drivers
- Each window corresponds to a Surface. The function of SF driver is to display each Surface on the same screen
- The function of Binder kernel driver is to provide IPC communication for the above server and client (or between server and server).
Zygote
The first Dalvik virtual machine program running in the system is called zygote, which means "an egg", because all next Dalvik virtual machine processes are hatched through this "egg".
The zygote process includes two main modules, as follows:
- Socket server. The socket server is used to receive the command to start a new Dalvik process.
- Framework shared classes and shared resources. After the zygote process is started, some shared classes and resources will be loaded. Shared classes are defined in the preload classes file and shared resources are defined in the preload resources file. Because the zygote process is used to hatch other Dalvik processes, after these classes and resources are loaded, the new Dalvik process does not need to load these classes and resources, which is the so-called sharing.
The specific program corresponding to the zygote process is app\_ Process, the program exists in the system/bin directory, and the instruction to start the program is configured in init.rc.
Zygote has two outstanding characteristics
- Each fork process is a Dalvik virtual machine. An independent process can prevent a program from crashing, resulting in all programs crashing. This virtual machine is similar to Java virtual machine. For programmers, they can directly use java to develop applications
- The zygote process will load shared classes and resources in advance. These classes and resources are actually most of the classes and resources defined in the SDK. Therefore, when a new process is hatched through zygote, the new APK process only needs to load the classes and resources contained in the A PK itself, which effectively solves the problem of multiple apks sharing Framework resources.
SystemServer
The first Dalvik process hatched by zygote is called SystemServer. SystemServer is only the alias of the process, and the specific corresponding program of the process is still app\_process, because SystemServer is from app\_ Hatched in process.
A Socket client is created in the system server, and AMS is responsible for managing the client. After that, all Dalvik processes will be started indirectly through the Socket client. When a new APK process needs to be started, AMS will send a start command to the Socket server of zygote process through the Socket client, and then zygote will hatch a new process. The server mentioned above, AMS, PMS, WMS, etc. are all started in system server
Android Framework source
The general startup process of the operating system is divided into three steps
- After power on, load the bootloader program
- Operating system kernel initialization
- Execute the first application
The Android system is based on the Linux Kernel. The Linux bootloader will not be introduced here. It will directly introduce the initialization of the operating system Kernel. At this time, it will load the init.rc file
init.rc file
Under the Android root directory, you can directly find init.rc
generic_x86:/ # ls
acct     bin        cache   config data         dev init            init.rc              init.usb.rc      lost+found mnt oem  product sdcard  sys    ueventd.rc
adb_keys bugreports charger d      default.prop etc init.environ.rc init.usb.configfs.rc init.zygote32.rc metadata   odm proc sbin    storage system vendor
Open init.rc
generic_x86:/ # cat init.rc
# ... omit others
 # Now we can start zygote for devices with file based encryption
trigger zygote-start

# It is recommended to put unnecessary data/ initialization from post-fs-data
# to start-zygote in device's init.rc to unblock zygote start.
on zygote-start
    # A/B update verifier that marks a successful boot.
    exec_start update_verifier_nonencrypted
    start netd
    start zygote
    start zygote_secondary

on property:vold.decrypt=trigger_restart_framework
    stop surfaceflinger
# Start SF
    start surfaceflinger

# ... omit other media, network, etc
That is, when init.rc, start the Android kernel.
app\_process
The Android kernel also starts with the main method, which is in frameworks/base/cmds/app\_process/app\_main.cpp
int main(int argc, char* const argv[])
{
    ...
    //Initialize Android runtime
    AppRuntime runtime(argv[0], computeArgBlockSize(argc, argv));

    bool zygote = false;
    bool startSystemServer = false;
    bool application = false;
    String8 niceName;
    String8 className;

    // Determine which service to start according to the parameters
    ++i;  // Skip unused "parent dir" argument.
    while (i < argc) {
        const char* arg = argv[i++];
        if (strcmp(arg, "--zygote") == 0) {
            zygote = true;
            niceName = ZYGOTE_NICE_NAME;
        } else if (strcmp(arg, "--start-system-server") == 0) {
            startSystemServer = true;
        } else if (strcmp(arg, "--application") == 0) {
            application = true;
        } else if (strncmp(arg, "--nice-name=", 12) == 0) {
            niceName.setTo(arg + 12);
        } else if (strncmp(arg, "--", 2) != 0) {
            className.setTo(arg);
            break;
        } else {
            --i;
            break;
        }
    }
    if (!className.isEmpty()) {
        args.add(application ? String8("application") : String8("tool"));
        runtime.setClassNameAndArgs(className, argc - i, argv + i);
    }else{
        ....
        //Start SystemServer
        if (startSystemServer) {
            args.add(String8("start-system-server"));
        }
    }
    ....
     if (zygote) {
       //Start Zygote
        runtime.start("com.android.internal.os.ZygoteInit", args, zygote);
    } else if (className) {
        runtime.start("com.android.internal.os.RuntimeInit", args, zygote);
    } else {
        fprintf(stderr, "Error: no class name or --zygote supplied.\n");
        app_usage();
        LOG_ALWAYS_FATAL("app_process: no class name or --zygote supplied.");
    }
}
In this Main method, AppRuntime is initialized first, and its parent class is AndroidRuntime. Then we see that the Java class ZygoteInit is started.
How to start Java classes in c + + code? Let's continue to look at the start method
void AndroidRuntime::start(const char* className, const Vector<String8>& options, bool zygote)
{
   ...
   //Start the Java virtual machine
     if (startVm(&mJavaVM, &env, zygote, primary_zygote) != 0) {
        return;
    }
    ...
    //Find the Main method in Java
     jmethodID startMeth = env->GetStaticMethodID(startClass, "main",
            "([Ljava/lang/String;)V");
        if (startMeth == NULL) {
            ALOGE("JavaVM unable to find main() in '%s'\n", className);
            /* keep going */
        } else {
        //Execute the Main method
            env->CallStaticVoidMethod(startClass, startMeth, strArray);
    }
    ....
}
You can see that you created the Java virtual machine first and called the Java main method. Do you feel a little familiar.
ZygoteInit
As mentioned above, it will start the ZygoteInit class of Java. What does it do? Let's look at the key code and start with the Main method
//ZygoteInit.java
  public static void main(String argv[]) {
    ZygoteServer zygoteServer = new ZygoteServer();
    ZygoteHooks.startZygoteNoThreadCreation();

    //Create socket
    zygoteServer.createZygoteSocket(socketName);
    Zygote.createBlastulaSocket(blastulaSocketName);

    if (!enableLazyPreload) {
            bootTimingsTraceLog.traceBegin("ZygotePreload");
            EventLog.writeEvent(LOG_BOOT_PROGRESS_PRELOAD_START,
            SystemClock.uptimeMillis());
            //Preload system resources
            preload(bootTimingsTraceLog);
            EventLog.writeEvent(LOG_BOOT_PROGRESS_PRELOAD_END,
                    SystemClock.uptimeMillis());
            bootTimingsTraceLog.traceEnd(); // ZygotePreload
    } else {
        Zygote.resetNicePriority();
    }

    //fork SystemServer process
    if (startSystemServer) {
        Runnable r = forkSystemServer(abiList, socketName, zygoteServer);
        // child (system_server) process.
        if (r != null) {
            r.run();
            return;
        }
    }

    //Wait for Socket access
    if (caller == null) {
        Log.i(TAG, "Accepting command socket connections");
        // The select loop returns early in the child process after a fork and
        // loops forever in the zygote.
        caller = zygoteServer.runSelectLoop(abiList);
    }
The comments write about the initialization content of Zygote startup
- Create Socket
- Load system resources
- Start SystemServer
- runSelectLoop waits for socket access and starts to fork the new process
SystemServer
Let's continue the process of starting the system server, starting with the Main method
//SystemServer.java
   /**
     * The main entry point from zygote.
     */
    public static void main(String[] args) {
        new SystemServer().run();
    }
Very simple, create your own object and execute the run method. Take a look at the run method
private void run() {
    ...
    if (System.currentTimeMillis() < EARLIEST_SUPPORTED_TIME) {
        Slog.w(TAG, "System clock is before 1970; setting to 1970.");
        SystemClock.setCurrentTimeMillis(EARLIEST_SUPPORTED_TIME);
    }

    VMRuntime.getRuntime().clearGrowthLimit();
    // The system server has to run all of the time, so it needs to be
    // as efficient as possible with its memory usage.
    VMRuntime.getRuntime().setTargetHeapUtilization(0.8f);

    android.os.Process.setThreadPriority(
                android.os.Process.THREAD_PRIORITY_FOREGROUND);
    android.os.Process.setCanSelfBackground(false);
    Looper.prepareMainLooper();

   // Create the system service manager.
    mSystemServiceManager = new SystemServiceManager(mSystemContext);
    mSystemServiceManager.setStartInfo(mRuntimeRestart,
            mRuntimeStartElapsedTime, mRuntimeStartUptime);
    LocalServices.addService(SystemServiceManager.class, mSystemServiceManager);

   try {
        traceBeginAndSlog("StartServices");
        startBootstrapServices();
        startCoreServices();
        startOtherServices();
        SystemServerInitThreadPool.shutdown();
    } catch (Throwable ex) {
           Slog.e("System", "******************************************");
            Slog.e("System", "************ Failure starting system services", ex);
            throw ex;
    } finally {
        traceEnd();
    }

    Looper.loop();
    throw new RuntimeException("Main thread loop unexpectedly exited");
}
The run method is mainly used to set the mobile phone time, set the memory size of the virtual machine, create a message loop Looper, create a SystemServiceManager, etc. the most important thing is to start various services. Let's take a look at the startbootstrap services, startCoreServices and startOtherServices methods
private void startBootstrapServices() {
    Installer installer = mSystemServiceManager.startService(Installer.class);
    mSystemServiceManager.startService(DeviceIdentifiersPolicyService.class);

    mActivityManagerService = mSystemServiceManager.startService(
                ActivityManagerService.Lifecycle.class).getService();
    mActivityManagerService.setSystemServiceManager(mSystemServiceManager);
    mActivityManagerService.setInstaller(installer);
    ....
}

private void startCoreServices() {
    ...
     mSystemServiceManager.startService(BatteryService.class);
     ...
}

 private void startOtherServices() {
        final Context context = mSystemContext;
        VibratorService vibrator = null;
        DynamicAndroidService dynamicAndroid = null;
        IStorageManager storageManager = null;
        NetworkManagementService networkManagement = null;
        IpSecService ipSecService = null;
        NetworkStatsService networkStats = null;
        NetworkPolicyManagerService networkPolicy = null;
        ConnectivityService connectivity = null;
        NsdService serviceDiscovery= null;
        WindowManagerService wm = null;
        SerialService serial = null;
        NetworkTimeUpdateService networkTimeUpdater = null;
        InputManagerService inputManager = null;
        TelephonyRegistry telephonyRegistry = null;
        ConsumerIrService consumerIr = null;
        MmsServiceBroker mmsService = null;
        HardwarePropertiesManagerService hardwarePropertiesService = null;
        ....
}
In these methods, we start our core services, and common services. AMS, PMS, WMS and other related services can also be seen in the code
Launcher launch introduction
Generally, after the service is started, you will want to call the systemReady() method. See a listening callback in SysytemServer startOtherServices
mActivityManagerService.systemReady(() -> {
  try {
        startSystemUi(context, windowManagerF);
    } catch (Throwable e) {
        reportWtf("starting System UI", e);
    }
  }
}

static final void startSystemUi(Context context, WindowManagerService windowManager) {
        Intent intent = new Intent();
        intent.setComponent(new ComponentName("com.android.systemui",
                    "com.android.systemui.SystemUIService"));
        intent.addFlags(Intent.FLAG_DEBUG_TRIAGED_MISSING);
        //Slog.d(TAG, "Starting service: " + intent);
        context.startServiceAsUser(intent, UserHandle.SYSTEM);
        windowManager.onSystemUiStarted();
}
After the Ams is started, the Launcher is displayed
//AMS.java
 public void systemReady(final Runnable goingCallback, TimingsTraceLog traceLog) {
 ...
     startHomeActivityLocked(currentUserId, "systemReady");
     //
     mStackSupervisor.resumeFocusedStackTopActivityLocked();
 ...
 }
In fact, I've finished the general process here, but I haven't answered when the main method of ActivityThread was called at the beginning of this article. I won't expand it in detail here, but I'll answer it briefly
How is the main method of ActivityThread called?
AMS manages the start and end of the Activity. Check the AMS code. When the currently started APP does not create a process, it will eventually call ZygoteProcess, and then send a socket request to Zygote.
resumeTopActivityLocked -> startProcessLocked -> Process.start() -> ZygoteProcess.start() -> ZygoteProcess.startViaZygote() —> ZygoteProcess.zygoteSendArgsAndGetResult()
Next, let's look at the general code
//AMS.java
private final boolean startProcessLocked(ProcessRecord app, String hostingType,
            String hostingNameStr, boolean disableHiddenApiChecks, String abiOverride) {
            //Here, entryPoint is ActivityThread
     final String entryPoint = "android.app.ActivityThread";

    return startProcessLocked(hostingType, hostingNameStr, entryPoint, app, uid, gids,
                    runtimeFlags, mountExternal, seInfo, requiredAbi, instructionSet, invokeWith,
                    startTime);
}
//ZygoteProcess.java
private Process.ProcessStartResult startViaZygote(final String processClass,... ){
ArrayList<String> argsForZygote = new ArrayList<String>();
argsForZygote.add("--runtime-args");
argsForZygote.add("--setuid=" + uid);
argsForZygote.add("--setgid=" + gid);
argsForZygote.add("--runtime-flags=" + runtimeFlags);
argsForZygote.add("--target-sdk-version=" + targetSdkVersion);
if (startChildZygote) {
argsForZygote.add("--start-child-zygote");
}
argsForZygote.add(processClass);
synchronized(mLock) {
return zygoteSendArgsAndGetResult(openZygoteSocketIfNeeded(abi),
useBlastulaPool,
argsForZygote);
}
}
//Initiate a Socket request to Zygote
private static Process.ProcessStartResult zygoteSendArgsAndGetResult(
ArrayList<String> args,..){
blastulaSessionSocket = zygoteState.getBlastulaSessionSocket();
final BufferedWriter blastulaWriter = new BufferedWriter(
new OutputStreamWriter(blastulaSessionSocket.getOutputStream()),
Zygote.SOCKET_BUFFER_SIZE);
final DataInputStream blastulaReader =
new DataInputStream(blastulaSessionSocket.getInputStream());
blastulaWriter.write(msgStr);
blastulaWriter.flush();
...
}Finally, Zygote receives the request and calls the zygoteinit method in zygoteinit
//ZygoteInit.java
 public static final Runnable zygoteInit(int targetSdkVersion, String[] argv,
            ClassLoader classLoader) {
        if (RuntimeInit.DEBUG) {
            Slog.d(RuntimeInit.TAG, "RuntimeInit: Starting application from zygote");
        }

        Trace.traceBegin(Trace.TRACE_TAG_ACTIVITY_MANAGER, "ZygoteInit");
        RuntimeInit.redirectLogStreams();

        RuntimeInit.commonInit();
        ZygoteInit.nativeZygoteInit();
        return RuntimeInit.applicationInit(targetSdkVersion, argv, classLoader);
    }
Find staticmain in RuntimeInit, and finally execute the returned Runnable in ZygoteInit to call the main method
protected static Runnable applicationInit(int targetSdkVersion, String[] argv,
            ClassLoader classLoader) {
        nativeSetExitWithoutCleanup(true);
        VMRuntime.getRuntime().setTargetHeapUtilization(0.75f);
        VMRuntime.getRuntime().setTargetSdkVersion(targetSdkVersion);
        final Arguments args = new Arguments(argv);
        Trace.traceEnd(Trace.TRACE_TAG_ACTIVITY_MANAGER);
        return findStaticMain(args.startClass, args.startArgs, classLoader);
    }

protected static Runnable findStaticMain(String className, String[] argv,
            ClassLoader classLoader) {
        ..
        m = cl.getMethod("main", new Class[] { String[].class });
        return new MethodAndArgsCaller(m, argv);
    }
This article is transferred from https://www.jianshu.com/p/5ba93dee3dfd , in case of infringement, please contact to delete.