catalogue
2, OLED displays name and student number
3, OLED display temperature and humidity
4, OLED displays scrolling characters
1, SPI introduction
1. Introduction to SPI protocol
SPI protocol is a serial peripheral interface proposed by Motorola, which is a high-speed full duplex communication bus. It is widely used between ADC, LCD and MCU, which requires high communication rate.
The rising edge sends, the falling edge receives, and the high bit sends first.
When the rising edge arrives, the level on the sdo will be sent to the register of the slave device.
When the falling edge arrives, the level on the sdi will be received into the register of the master device.
2. SPI physical layer introduction
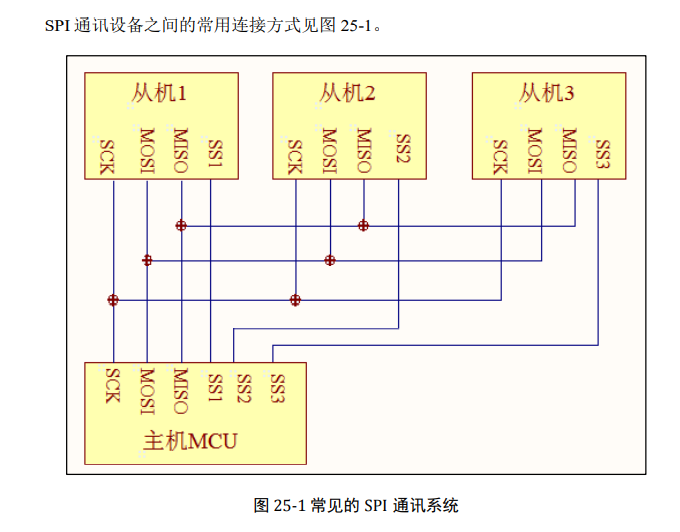
SS (slave select): select the signal line from the device, often referred to as chip selection signal line, also known as NSS and CS, which is represented by NSS below.
SCK (Serial Clock): clock signal line, used for communication data synchronization.
MOSI (Master Output, Slave Input): master device output / slave device input pin.
MISO(Master Input, Slave Output): master device input / slave device output pin
For specific instructions, please refer to the wildfire playbook.
2. SPI protocol layer introduction
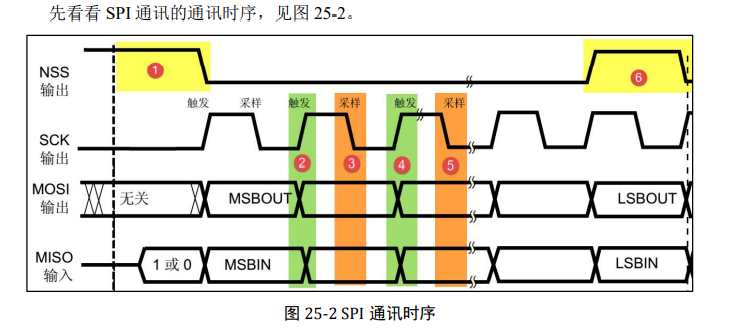
This is the communication sequence of a host. NSS, SCK and MOSI signals are generated by the master, while MISO signals are generated by the slave. The master reads the data of the slave through the signal line. MOSI and MISO signals are valid only when NSS is at low level. MOSI and MISO transmit one bit of data in each clock cycle of SCK.
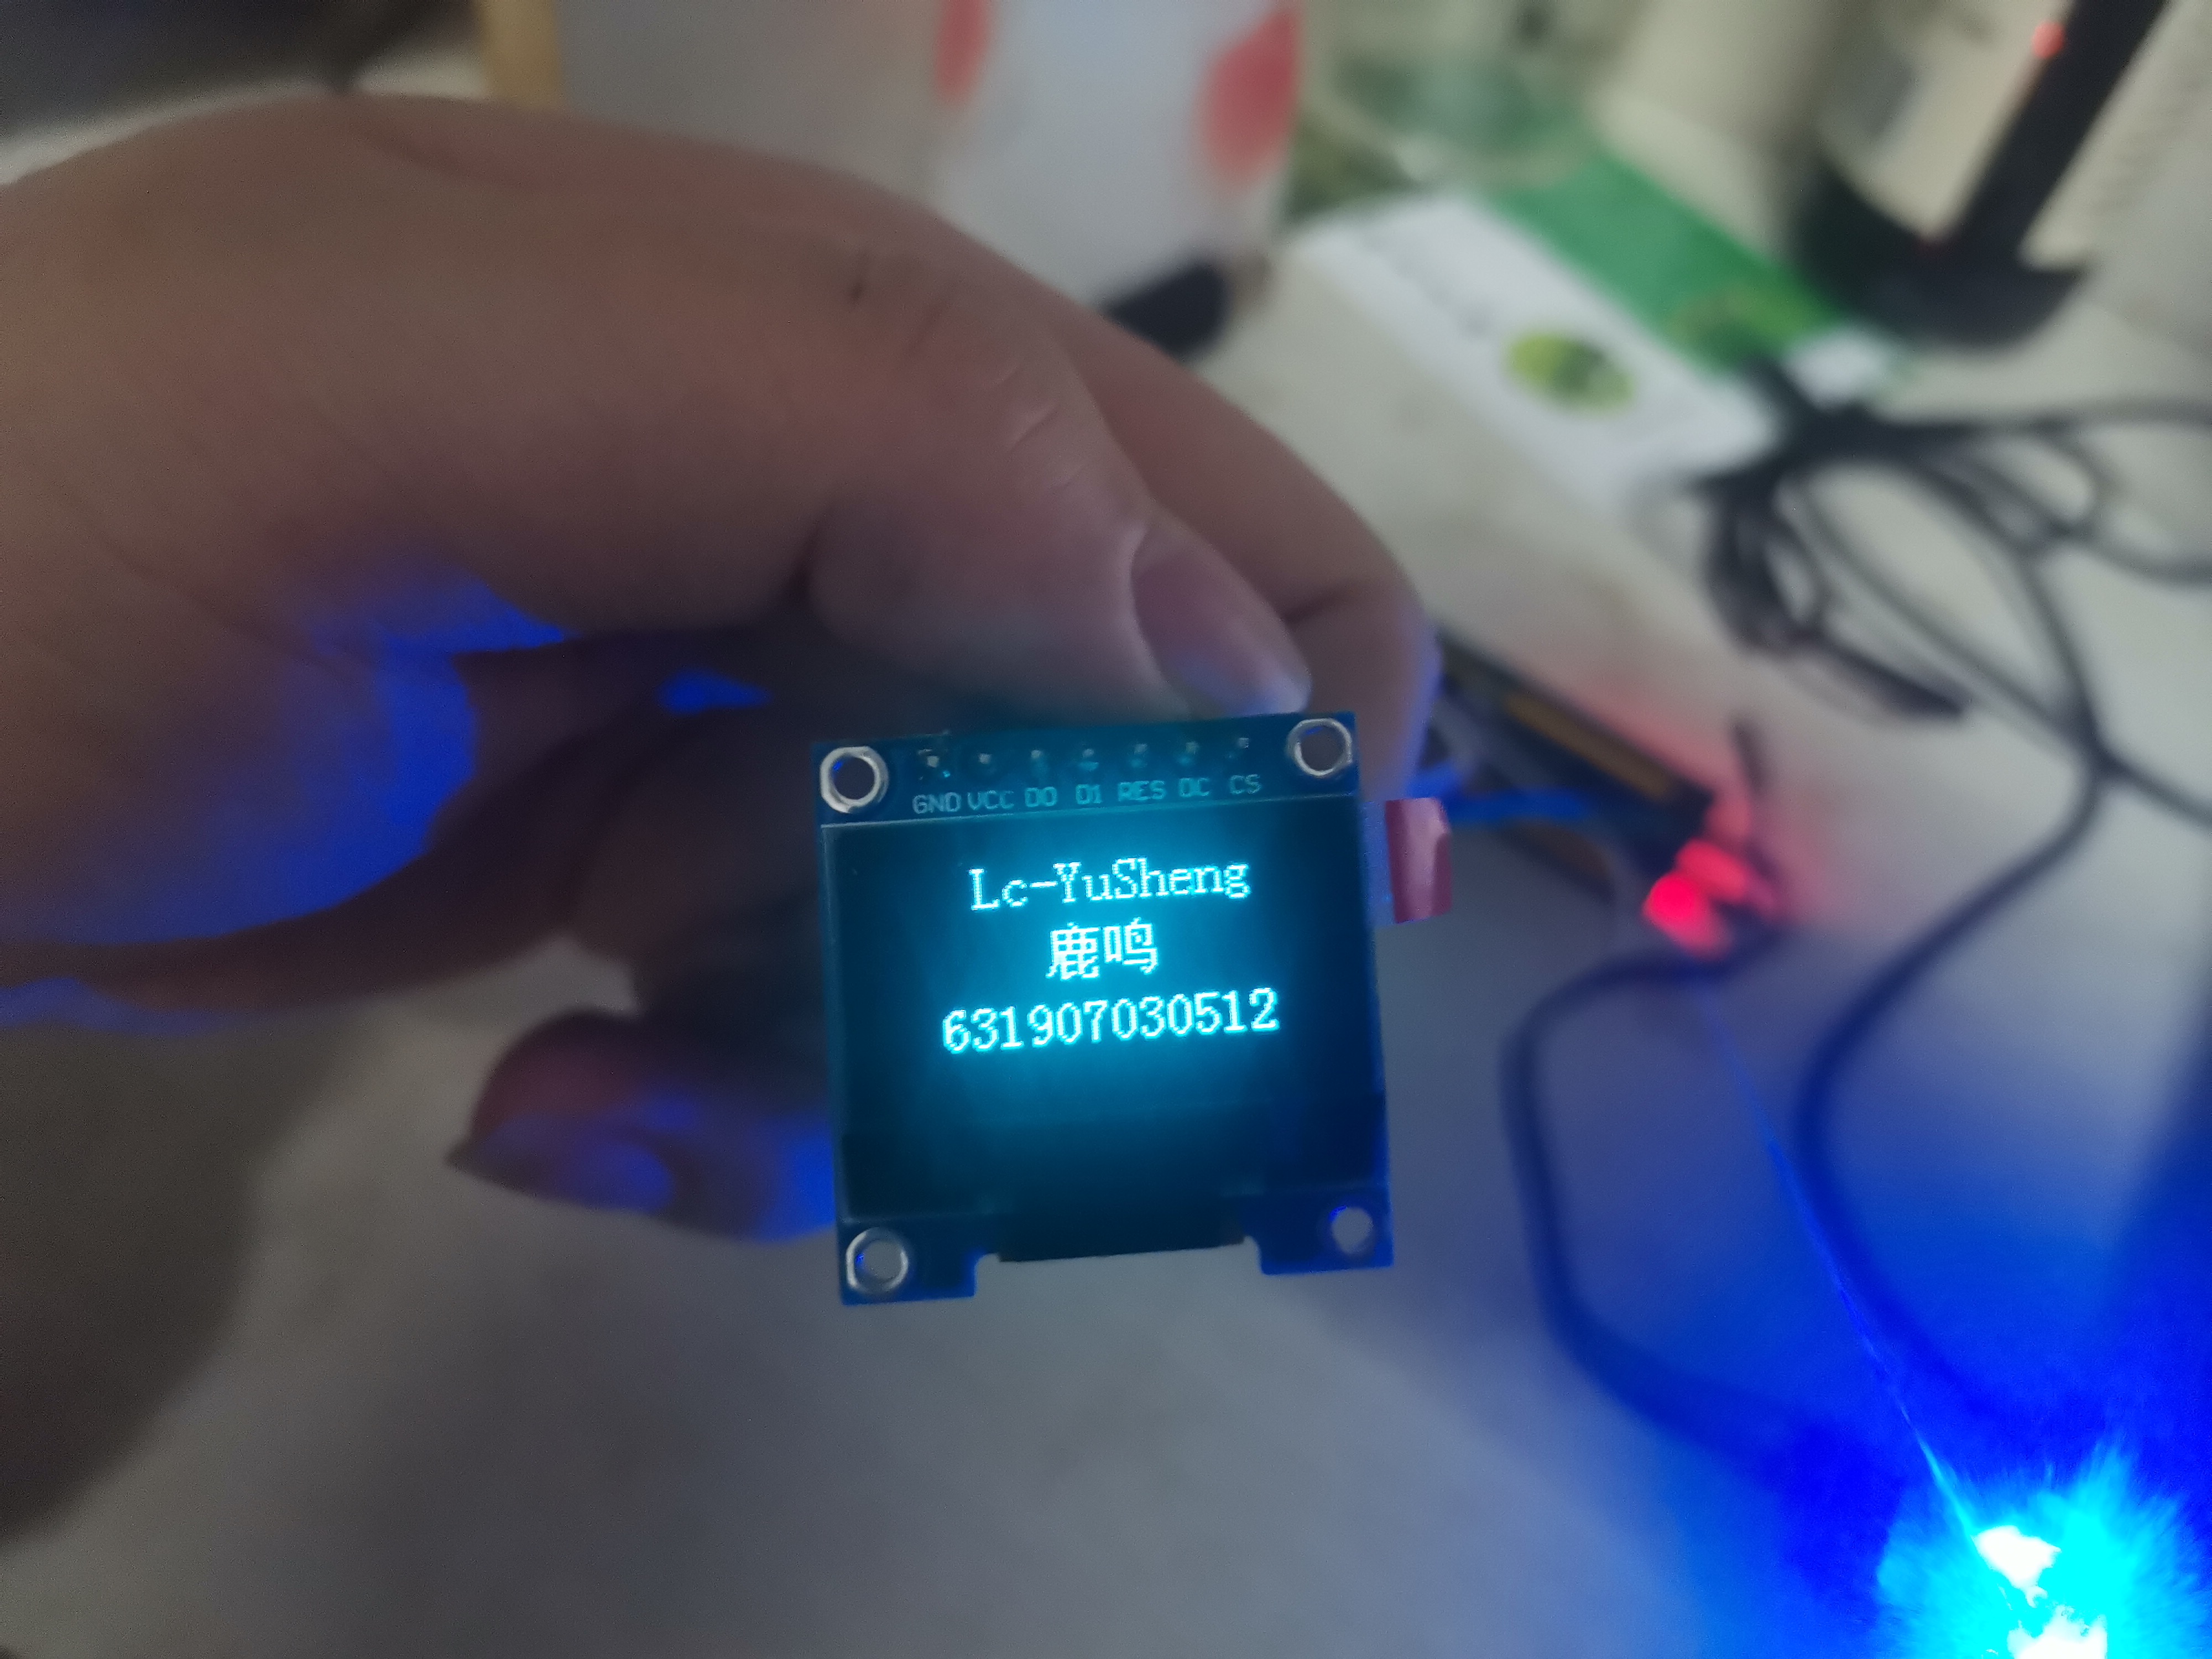
2, OLED displays name and student number
Like the temperature and humidity evaluation, all the codes of this experiment are based on the open source code given by the manufacturer, not all written by ourselves.
1. Introduction to OLED display
0.96inch SPI OLED Module - LCD wiki
2. Manufacturer open source code link
Note: there are many types of chips in the open source code given by the manufacturer. Select what you need, and then open it with the corresponding software.
Pin description and corresponding STM32MIni connection method:
| GND OLED power ground | GND |
| VCC OLED power supply positive (3.3V~5V) | VCC |
| D0 OLED SPI and IIC bus clock signals | PB13 |
| D1 OLED SPI and IIC bus data signals | PB15 |
| RES OLED reset signal, low level reset (this pin needs to be reset when IIC bus is selected) To be connected to high level (VCC can be connected) | PB12 |
| DC OLED command / data input selection signal, high level: data, low level: Command (when 3-wire SPI bus is selected, this pin does not need to be used (optional) Ground); when selecting IIC bus, this pin needs to be grounded) | PB10 |
| CS OLED chip selection signal, low level enable (when IIC bus is selected, this pin needs to be To be grounded) | PB11 |
3. Chinese character display configuration
To display Chinese characters on OLED, you need to find the corresponding Chinese character configuration in the dot matrix characters:
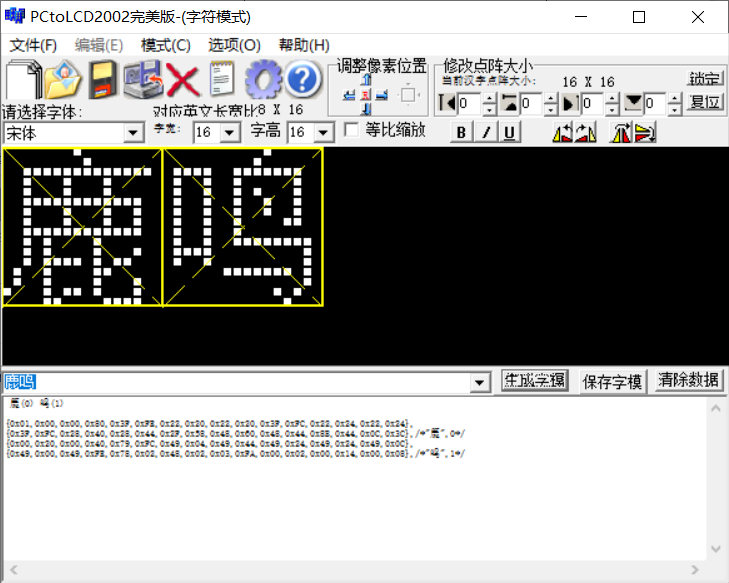 What I choose here is the Chinese character extraction tool attached to No. 7 in the official website resource package, and then input Luming to obtain the corresponding code.
During configuration: click the option to change the output format to C51
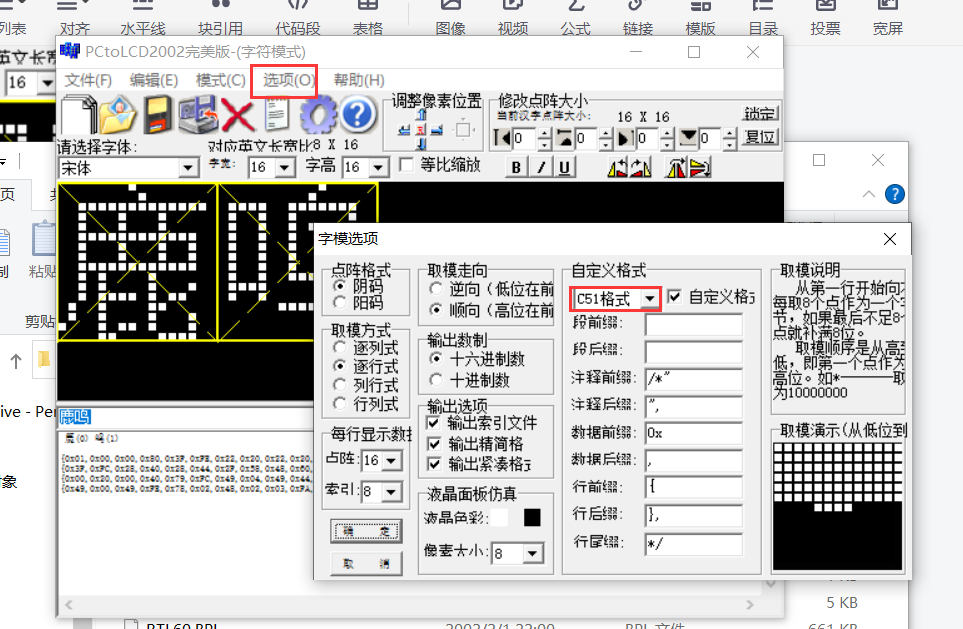
Add the generated code to the corresponding location: user - > GUI. C - > ole DOF. H 16 * 16 Chinese character position (if the output is not 16 * 16, add the code to the corresponding position.
4. Relevant code display:
Luming output format:
"deer",0x01,0x00,0x00,0x80,0x3F,0xFE,0x22,0x20,0x22,0x20,0x3F,0xFC,0x22,0x24,0x22,0x24,
  0x3F,0xFC,0x28,0x40,0x28,0x44,0x2F,0x58,0x48,0x60,0x48,0x44,0x8B,0x44,0x0C,0x3C,/*"Deer ", 10*/

"Sound",0x00,0x20,0x00,0x40,0x79,0xFC,0x49,0x04,0x49,0x44,0x49,0x24,0x49,0x24,0x49,0x0C,
  0x49,0x00,0x49,0xFE,0x78,0x02,0x48,0x02,0x03,0xFA,0x00,0x02,0x00,0x14,0x00,0x08,/*""Sound", 11*/
Implementation code display:
void TEST_MainPage(void)
{
	GUI_ShowString(28,0,"Lc-YuSheng",16,1);    //Display English name
	GUI_ShowCHinese(48,20,16,"Lu Ming",1);        //Display Chinese name
	GUI_ShowString(17,40,"631907030512",16,1);   //Display student number
	delay_ms(1500);
	delay_ms(1500);
}
GUI_ShowString Function Description: 28: x coordinates 0: ordinate character string 16: bit 1: mode (form)
GUI_ShowCHinese Function Description: 48: x coordinate 20: y coordinate 16: Chinese character dot matrix form Han character string 1: mode
main.c
#include "delay.h"
#include "sys.h"
#include "oled.h"
#include "gui.h"
#include "test.h"
int main(void)
{
	delay_init();	    	       //Delay function initialization
	//NVIC_Configuration();  	   // Set NVIC interrupt packet 2: 2-bit preemption priority and 2-bit response priority
	OLED_Init();			         //Initialize OLED
	OLED_Clear(0);             //Clear screen (all black)
	while(1)
	{
		TEST_MainPage();         //Main interface display test
		 //OLED_Clear(0);
		 //Test_Color(); / / screen swiping test
		 //OLED_Clear(0);
		 //Test_Rectangular(); / / rectangle drawing test
		 //OLED_Clear(0);
		 //Test_Circle(); / / circle drawing test
		 //OLED_Clear(0);
		 //Test_Triangle(); / / triangle drawing test
		 //OLED_Clear(0);
		 //TEST_English(); / / English display test
		 //OLED_Clear(0);
		 //TEST_Number_Character(); / / number and symbol display test
		 //OLED_Clear(0);
		 //TEST_Chinese(); / / Chinese display test
		 //OLED_Clear(0);
		 //Test_bmp(); / / BMP monochrome picture display test
		 //OLED_Clear(0);
		 //TEST_Menu1(); / / menu 1 displays the test
		 //OLED_Clear(0);
		 //TEST_Menu2(); / / menu 2 displays the test
		 //OLED_Clear(0);
	}
}
5. The results show that
3, OLED display temperature and humidity
1. Add the file written by the serial port to the OLED display code
For specific steps, refer to: https://github.com/Sunlight-Dazzling/stm32_AHT20_OLED/tree/main/User/usart
2. Implementation of related Chinese characters
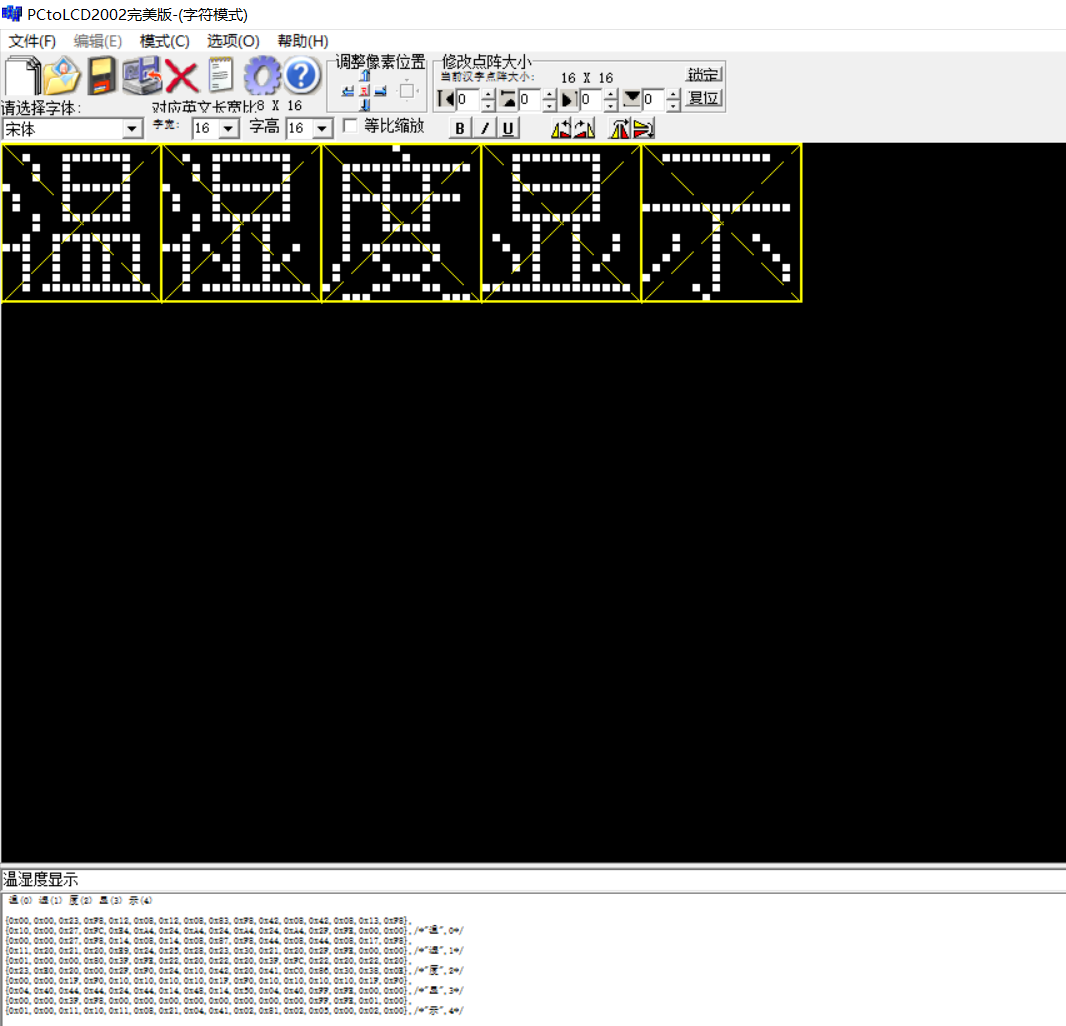
The steps are the same as above.
3. Display code writing
main.c:
#include "delay.h"
#include "usart.h"
#include "bsp_i2c.h"
#include "sys.h"

#include "oled.h"
#include "gui.h"
#include "test.h"

int main(void)
{
	delay_init();	    	       //Delay function initialization
	uart_init(115200);
	IIC_Init();

	NVIC_Configuration(); 	   //Set NVIC interrupt packet 2: 2-bit preemption priority and 2-bit response priority
	OLED_Init();			         //Initialize OLED
	OLED_Clear(0);
	while(1)
	{
		//printf("temperature and humidity display");
		read_AHT20_once();
		OLED_Clear(0);
		delay_ms(1500);
  }
}
Lattice of corresponding Chinese characters
	"temperature",0x00,0x00,0x23,0xF8,0x12,0x08,0x12,0x08,0x83,0xF8,0x42,0x08,0x42,0x08,0x13,0xF8,
  0x10,0x00,0x27,0xFC,0xE4,0xA4,0x24,0xA4,0x24,0xA4,0x24,0xA4,0x2F,0xFE,0x00,0x00,/*"Temperature ", 0*/
	"degree",0x01,0x00,0x00,0x80,0x3F,0xFE,0x22,0x20,0x22,0x20,0x3F,0xFC,0x22,0x20,0x22,0x20,
  0x23,0xE0,0x20,0x00,0x2F,0xF0,0x24,0x10,0x42,0x20,0x41,0xC0,0x86,0x30,0x38,0x0E,/*"Degrees ", 0*/
	"wet",0x00,0x00,0x27,0xF8,0x14,0x08,0x14,0x08,0x87,0xF8,0x44,0x08,0x44,0x08,0x17,0xF8,
  0x11,0x20,0x21,0x20,0xE9,0x24,0x25,0x28,0x23,0x30,0x21,0x20,0x2F,0xFE,0x00,0x00,/*"Wet ", 0*/
	"display",0x00,0x00,0x1F,0xF0,0x10,0x10,0x10,0x10,0x1F,0xF0,0x10,0x10,0x10,0x10,0x1F,0xF0,
  0x04,0x40,0x44,0x44,0x24,0x44,0x14,0x48,0x14,0x50,0x04,0x40,0xFF,0xFE,0x00,0x00,/*"Display ", 0*/
	"show",0x00,0x00,0x3F,0xF8,0x00,0x00,0x00,0x00,0x00,0x00,0x00,0x00,0xFF,0xFE,0x01,0x00,
  0x01,0x00,0x11,0x10,0x11,0x08,0x21,0x04,0x41,0x02,0x81,0x02,0x05,0x00,0x02,0x00,/*"Display ", 0*/
Receive function:
void  read_AHT20_once(void)
{
	delay_ms(10);

	reset_AHT20();
	delay_ms(10);

	init_AHT20();
	delay_ms(10);

	startMeasure_AHT20();
	delay_ms(80);

	read_AHT20();
	delay_ms(5);
}


void  reset_AHT20(void)
{

	I2C_Start();

	I2C_WriteByte(0x70);
	ack_status = Receive_ACK();
	if(ack_status) printf("1");
	else printf("1-n-");
	I2C_WriteByte(0xBA);
	ack_status = Receive_ACK();
		if(ack_status) printf("2");
	else printf("2-n-");
	I2C_Stop();

	/*
	AHT20_OutData[0] = 0;
	AHT20_OutData[1] = 0;
	AHT20_OutData[2] = 0;
	AHT20_OutData[3] = 0;
	*/
}


void  init_AHT20(void)
{
	I2C_Start();

	I2C_WriteByte(0x70);
	ack_status = Receive_ACK();
	if(ack_status) printf("3");
	else printf("3-n-");
	I2C_WriteByte(0xE1);
	ack_status = Receive_ACK();
	if(ack_status) printf("4");
	else printf("4-n-");
	I2C_WriteByte(0x08);
	ack_status = Receive_ACK();
	if(ack_status) printf("5");
	else printf("5-n-");
	I2C_WriteByte(0x00);
	ack_status = Receive_ACK();
	if(ack_status) printf("6");
	else printf("6-n-");
	I2C_Stop();
}


void  startMeasure_AHT20(void)
{
	//------------
	I2C_Start();

	I2C_WriteByte(0x70);
	ack_status = Receive_ACK();
	if(ack_status) printf("7");
	else printf("7-n-");
	I2C_WriteByte(0xAC);
	ack_status = Receive_ACK();
	if(ack_status) printf("8");
	else printf("8-n-");
	I2C_WriteByte(0x33);
	ack_status = Receive_ACK();
	if(ack_status) printf("9");
	else printf("9-n-");
	I2C_WriteByte(0x00);
	ack_status = Receive_ACK();
	if(ack_status) printf("10");
	else printf("10-n-");
	I2C_Stop();
}


void read_AHT20(void)
{
	uint8_t   i;
	for(i=0; i<6; i++)
	{
		readByte[i]=0;
	}

	//-------------
	I2C_Start();

	I2C_WriteByte(0x71);
	ack_status = Receive_ACK();
	readByte[0]= I2C_ReadByte();
	Send_ACK();

	readByte[1]= I2C_ReadByte();
	Send_ACK();

	readByte[2]= I2C_ReadByte();
	Send_ACK();

	readByte[3]= I2C_ReadByte();
	Send_ACK();

	readByte[4]= I2C_ReadByte();
	Send_ACK();

	readByte[5]= I2C_ReadByte();
	SendNot_Ack();
	//Send_ACK();

	I2C_Stop();

	//--------------
	if( (readByte[0] & 0x68) == 0x08 )
	{
		H1 = readByte[1];
		H1 = (H1<<8) | readByte[2];
		H1 = (H1<<8) | readByte[3];
		H1 = H1>>4;

		H1 = (H1*1000)/1024/1024;

		T1 = readByte[3];
		T1 = T1 & 0x0000000F;
		T1 = (T1<<8) | readByte[4];
		T1 = (T1<<8) | readByte[5];

		T1 = (T1*2000)/1024/1024 - 500;

		AHT20_OutData[0] = (H1>>8) & 0x000000FF;
		AHT20_OutData[1] = H1 & 0x000000FF;

		AHT20_OutData[2] = (T1>>8) & 0x000000FF;
		AHT20_OutData[3] = T1 & 0x000000FF;
	}
	else
	{
		AHT20_OutData[0] = 0xFF;
		AHT20_OutData[1] = 0xFF;

		AHT20_OutData[2] = 0xFF;
		AHT20_OutData[3] = 0xFF;
		printf("lyy");

	}
	printf("\r\n");

	printf("temperature:%d%d.%d",T1/100,(T1/10)%10,T1%10);
	printf("humidity:%d%d.%d",H1/100,(H1/10)%10,H1%10);
	printf("\r\n");
	t=T1/10;
	t1=T1%10;
	a=(float)(t+t1*0.1);
	h=H1/10;
	h1=H1%10;
	b=(float)(h+h1*0.1);
	sprintf(strTemp,"%.1f",a);   //Call the Sprintf function to format the temperature data of DHT11 into the string array variable strTemp
  sprintf(strHumi,"%.1f",b);    //Call the Sprintf function to format the humidity data of DHT11 into the string array variable strHumi
	//printf(strTemp);
	//printf("/r/n");
	GUI_ShowCHinese(16,00,16,"Temperature and humidity display",1);
	GUI_ShowCHinese(16,20,16,"temperature",1);
	GUI_ShowString(53,20,strTemp,16,1);
	GUI_ShowCHinese(16,38,16,"humidity",1);
	GUI_ShowString(53,38,strHumi,16,1);
	delay_ms(1500);
	delay_ms(1500);
	delay_ms(1500);
	delay_ms(1500);

}
4. The results show that
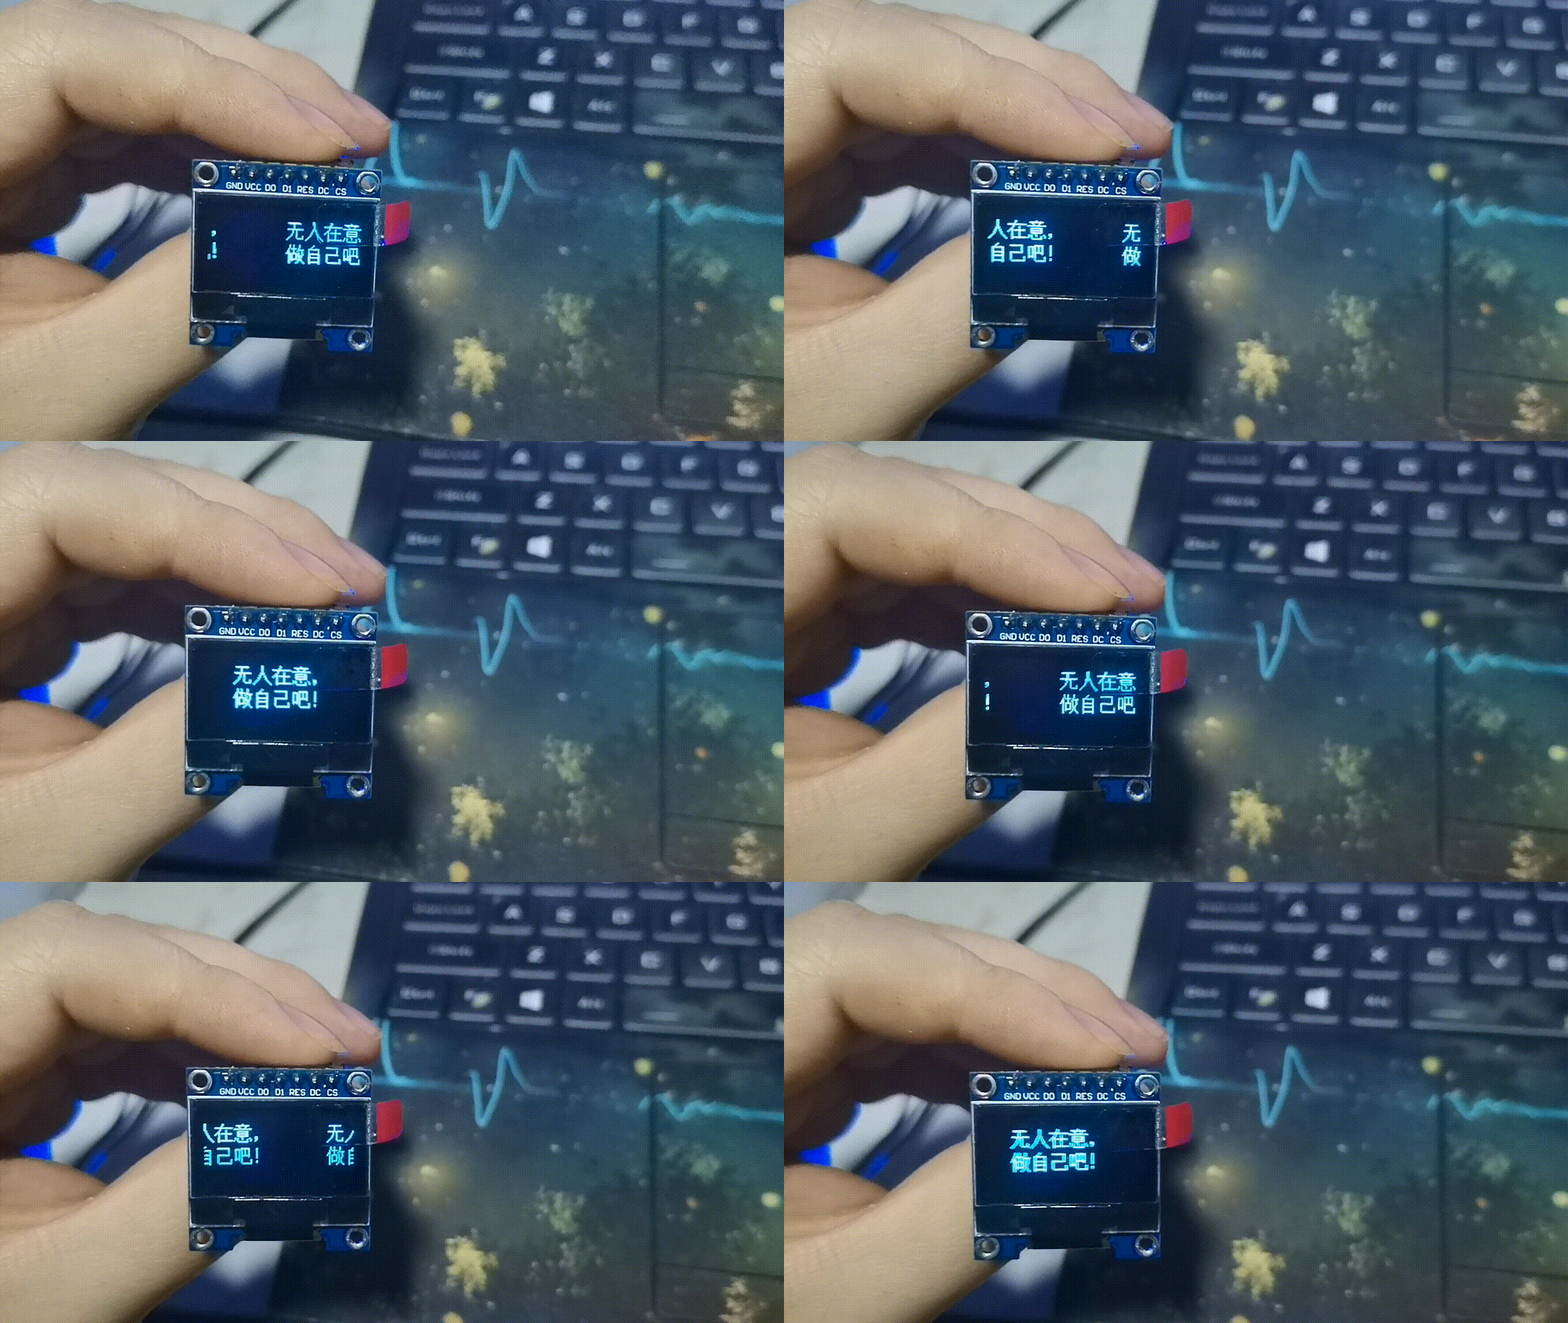
4, OLED displays scrolling characters
1. Understand the scroll command of OLED screen
Horizontal left-right translation
OLED_WR_Byte(0x2E,OLED_CMD);        //Turn off scrolling
OLED_WR_Byte(0x26,OLED_CMD);        //Scroll horizontally left or right 26 / 27
OLED_WR_Byte(0x00,OLED_CMD);        //virtual byte
OLED_WR_Byte(0x00,OLED_CMD);        //Start page 0
OLED_WR_Byte(0x07,OLED_CMD);        //Rolling interval
OLED_WR_Byte(0x07,OLED_CMD);        //Termination page 7
OLED_WR_Byte(0x00,OLED_CMD);        //virtual byte
OLED_WR_Byte(0xFF,OLED_CMD);        //virtual byte
OLED_WR_Byte(0x2F,OLED_CMD);        //Turn on scrolling
Scroll vertically left and right
OLED_WR_Byte(0x2e,OLED_CMD);        //Turn off scrolling
OLED_WR_Byte(0x29,OLED_CMD);        //Horizontal vertical and horizontal scroll left and right 29/2a
OLED_WR_Byte(0x00,OLED_CMD);        //virtual byte
OLED_WR_Byte(0x00,OLED_CMD);        //Start page 0
OLED_WR_Byte(0x07,OLED_CMD);        //Rolling interval
OLED_WR_Byte(0x07,OLED_CMD);        //Termination page 1
OLED_WR_Byte(0x01,OLED_CMD);        //Vertical scroll offset
OLED_WR_Byte(0x2F,OLED_CMD);        //Turn on scrolling
Note: before setting, it is necessary to first send the instruction 2E to turn off scrolling, and then send the scrolling instruction 29 (right) or 2A (left). Then send five parameter setting instructions to set the continuous horizontal scrolling parameters and determine the scrolling start page, end page, scrolling speed and vertical scrolling offset. Finally, send the instruction 2F to start scrolling.
Note: the display data shall be transmitted before sending the start of scrolling (2F). If the display data is transmitted during scrolling, the contents in RAM may be damaged and cannot be displayed normally.
2. Dot matrix Chinese character module
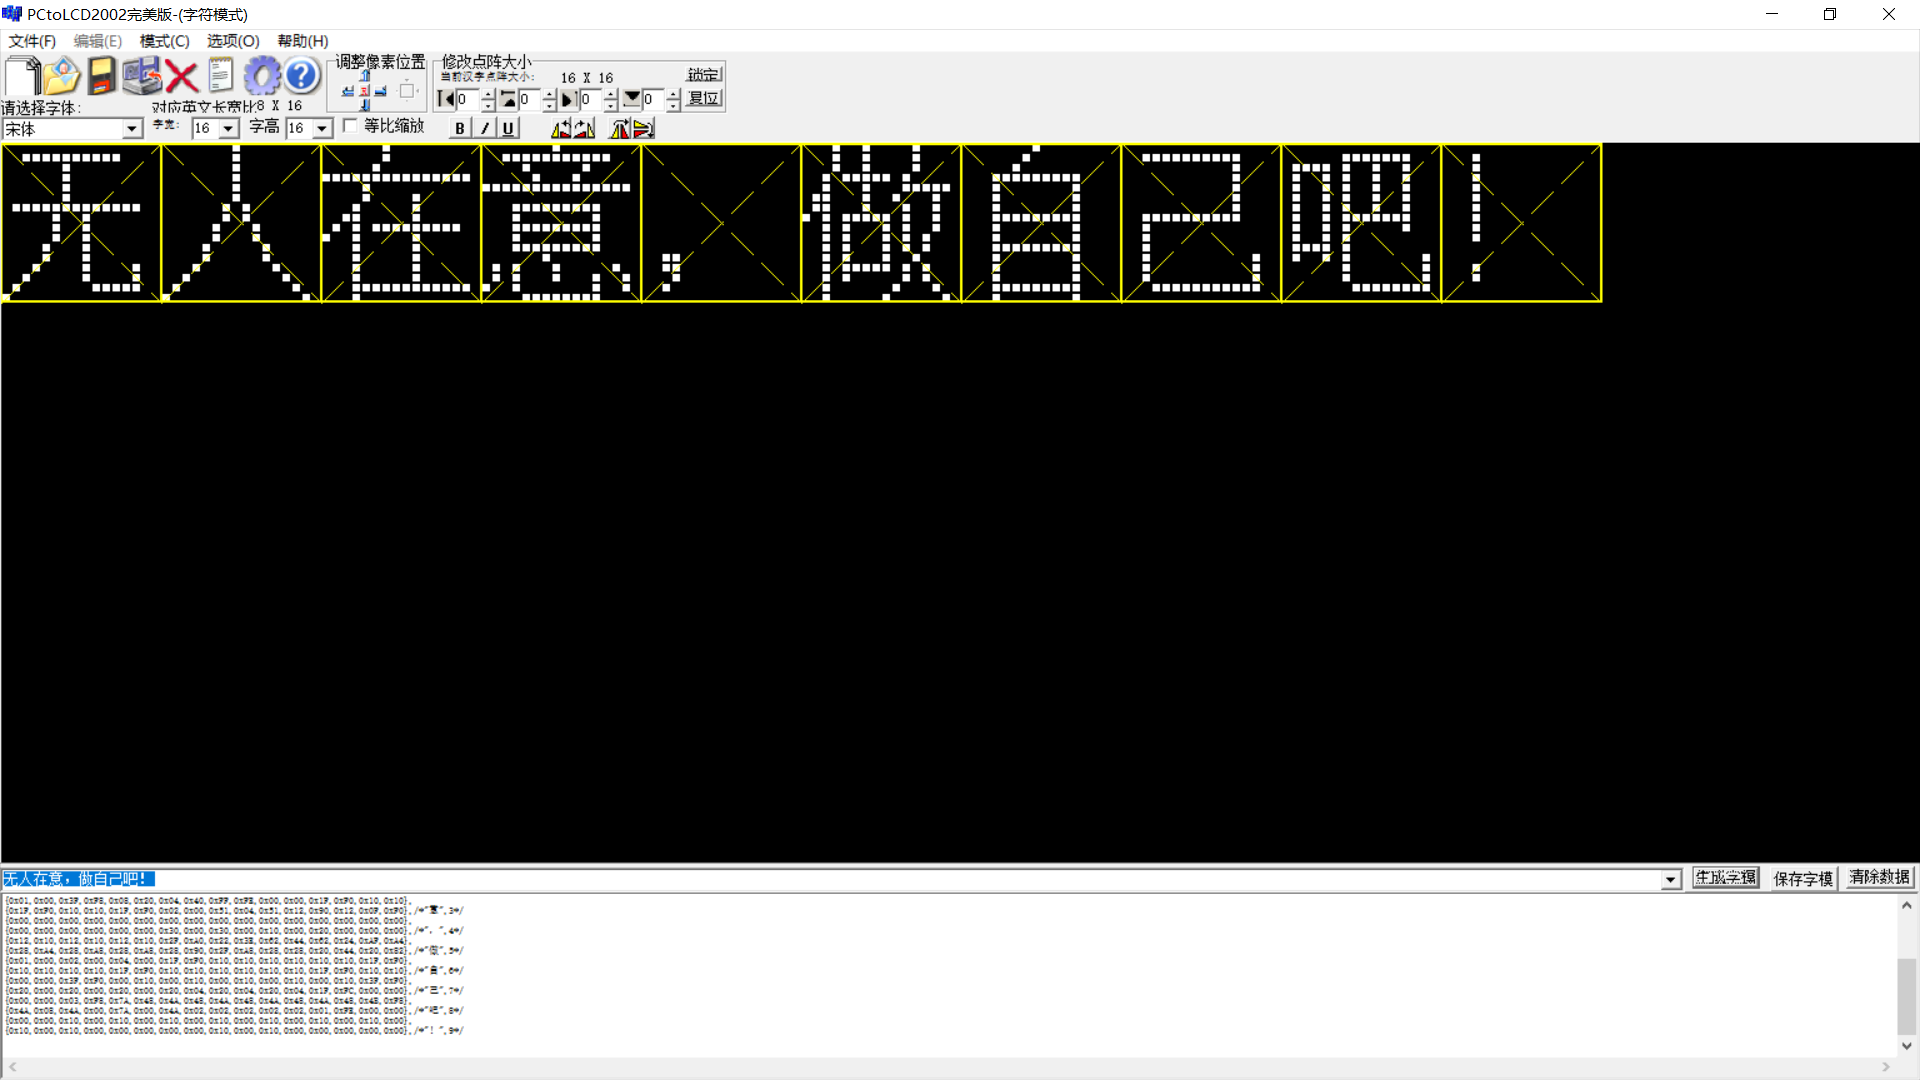
The remaining steps are the same as above
3. Main code display
main.c
int main(void)
{
	delay_init();	    	       //Delay function initialization
	NVIC_Configuration(); 	   //Set NVIC interrupt packet 2: 2-bit preemption priority and 2-bit response priority
	OLED_Init();			         //Initialize OLED
	OLED_Clear(0);             //Clear screen (all black)
	OLED_WR_Byte(0x2E,OLED_CMD);        //Turn off scrolling
    OLED_WR_Byte(0x27,OLED_CMD);        //Scroll horizontally left or right 26 / 27
    OLED_WR_Byte(0x00,OLED_CMD);        //virtual byte
	OLED_WR_Byte(0x00,OLED_CMD);        //Start page 0
	OLED_WR_Byte(0x07,OLED_CMD);        //Rolling interval
	OLED_WR_Byte(0x07,OLED_CMD);        //Termination page 7
	OLED_WR_Byte(0x00,OLED_CMD);        //virtual byte
	OLED_WR_Byte(0xFF,OLED_CMD);        //virtual byte
	TEST_MainPage();
	OLED_WR_Byte(0x2F,OLED_CMD);
}
Display content function
void TEST_MainPage(void)
{
	//GUI_ShowCHinese(28,20,16, "Xiaojin", 1);
	GUI_ShowCHinese(10,10,16,"Nobody cares,",1);
	GUI_ShowCHinese(10,30,16,"Be yourself!",1);
	/*GUI_ShowString(28,0,"Harriet",16,1);
	GUI_ShowCHinese(28,20,16,"Harriet ", 1);
	//GUI_ShowString(40,32,"64X128",16,1);
	GUI_ShowString(4,48,"631807060517",16,1);
	//GUI_ShowString(4,48,"www.lcdwiki.com",16,1);*/
	delay_ms(1500);
	delay_ms(1500);
}
4. Result display
5, Summary
This experiment is still very troublesome. First, we need to understand the mold taking rules of Chinese character dot matrix, and then constantly modify the code on the official website. When we see the code of other people's bosses, we have to say that I still have many deficiencies. Then, when displaying the temperature and humidity, we originally wanted to add the temperature and humidity unit, but in the end, we don't know why there is a problem with the display of Celsius , hope to have experience in solving similar problems.
6, Reference link
https://blog.csdn.net/qq_43279579/article/details/111500137
Full code link:
Link: https://pan.baidu.com/s/16-2UatCuMMP5hNPfXkEY9w
Extraction code: 1x68