Code address of this series: https://github.com/JoJoTec/sp...
Next, we will enter another big module on our upgrade path, namely the gateway module. In the gateway module, we abandoned zuul that has entered the maintenance state and selected Spring Cloud Gateway as the internal gateway. The reasons for choosing Spring Cloud Gateway instead of nginx and Kong are:
- It is important that the project team is more familiar with Java and asynchronous programming of Project Reactor
- We need to use the request based stateful retry pressure sensitive load balancer we implemented earlier in the gateway
- Retry needs to be implemented in the gateway
- You need to implement instance path breaking in the gateway
- Unified business encryption and decryption is required in the gateway
- The BFF (Backends For Frontends) interface needs to be implemented in the gateway, that is, the requests of several different interfaces are combined and returned at one time according to the client request
- Redis should be used in the gateway to record some Token related values
Therefore, we use the Spring Cloud Gateway as the internal gateway. Next, we will implement these functions in turn. At the same time, during the use of this upgrade, the Spring Cloud Gateway also has some pits, such as:
- When spring cloud sleuth is used in combination, there will be link information tracking, but link information will be lost in some cases.
- The asynchronous API encapsulated by the three-party Reactor (for example, spring data Redis used by Redis) is not well understood, resulting in the occupation of key threads.
But first, we need to briefly understand what components Spring Cloud Gateway includes and what the whole calling process looks like. Since Spring Cloud Gateway is implemented based on spring boot and spring Webflux, we will start with the outer WebFilter, and then analyze how to go to the packaging logic of Spring Cloud Gateway, as well as the components contained in Spring Cloud Gateway, how to forward the request, and what processing has been done after coming back. We will analyze these one by one.
Create a simple API gateway
In order to analyze the process in detail, let's first create a simple gateway for quick start and analysis.
Create dependencies first:
pom.xml
<?xml version="1.0" encoding="UTF-8"?>
<project xmlns="http://maven.apache.org/POM/4.0.0"
         xmlns:xsi="http://www.w3.org/2001/XMLSchema-instance"
         xsi:schemaLocation="http://maven.apache.org/POM/4.0.0 http://maven.apache.org/xsd/maven-4.0.0.xsd">
    <parent>
        <artifactId>spring-cloud-parent</artifactId>
        <groupId>com.github.jojotech</groupId>
        <version>2020.0.3-SNAPSHOT</version>
    </parent>
    <modelVersion>4.0.0</modelVersion>

    <artifactId>spring-cloud-api-gateway</artifactId>

    <dependencies>
        <dependency>
            <groupId>com.github.jojotech</groupId>
            <artifactId>spring-cloud-webflux</artifactId>
            <version>${project.version}</version>
        </dependency>
        <dependency>
            <groupId>org.springframework.cloud</groupId>
            <artifactId>spring-cloud-starter-gateway</artifactId>
        </dependency>
    </dependencies>
</project>
The parent points to the spring cloud parent of our project, adds the spring cloud weblux dependency implemented in the previous section, and also needs to add the spring cloud starter gateway. Since our spring cloud parent has specified the version dependency management of spring cloud parent, it is not necessary to specify the version of spring cloud starter gateway here
Then we start writing the configuration file:
application.yml
server:
  ##Port 8181
  port: 8181
spring:
  application:
    # The microservice name is apiGateway
    name: apiGateway
  cloud:
    gateway:
      httpclient:
        # The timeout of the HTTP connection forwarded by the gateway to other microservices is 500ms
        connect-timeout: 500
        # The timeout of HTTP response forwarded by the gateway to other microservices is 500ms
        response-timeout: 60000
      routes:
        # Write forwarding rules
        - id: first_route
          # Forward to microservice test service
          uri: lb://test-service
          # Which paths are included
          predicates:
            - Path=/test-ss/**
          #  For the micro service access path forwarded to, remove the first block in the path, that is, remove / test SS
          filters:
            - StripPrefix=1
    loadbalancer:
      # Specify a zone because we added the logic that only instances of the same zone can access each other in load balancing
      zone: test
      ribbon:
        # Close ribbon
        enabled: false
      cache:
        # Cache time of local microservice instance list
        ttl: 5
        # The cache size, which is set to 256 by default, depends on how many other microservices your microservice calls
        capacity: 256
    discovery:
      client:
        simple:
          # Using the simple discovery client service in spring common to discover the client is to write the microservice instance in the configuration file
          instances:
            # Specify the instance list of the micro service test service
            test-service:
              - host: httpbin.org
                port: 80
                metadata:
                  # Specify the zone of this instance because we added the logic that only instances of the same zone can access each other in load balancing
                  zone: test
eureka:
  client:
    # Turn off eureka
    enabled: false
Finally, write the startup entry class:
package com.github.jojotech.spring.cloud.apigateway;

import org.springframework.boot.SpringApplication;
import org.springframework.boot.autoconfigure.SpringBootApplication;

@SpringBootApplication(scanBasePackages = "com.github.jojotech.spring.cloud.apigateway")
public class Application {
    public static void main(String[] args) {
        SpringApplication.run(Application.class, args);
    }
}
Startup, access path: http://127.0.0.1:8181/test-ss/anything, you can see that the request is sent to the anything path of httpbin.org, and this interface will return all the information in the request.
In this way, we have implemented a simple gateway. Next, let's analyze its workflow and source code in detail.
The core of request processing in asynchronous environment - spring boot + WebHandler of spring Webflux
The external service container of the Simple Gateway we created is actually a container based on Netty and Project Reactor. We skip these and directly enter the processing logic related to Spring Boot. We only need to know that the request and its corresponding response will be encapsulated by the outer container into ServerHttpRequest request and serverhttpresponse response (both under the package org.springframework.http.server.reactive).
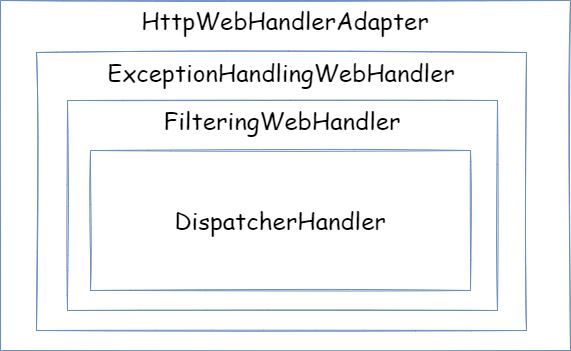
Then, it will be handed over to WebHandler for processing. The implementation of WebHandler is actually a responsibility chain decoration mode, as shown in the figure below. The WebHandler of each layer will decorate the request and response with their own responsibilities, and then hand them over to the WebHandler of the inner layer for processing.

HttpWebHandlerAdapter - encapsulates the request as ServerWebExchange
The interface definition of WebHandler is:
public interface WebHandler {
    Mono<Void> handle(ServerWebExchange exchange);
}
However, the parameters passed in from the outermost layer are request and response. They need to be encapsulated into ServerWebExchange. This work is done in the HttpWebHandlerAdapter. In fact, the main task of HttpWebHandlerAdapter is to encapsulate various parameters into ServerWebExchange (in addition to the request and response related to this request, session manager, codec configuration, internationalization configuration, and ApplicationContext for extension).
In addition to these, the processing of Forwarded and the configuration logic of X-Forwarded * related headers are also carried out here. Then hand the encapsulated ServerWebExchange to the inner WebHandler, that is, exceptionhandling WebHandler, to continue processing. At the same time, it can be seen from the source code that Mono, which is handed over to the inner layer for processing, also adds the logic of exception handling and recording response information:
//Leave it to the inner layer to handle the encapsulated ` ServerWebExchange`
return getDelegate().handle(exchange)
        //Record the response log, trace level, which is generally not used
        .doOnSuccess(aVoid -> logResponse(exchange))
        //Handling exceptions not handled by the inner layer generally does not come here
        .onErrorResume(ex -> handleUnresolvedError(exchange, ex))
        //After all processing is completed, set the response to complete
        .then(Mono.defer(response::setComplete));
The remaining inner WebHandler will be analyzed in the next section
WeChat search "my programming meow" attention to the official account, daily brush, easy to upgrade technology, and capture all kinds of offer:
